2005 BMW 525I SEDAN warning
[x] Cancel search: warningPage 84 of 221
Controls
83Reference
At a glance
Driving tips
Communication
Navigation
Entertainment
Mobility
Airbags
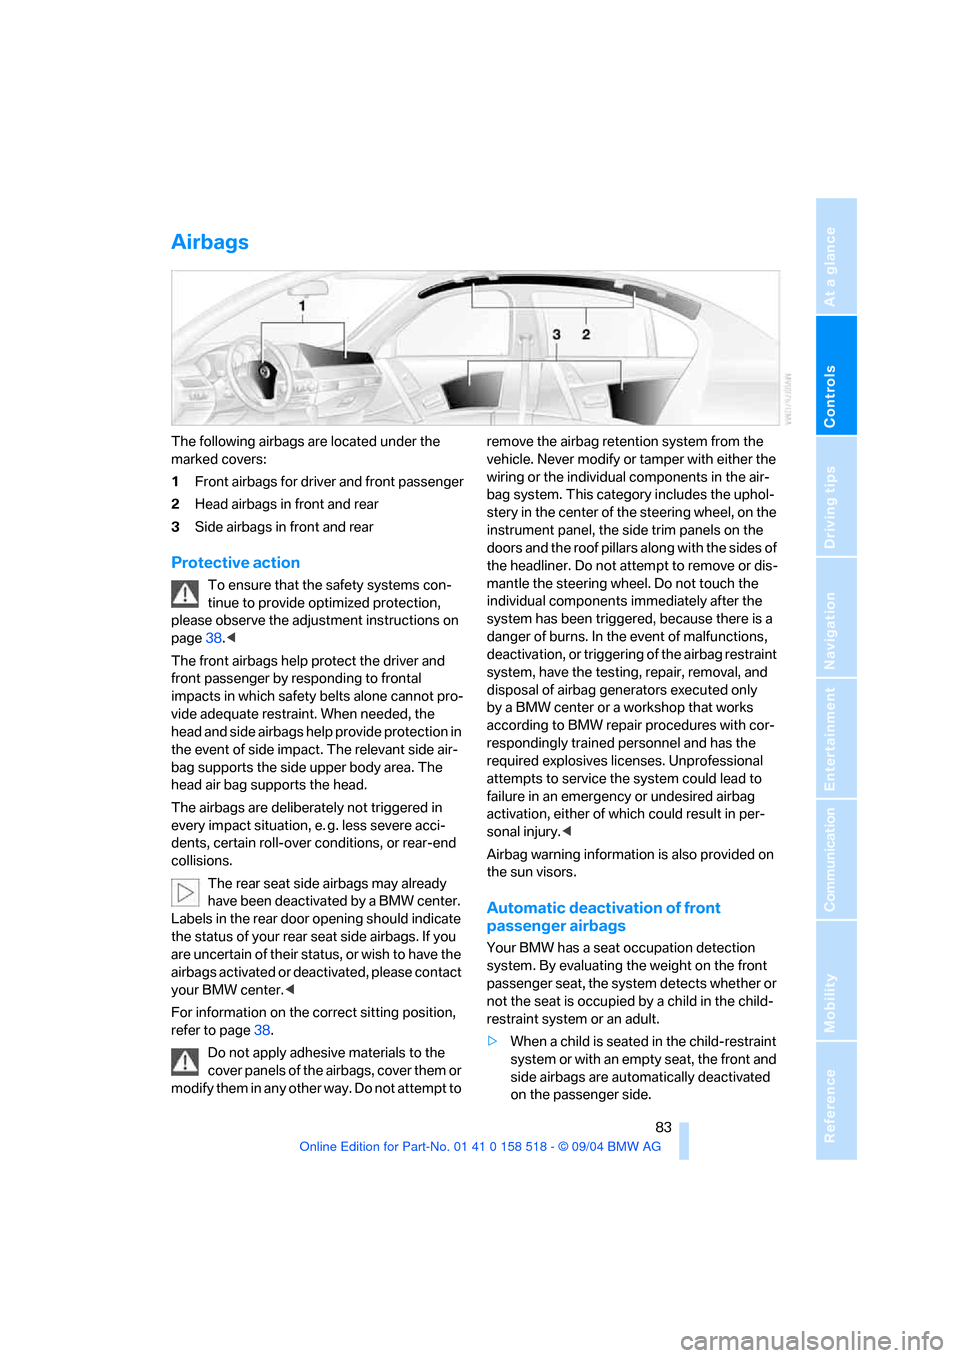
The following airbags are located under the
marked covers:
1Front airbags for driver and front passenger
2Head airbags in front and rear
3Side airbags in front and rear
Protective action
To ensure that the safety systems con-
tinue to provide optimized protection,
please observe the adjustment instructions on
page38.<
The front airbags help protect the driver and
front passenger by responding to frontal
impacts in which safety belts alone cannot pro-
vide adequate restraint. When needed, the
head and side airbags help provide protection in
the event of side impact. The relevant side air-
bag supports the side upper body area. The
head air bag supports the head.
The airbags are deliberately not triggered in
every impact situation, e. g. less severe acci-
dents, certain roll-over conditions, or rear-end
collisions.
The rear seat side airbags may already
have been deactivated by a BMW center.
Labels in the rear door opening should indicate
the status of your rear seat side airbags. If you
are uncertain of their status, or wish to have the
airbags activated or deactivated, please contact
your BMW center.<
For information on the correct sitting position,
refer to page38.
Do not apply adhesive materials to the
cover panels of the airbags, cover them or
modify them in any other way. Do not attempt to remove the airbag retention system from the
vehicle. Never modify or tamper with either the
wiring or the individual components in the air-
bag system. This category includes the uphol-
stery in the center of the steering wheel, on the
instrument panel, the side trim panels on the
doors and the roof pillars along with the sides of
the headliner. Do not attempt to remove or dis-
mantle the steering wheel. Do not touch the
individual components immediately after the
system has been triggered, because there is a
danger of burns. In the event of malfunctions,
deactivation, or triggering of the airbag restraint
system, have the testing, repair, removal, and
disposal of airbag generators executed only
by a BMW center or a workshop that works
according to BMW repair procedures with cor-
respondingly trained personnel and has the
required explosives licenses. Unprofessional
attempts to service the system could lead to
failure in an emergency or undesired airbag
activation, either of which could result in per-
sonal injury.<
Airbag warning information is also provided on
the sun visors.
Automatic deactivation of front
passenger airbags
Your BMW has a seat occupation detection
system. By evaluating the weight on the front
passenger seat, the system detects whether or
not the seat is occupied by a child in the child-
restraint system or an adult.
>When a child is seated in the child-restraint
system or with an empty seat, the front and
side airbags are automatically deactivated
on the passenger side.
Page 85 of 221

Technology for comfort, convenience and safety
84 >When an adult is traveling in the front seat,
the front and side airbags remain active on
the passenger side.
Although not desired, it can occur in the
case of heavier children that the front
passenger airbags remain active or in the case
of very light adults or young persons that the
front passenger airbags are deactivated. In
these cases, have the person ride in the rear
seat, refer to Passenger airbag status lamp
below. Do not load the passenger seat with any
items in addition to the person to be trans-
ported. Do not fit seat covers, seat cushion pad-
ding, ball mats or other items onto the front pas-
senger seat unless they are specifically
r e c o m m e n d e d b y B M W . D o n o t p l a c e a n y i t e m s
under the seat. Otherwise, the function of the
seat occupation detection could be impaired.<
Operational readiness of airbag system
As of ignition key position of 1, the warning
lamp lights up briefly, thus indicating the opera-
tional readiness of the entire airbag system and
the safety belt tensioners.
Airbag system malfunction
>The warning lamp does not light up as of
ignition key position 1.
>Warning lamp lights up continuously.
A malfunction could prevent the airbag
system from responding in the expected
manner to an impact occurring within its normal
response range.<
Passenger airbag status lamp
The indicator lamp located above the rear view
mirror indicates whether the front passenger
airbag system is active or not active/OFF.
The indicator lamp is used only for the
front passenger airbag system. The indi-
cator lamp illuminates to show that the front
passenger airbag system is OFF/not active.<
>The lamp illuminates briefly during startup,
but then goes out if the seat is empty, or an
adult or child of sufficient size is detected.
>The lamp remains illuminated when a child
in a rear facing child-restraint system is
detected and indicates that the passenger
airbag system is off.
If the lamp is illuminated when the seat is
occupied by a very light adult or teenager,
it is recommended that the person sit in the
rear.<
Find more information about passenger airbag
system and seat occupancy detection in the
section Automatic deactivation of front passen-
ger airbags above.
Head-Up Display*
The concept
With the Head-Up Display important informa-
tion is projected into the driver's field of view,
e.g. navigation instructions. This enables you to
take in this information without looking away
from the road.
Page 88 of 221

Controls
87Reference
At a glance
Driving tips
Communication
Navigation
Entertainment
Mobility
Lamps
Parking lamps/low beams
0Lights off
1Parking lamps
2Low beams/daytime driving lamps
*
3Automatic headlamp control*/
Adaptive Head Light
*
Parking lamps
In switch position1, the front, rear and side
vehicle lighting is switched on. You can use the
parking lamps for parking. For lighting on one
side for parking as an additional feature, refer to
page88.
Low beams
The low beams are activated in switch
position2 only when the engine is running, oth-
erwise only the parking lamps are switched on.
Pathway lighting
If the vehicle is parked and the headlamps are
switched off, operating the headlamp flasher
activates the low beams. You can set the dura-
tion on the Control Display or deactivate the
function.
Control Center, for principle details, refer to
page16.
1.Open the menu.
2.Select "Vehicle settings" and press the
controller.3.Select "Light" and press the controller.
4.Select "Pathway lighting" and press the
controller.
5.Turn the controller to select the corre-
sponding duration.
6.Press the controller to apply the setting.
Lights on warning
If you turn the ignition key to position 0, an
acoustic signal sounds when you open the
driver's door for a few seconds to remind you
that the light has not yet been switched off.
At the same time a message appears on the
Control Display.
Daytime driving lamps*
If so desired, you can leave the light switch in
the low beam position2.
Always observe all applicable laws governing
the use of daytime driving lamps.
You can switch on the parking lamps when
needed using the standard procedure
described under Parking lamps.
Automatic headlamp control*
In the switch position3, the system activates
and switches on and off the low beams in
response to changes in ambient light condi-
tions, for instance, in a tunnel, at dawn and
d u s k , a n d in r a i n o r s n o w . A d a p t iv e H e a d L ig h t
*
is active. The LED next to the symbol is illumi-
nated when the low beams are on.
Page 142 of 221
Navigation
Entertainment
Driving tips
141Reference
At a glance
Controls
Communication
Mobility
The channels of the last selection criterion are
displayed once again after a short time.
The stations are stored for the remote control
currently in use.
Changing a memory location
Control Center, for principle details, refer to
page16.
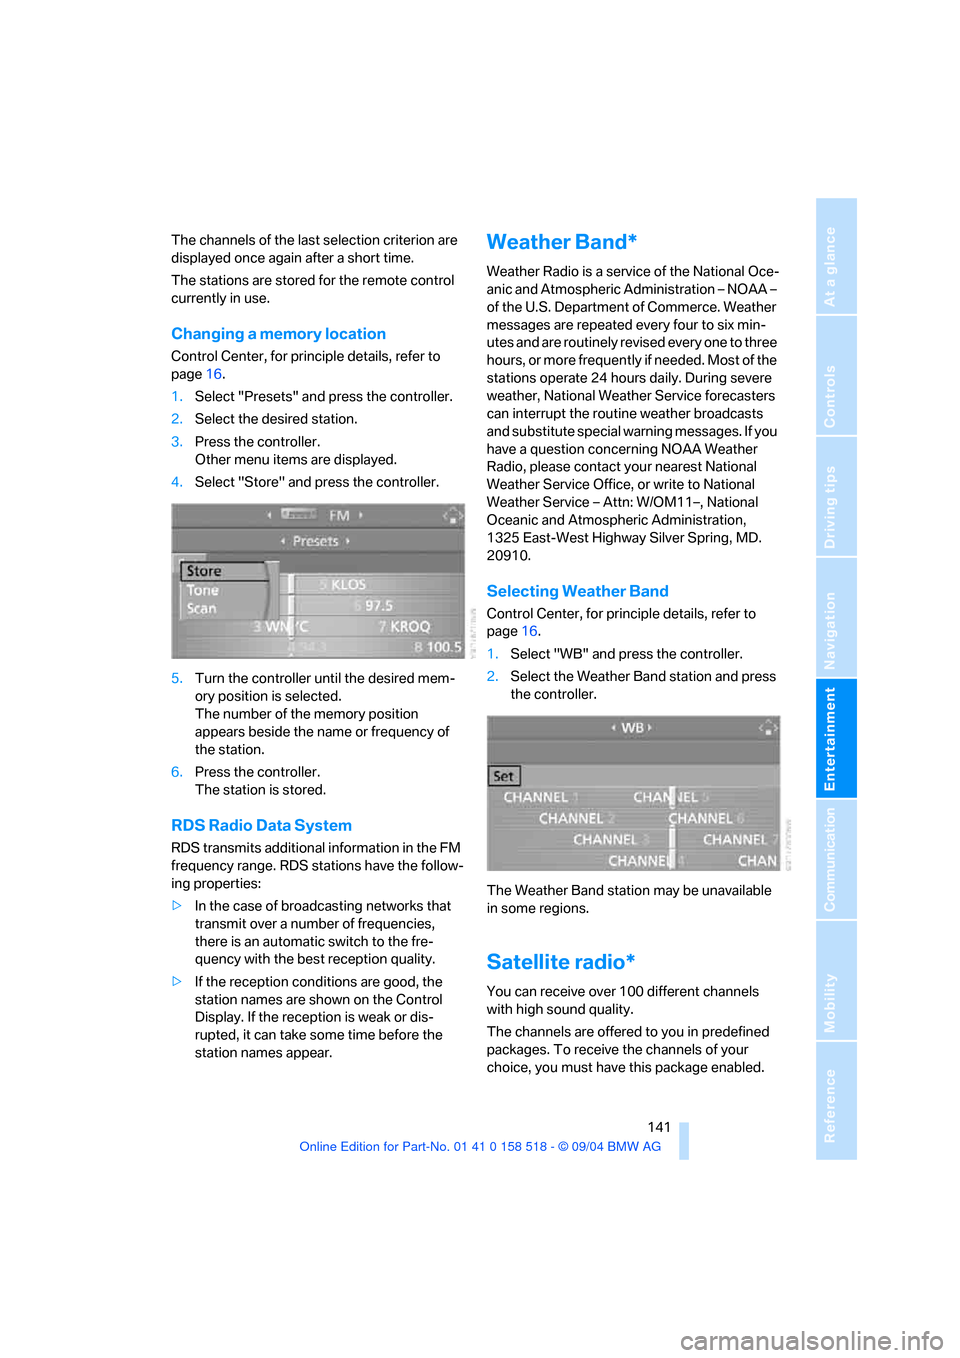
1.Select "Presets" and press the controller.
2.Select the desired station.
3.Press the controller.
Other menu items are displayed.
4.Select "Store" and press the controller.
5.Turn the controller until the desired mem-
ory position is selected.
The number of the memory position
appears beside the name or frequency of
the station.
6.Press the controller.
The station is stored.
RDS Radio Data System
RDS transmits additional information in the FM
frequency range. RDS stations have the follow-
ing properties:
>In the case of broadcasting networks that
transmit over a number of frequencies,
there is an automatic switch to the fre-
quency with the best reception quality.
>If the reception conditions are good, the
station names are shown on the Control
Display. If the reception is weak or dis-
rupted, it can take some time before the
station names appear.
Weather Band*
Weather Radio is a service of the National Oce-
anic and Atmospheric Administration – NOAA –
of the U.S. Department of Commerce. Weather
messages are repeated every four to six min-
utes and are routinely revised every one to three
hours, or more frequently if needed. Most of the
stations operate 24 hours daily. During severe
weather, National Weather Service forecasters
can interrupt the routine weather broadcasts
and substitute special warning messages. If you
have a question concerning NOAA Weather
Radio, please contact your nearest National
Weather Service Office, or write to National
Weather Service – Attn: W/OM11–, National
Oceanic and Atmospheric Administration,
1325 East-West Highway Silver Spring, MD.
20910.
Selecting Weather Band
Control Center, for principle details, refer to
page16.
1.Select "WB" and press the controller.
2.Select the Weather Band station and press
the controller.
The Weather Band station may be unavailable
in some regions.
Satellite radio*
You can receive over 100 different channels
with high sound quality.
The channels are offered to you in predefined
packages. To receive the channels of your
choice, you must have this package enabled.
Page 179 of 221

Under the hood
178 Do not exceed the upper marking on the
dipstick, otherwise an overfilling of oil can
damage the engine.<
Adding engine oil
Do not top off the oil until the oil level has
dropped to just above the lower marking on the
dipstick. In this area a message also appears on
the Control Display.
Refill the oil within the next 125 miles/
200 km, otherwise engine damage could
result.<
Continuous exposure to used oil has
caused cancer in laboratory testing.
For this reason, any skin areas that come into
contact with oil should be thoroughly washed
with soap and water.
Store oil, grease, etc., well out of the reach of
children; always observe all warning labels on
the containers.<
Oil change
Have oil changed only at your BMW center or
at a workshop that works according to BMW
repair procedures with correspondingly trained
personnel.
Specified engine oils
The quality of the engine oil selected has critical
significance for the operation and service life of
an engine. BMW continuously approves spe-
cific oils after confirming their suitability for use
in its vehicles with extensive testing.
Use only approved BMW High Performance
Synthetic Oil.
If you are unable to obtain BMW High Perfor-
mance Synthetic Oil, you can add small amounts of another synthetic oil between oil
changes. Use only oils with the API SH specifi-
cation or higher.
Ask your BMW center for details concern-
ing the specific BMW High Performance
Synthetic Oil or synthetic oils which have been
approved.<
You can also call BMW of North America at
1-800-831-1117 or visit this website:
www.bmwusa.com to obtain this information.
Viscosity ratings
Viscosity is the oil flow rating as defined in
SAE classes.
The selection of the correct SAE class depends
on the climatic conditions in the area where you
typically drive your BMW.
Approved oils are in SAE classes 5W-40
and 5W-30.<
These oils may be used for driving in all ambient
temperatures.
Coolant
Do not add coolant to the cooling system
when the engine is hot. Escaping coolant
can cause burns.<
Coolant consists of water and the addition of
antifreeze and anticorrosion agent. Not all com-
mercially available additives are suitable for
your BMW. Ask your BMW center for suitable
additives.
Only use suitable additives, as otherwise
engine damage may result. The additives
present a health hazard; observe the instruc-
tions on the containers.<
Comply with the appropriate environ-
mental protection regulations when dis-
posing of coolant additives.<
Checking coolant level
1.The engine must be at ambient tempera-
ture.
2.Turn the cap of the expansion tank counter-
clockwise to allow any accumulated pres-
Page 180 of 221
Mobility
179Reference
At a glance
Controls
Driving tips
Communica-
Navigation
Entertainment
sure to escape, then continue turning to
open.
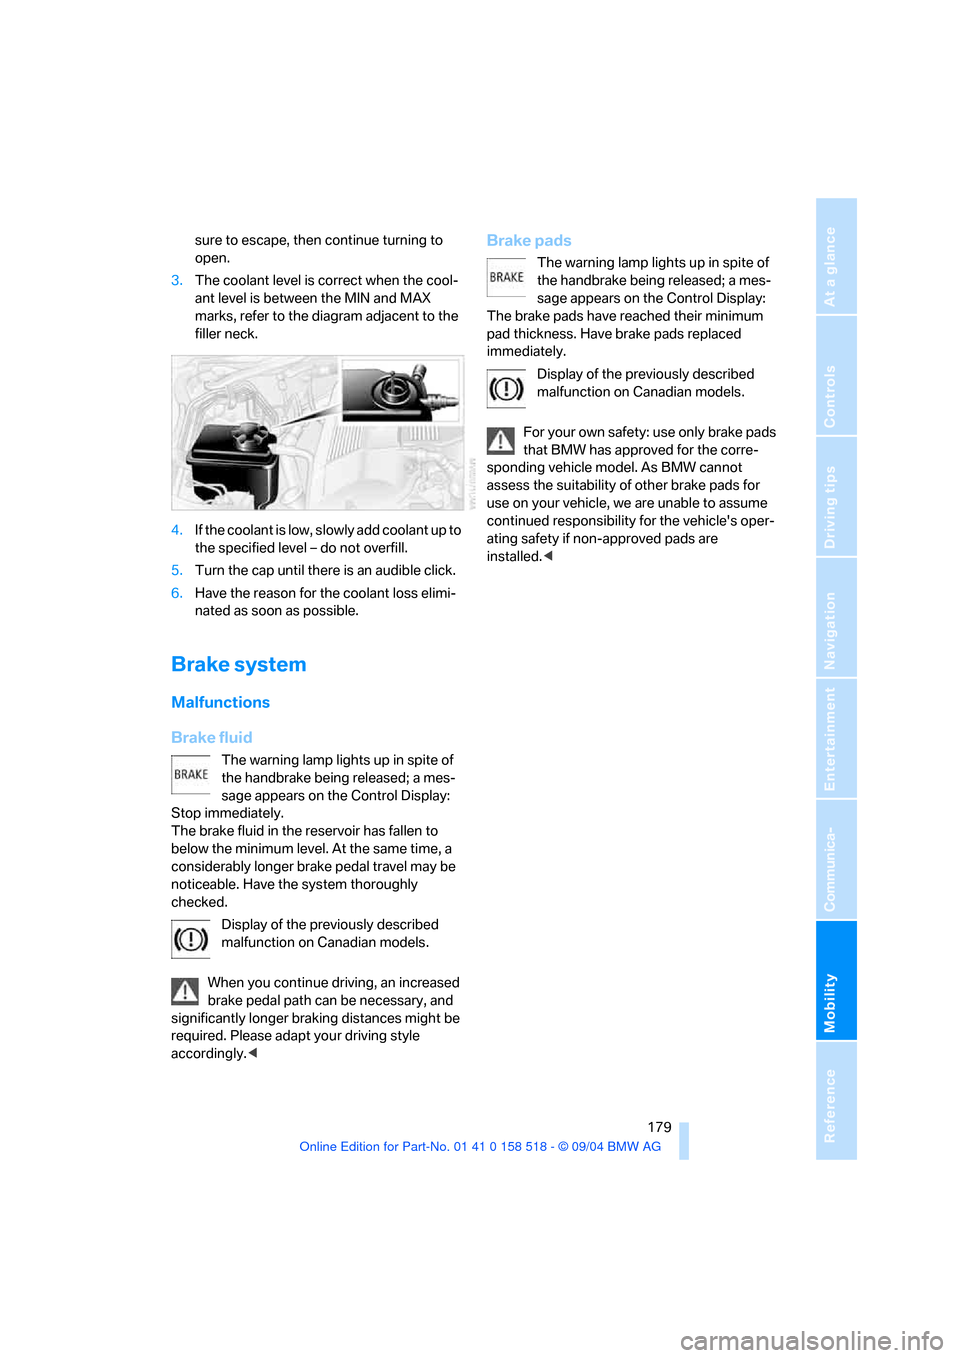
3.The coolant level is correct when the cool-
ant level is between the MIN and MAX
marks, refer to the diagram adjacent to the
filler neck.
4.If the coolant is low, slowly add coolant up to
the specified level – do not overfill.
5.Turn the cap until there is an audible click.
6.Have the reason for the coolant loss elimi-
nated as soon as possible.
Brake system
Malfunctions
Brake fluid
The warning lamp lights up in spite of
the handbrake being released; a mes-
sage appears on the Control Display:
Stop immediately.
The brake fluid in the reservoir has fallen to
below the minimum level. At the same time, a
considerably longer brake pedal travel may be
noticeable. Have the system thoroughly
checked.
Display of the previously described
malfunction on Canadian models.
When you continue driving, an increased
brake pedal path can be necessary, and
significantly longer braking distances might be
required. Please adapt your driving style
accordingly.<
Brake pads
The warning lamp lights up in spite of
the handbrake being released; a mes-
sage appears on the Control Display:
The brake pads have reached their minimum
pad thickness. Have brake pads replaced
immediately.
Display of the previously described
malfunction on Canadian models.
For your own safety: use only brake pads
that BMW has approved for the corre-
sponding vehicle model. As BMW cannot
assess the suitability of other brake pads for
use on your vehicle, we are unable to assume
continued responsibility for the vehicle's oper-
ating safety if non-approved pads are
installed.<
Page 186 of 221
Mobility
185Reference
At a glance
Controls
Driving tips
Communication
Navigation
Entertainment
1.Insert screwdriver into the slot and press to
the right, refer to arrows. This releases the
lamp.
2.Remove the lamp and replace the bulb.
Backup lamps
In the event of a malfunction, please go to your
BMW center or a workshop that works accord-
ing to BMW repair procedures with correspond-
ingly trained personnel.
LEDs light-emitting diodes
Light-emitting diodes installed behind translu-
cent lenses serve as the light source for many of
the controls and displays in your vehicle. These
light-emitting diodes, which operate using a
concept similar to that applied in conventional
lasers, are officially designated as Class 1 light-
emitting diodes.
Do not remove the covers, and never
stare directly into the unfiltered light for
several hours, as this could result in irritation of
the retina.<
Changing wheels
Safety precautions in the event of a flat
tire or wheel change: Park the vehicle as
far as possible from passing traffic and on solid
ground. Switch on the hazard warning flashers.
Lock the steering wheel in straight-ahead set-
ting of the wheels. Apply the handbrake and
engage first gear, reverse gear or selector lever
position P.
Have all vehicle occupants get out of the vehicle
and ensure that they remain outside the imme-
diate area in a safe place, such as behind a guardrail.
If a warning triangle or portable hazard warning
lamp is required, set it up on the roadside at an
appropriate distance from the rear of the vehi-
cle. Comply with all safety guidelines and regu-
lations.
Change the wheel only on a level, firm surface
which is not slippery. The vehicle or the jack
could slip to the side if you attempt to raise the
vehicle on a soft or slippery surface such as
snow, ice, tiles, etc.
Position the jack on a firm support surface.
Do not use a wooden block or similar object as a
support base for the jack, as this would prevent
it from extending to its full support height and
reduce its load-carrying capacity.
To avoid serious or fatal injury: never lie under
the vehicle, and never start the engine while it is
supported by the jack.<
What you will need
To avoid rattling noises later on, note the posi-
tions of the tools before removing them, then
return them to their initial positions after com-
pleting work.
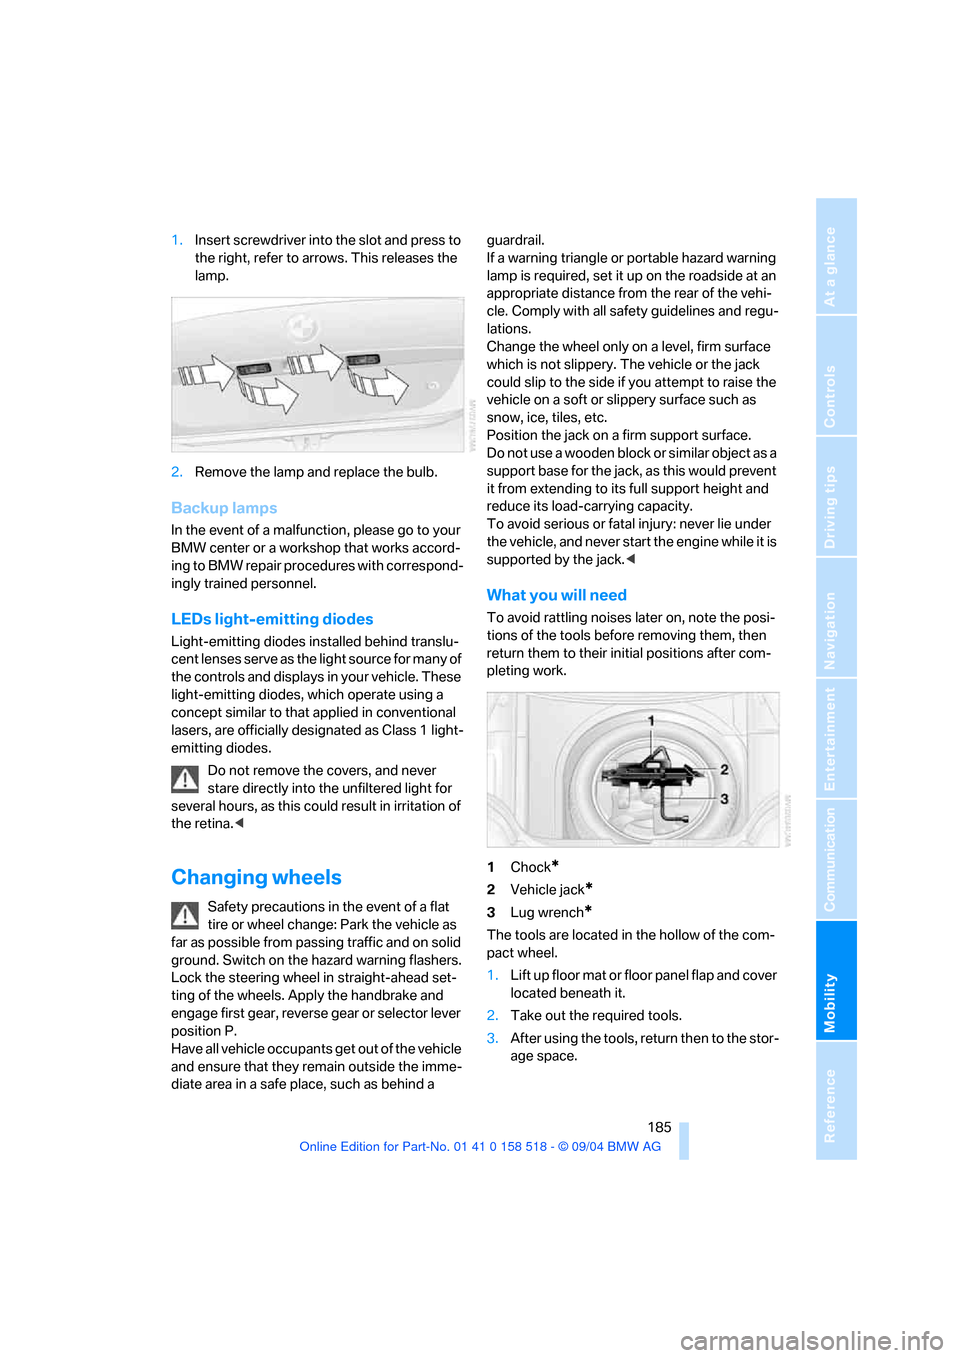
1Chock
*
2Vehicle jack*
3Lug wrench*
The tools are located in the hollow of the com-
pact wheel.
1.Lift up floor mat or floor panel flap and cover
located beneath it.
2.Take out the required tools.
3.After using the tools, return then to the stor-
age space.
Page 190 of 221
Mobility
189Reference
At a glance
Controls
Driving tips
Communication
Navigation
Entertainment
Giving and receiving assistance
Emergency calling*
Conditions for an emergency call:
>Once ignition key is in position 1.
>The car phone is logged on to a cellular
telephone network.
>The emergency call system is operable.
Initiating an emergency call
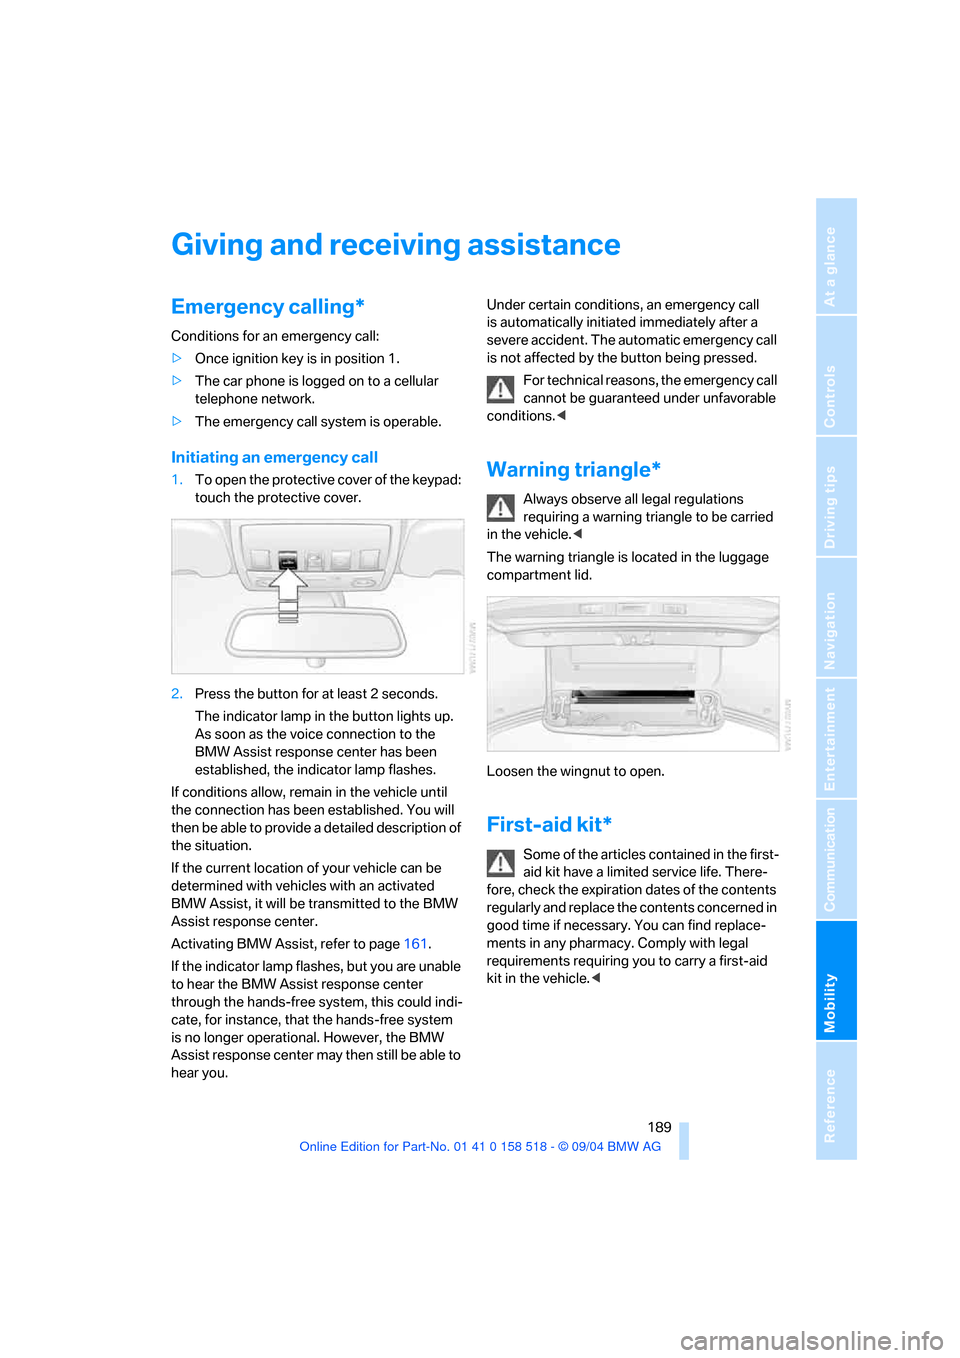
1.To open the protective cover of the keypad:
touch the protective cover.
2.Press the button for at least 2 seconds.
The indicator lamp in the button lights up.
As soon as the voice connection to the
BMW Assist response center has been
established, the indicator lamp flashes.
If conditions allow, remain in the vehicle until
the connection has been established. You will
then be able to provide a detailed description of
the situation.
If the current location of your vehicle can be
determined with vehicles with an activated
BMW Assist, it will be transmitted to the BMW
Assist response center.
Activating BMW Assist, refer to page161.
If the indicator lamp flashes, but you are unable
to hear the BMW Assist response center
through the hands-free system, this could indi-
cate, for instance, that the hands-free system
is no longer operational. However, the BMW
Assist response center may then still be able to
hear you.Under certain conditions, an emergency call
is automatically initiated immediately after a
severe accident. The automatic emergency call
is not affected by the button being pressed.
For technical reasons, the emergency call
cannot be guaranteed under unfavorable
conditions.
requiring a warning triangle to be carried
in the vehicle.<
The warning triangle is located in the luggage
compartment lid.
Loosen the wingnut to open.
First-aid kit*
Some of the articles contained in the first-
aid kit have a limited service life. There-
fore, check the expiration dates of the contents
regularly and replace the contents concerned in
good time if necessary. You can find replace-
ments in any pharmacy. Comply with legal
requirements requiring you to carry a first-aid
kit in the vehicle.<