2005 BMW 525I lock
[x] Cancel search: lockPage 99 of 221
Practical interior accessories
98
Closing
Fold the cover up.
To prevent injury in the event of an acci-
dent while the vehicle is being driven,
close the glove compartment immediately after
use.<
Locking
Lock with a master key. Unlocking is also only
possible with a master key.
If you only hand over the spare key, e. g.
for valet parking, refer to page28, the
glove compartment cannot be unlocked.<
Rechargeable flashlight
The flashlight is located on the left side of the
glove compartment.
The flashlight can remain plugged in continu-
ously.
Be sure that the flashlight is switched off
when it is inserted into its holder. Failure
to comply with this precaution could lead to
overcharging and damage.<
Center armrest
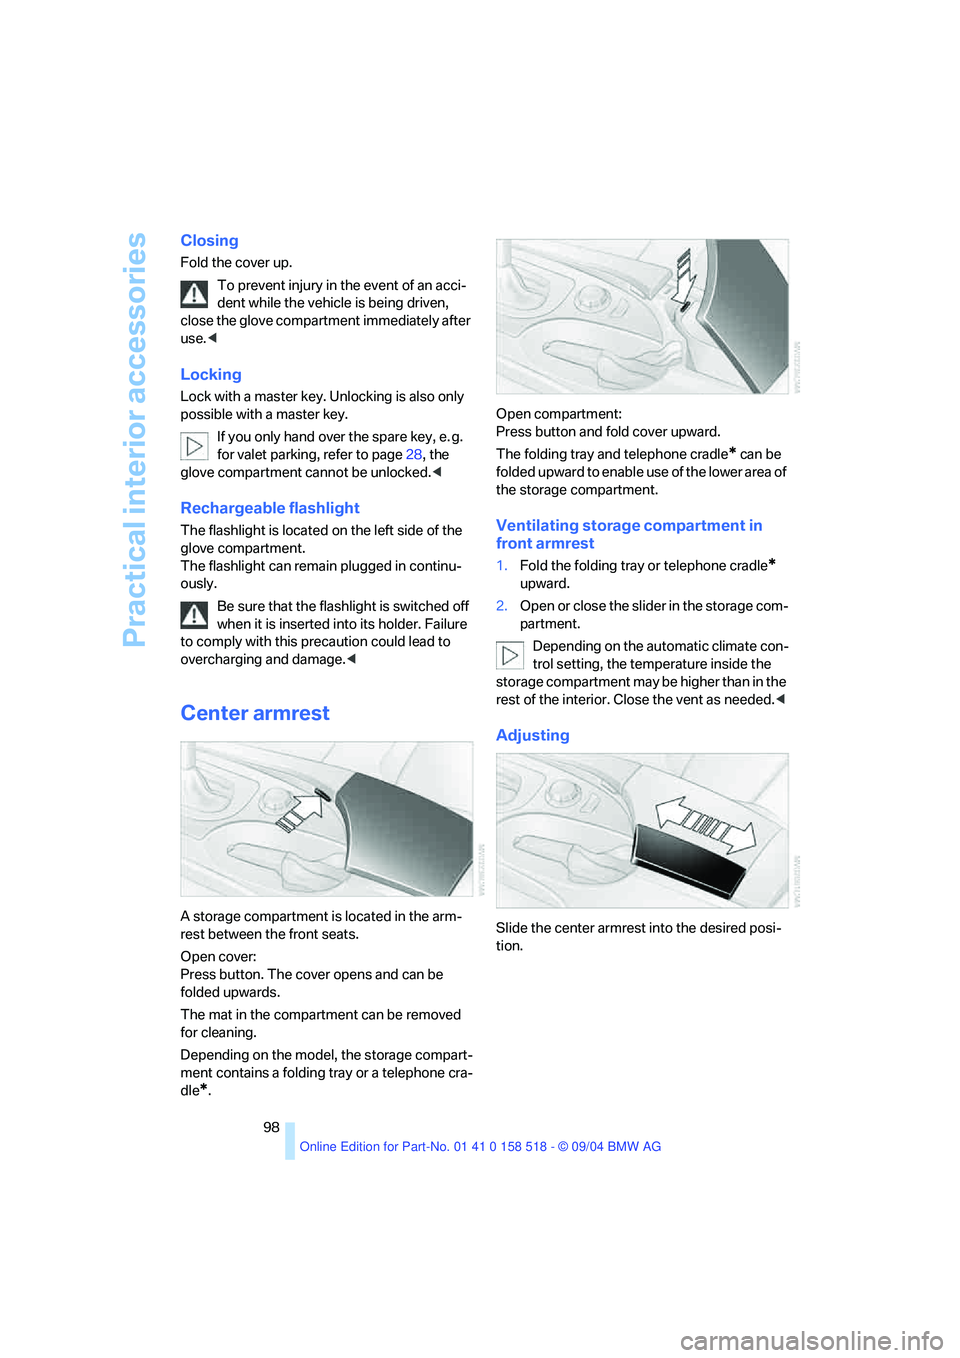
A storage compartment is located in the arm-
rest between the front seats.
Open cover:
Press button. The cover opens and can be
folded upwards.
The mat in the compartment can be removed
for cleaning.
Depending on the model, the storage compart-
ment contains a folding tray or a telephone cra-
dle
*.Open compartment:
Press button and fold cover upward.
The folding tray and telephone cradle
* can be
folded upward to enable use of the lower area of
the storage compartment.
Ventilating storage compartment in
front armrest
1.Fold the folding tray or telephone cradle*
upward.
2.Open or close the slider in the storage com-
partment.
Depending on the automatic climate con-
trol setting, the temperature inside the
storage compartment may be higher than in the
rest of the interior. Close the vent as needed.<
Adjusting
Slide the center armrest into the desired posi-
tion.
Page 102 of 221
Controls
101Reference
At a glance
Driving tips
Communication
Navigation
Entertainment
Mobility
Folding down rear seat*
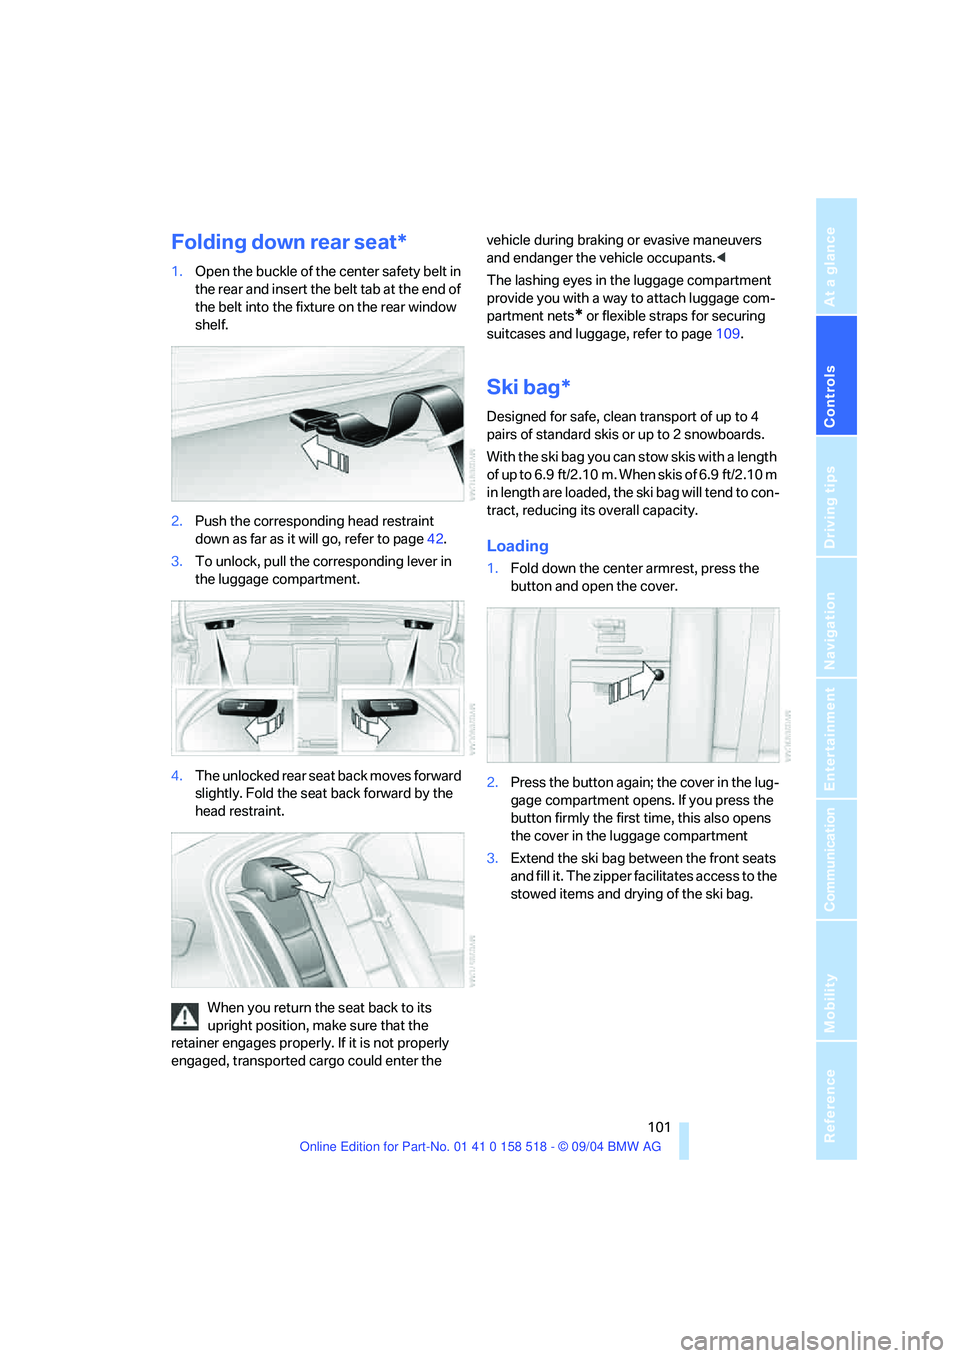
1.Open the buckle of the center safety belt in
the rear and insert the belt tab at the end of
the belt into the fixture on the rear window
shelf.
2.Push the corresponding head restraint
down as far as it will go, refer to page42.
3.To unlock, pull the corresponding lever in
the luggage compartment.
4.The unlocked rear seat back moves forward
slightly. Fold the seat back forward by the
head restraint.
When you return the seat back to its
upright position, make sure that the
retainer engages properly. If it is not properly
engaged, transported cargo could enter the vehicle during braking or evasive maneuvers
and endanger the vehicle occupants.<
The lashing eyes in the luggage compartment
provide you with a way to attach luggage com-
partment nets
* or flexible straps for securing
suitcases and luggage, refer to page109.
Ski bag*
Designed for safe, clean transport of up to 4
pairs of standard skis or up to 2 snowboards.
With the ski bag you can stow skis with a length
of up to 6.9 ft/2.10 m. When skis of 6.9 ft/2.10 m
in length are loaded, the ski bag will tend to con-
tract, reducing its overall capacity.
Loading
1.Fold down the center armrest, press the
button and open the cover.
2.Press the button again; the cover in the lug-
gage compartment opens. If you press the
button firmly the first time, this also opens
the cover in the luggage compartment
3.Extend the ski bag between the front seats
and fill it. The zipper facilitates access to the
stowed items and drying of the ski bag.
Page 138 of 221
Navigation
Entertainment
Driving tips
137Reference
At a glance
Controls
Communication
Mobility
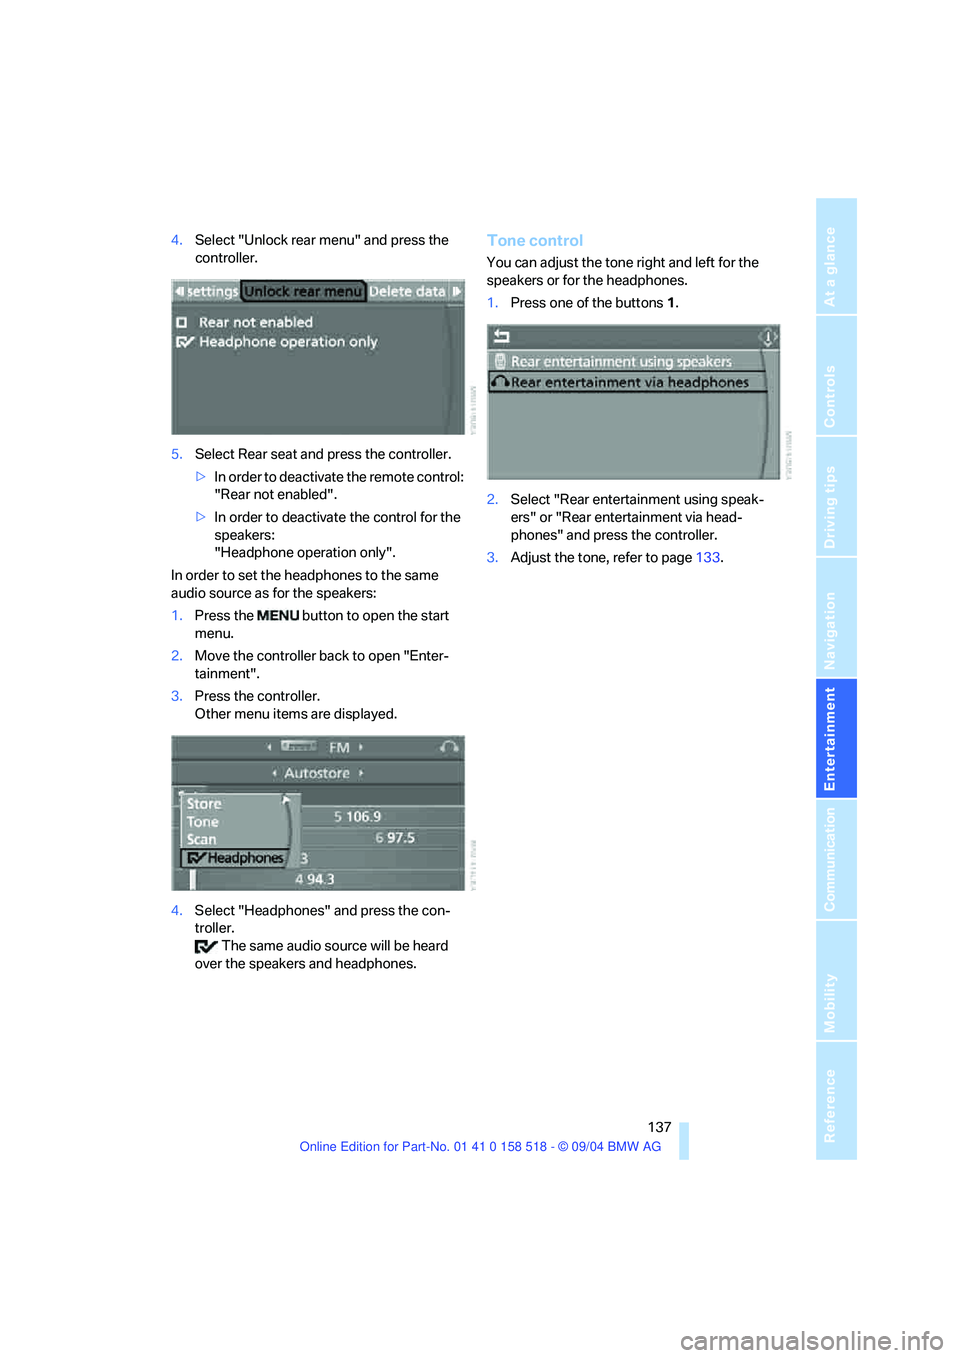
4.Select "Unlock rear menu" and press the
controller.
5.Select Rear seat and press the controller.
>In order to deactivate the remote control:
"Rear not enabled".
>In order to deactivate the control for the
speakers:
"Headphone operation only".
In order to set the headphones to the same
audio source as for the speakers:
1.Press the button to open the start
menu.
2.Move the controller back to open "Enter-
tainment".
3.Press the controller.
Other menu items are displayed.
4.Select "Headphones" and press the con-
troller.
The same audio source will be heard
over the speakers and headphones.Tone control
You can adjust the tone right and left for the
speakers or for the headphones.
1.Press one of the buttons1.
2.Select "Rear entertainment using speak-
ers" or "Rear entertainment via head-
phones" and press the controller.
3.Adjust the tone, refer to page133.
Page 145 of 221
Radio
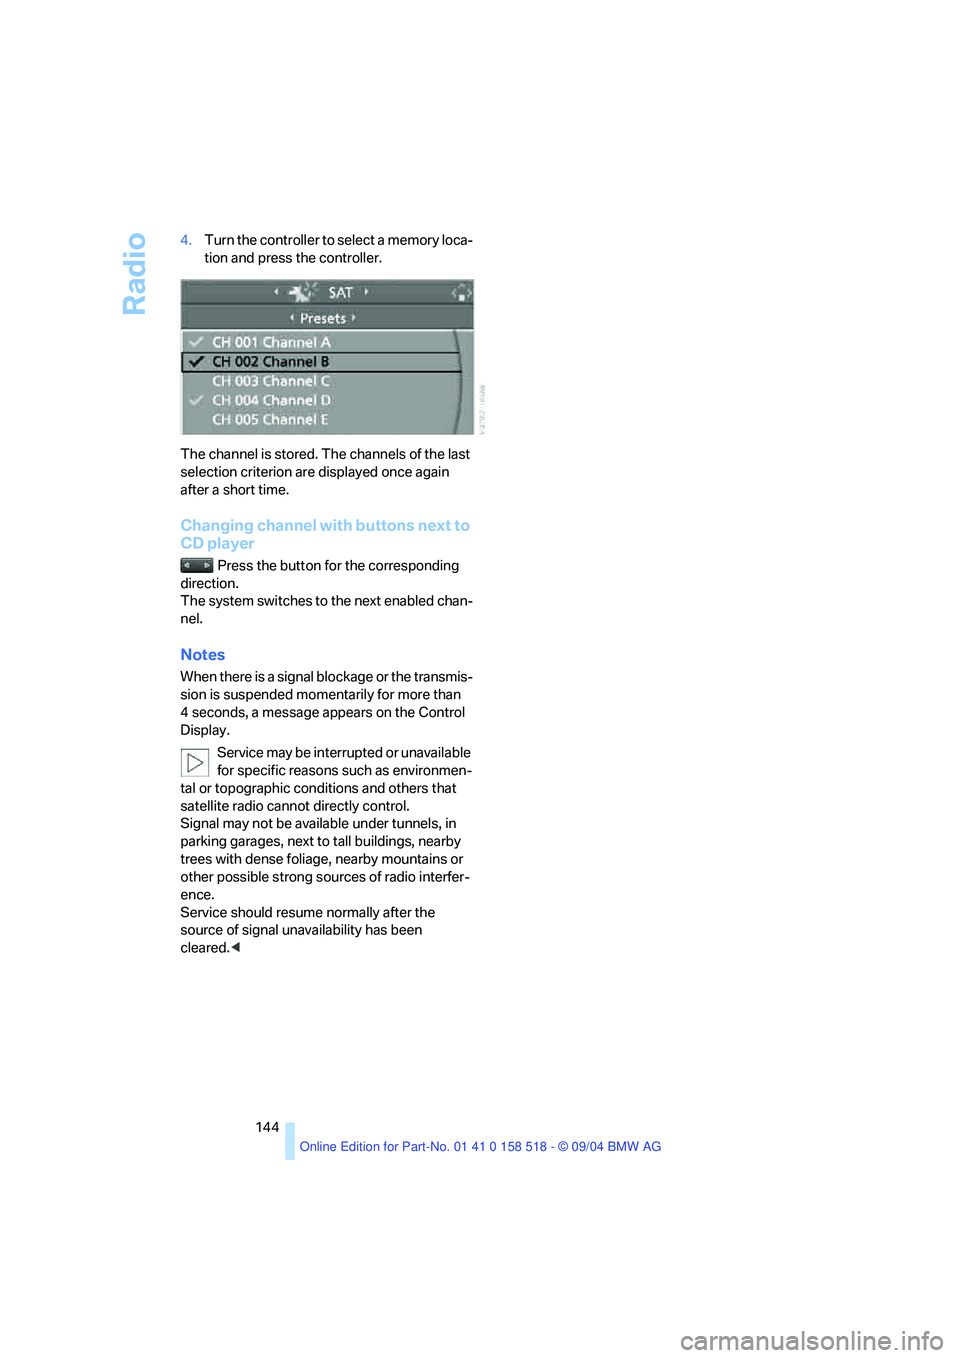
144 4.Turn the controller to select a memory loca-
tion and press the controller.
The channel is stored. The channels of the last
selection criterion are displayed once again
after a short time.
Changing channel with buttons next to
CD player
Press the button for the corresponding
direction.
The system switches to the next enabled chan-
nel.
Notes
When there is a signal blockage or the transmis-
sion is suspended momentarily for more than
4 seconds, a message appears on the Control
Display.
Service may be interrupted or unavailable
for specific reasons such as environmen-
tal or topographic conditions and others that
satellite radio cannot directly control.
Signal may not be available under tunnels, in
parking garages, next to tall buildings, nearby
trees with dense foliage, nearby mountains or
other possible strong sources of radio interfer-
ence.
Service should resume normally after the
source of signal unavailability has been
cleared.<
Page 165 of 221
TeleService, BMW Assist
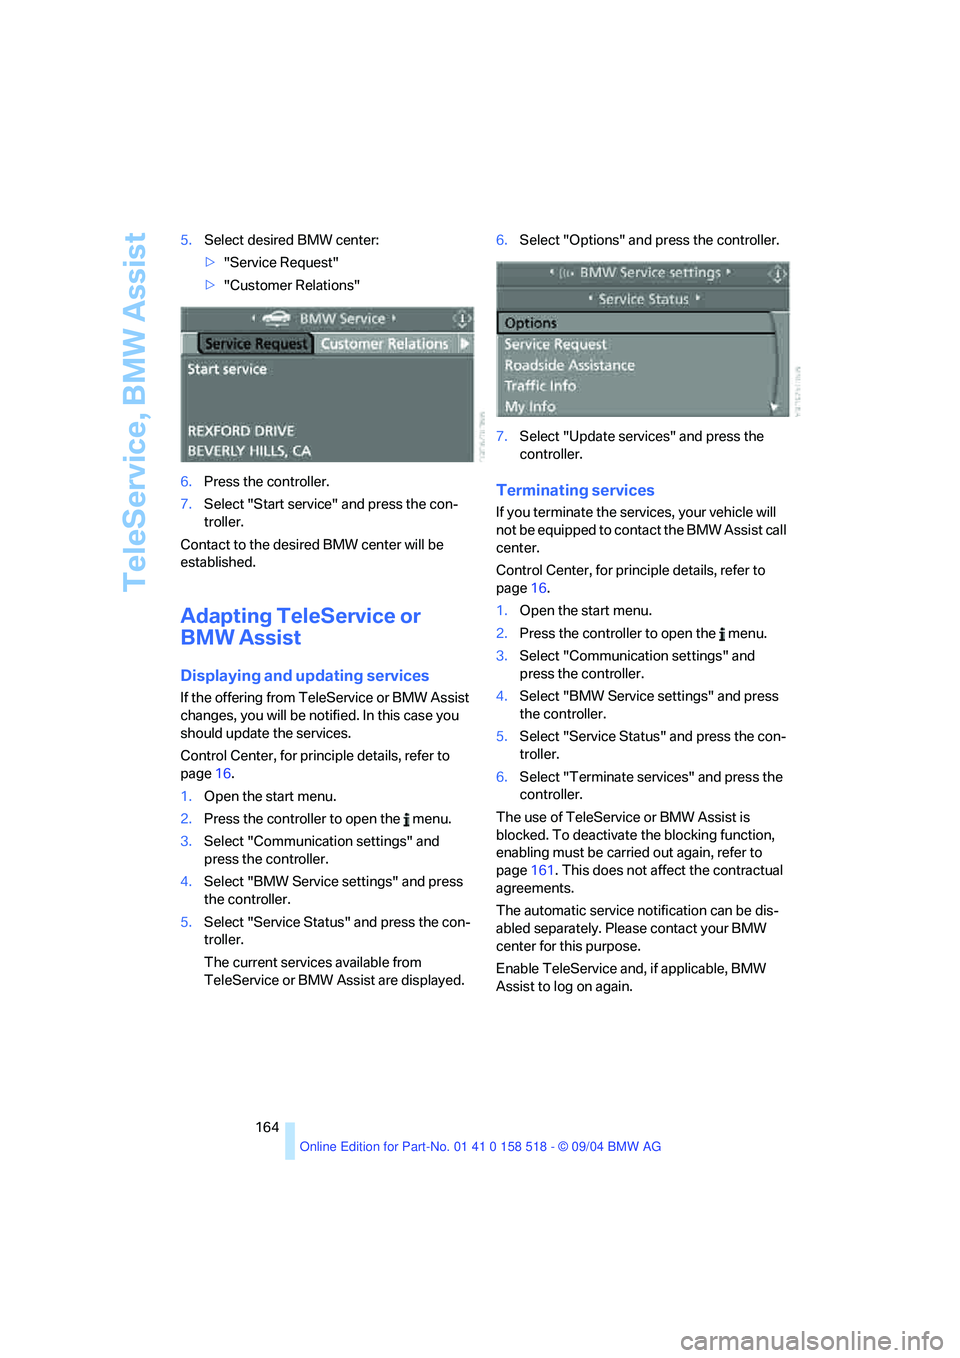
164 5.Select desired BMW center:
>"Service Request"
>"Customer Relations"
6.Press the controller.
7.Select "Start service" and press the con-
troller.
Contact to the desired BMW center will be
established.
Adapting TeleService or
BMW Assist
Displaying and updating services
If the offering from TeleService or BMW Assist
changes, you will be notified. In this case you
should update the services.
Control Center, for principle details, refer to
page16.
1.Open the start menu.
2.Press the controller to open the menu.
3.Select "Communication settings" and
press the controller.
4.Select "BMW Service settings" and press
the controller.
5.Select "Service Status" and press the con-
troller.
The current services available from
TeleService or BMW Assist are displayed.6.Select "Options" and press the controller.
7.Select "Update services" and press the
controller.
Terminating services
If you terminate the services, your vehicle will
not be equipped to contact the BMW Assist call
center.
Control Center, for principle details, refer to
page16.
1.Open the start menu.
2.Press the controller to open the menu.
3.Select "Communication settings" and
press the controller.
4.Select "BMW Service settings" and press
the controller.
5.Select "Service Status" and press the con-
troller.
6.Select "Terminate services" and press the
controller.
The use of TeleService or BMW Assist is
blocked. To deactivate the blocking function,
enabling must be carried out again, refer to
page161. This does not affect the contractual
agreements.
The automatic service notification can be dis-
abled separately. Please contact your BMW
center for this purpose.
Enable TeleService and, if applicable, BMW
Assist to log on again.
Page 169 of 221
Refueling
168
Refueling
Always switch off the engine before refu-
eling. If you do not, fuel cannot be dis-
pensed into the tank and a message on the
Control Display will appear.<
Always observe all applicable precautions
and regulations when handling fuels.
Never carry spare fuel containers in your vehi-
cle. Whether empty or full, these containers can
leak, cause an explosion, and lead to fire in the
event of a collision.<
Fuel filler door
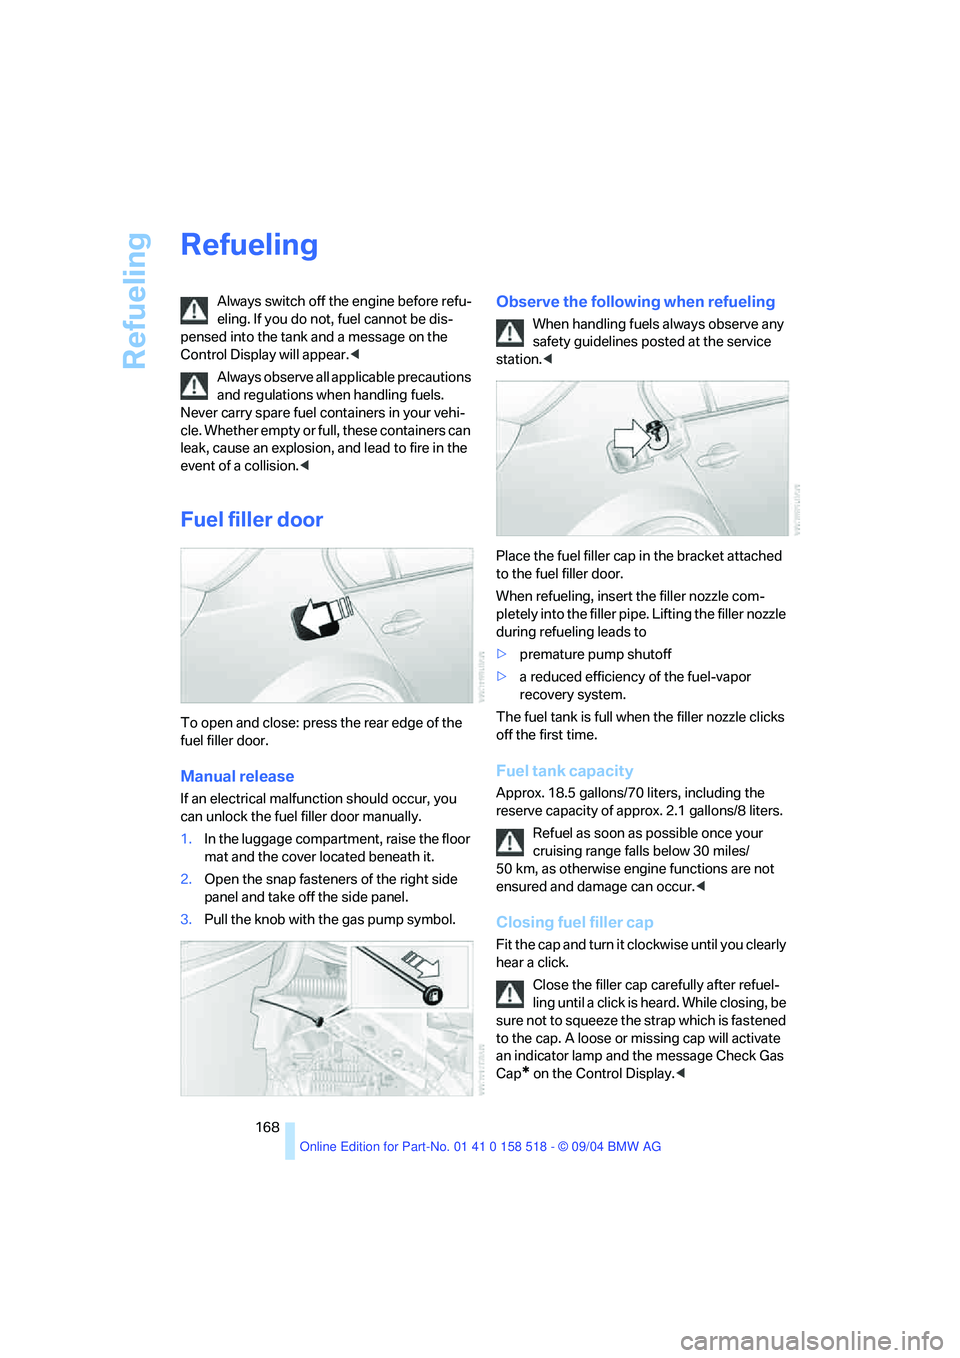
To open and close: press the rear edge of the
fuel filler door.
Manual release
If an electrical malfunction should occur, you
can unlock the fuel filler door manually.
1.In the luggage compartment, raise the floor
mat and the cover located beneath it.
2.Open the snap fasteners of the right side
panel and take off the side panel.
3.Pull the knob with the gas pump symbol.
Observe the following when refueling
When handling fuels always observe any
safety guidelines posted at the service
station.<
Place the fuel filler cap in the bracket attached
to the fuel filler door.
When refueling, insert the filler nozzle com-
pletely into the filler pipe. Lifting the filler nozzle
during refueling leads to
>premature pump shutoff
>a reduced efficiency of the fuel-vapor
recovery system.
The fuel tank is full when the filler nozzle clicks
off the first time.
Fuel tank capacity
Approx. 18.5 gallons/70 liters, including the
reserve capacity of approx. 2.1 gallons/8 liters.
Refuel as soon as possible once your
cruising range falls below 30 miles/
50 km, as otherwise engine functions are not
ensured and damage can occur.<
Closing fuel filler cap
Fit the cap and turn it clockwise until you clearly
hear a click.
Close the filler cap carefully after refuel-
ling until a click is heard. While closing, be
sure not to squeeze the strap which is fastened
to the cap. A loose or missing cap will activate
an indicator lamp and the message Check Gas
Cap
* on the Control Display.<
Page 179 of 221
Under the hood
178 Do not exceed the upper marking on the
dipstick, otherwise an overfilling of oil can
damage the engine.<
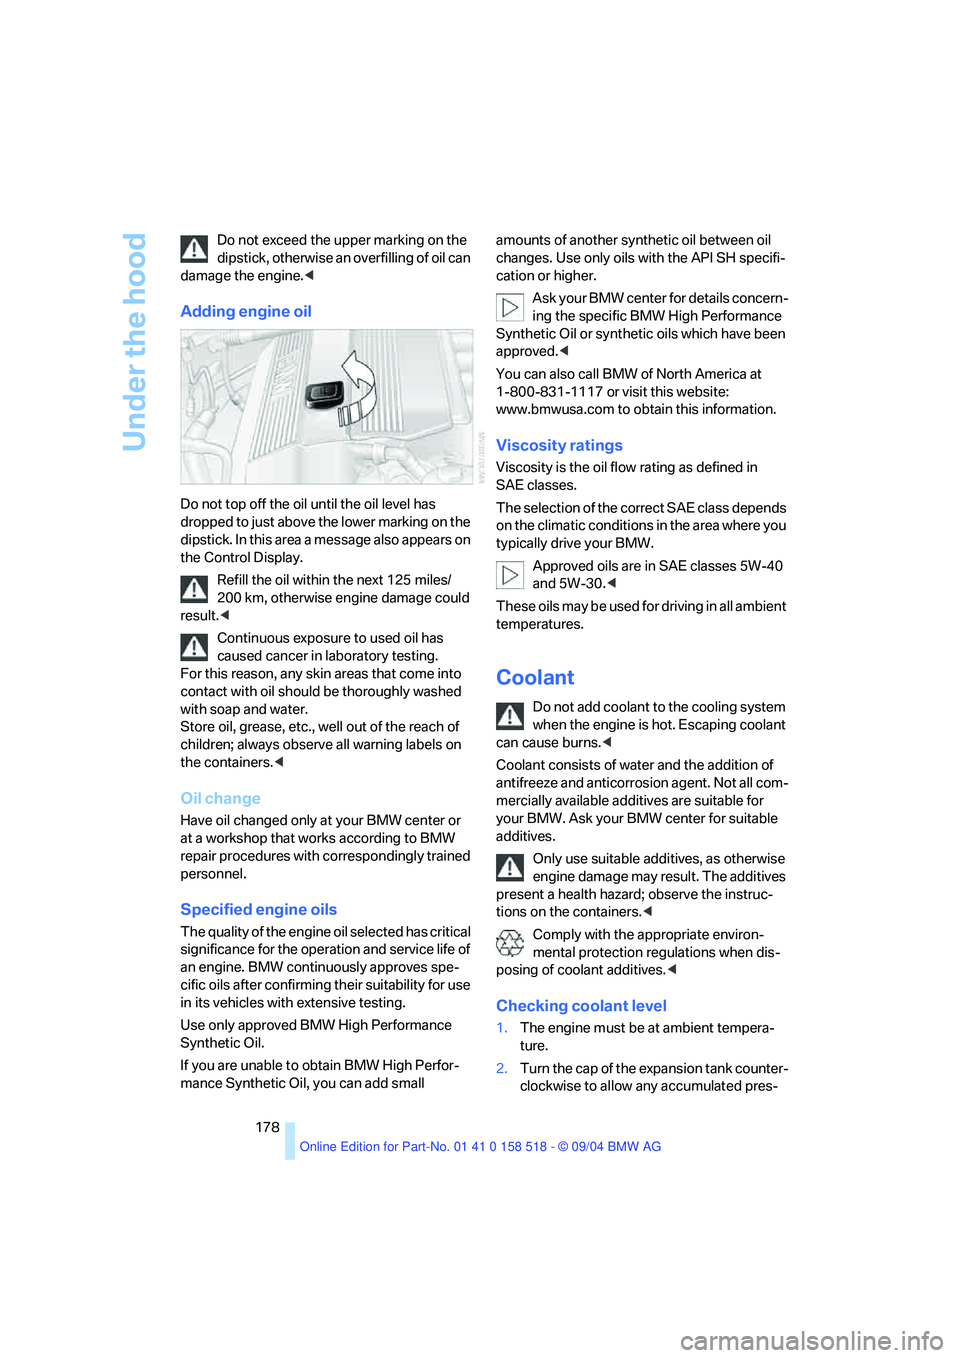
Adding engine oil
Do not top off the oil until the oil level has
dropped to just above the lower marking on the
dipstick. In this area a message also appears on
the Control Display.
Refill the oil within the next 125 miles/
200 km, otherwise engine damage could
result.<
Continuous exposure to used oil has
caused cancer in laboratory testing.
For this reason, any skin areas that come into
contact with oil should be thoroughly washed
with soap and water.
Store oil, grease, etc., well out of the reach of
children; always observe all warning labels on
the containers.<
Oil change
Have oil changed only at your BMW center or
at a workshop that works according to BMW
repair procedures with correspondingly trained
personnel.
Specified engine oils
The quality of the engine oil selected has critical
significance for the operation and service life of
an engine. BMW continuously approves spe-
cific oils after confirming their suitability for use
in its vehicles with extensive testing.
Use only approved BMW High Performance
Synthetic Oil.
If you are unable to obtain BMW High Perfor-
mance Synthetic Oil, you can add small amounts of another synthetic oil between oil
changes. Use only oils with the API SH specifi-
cation or higher.
Ask your BMW center for details concern-
ing the specific BMW High Performance
Synthetic Oil or synthetic oils which have been
approved.<
You can also call BMW of North America at
1-800-831-1117 or visit this website:
www.bmwusa.com to obtain this information.
Viscosity ratings
Viscosity is the oil flow rating as defined in
SAE classes.
The selection of the correct SAE class depends
on the climatic conditions in the area where you
typically drive your BMW.
Approved oils are in SAE classes 5W-40
and 5W-30.<
These oils may be used for driving in all ambient
temperatures.
Coolant
Do not add coolant to the cooling system
when the engine is hot. Escaping coolant
can cause burns.<
Coolant consists of water and the addition of
antifreeze and anticorrosion agent. Not all com-
mercially available additives are suitable for
your BMW. Ask your BMW center for suitable
additives.
Only use suitable additives, as otherwise
engine damage may result. The additives
present a health hazard; observe the instruc-
tions on the containers.<
Comply with the appropriate environ-
mental protection regulations when dis-
posing of coolant additives.<
Checking coolant level
1.The engine must be at ambient tempera-
ture.
2.Turn the cap of the expansion tank counter-
clockwise to allow any accumulated pres-
Page 186 of 221
Mobility
185Reference
At a glance
Controls
Driving tips
Communication
Navigation
Entertainment
1.Insert screwdriver into the slot and press to
the right, refer to arrows. This releases the
lamp.
2.Remove the lamp and replace the bulb.
Backup lamps
In the event of a malfunction, please go to your
BMW center or a workshop that works accord-
ing to BMW repair procedures with correspond-
ingly trained personnel.
LEDs light-emitting diodes
Light-emitting diodes installed behind translu-
cent lenses serve as the light source for many of
the controls and displays in your vehicle. These
light-emitting diodes, which operate using a
concept similar to that applied in conventional
lasers, are officially designated as Class 1 light-
emitting diodes.
Do not remove the covers, and never
stare directly into the unfiltered light for
several hours, as this could result in irritation of
the retina.<
Changing wheels
Safety precautions in the event of a flat
tire or wheel change: Park the vehicle as
far as possible from passing traffic and on solid
ground. Switch on the hazard warning flashers.
Lock the steering wheel in straight-ahead set-
ting of the wheels. Apply the handbrake and
engage first gear, reverse gear or selector lever
position P.
Have all vehicle occupants get out of the vehicle
and ensure that they remain outside the imme-
diate area in a safe place, such as behind a guardrail.
If a warning triangle or portable hazard warning
lamp is required, set it up on the roadside at an
appropriate distance from the rear of the vehi-
cle. Comply with all safety guidelines and regu-
lations.
Change the wheel only on a level, firm surface
which is not slippery. The vehicle or the jack
could slip to the side if you attempt to raise the
vehicle on a soft or slippery surface such as
snow, ice, tiles, etc.
Position the jack on a firm support surface.
Do not use a wooden block or similar object as a
support base for the jack, as this would prevent
it from extending to its full support height and
reduce its load-carrying capacity.
To avoid serious or fatal injury: never lie under
the vehicle, and never start the engine while it is
supported by the jack.<
What you will need
To avoid rattling noises later on, note the posi-
tions of the tools before removing them, then
return them to their initial positions after com-
pleting work.
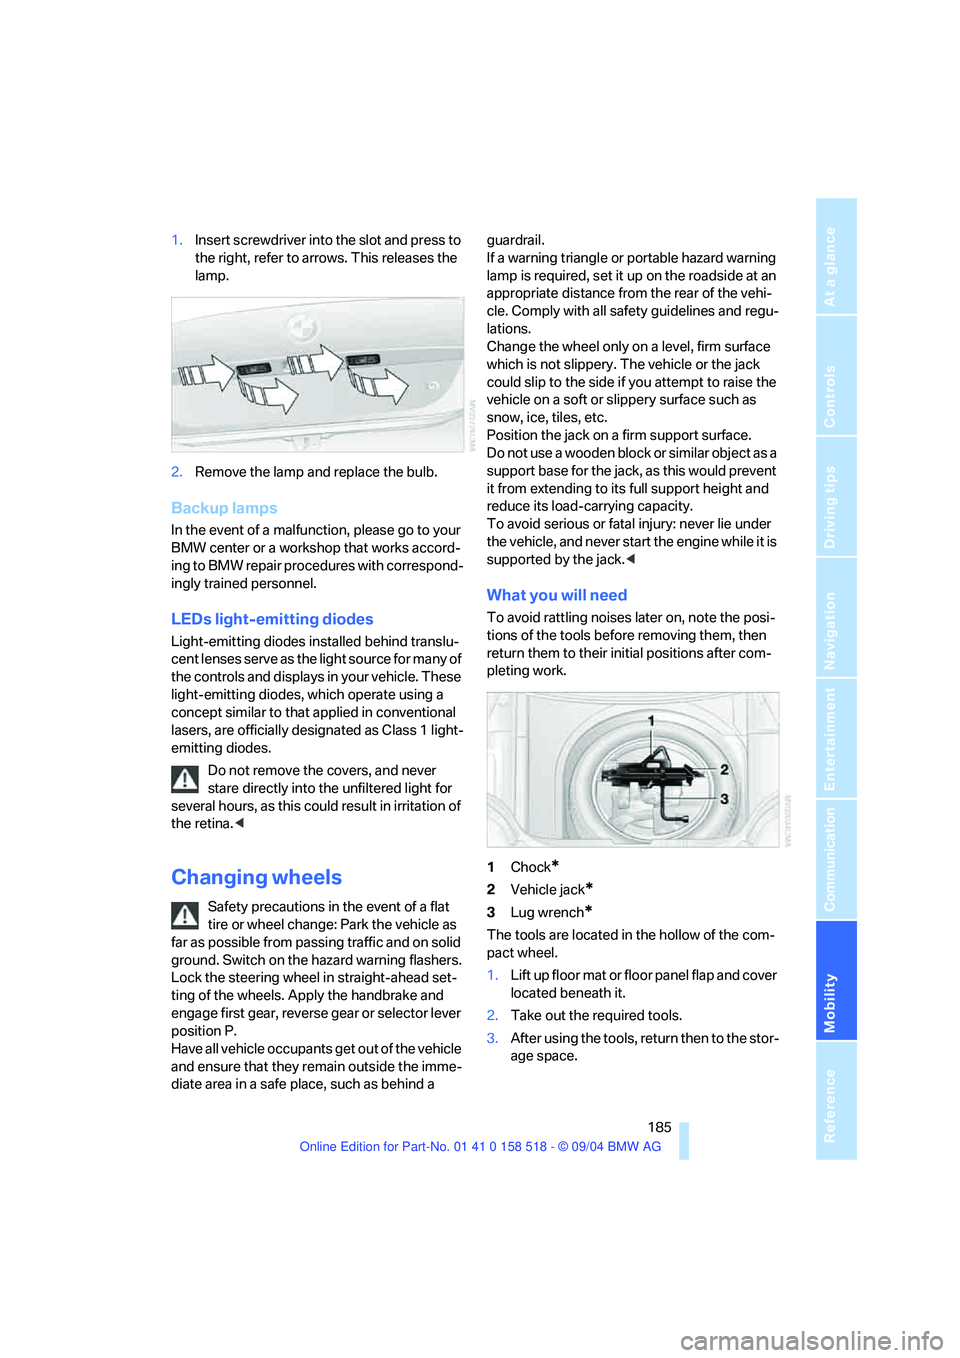
1Chock
*
2Vehicle jack*
3Lug wrench*
The tools are located in the hollow of the com-
pact wheel.
1.Lift up floor mat or floor panel flap and cover
located beneath it.
2.Take out the required tools.
3.After using the tools, return then to the stor-
age space.