2005 BMW 525I manual transmission
[x] Cancel search: manual transmissionPage 97 of 221
Practical interior accessories
96
Practical interior accessories
Integrated universal remote
control*
The concept
The integrated universal remote control can
replace as many as three hand-held transmit-
ters for various remote-controlled accessories,
such as door openers and house alarm sys-
tems. The integrated universal remote control
registers and stores signals from the original
hand-held transmitters.
The signal of an original hand-held transmitter
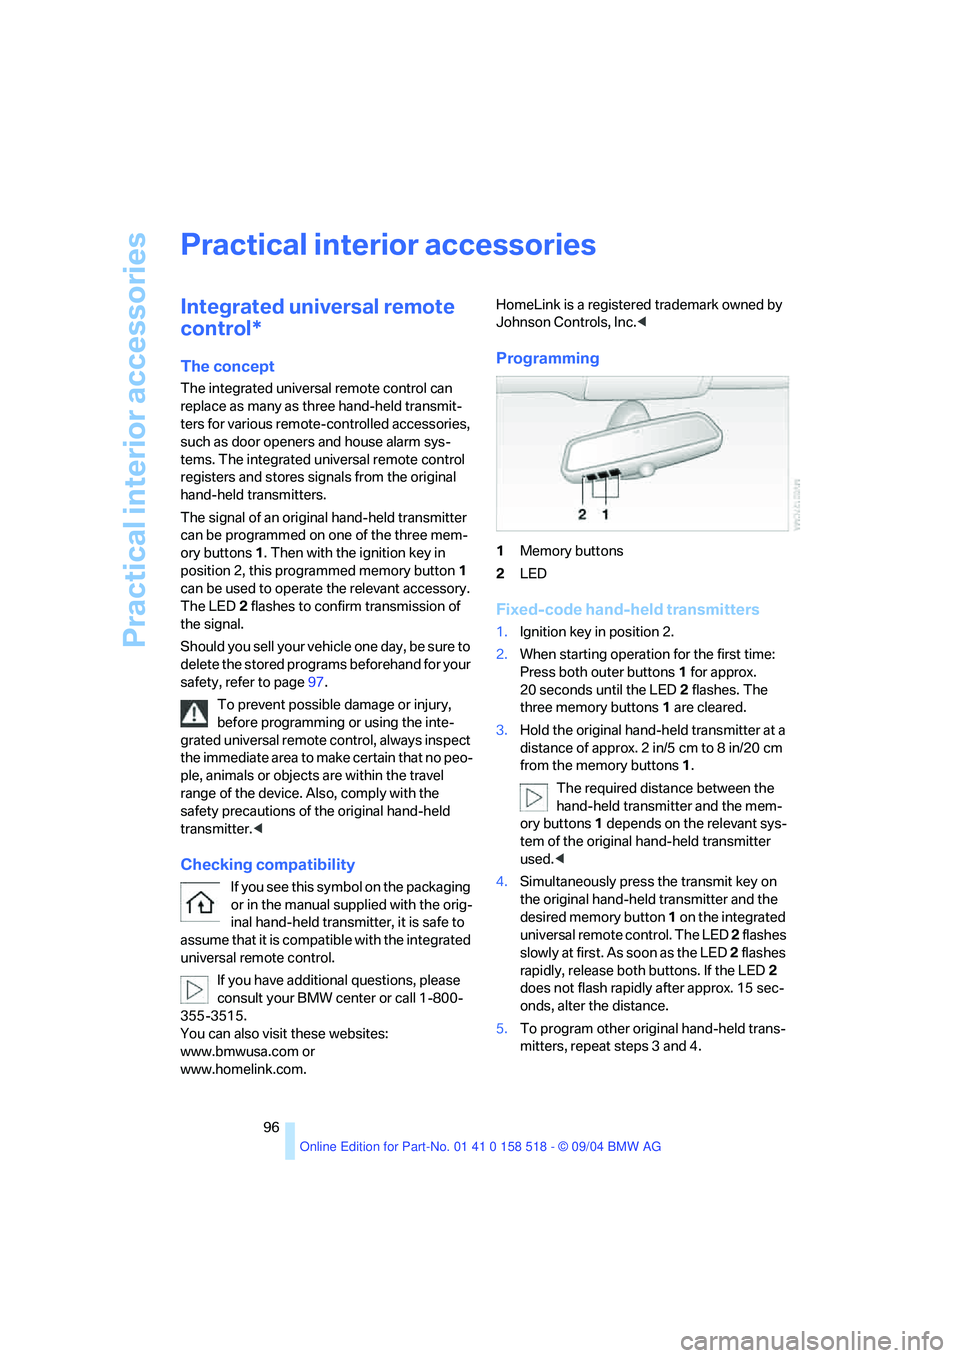
can be programmed on one of the three mem-
ory buttons1. Then with the ignition key in
position 2, this programmed memory button1
can be used to operate the relevant accessory.
The LED 2 flashes to confirm transmission of
the signal.
Should you sell your vehicle one day, be sure to
delete the stored programs beforehand for your
safety, refer to page97.
To prevent possible damage or injury,
before programming or using the inte-
grated universal remote control, always inspect
the immediate area to make certain that no peo-
ple, animals or objects are within the travel
range of the device. Also, comply with the
safety precautions of the original hand-held
transmitter.<
Checking compatibility
If you see this symbol on the packaging
or in the manual supplied with the orig-
inal hand-held transmitter, it is safe to
assume that it is compatible with the integrated
universal remote control.
If you have additional questions, please
consult your BMW center or call 1-800-
355-3515.
You can also visit these websites:
www.bmwusa.com or
www.homelink.com. HomeLink is a registered trademark owned by
Johnson Controls, Inc.<
Programming
1Memory buttons
2LED
Fixed-code hand-held transmitters
1.Ignition key in position 2.
2.When starting operation for the first time:
Press both outer buttons1 for approx.
20 seconds until the LED2 flashes. The
three memory buttons 1 are cleared.
3.Hold the original hand-held transmitter at a
distance of approx. 2 in/5 cm to 8 in/20 cm
from the memory buttons1.
The required distance between the
hand-held transmitter and the mem-
ory buttons1 depends on the relevant sys-
tem of the original hand-held transmitter
used.<
4.Simultaneously press the transmit key on
the original hand-held transmitter and the
desired memory button 1 on the integrated
universal remote control. The LED 2 flashes
slowly at first. As soon as the LED 2 flashes
rapidly, release both buttons. If the LED2
does not flash rapidly after approx. 15 sec-
onds, alter the distance.
5.To program other original hand-held trans-
mitters, repeat steps 3 and 4.
Page 107 of 221
Things to remember when driving
106
Things to remember when driving
Break-in period
Moving parts need breaking-in time to adjust to
each other. To ensure that your vehicle contin-
ues to provide optimized economy of operation
throughout an extended service life, we request
that you devote careful attention to the follow-
ing section.
Engine and differential
Up to 1,200 miles/2,000 km:
You should attempt to vary both engine and
vehicle speeds. Until the break-in period has
been completed, you should also refrain from
exceeding an engine speed of 4,500 rpm or a
driving speed of 100 mph/160 km/h.
Always obey all official speed limits.
Avoid full-throttle operation and use of the
transmission's kick-down mode during these
initial miles.
Once you have driven 1,200 miles/2000 km, the
engine and vehicle speeds can be gradually
increased.
SMG Sequential manual transmission
Do not use the acceleration assistant during the
break-in period, refer to page55.
Tires
Due to technical factors associated with their
manufacture, tires do not achieve their full trac-
tion potential until after an initial break-in
period. Therefore, drive reservedly during the
first 200 miles/300 km.
Brake system
Brakes require an initial break-in period of
approx. 300 miles/500 km to achieve optimized
contact and wear patterns between brake pads
and rotors.
Clutch
The function of the clutch is only at its opti-
mized level after a distance driven of approx.
300 miles/500 km. During this break-in period,
engage the clutch gently.
Following part replacement
Observe the break-in instructions again if com-
ponents mentioned above must be replaced
after subsequent driving operation.
General driving notes
Closing luggage compartment lid
Operate the vehicle only when the lug-
gage compartment lid is completely
closed. Otherwise, exhaust fumes could pene-
trate to the interior of the vehicle.<
If special circumstances should make it abso-
lutely necessary to operate the vehicle with the
luggage compartment lid open:
1.Close all windows and the glass sunroof.
2.Increase the air volume of the automatic
climate control to a high level, refer to
page91.
Hot exhaust system
As in all vehicles equipped with a catalytic
converter, extremely high temperatures
are generated in this vehicle. Do not remove the
heat shields installed adjacent to various sec-
tions of the exhaust system, and never apply
undercoating to them. When driving, standing
at idle and while parking take care to avoid pos-
sible contact between the hot exhaust system
and any highly flammable materials such as hay,
leaves, grass, etc. Such contact could lead to a
fire, and with it the risk of serious property dam-
age as well as personal injury.<
Page 108 of 221
Driving tips
107Reference
At a glance
Controls
Communication
Navigation
Entertainment
Mobility
Portable phone in the vehicle
BMW discourages the use of mobile
communications devices, e. g. portable
phones, inside the vehicle without a direct con-
nection to an outside antenna. Otherwise, the
vehicle electronics and mobile communication
device can influence one another. In addition,
there is no assurance that the radiation which
results from transmission will be dissipated
from the vehicle interior.<
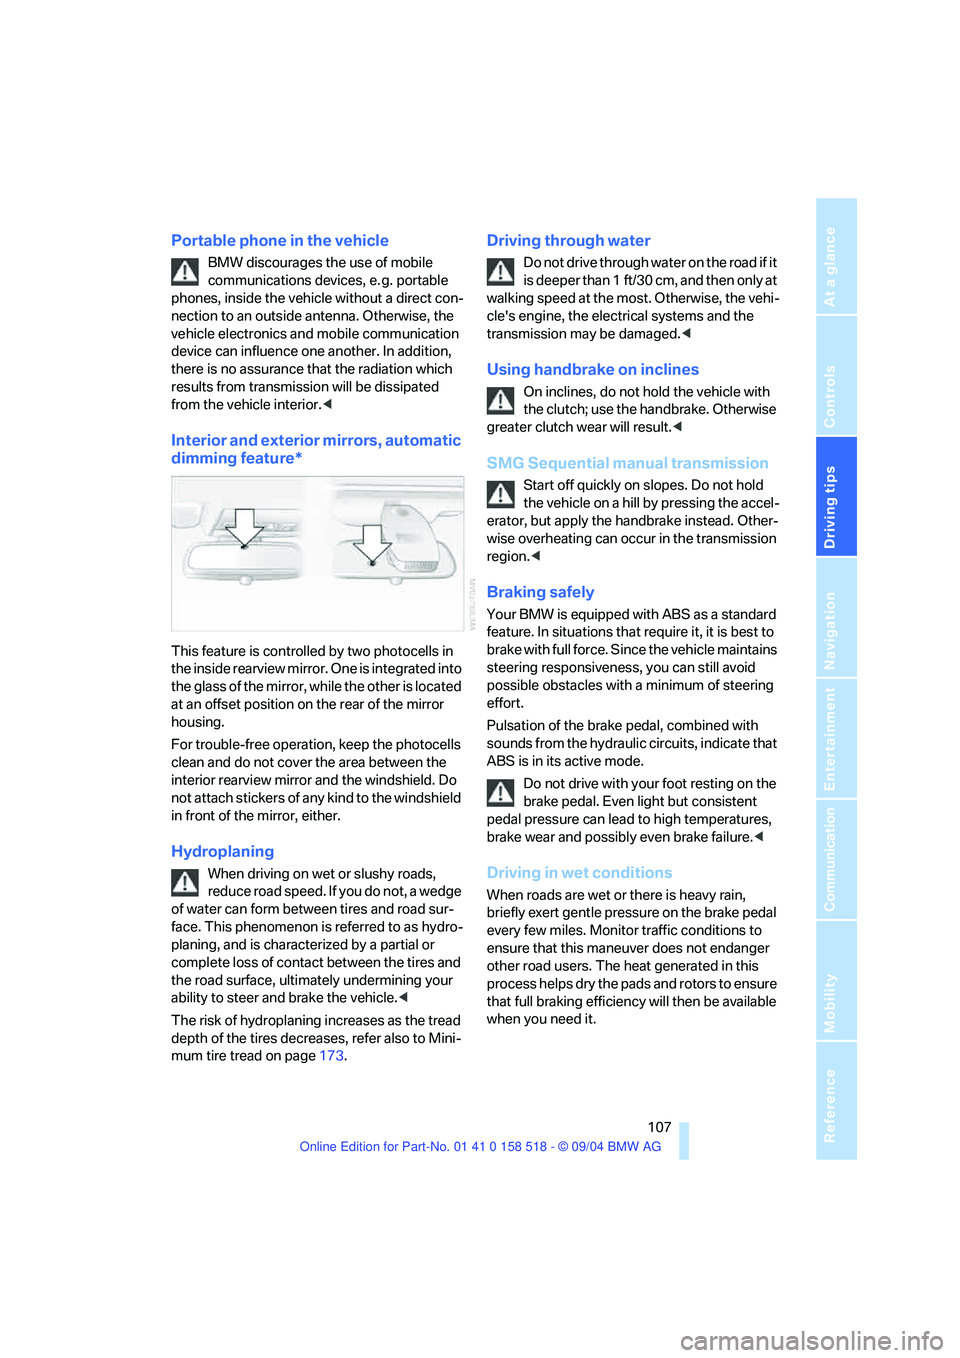
Interior and exterior mirrors, automatic
dimming feature*
This feature is controlled by two photocells in
the inside rearview mirror. One is integrated into
the glass of the mirror, while the other is located
at an offset position on the rear of the mirror
housing.
For trouble-free operation, keep the photocells
clean and do not cover the area between the
interior rearview mirror and the windshield. Do
not attach stickers of any kind to the windshield
in front of the mirror, either.
Hydroplaning
When driving on wet or slushy roads,
reduce road speed. If you do not, a wedge
of water can form between tires and road sur-
face. This phenomenon is referred to as hydro-
planing, and is characterized by a partial or
complete loss of contact between the tires and
the road surface, ultimately undermining your
ability to steer and brake the vehicle.<
The risk of hydroplaning increases as the tread
depth of the tires decreases, refer also to Mini-
mum tire tread on page173.
Driving through water
Do not drive through water on the road if it
is deeper than 1 ft/30 cm, and then only at
walking speed at the most. Otherwise, the vehi-
cle's engine, the electrical systems and the
transmission may be damaged.<
Using handbrake on inclines
On inclines, do not hold the vehicle with
the clutch; use the handbrake. Otherwise
greater clutch wear will result.<
SMG Sequential manual transmission
Start off quickly on slopes. Do not hold
the vehicle on a hill by pressing the accel-
erator, but apply the handbrake instead. Other-
wise overheating can occur in the transmission
region.<
Braking safely
Your BMW is equipped with ABS as a standard
feature. In situations that require it, it is best to
brake with full force. Since the vehicle maintains
steering responsiveness, you can still avoid
possible obstacles with a minimum of steering
effort.
Pulsation of the brake pedal, combined with
sounds from the hydraulic circuits, indicate that
ABS is in its active mode.
Do not drive with your foot resting on the
brake pedal. Even light but consistent
pedal pressure can lead to high temperatures,
brake wear and possibly even brake failure.<
Driving in wet conditions
When roads are wet or there is heavy rain,
briefly exert gentle pressure on the brake pedal
every few miles. Monitor traffic conditions to
ensure that this maneuver does not endanger
other road users. The heat generated in this
process helps dry the pads and rotors to ensure
that full braking efficiency will then be available
when you need it.
Page 109 of 221
Things to remember when driving
108
Hills
To prevent overheating and the resulting
reduced efficiency of the brake system,
drive long or steep downhill gradients in the
gear in which the least braking is required. Even
light but consistent pedal pressure can lead to
high temperatures, brake wear and possibly
even brake failure.<
You can further enhance the engine's braking
action by selecting a lower gear in the automatic
transmission's manual mode, downshifting as
far as first gear on extremely steep stretches,
refer to page56. This strategy helps you avoid
placing excessive loads on the brake system.
Never drive with the clutch pressed or
allow the vehicle to coast with the trans-
mission in Neutral – or with the engine switched
off – there is no engine braking when the trans-
mission is in Neutral, and no power-assist for
brakes and steering when the engine is not run-
ning.
Never allow floor mats, carpets or any other
objects to protrude into the area around the
accelerator and brake pedals and obstruct their
movement.<
Corrosion on brake rotors
When the vehicle is driven only occasionally,
during extended periods when the vehicle is not
used at all, and in operating conditions where
brake applications are less frequent, there is an
increased tendency for corrosion to form on
rotors, while contaminants accumulate on the
brake pads. This occurs because the minimum
pressure which must be exerted by the pads
during brake applications to clean the rotors is
not reached.
Should corrosion form on the brake rotors, the
brakes will tend to respond with a pulsating
effect that even extended application will fail to
cure.
When the vehicle is parked
Condensation forms in the air conditioner sys-
tem during operation, and then exits under the
vehicle.
Traces of condensed water under the
vehicle are therefore normal
.
Before driving into a car wash
To prevent the exterior mirrors on this vehicle
from being damaged, always fold them in by
hand before entering an automatic car wash.
Cargo loading
To avoid loading the tires beyond their
approved carrying capacity, never over-
load the vehicle. Overloading can lead to over-
heating and increases the rate at which damage
develops inside the tires. The ultimate result
can assume the form of a sudden blow-out.<
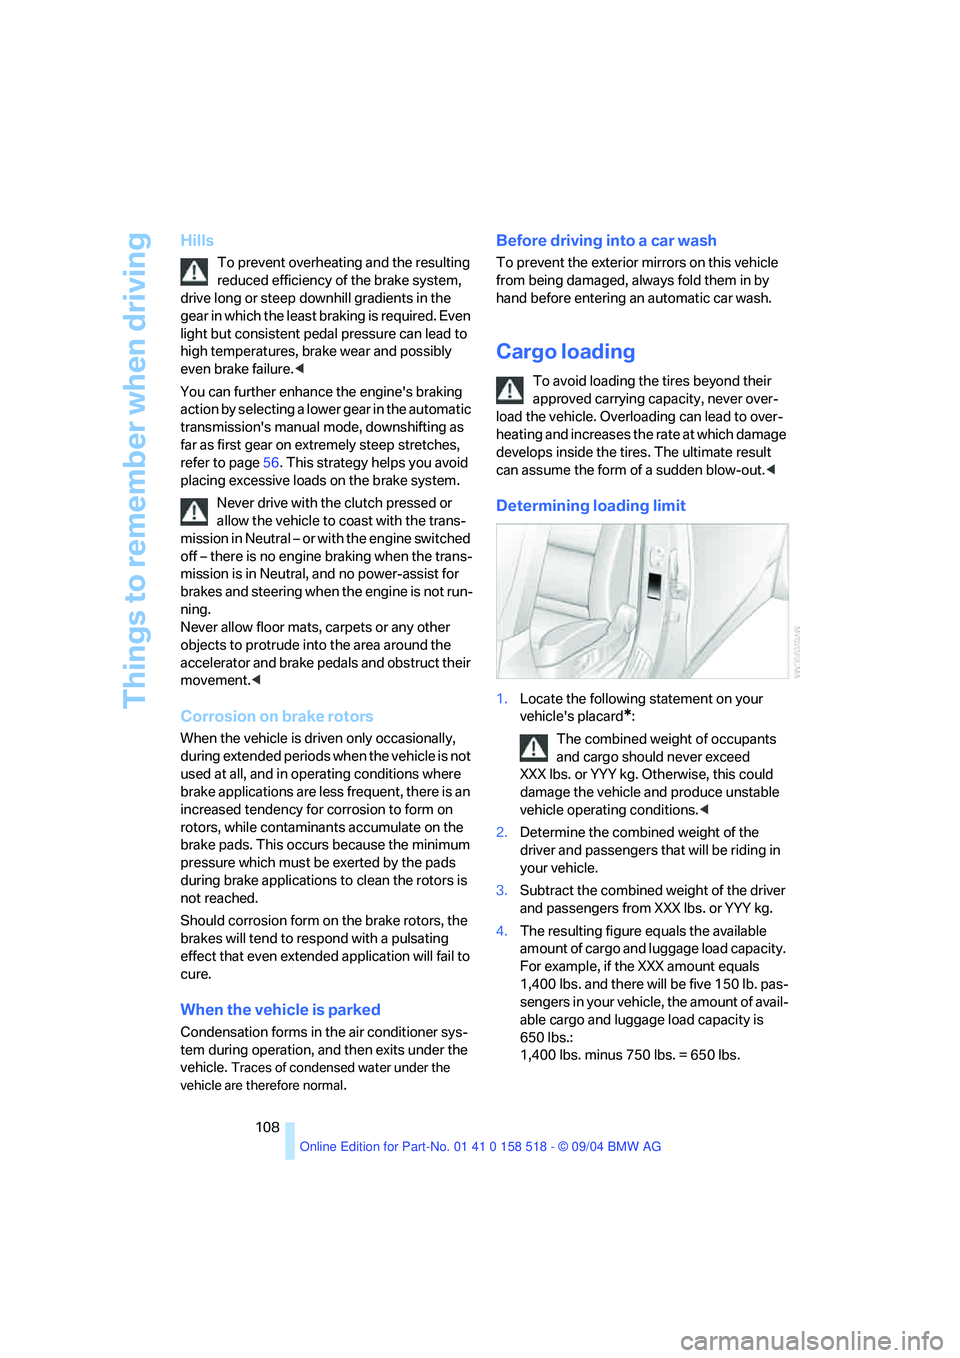
Determining loading limit
1.Locate the following statement on your
vehicle's placard
*:
The combined weight of occupants
and cargo should never exceed
XXX lbs. or YYY kg. Otherwise, this could
damage the vehicle and produce unstable
vehicle operating conditions.<
2.Determine the combined weight of the
driver and passengers that will be riding in
your vehicle.
3.Subtract the combined weight of the driver
and passengers from XXX lbs. or YYY kg.
4.The resulting figure equals the available
amount of cargo and luggage load capacity.
For example, if the XXX amount equals
1,400 lbs. and there will be five 150 lb. pas-
sengers in your vehicle, the amount of avail-
able cargo and luggage load capacity is
650 lbs.:
1,400 lbs. minus 750 lbs. = 650 lbs.
Page 140 of 221
Navigation
Entertainment
Driving tips
139Reference
At a glance
Controls
Communication
Mobility
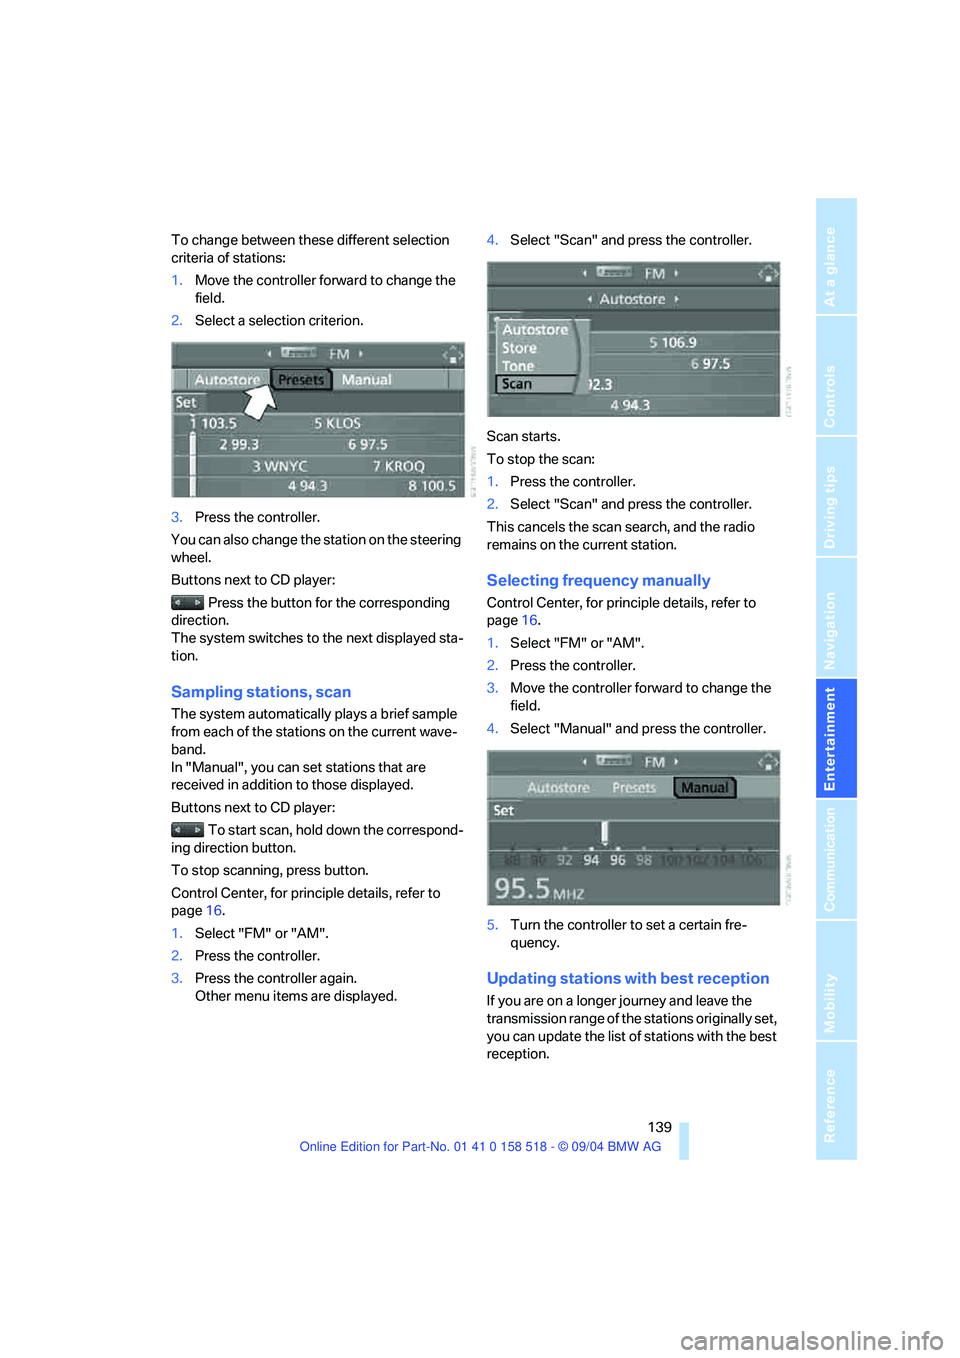
To change between these different selection
criteria of stations:
1.Move the controller forward to change the
field.
2.Select a selection criterion.
3.Press the controller.
You can also change the station on the steering
wheel.
Buttons next to CD player:
Press the button for the corresponding
direction.
The system switches to the next displayed sta-
tion.
Sampling stations, scan
The system automatically plays a brief sample
from each of the stations on the current wave-
band.
In "Manual", you can set stations that are
received in addition to those displayed.
Buttons next to CD player:
To start scan, hold down the correspond-
ing direction button.
To stop scanning, press button.
Control Center, for principle details, refer to
page16.
1.Select "FM" or "AM".
2.Press the controller.
3.Press the controller again.
Other menu items are displayed.4.Select "Scan" and press the controller.
Scan starts.
To stop the scan:
1.Press the controller.
2.Select "Scan" and press the controller.
This cancels the scan search, and the radio
remains on the current station.
Selecting frequency manually
Control Center, for principle details, refer to
page16.
1.Select "FM" or "AM".
2.Press the controller.
3.Move the controller forward to change the
field.
4.Select "Manual" and press the controller.
5.Turn the controller to set a certain fre-
quency.
Updating stations with best reception
If you are on a longer journey and leave the
transmission range of the stations originally set,
you can update the list of stations with the best
reception.
Page 193 of 221
Giving and receiving assistance
192
Vehicles with manual transmission
Gearshift lever in neutral position.
Vehicles with automatic transmission
Selector lever in position N.
Do not exceed a towing speed of 45 mph/
70 km/h and a towing distance of
90 miles/150 km, as otherwise the automatic
transmission may be damaged.<
Vehicles with SMG Sequential manual
transmission
With the ignition switched on, engage the
selector lever position N, then switch off the
ignition again.
Towing methods
In some countries, towing with tow bars or
ropes in public traffic is not permitted. Familiar-
ize yourself with the regulations on towing in the
respective country.
With tow bar
The towing vehicle may not be lighter
than the vehicle to be towed, as otherwise
it will not be possible to control vehicle
response.<
The tow fittings used should be on the same
side on both vehicles. Should it prove impossi-
ble to avoid mounting the tow bar at an offset
angle, please observe the following:
>Clearance and maneuvering capability will
be sharply limited during cornering.
>When mounted at an angle, the tow bar will
exert lateral forces, tending to push the
vehicle sideways.
Secure the tow bar to the tow fitting only.
Otherwise damage to other vehicle parts
could result.<
With tow rope
When starting off in the towing vehicle, make
sure that the tow rope is taut.To avoid jerking and the associated
stresses on vehicle components when
towing, always use nylon ropes or nylon straps.
Secure the tow rope to the tow fitting only.
Otherwise damage to other vehicle parts could
result.<
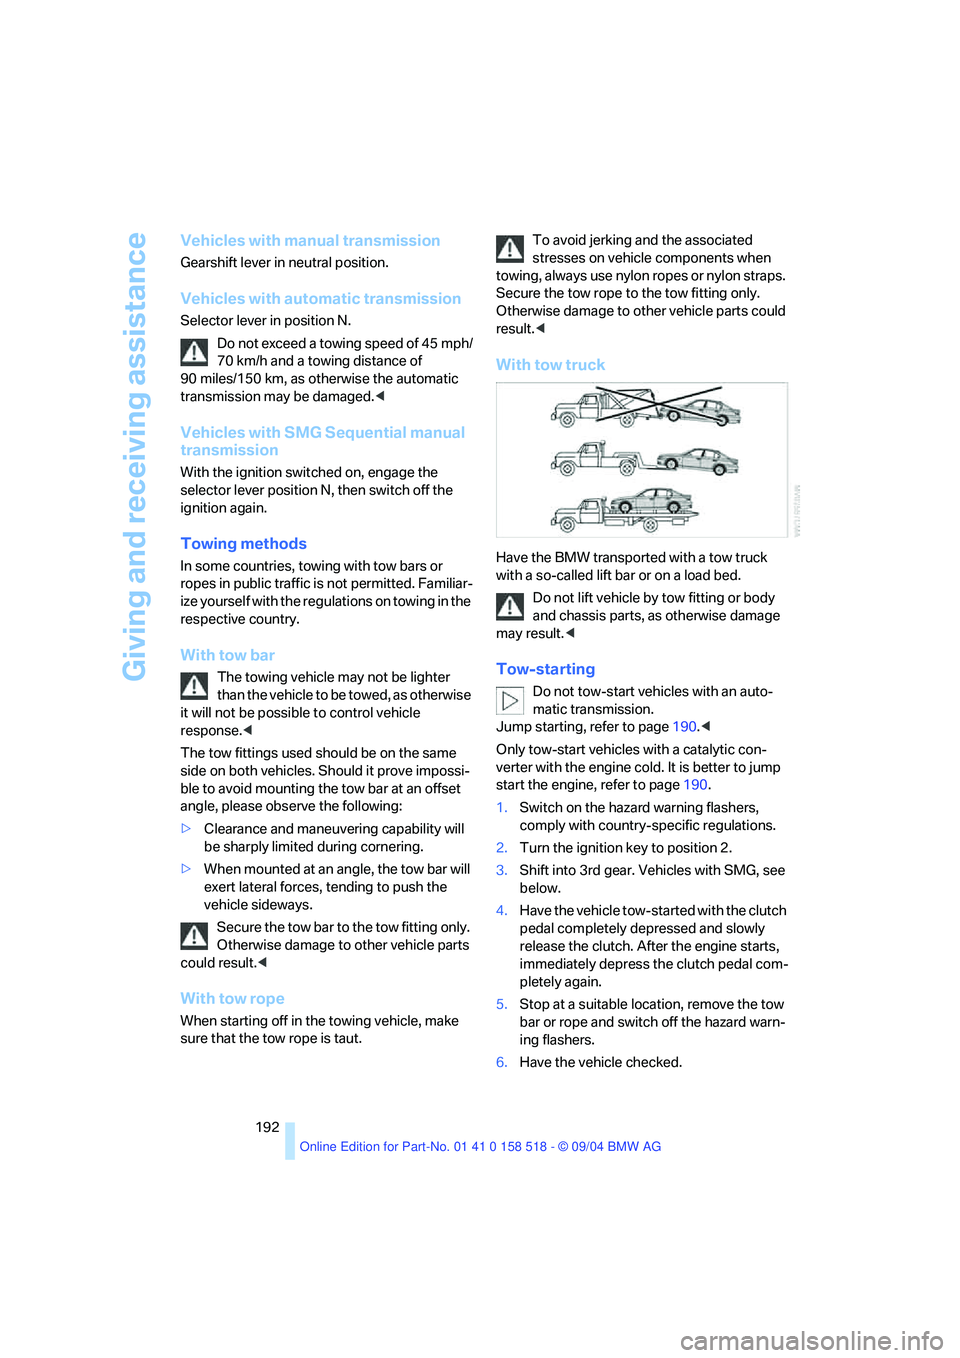
With tow truck
Have the BMW transported with a tow truck
with a so-called lift bar or on a load bed.
Do not lift vehicle by tow fitting or body
and chassis parts, as otherwise damage
may result.<
Tow-starting
Do not tow-start vehicles with an auto-
matic transmission.
Jump starting, refer to page190.<
Only tow-start vehicles with a catalytic con-
verter with the engine cold. It is better to jump
start the engine, refer to page190.
1.Switch on the hazard warning flashers,
comply with country-specific regulations.
2.Turn the ignition key to position 2.
3.Shift into 3rd gear. Vehicles with SMG, see
below.
4.Have the vehicle tow-started with the clutch
pedal completely depressed and slowly
release the clutch. After the engine starts,
immediately depress the clutch pedal com-
pletely again.
5.Stop at a suitable location, remove the tow
bar or rope and switch off the hazard warn-
ing flashers.
6.Have the vehicle checked.
Page 199 of 221
Technical data
198
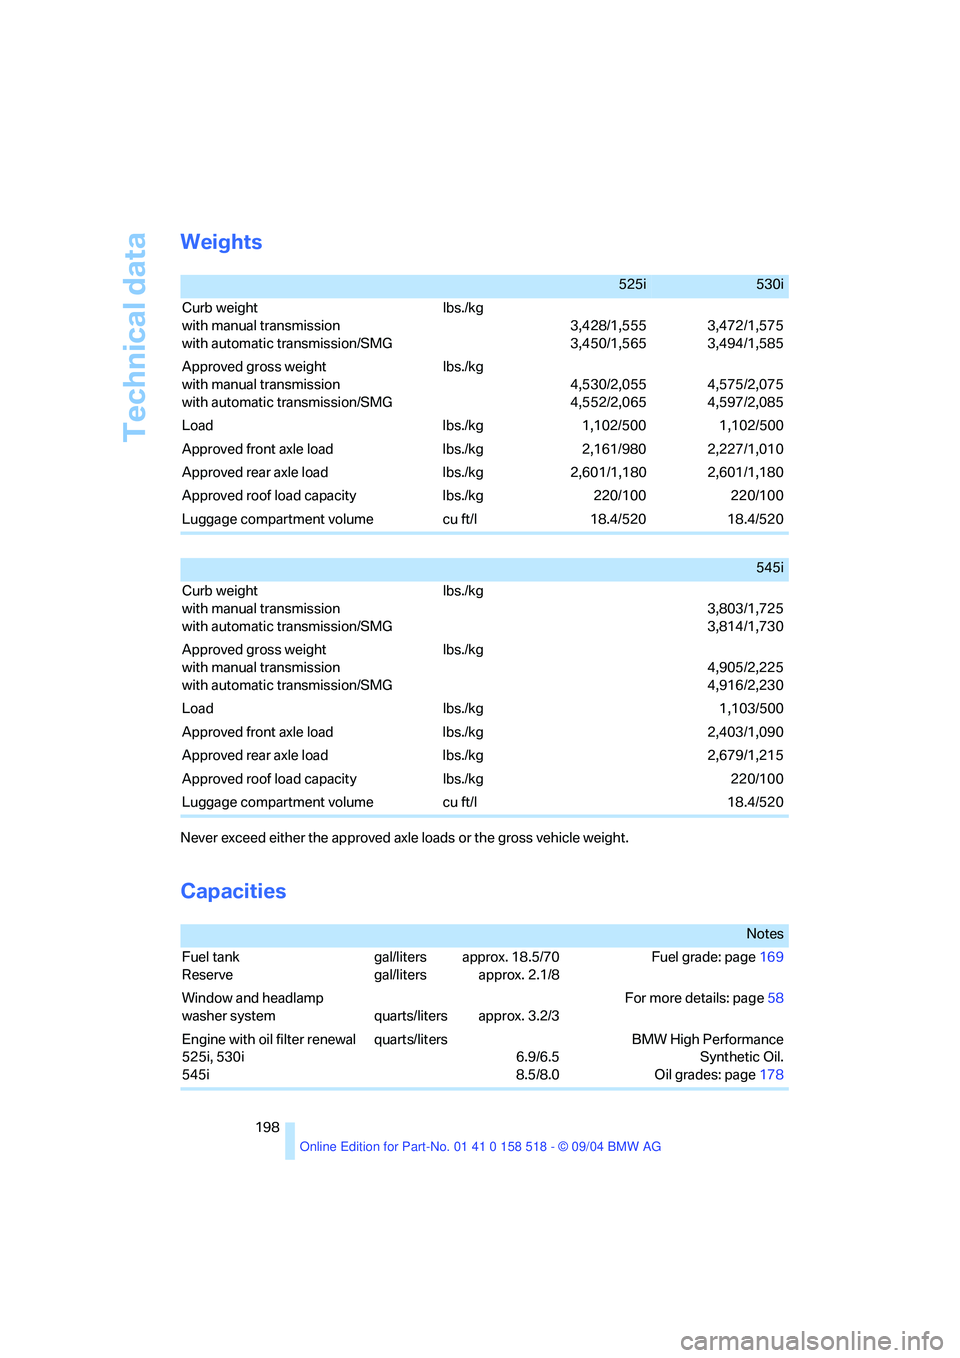
Weights
Never exceed either the approved axle loads or the gross vehicle weight.
Capacities
525i530i
Curb weight
with manual transmission
with automatic transmission/SMG lbs./kg
3,428/1,555
3,450/1,5653,472/1,575
3,494/1,585
Approved gross weight
with manual transmission
with automatic transmission/SMG lbs./kg
4,530/2,055
4,552/2,0654,575/2,075
4,597/2,085
Load lbs./kg 1,102/500 1,102/500
Approved front axle load lbs./kg 2,161/980 2,227/1,010
Approved rear axle load lbs./kg 2,601/1,180 2,601/1,180
Approved roof load capacity lbs./kg 220/100 220/100
Luggage compartment volume cu ft/l 18.4/520 18.4/520
545i
Curb weight
with manual transmission
with automatic transmission/SMG lbs./kg
3,803/1,725
3,814/1,730
Approved gross weight
with manual transmission
with automatic transmission/SMG lbs./kg
4,905/2,225
4,916/2,230
Load lbs./kg 1,103/500
Approved front axle load lbs./kg 2,403/1,090
Approved rear axle load lbs./kg 2,679/1,215
Approved roof load capacity lbs./kg 220/100
Luggage compartment volume cu ft/l 18.4/520
Notes
Fuel tank
Reserve gal/liters
gal/litersapprox. 18.5/70
approx. 2.1/8Fuel grade: page169
Window and headlamp
washer system quarts/liters approx. 3.2/3For more details: page58
Engine with oil filter renewal
525i, 530i
545iquarts/liters
6.9/6.5
8.5/8.0BMW High Performance
Synthetic Oil.
Oil grades: page178
Page 203 of 221
Everything from A to Z
202
Everything from A to Z
Index
"..." Identifies Control Display
texts used to select
individual functions,
pointing out where these are
located.
A
ABS Antilock Brake
System77
– indicator lamp79
– malfunction79
ACC, refer to Active cruise
control59
Acceleration assistant for
SMG Sequential manual
transmission55
Accessories6
Acoustic Signal, refer to
Check Control67
Activated-charcoal filter94
"Activation time" for
independent ventilation94
Active cruise control59
– indicator lamp60
– malfunction64
– selecting distance62
– sensor, refer to
Malfunction64
Active head restraints,
front42
Active roll stabilization79
Active seat44
Active seat ventilation44
Active steering81
– initializing system81
– warning lamp81
Adaptive Head Light88
"Add digits" for portable
phone155
"Address book" for
navigation120Address for navigation
– deleting121
– entering115
– selecting121
– storing current position120
"Add to destination list"117
Adhesive bandages, refer to
First-aid kit189
Adjusting active backrest
width40
Adjusting temperature in
upper body region93
Adjusting the temperature
with automatic climate
control91
Adjusting the thigh support39
Adjusting the tone during
audio operation, refer to
Tone control133
Adjustment in audio mode
– front-to-rear134
– right/left balance134
"After opening door"41
"After unlocking"41
Airbags83
– sitting safely38
– warning lamp84
Air circulation, refer to Air
recirculation91
Air distribution
– automatic91
– manual92
Airing, refer to Ventilation93
Air recirculation
– AUC Automatic recircu-
lated-air control91
– recirculated-air mode91
"Air recirculation on / off"46
Air vent outlets of automatic
climate control90
Air vents90
– refer to Ventilation93
Air volume91AKI, refer to Fuel
specifications169
Alarm system33
– avoiding unintentional
alarms34
– interior motion sensor34
– switching off the alarm34
– switching off the tilt alarm
sensor and interior motion
sensor34
– tilt alarm sensor34
All around the center
console14
All around the steering
wheel10
"All channels"143
"All doors"29
All-season tires, refer to
Winter tires175
Altering stretch of road127
"AM", reception
range133,138
Antenna for portable
phone152
Antifreeze
– coolant178
– washer fluid58
Antilock Brake System
ABS77
– indicator lamp79
Anti-theft alarm system, refer
to Alarm system33
Anti-theft system29
Anti-trapping mechanism
– glass sunroof, electric36
– power windows35
Approved axle loads, refer to
Weights198
Approved gross vehicle
weight, refer to Weights198
Armrest, refer to Center
armrest
– rear100