2005 BMW 330XI SEDAN engine
[x] Cancel search: enginePage 169 of 223
Refueling
168
Refueling
Always switch off the engine before refu-
eling. If you do not, fuel cannot be filled
into the tank and a message will appear on the
Control Display.<
Always observe all applicable precautions
and regulations when handling fuels.
Never carry spare fuel containers in your vehi-
cle. Whether empty or full, these containers can
leak, cause an explosion, or lead to fire in the
event of a collision.<
Gas cap
Opening
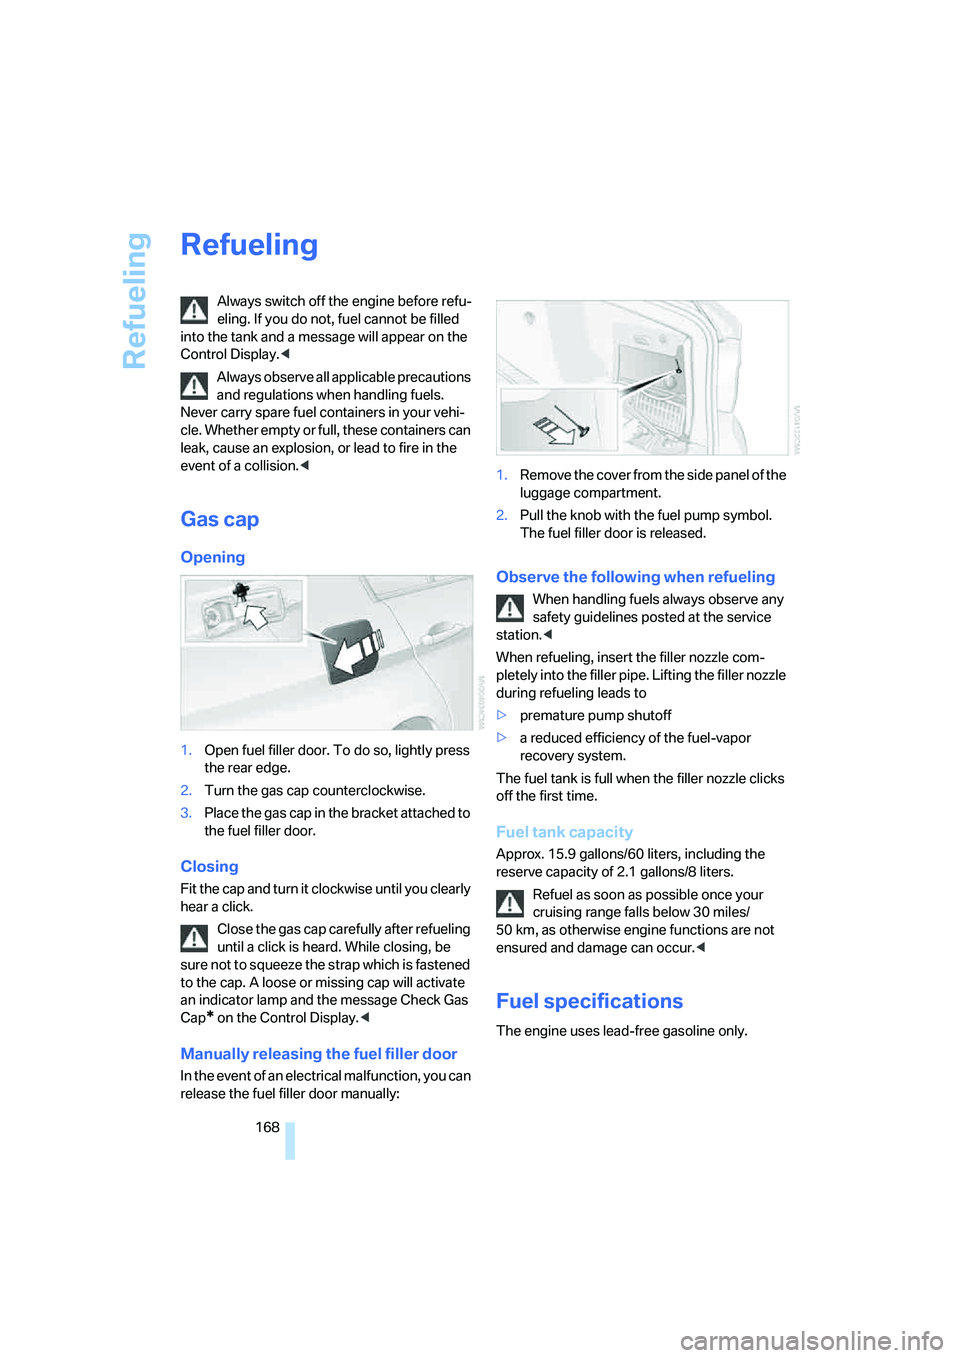
1.Open fuel filler door. To do so, lightly press
the rear edge.
2.Turn the gas cap counterclockwise.
3.Place the gas cap in the bracket attached to
the fuel filler door.
Closing
Fit the cap and turn it clockwise until you clearly
hear a click.
Close the gas cap carefully after refueling
until a click is heard. While closing, be
sure not to squeeze the strap which is fastened
to the cap. A loose or missing cap will activate
an indicator lamp and the message Check Gas
Cap
* on the Control Display.<
Manually releasing the fuel filler door
In the event of an electrical malfunction, you can
release the fuel filler door manually:1.Remove the cover from the side panel of the
luggage compartment.
2.Pull the knob with the fuel pump symbol.
The fuel filler door is released.
Observe the following when refueling
When handling fuels always observe any
safety guidelines posted at the service
station.<
When refueling, insert the filler nozzle com-
pletely into the filler pipe. Lifting the filler nozzle
during refueling leads to
>premature pump shutoff
>a reduced efficiency of the fuel-vapor
recovery system.
The fuel tank is full when the filler nozzle clicks
off the first time.
Fuel tank capacity
Approx. 15.9 gallons/60 liters, including the
reserve capacity of 2.1 gallons/8 liters.
Refuel as soon as possible once your
cruising range falls below 30 miles/
50 km, as otherwise engine functions are not
ensured and damage can occur.<
Fuel specifications
The engine uses lead-free gasoline only.
Page 170 of 223
Mobility
169Reference
At a glance
Controls
Driving tips
Communications
Navigation
Entertainment
Required fuel
Premium Unleaded Gasoline
The minimum octane rating is 91.
If you use gasoline with this minimum octane
rating, the engine may produce knocking
sounds when starting at high outside tempera-
tures. This has no affect on the engine life.
Minimum octane rating corresponds to the Anti
Knock Index AKI and is determined according
to the so-called (R+M)/2 method.
Do not fill the tank with leaded fuel, as this
would cause permanent damage to the
catalytic converter.<
Use high-quality brands
Field experience has indicated significant dif-
ferences in fuel quality: volatility, composition,
additives, etc., among gasolines offered for sale
in the United States and Canada. Fuels contain-
ing up to and including 10 % ethanol or other
oxygenates with up to 2.8 % oxygen by weight,
that is, 15 % MTBE or 3 % methanol plus an
equivalent amount of co-solvent, will not void
the applicable warranties with respect to
defects in materials or workmanship.
The use of poor-quality fuels may result in
drivability, starting and stalling problems
especially under certain environmental condi-
tions such as high ambient temperature and
high altitude.
Should you encounter drivability problems
which you suspect could be related to the fuel
you are using, we recommend that you respond
by switching to a recognized high-quality
brand.
Failure to comply with these recommendations
may also result in unscheduled maintenance.<
Page 182 of 223
Mobility
181Reference
At a glance
Controls
Driving tips
Communications
Navigation
Entertainment
Engine compartment
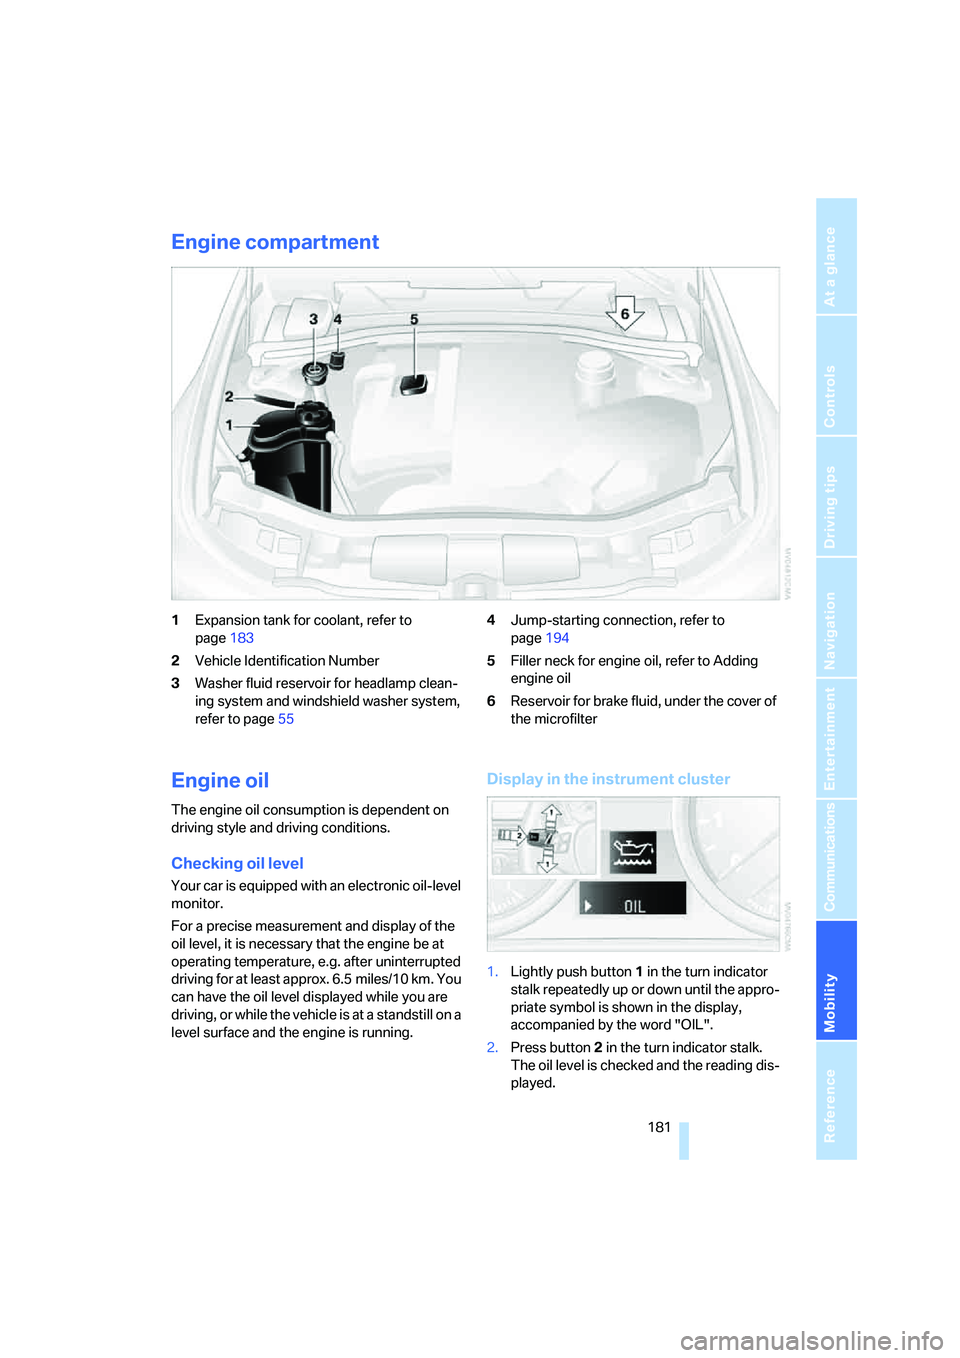
1Expansion tank for coolant, refer to
page183
2Vehicle Identification Number
3Washer fluid reservoir for headlamp clean-
ing system and windshield washer system,
refer to page554Jump-starting connection, refer to
page194
5Filler neck for engine oil, refer to Adding
engine oil
6Reservoir for brake fluid, under the cover of
the microfilter
Engine oil
The engine oil consumption is dependent on
driving style and driving conditions.
Checking oil level
Your car is equipped with an electronic oil-level
monitor.
For a precise measurement and display of the
oil level, it is necessary that the engine be at
operating temperature, e.g. after uninterrupted
driving for at least approx. 6.5 miles/10 km. You
can have the oil level displayed while you are
driving, or while the vehicle is at a standstill on a
level surface and the engine is running.
Display in the instrument cluster
1.Lightly push button 1 in the turn indicator
stalk repeatedly up or down until the appro-
priate symbol is shown in the display,
accompanied by the word "OIL".
2.Press button 2 in the turn indicator stalk.
The oil level is checked and the reading dis-
played.
Page 183 of 223
Under the hood
182
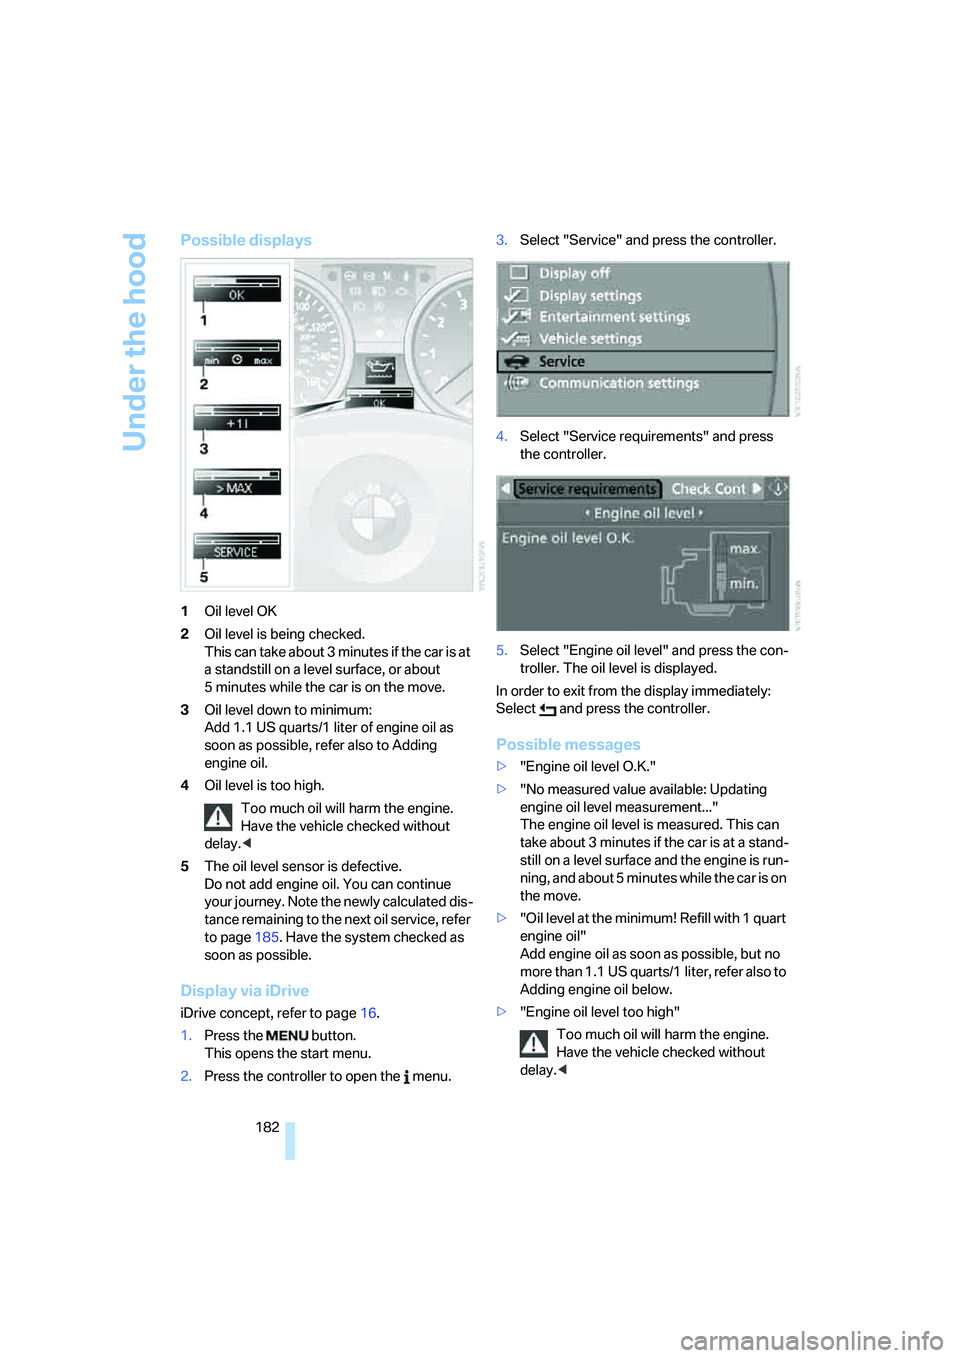
Possible displays
1Oil level OK
2Oil level is being checked.
This can take about 3 minutes if the car is at
a standstill on a level surface, or about
5 minutes while the car is on the move.
3Oil level down to minimum:
Add 1.1 US quarts/1 liter of engine oil as
soon as possible, refer also to Adding
engine oil.
4Oil level is too high.
Too much oil will harm the engine.
Have the vehicle checked without
delay.<
5The oil level sensor is defective.
Do not add engine oil. You can continue
your journey. Note the newly calculated dis-
tance remaining to the next oil service, refer
to page185. Have the system checked as
soon as possible.
Display via iDrive
iDrive concept, refer to page16.
1.Press the button.
This opens the start menu.
2.Press the controller to open the menu.3.Select "Service" and press the controller.
4.Select "Service requirements" and press
the controller.
5.Select "Engine oil level" and press the con-
troller. The oil level is displayed.
In order to exit from the display immediately:
Select and press the controller.
Possible messages
>"Engine oil level O.K."
>"No measured value available: Updating
engine oil level measurement..."
The engine oil level is measured. This can
take about 3 minutes if the car is at a stand-
still on a level surface and the engine is run-
ning, and about 5 minutes while the car is on
the move.
>"Oil level at the minimum! Refill with 1 quart
engine oil"
Add engine oil as soon as possible, but no
more than 1.1 US quarts/1 liter, refer also to
Adding engine oil below.
>"Engine oil level too high"
Too much oil will harm the engine.
Have the vehicle checked without
delay.<
Page 184 of 223
Mobility
183Reference
At a glance
Controls
Driving tips
Communications
Navigation
Entertainment
>"Please observe recalculated service inter-
val for engine oil"
Do not add engine oil. You can continue
your journey. Note the newly calculated dis-
tance remaining to the next oil service, refer
to page185. Have the system checked as
soon as possible.
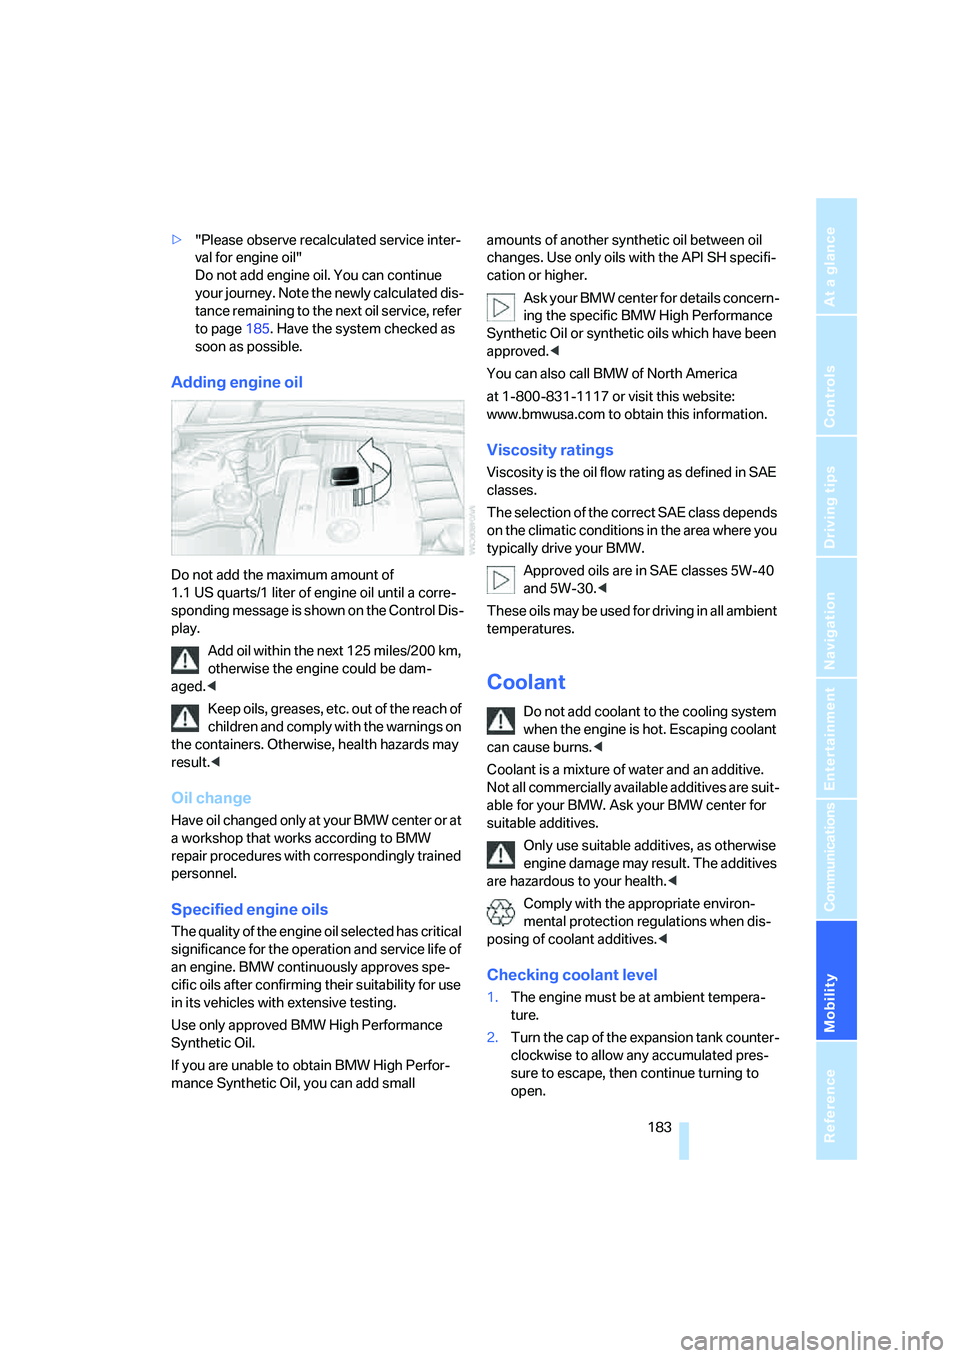
Adding engine oil
Do not add the maximum amount of
1.1 US quarts/1 liter of engine oil until a corre-
sponding message is shown on the Control Dis-
play.
Add oil within the next 125 miles/200 km,
otherwise the engine could be dam-
aged.<
Keep oils, greases, etc. out of the reach of
children and comply with the warnings on
the containers. Otherwise, health hazards may
result.<
Oil change
Have oil changed only at y our B MW c ente r o r a t
a workshop that works according to BMW
repair procedures with correspondingly trained
personnel.
Specified engine oils
The quality of the engine oil selected has critical
significance for the operation and service life of
an engine. BMW continuously approves spe-
cific oils after confirming their suitability for use
in its vehicles with extensive testing.
Use only approved BMW High Performance
Synthetic Oil.
If you are unable to obtain BMW High Perfor-
mance Synthetic Oil, you can add small amounts of another synthetic oil between oil
changes. Use only oils with the API SH specifi-
cation or higher.
Ask your BMW center for details concern-
ing the specific BMW High Performance
Synthetic Oil or synthetic oils which have been
approved.<
You can also call BMW of North America
at 1-800-831-1117 or visit this website:
www.bmwusa.com to obtain this information.
Viscosity ratings
Viscosity is the oil flow rating as defined in SAE
classes.
The selection of the correct SAE class depends
on the climatic conditions in the area where you
typically drive your BMW.
Approved oils are in SAE classes 5W-40
and 5W-30.<
These oils may be used for driving in all ambient
temperatures.
Coolant
Do not add coolant to the cooling system
when the engine is hot. Escaping coolant
can cause burns.<
Coolant is a mixture of water and an additive.
Not all commercially available additives are suit-
able for your BMW. Ask your BMW center for
suitable additives.
Only use suitable additives, as otherwise
engine damage may result. The additives
are hazardous to your health.<
Comply with the appropriate environ-
mental protection regulations when dis-
posing of coolant additives.<
Checking coolant level
1.The engine must be at ambient tempera-
ture.
2.Turn the cap of the expansion tank counter-
clockwise to allow any accumulated pres-
sure to escape, then continue turning to
open.
Page 186 of 223
Mobility
185Reference
At a glance
Controls
Driving tips
Communications
Navigation
Entertainment
Maintenance
The BMW Maintenance
System
The BMW Maintenance System supports the
preservation of the traffic and operating safety
of your BMW. The service schedule also
includes operations related to the vehicle's
comfort and convenience features, such as
replacement of the filters for the inside air. The
objective is to optimize efforts with respect to
minimal vehicle maintenance costs.
If and when you come to sell your BMW, a com-
prehensive record of servicing will prove a sig-
nificant benefit.
CBS Condition Based Service
Sensors and special algorithms take the differ-
ent driving conditions of your BMW into
account. Condition Based Service uses this to
determine the current and future service
requirements. By letting you define a service
and maintenance regimen that reflects your
own individual requirements, the system builds
the basis for trouble-free driving.
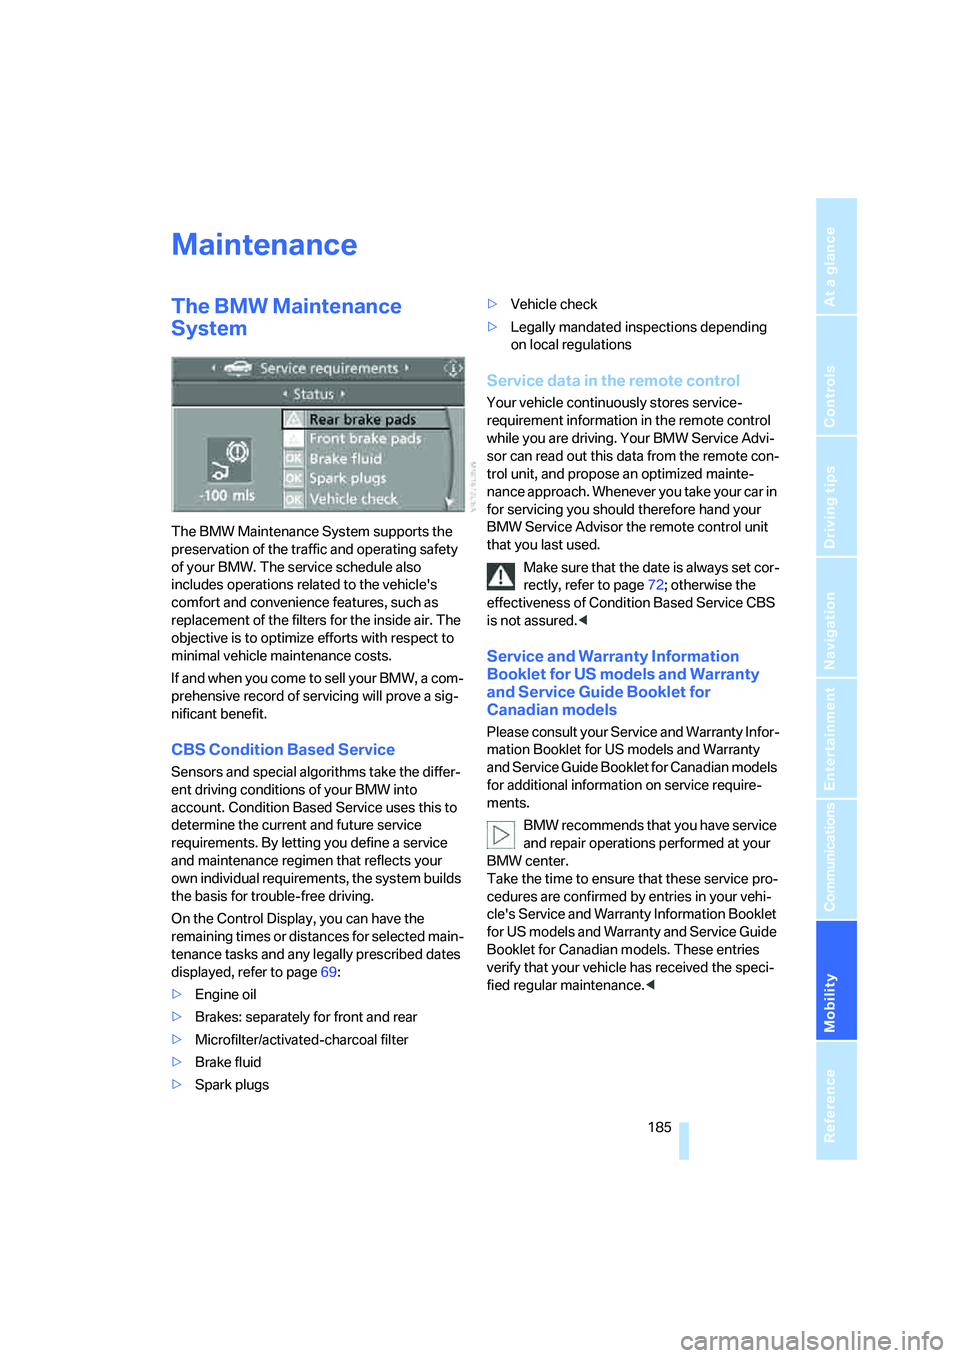
On the Control Display, you can have the
remaining times or distances for selected main-
tenance tasks and any legally prescribed dates
displayed, refer to page69:
>Engine oil
>Brakes: separately for front and rear
>Microfilter/activated-charcoal filter
>Brake fluid
>Spark plugs>Vehicle check
>Legally mandated inspections depending
on local regulations
Service data in the remote control
Your vehicle continuously stores service-
requirement information in the remote control
while you are driving. Your BMW Service Advi-
sor can read out this data from the remote con-
trol unit, and propose an optimized mainte-
nance approach. Whenever you take your car in
for servicing you should therefore hand your
BMW Service Advisor the remote control unit
that you last used.
Make sure that the date is always set cor-
rectly, refer to page72; otherwise the
effectiveness of Condition Based Service CBS
is not assured.<
Service and Warranty Information
Booklet for US models and Warranty
and Service Guide Booklet for
Canadian models
Please consult your Service and Warranty Infor-
mation Booklet for US models and Warranty
and Service Guide Booklet for Canadian models
for additional information on service require-
ments.
BMW recommends that you have service
and repair operations performed at your
BMW center.
Take the time to ensure that these service pro-
cedures are confirmed by entries in your vehi-
cle's Service and Warranty Information Booklet
for US models and Warranty and Service Guide
Booklet for Canadian models. These entries
verify that your vehicle has received the speci-
fied regular maintenance.<
Page 187 of 223
Maintenance
186
OBD Socket
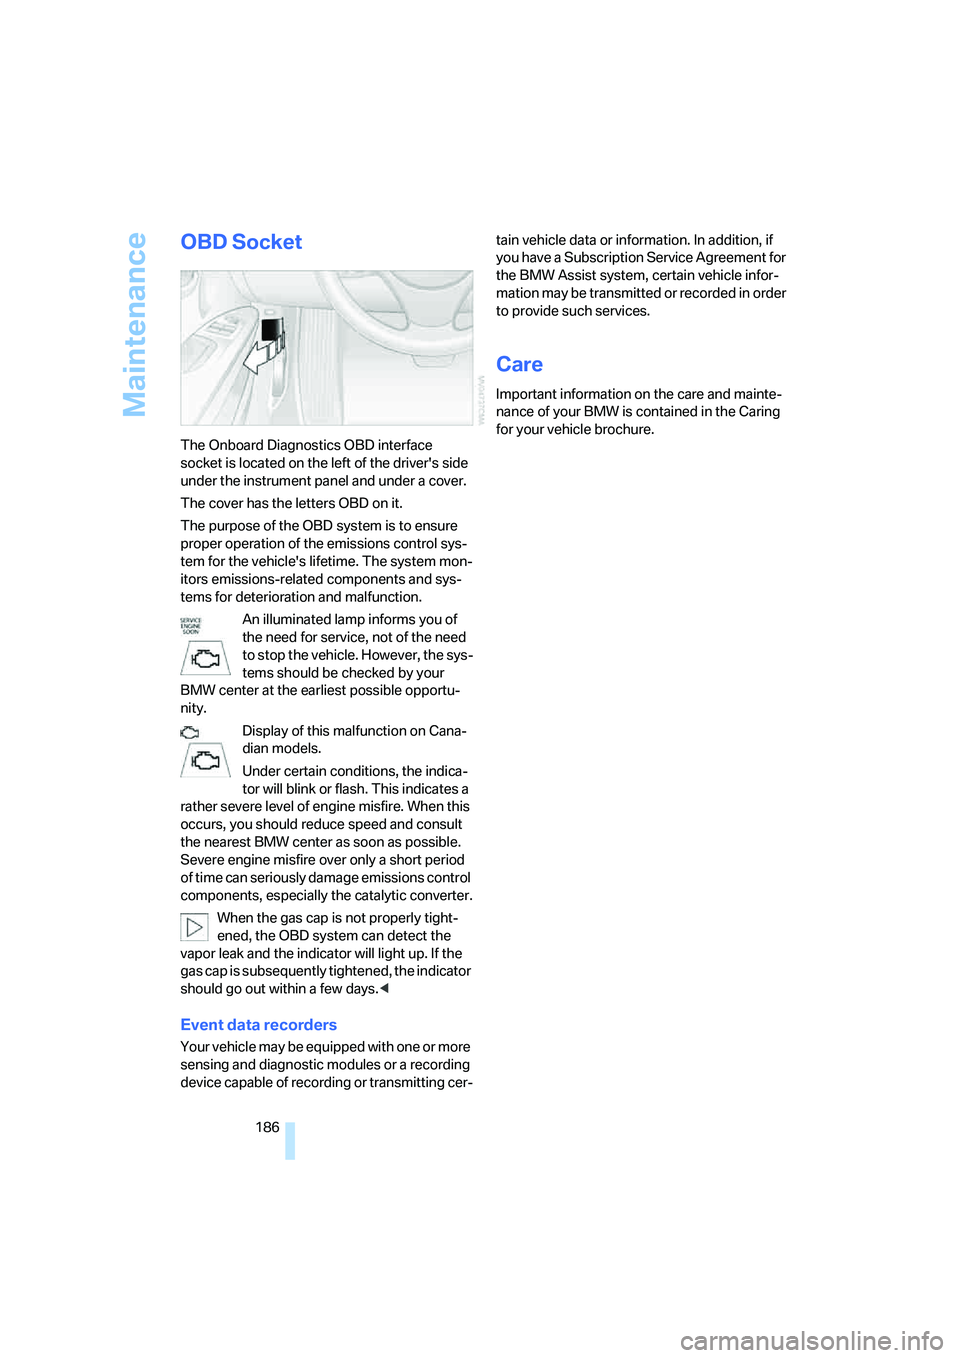
The Onboard Diagnostics OBD interface
socket is located on the left of the driver's side
under the instrument panel and under a cover.
The cover has the letters OBD on it.
The purpose of the OBD system is to ensure
proper operation of the emissions control sys-
tem for the vehicle's lifetime. The system mon-
itors emissions-related components and sys-
tems for deterioration and malfunction.
An illuminated lamp informs you of
the need for service, not of the need
to stop the vehicle. However, the sys-
tems should be checked by your
BMW center at the earliest possible opportu-
nity.
Display of this malfunction on Cana-
dian models.
Under certain conditions, the indica-
tor will blink or flash. This indicates a
rather severe level of engine misfire. When this
occurs, you should reduce speed and consult
the nearest BMW center as soon as possible.
Severe engine misfire over only a short period
of time can seriously damage emissions control
components, especially the catalytic converter.
When the gas cap is not properly tight-
ened, the OBD system can detect the
vapor leak and the indicator will light up. If the
gas cap is subsequently tightened, the indicator
should go out within a few days.<
Event data recorders
Your vehicle may be equipped with one or more
sensing and diagnostic modules or a recording
device capable of recording or transmitting cer-tain vehicle data or information. In addition, if
you have a Subscription Service Agreement for
the BMW Assist system, certain vehicle infor-
mation may be transmitted or recorded in order
to provide such services.
Care
Important information on the care and mainte-
nance of your BMW is contained in the Caring
for your vehicle brochure.
Page 188 of 223
Mobility
187Reference
At a glance
Controls
Driving tips
Communications
Navigation
Entertainment
Replacing components
Onboard tool kit
The onboard tool kit is stored in a compartment
on the right-hand side of the luggage compart-
ment. Remove the cover.
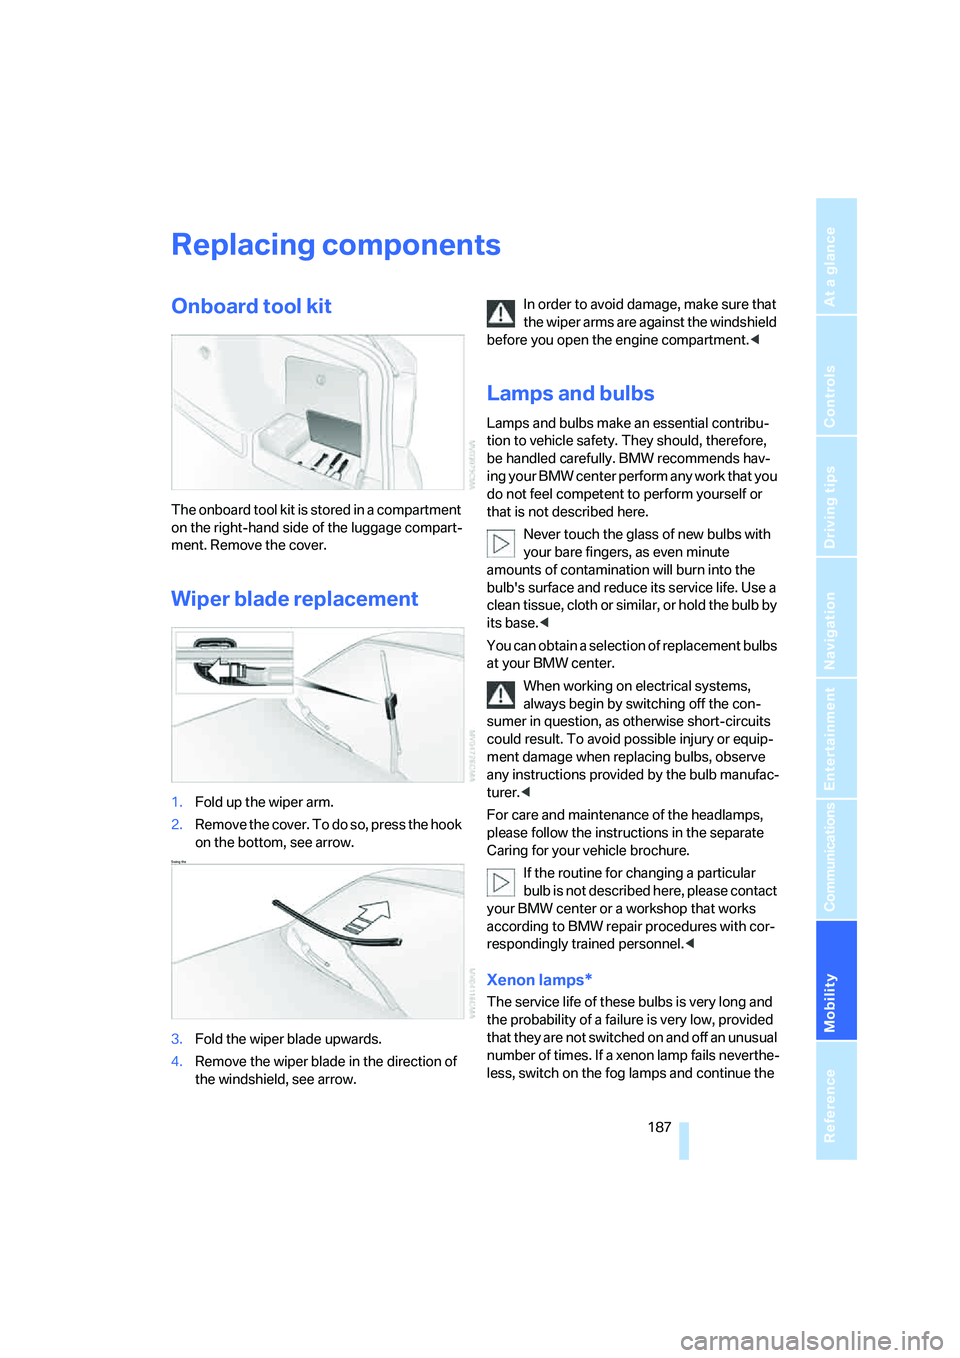
Wiper blade replacement
1.Fold up the wiper arm.
2.Remove the cover. To do so, press the hook
on the bottom, see arrow.
Swing the
3.Fold the wiper blade upwards.
4.Remove the wiper blade in the direction of
the windshield, see arrow.In order to avoid damage, make sure that
the wiper arms are against the windshield
before you open the engine compartment.<
Lamps and bulbs
Lamps and bulbs make an essential contribu-
tion to vehicle safety. They should, therefore,
be handled carefully. BMW recommends hav-
ing your BMW center perform any work that you
do not feel competent to perform yourself or
that is not described here.
Never touch the glass of new bulbs with
your bare fingers, as even minute
amounts of contamination will burn into the
bulb's surface and reduce its service life. Use a
clean tissue, cloth or similar, or hold the bulb by
its base.<
You can obtain a selection of replacement bulbs
at your BMW center.
When working on electrical systems,
always begin by switching off the con-
sumer in question, as otherwise short-circuits
could result. To avoid possible injury or equip-
ment damage when replacing bulbs, observe
any instructions provided by the bulb manufac-
turer.<
For care and maintenance of the headlamps,
please follow the instructions in the separate
Caring for your vehicle brochure.
If the routine for changing a particular
bulb is not described here, please contact
your BMW center or a workshop that works
according to BMW repair procedures with cor-
respondingly trained personnel.<
Xenon lamps*
The service life of these bulbs is very long and
the probability of a failure is very low, provided
that they are not switched on and off an unusual
number of times. If a xenon lamp fails neverthe-
less, switch on the fog lamps and continue the