2005 BMW 330XI SEDAN remote control
[x] Cancel search: remote controlPage 95 of 223
Practical interior accessories
94 The corresponding memory button 1 is now
programmed with the signal of the original
hand-held transmitter.
You can operate the system when the engine is
running or when the ignition is switched on.
If the system fails to function even after
repeated programming, check whether
the original hand-held transmitter uses an alter-
nating-code system. To do so, either read the
instructions for the original hand-held transmit-
ter or hold down the programmed memory
button1 of the integrated universal remote
control. If the LED2 on the integrated universal
remote control flashes rapidly for a short while
and then remains lit for about two seconds, the
original hand-held transmitter uses an alternat-
ing-code system. If it uses an alternating-code
system, program the memory buttons1 as
described under Alternating-code hand-held
transmitters.<
Alternating-code hand-held
transmitters
To program the integrated universal remote
control, consult the operating instructions for
the device to be set. You will find information
there on the possibilities for synchronization.
When programming hand-held transmitters that employ an alternating code, please observe
the following supplementary instructions:
Programming will be easier with the aid of
a second person.<
1.Park your vehicle within the range of the
remote-controlled device.
2.Program the integrated universal remote
control as described above in the section
Fixed-code hand-held transmitters.
3.Locate the button on the receiver of the
device to be set, e.g. on the drive unit.
4.Press the button on the receiver of the
device to be set. After step 4, you have
approx. 30 seconds for step 5.
5.Press the programmed memory button1 of
the integrated universal remote control
three times.
The corresponding memory button 1 is now
programmed with the signal of the original
hand-held transmitter.
If you have any questions, please contact
your BMW center.<
Deleting stored programs
Press both outer memory buttons1 for approx.
20 seconds until the LED2 flashes: all stored
programs are cleared.
It is not possible to clear individual programs.
Interior rearview mirror with digital compass*
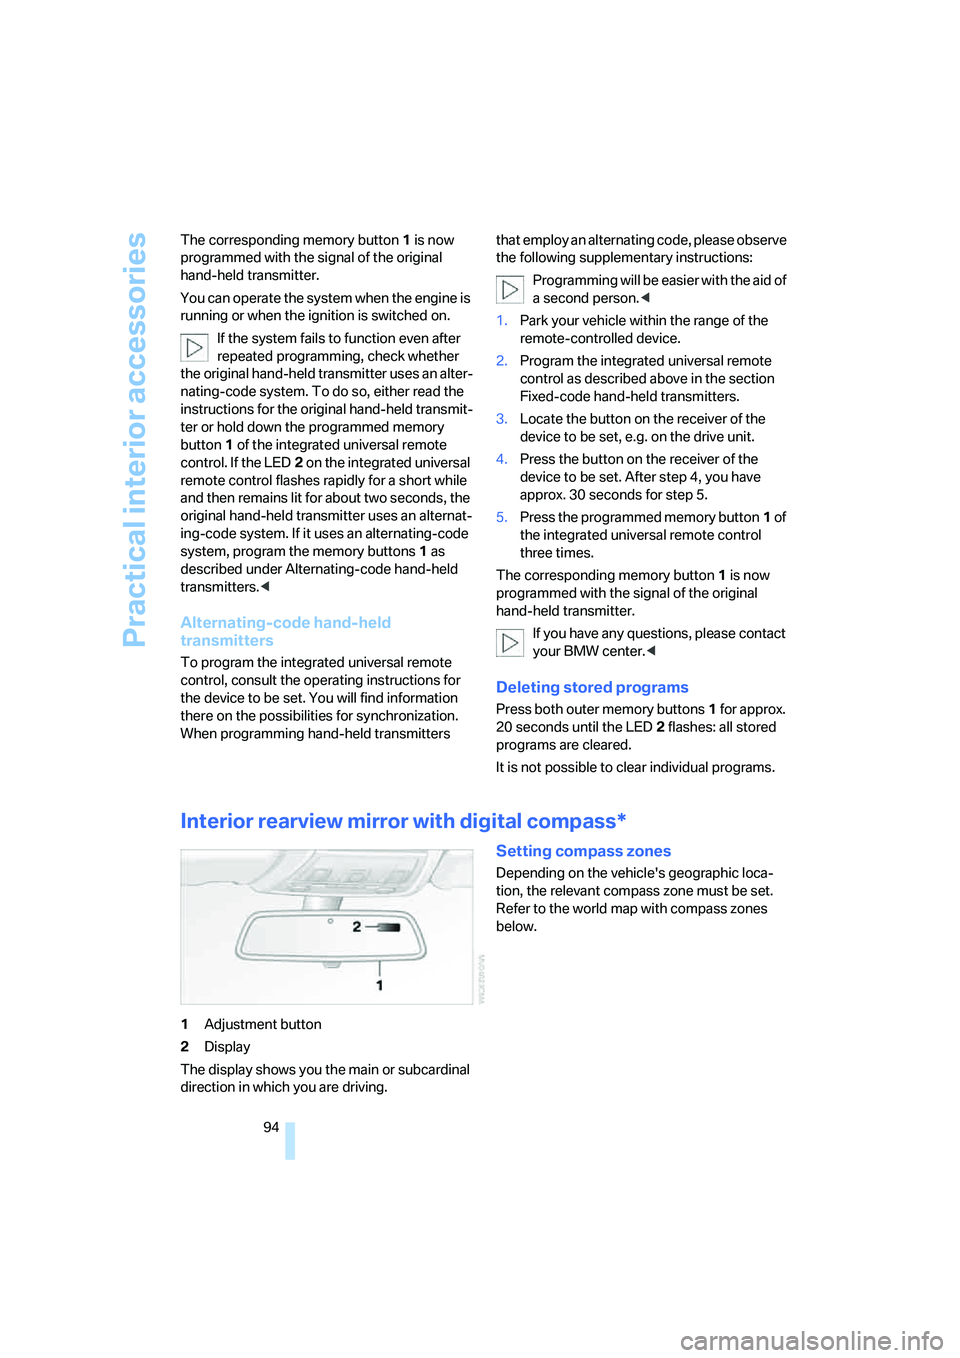
1Adjustment button
2Display
The display shows you the main or subcardinal
direction in which you are driving.
Setting compass zones
Depending on the vehicle's geographic loca-
tion, the relevant compass zone must be set.
Refer to the world map with compass zones
below.
Page 97 of 223
Practical interior accessories
96
Roller sun blind for rear side window
Pull loop of roller sun blind and hook onto
bracket.
Glove compartment
Opening
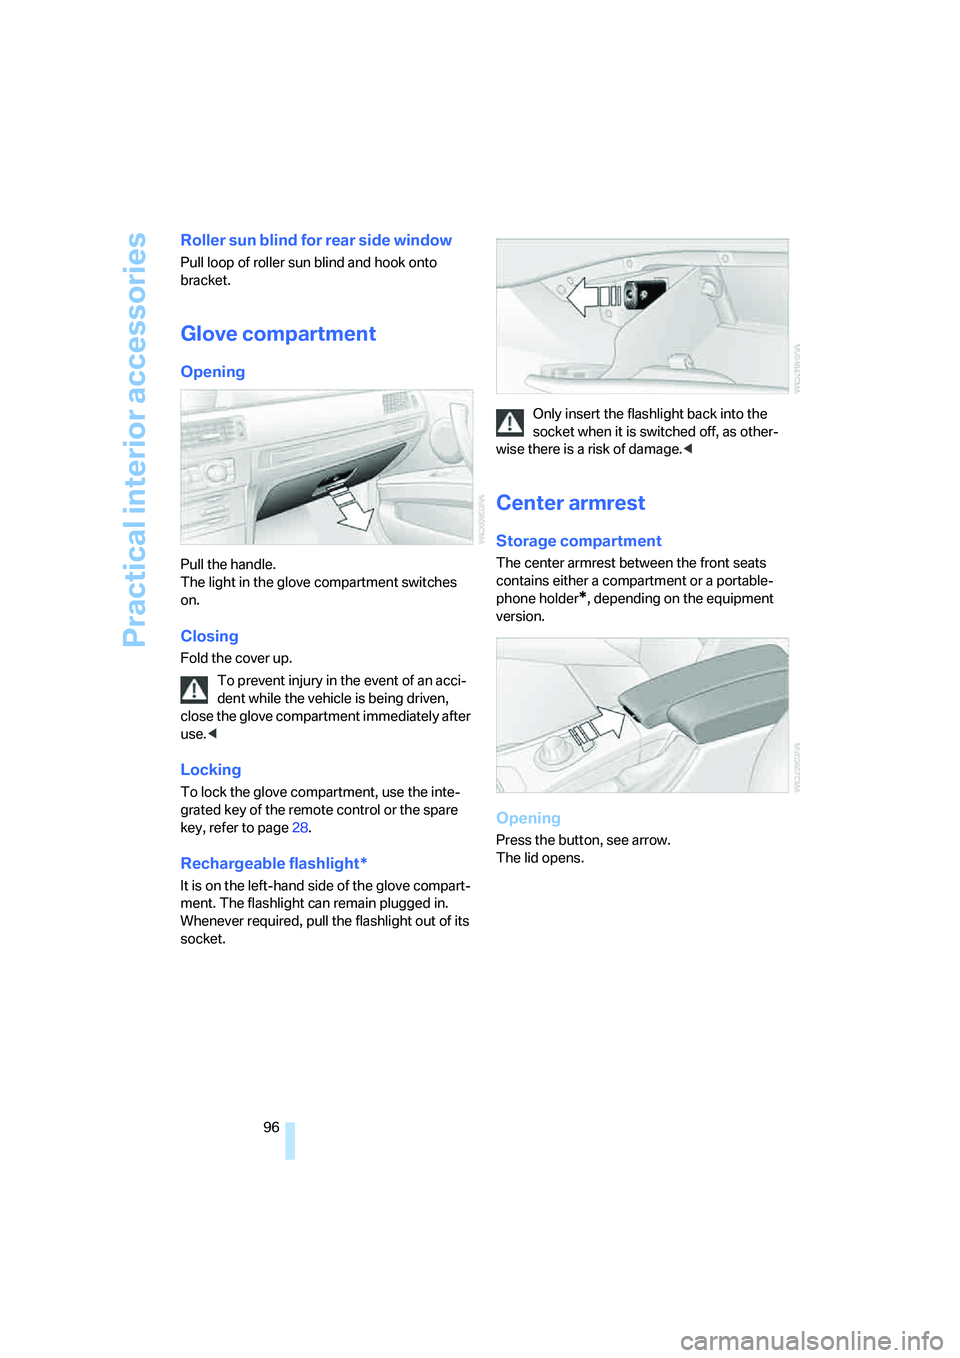
Pull the handle.
The light in the glove compartment switches
on.
Closing
Fold the cover up.
To prevent injury in the event of an acci-
dent while the vehicle is being driven,
close the glove compartment immediately after
use.<
Locking
To lock the glove compartment, use the inte-
grated key of the remote control or the spare
key, refer to page28.
Rechargeable flashlight*
It is on the left-hand side of the glove compart-
ment. The flashlight can remain plugged in.
Whenever required, pull the flashlight out of its
socket.Only insert the flashlight back into the
socket when it is switched off, as other-
wise there is a risk of damage.<
Center armrest
Storage compartment
The center armrest between the front seats
contains either a compartment or a portable-
phone holder
*, depending on the equipment
version.
Opening
Press the button, see arrow.
The lid opens.
Page 100 of 223
Controls
99Reference
At a glance
Driving tips
Communications
Navigation
Entertainment
Mobility
Emptying
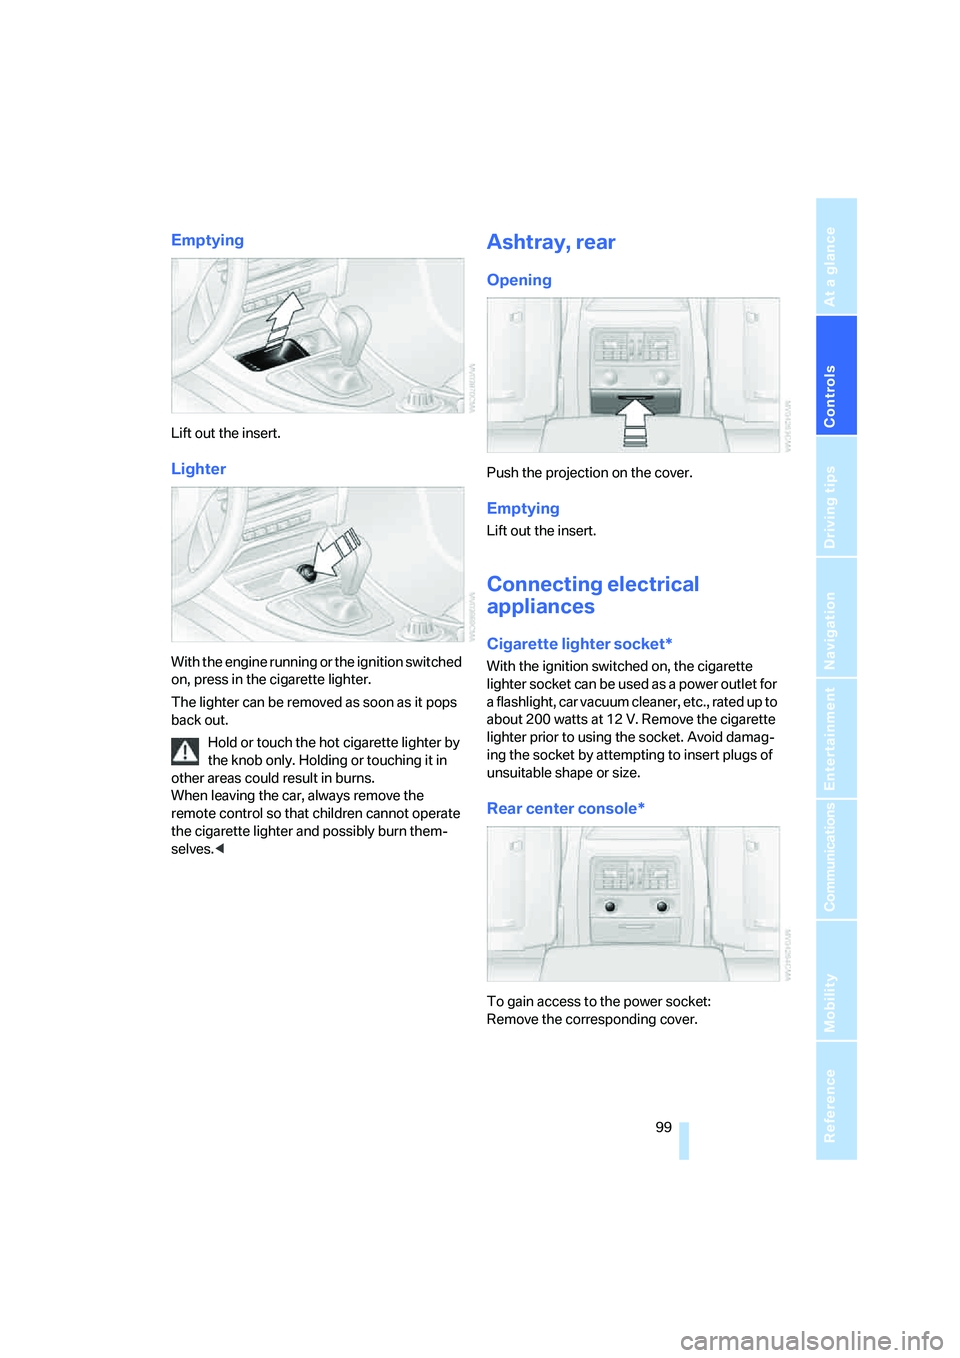
Lift out the insert.
Lighter
With the engine running or the ignition switched
on, press in the cigarette lighter.
The lighter can be removed as soon as it pops
back out.
Hold or touch the hot cigarette lighter by
the knob only. Holding or touching it in
other areas could result in burns.
When leaving the car, always remove the
remote control so that children cannot operate
the cigarette lighter and possibly burn them-
selves.<
Ashtray, rear
Opening
Push the projection on the cover.
Emptying
Lift out the insert.
Connecting electrical
appliances
Cigarette lighter socket*
With the ignition switched on, the cigarette
lighter socket can be used as a power outlet for
a flashlight, car vacuum cleaner, etc., rated up to
about 200 watts at 12 V. Remove the cigarette
lighter prior to using the socket. Avoid damag-
ing the socket by attempting to insert plugs of
unsuitable shape or size.
Rear center console*
To gain access to the power socket:
Remove the corresponding cover.
Page 129 of 223
Destination guidance
128 map view:
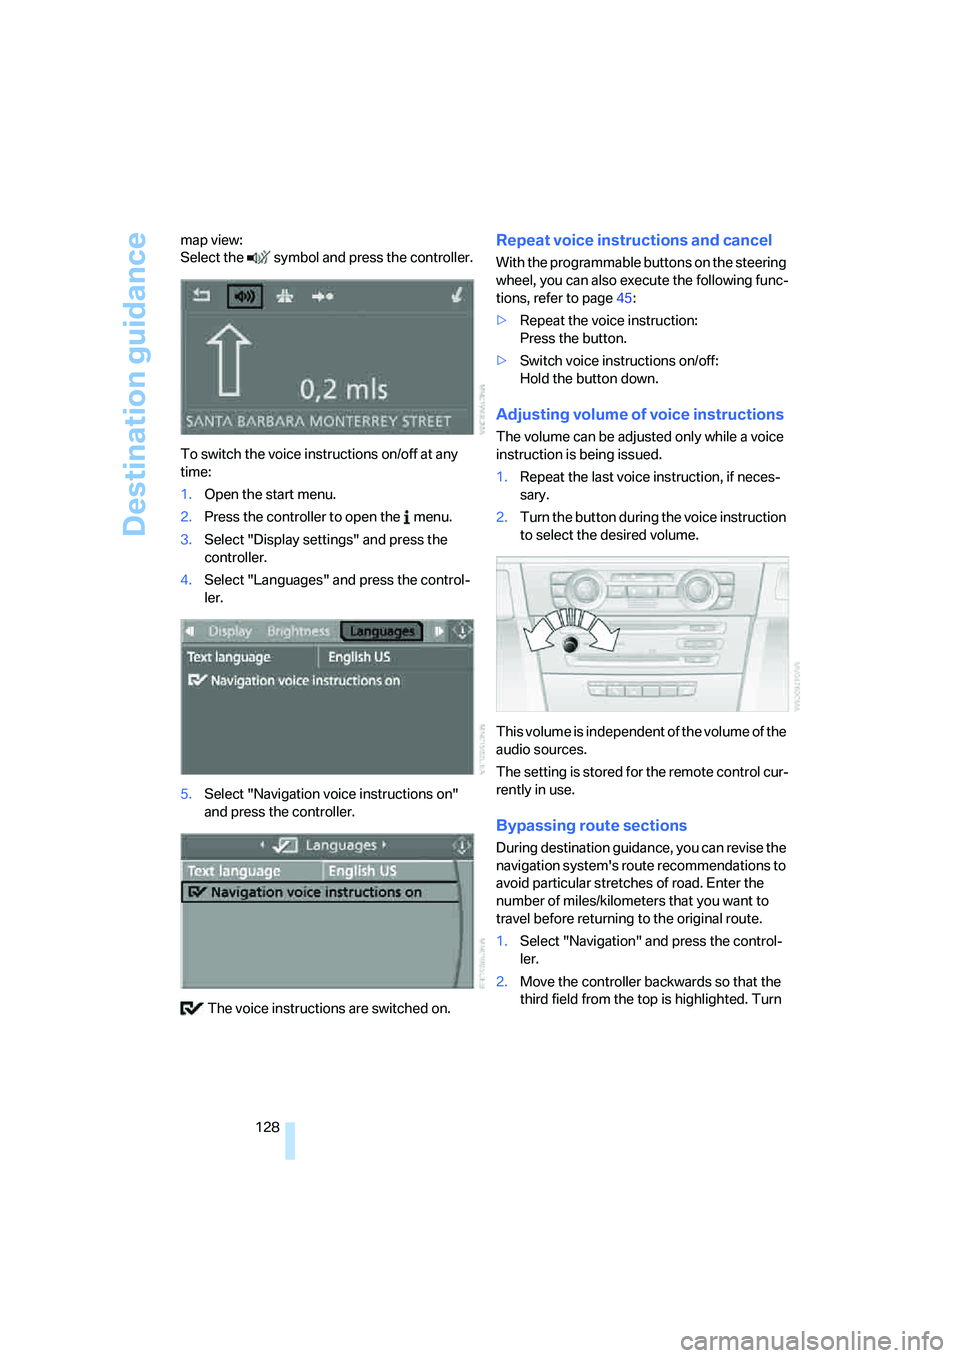
Select the symbol and press the controller.
To switch the voice instructions on/off at any
time:
1.Open the start menu.
2.Press the controller to open the menu.
3.Select "Display settings" and press the
controller.
4.Select "Languages" and press the control-
ler.
5.Select "Navigation voice instructions on"
and press the controller.
The voice instructions are switched on.
Repeat voice instructions and cancel
With the programmable buttons on the steering
wheel, you can also execute the following func-
tions, refer to page45:
>Repeat the voice instruction:
Press the button.
>Switch voice instructions on/off:
Hold the button down.
Adjusting volume of voice instructions
The volume can be adjusted only while a voice
instruction is being issued.
1.Repeat the last voice instruction, if neces-
sary.
2.Turn the button during the voice instruction
to select the desired volume.
This volume is independent of the volume of the
audio sources.
The setting is stored for the remote control cur-
rently in use.
Bypassing route sections
During destination guidance, you can revise the
navigation system's route recommendations to
avoid particular stretches of road. Enter the
number of miles/kilometers that you want to
travel before returning to the original route.
1.Select "Navigation" and press the control-
ler.
2.Move the controller backwards so that the
third field from the top is highlighted. Turn
Page 136 of 223
Navigation
Entertainment
Driving tips
135Reference
At a glance
Controls
Communications
Mobility
Adjusting volume
Turn knob1 on the CD player until the desired
volume is obtained.
You can also adjust the volume with buttons on
the steering wheel, refer to page10.
The setting is stored for the remote control cur-
rently in use.
Tone control
You can alter various tone settings, e.g. treble
and bass or the speed-dependent volume
increase.
The tone settings are applied to all audio
sources.
The settings are stored for the remote control
currently in use.
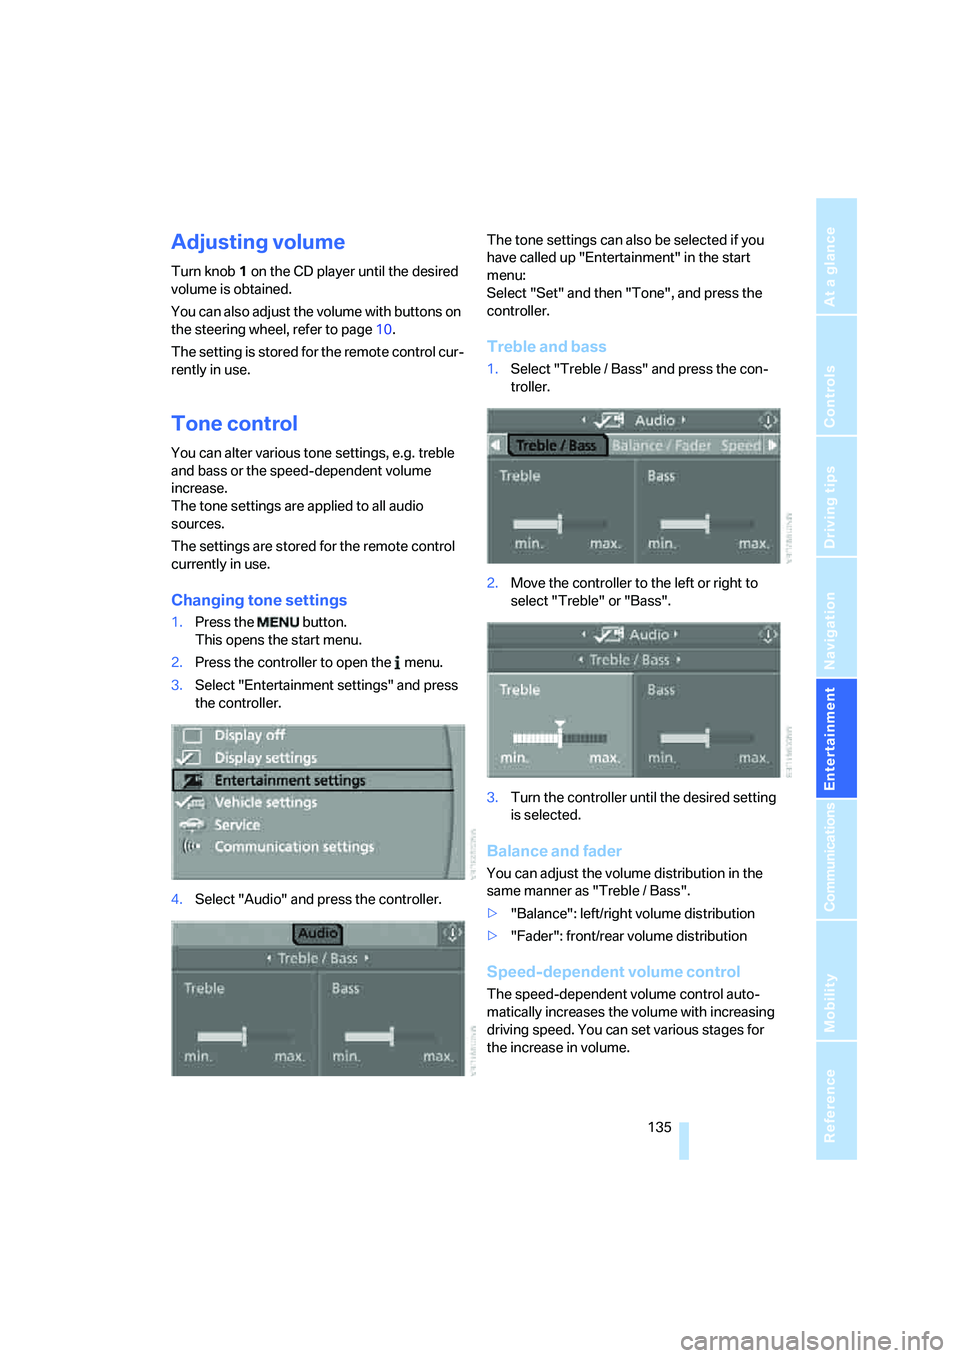
Changing tone settings
1.Press the button.
This opens the start menu.
2.Press the controller to open the menu.
3.Select "Entertainment settings" and press
the controller.
4.Select "Audio" and press the controller.The tone settings can also be selected if you
have called up "Entertainment" in the start
menu:
Select "Set" and then "Tone", and press the
controller.
Treble and bass
1.Select "Treble / Bass" and press the con-
troller.
2.Move the controller to the left or right to
select "Treble" or "Bass".
3.Turn the controller until the desired setting
is selected.
Balance and fader
You can adjust the volume distribution in the
same manner as "Treble / Bass".
>"Balance": left/right volume distribution
>"Fader": front/rear volume distribution
Speed-dependent volume control
The speed-dependent volume control auto-
matically increases the volume with increasing
driving speed. You can set various stages for
the increase in volume.
Page 141 of 223
Radio
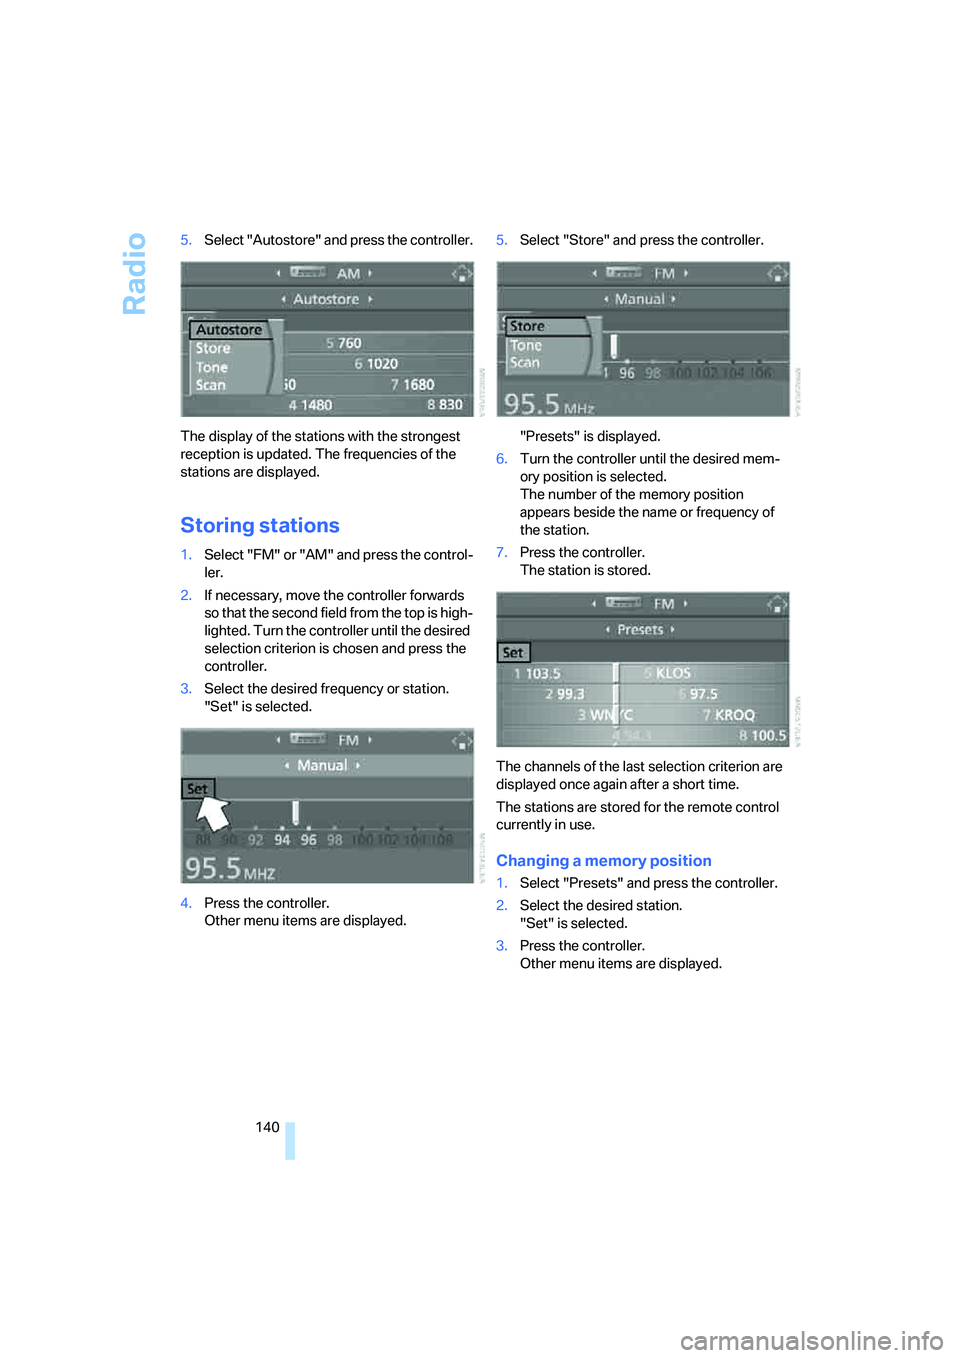
140 5.Select "Autostore" and press the controller.
The display of the stations with the strongest
reception is updated. The frequencies of the
stations are displayed.
Storing stations
1.Select "FM" or "AM" and press the control-
ler.
2.If necessary, move the controller forwards
so that the second field from the top is high-
lighted. Turn the controller until the desired
selection criterion is chosen and press the
controller.
3.Select the desired frequency or station.
"Set" is selected.
4.Press the controller.
Other menu items are displayed.5.Select "Store" and press the controller.
"Presets" is displayed.
6.Turn the controller until the desired mem-
ory position is selected.
The number of the memory position
appears beside the name or frequency of
the station.
7.Press the controller.
The station is stored.
The channels of the last selection criterion are
displayed once again after a short time.
The stations are stored for the remote control
currently in use.
Changing a memory position
1.Select "Presets" and press the controller.
2.Select the desired station.
"Set" is selected.
3.Press the controller.
Other menu items are displayed.
Page 154 of 223
153
Entertainment
Reference
At a glance
Controls
Driving tips Communications
Navigation
Mobility
Adjusting volume
Turn the knob during a call to select the desired
volume.
This volume for the hands-free system is main-
tained, even if the other audio sources are set to
minimum volume.
The setting is stored for the remote control cur-
rently in use.
Operation via iDrive
Once the portable phone is connected to the
vehicle via Bluetooth, the following functions
can be used via iDrive:
>Dialing phone numbers
>Phone book
>Top 8
>Redialing
>Displaying accepted calls
>Displaying missed calls
iDrive concept, refer to page16.
1.Press the button.
This opens the start menu.
2.Move the controller forwards to call up
"Communication".
Receiving calls
If you have the phone number of the caller
stored in the phone book and the phone num-
ber is transmitted, the name of the entry is dis-
played.
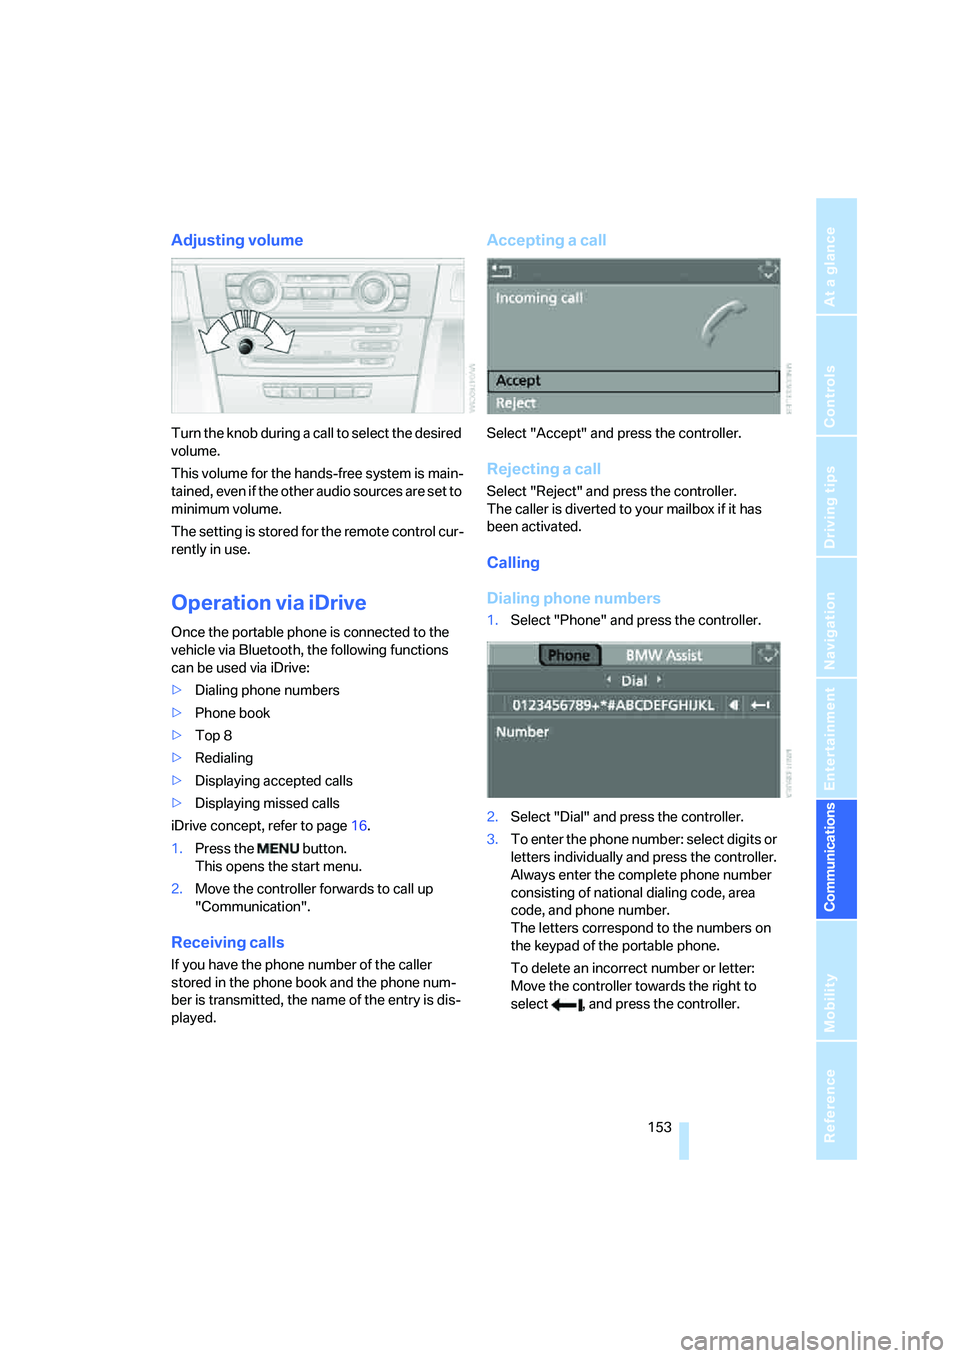
Accepting a call
Select "Accept" and press the controller.
Rejecting a call
Select "Reject" and press the controller.
The caller is diverted to your mailbox if it has
been activated.
Calling
Dialing phone numbers
1.Select "Phone" and press the controller.
2.Select "Dial" and press the controller.
3.To enter the phone number: select digits or
letters individually and press the controller.
Always enter the complete phone number
consisting of national dialing code, area
code, and phone number.
The letters correspond to the numbers on
the keypad of the portable phone.
To delete an incorrect number or letter:
Move the controller towards the right to
select , and press the controller.
Page 157 of 223
Telephoning
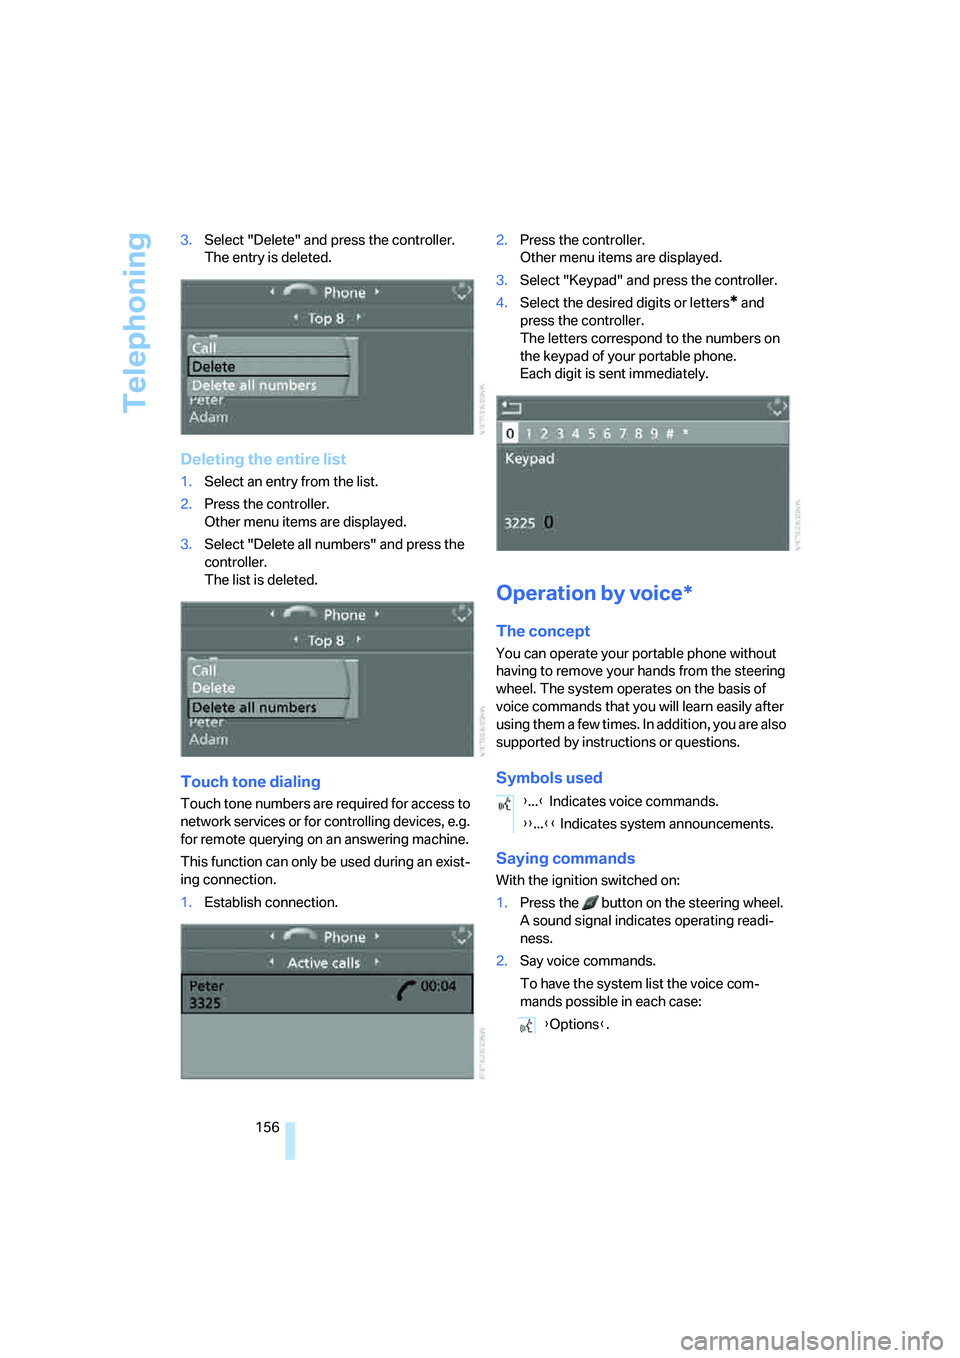
156 3.Select "Delete" and press the controller.
The entry is deleted.
Deleting the entire list
1.Select an entry from the list.
2.Press the controller.
Other menu items are displayed.
3.Select "Delete all numbers" and press the
controller.
The list is deleted.
Touch tone dialing
Touch tone numbers are required for access to
network services or for controlling devices, e.g.
for remote querying on an answering machine.
This function can only be used during an exist-
ing connection.
1.Establish connection.2.Press the controller.
Other menu items are displayed.
3.Select "Keypad" and press the controller.
4.Select the desired digits or letters
* and
press the controller.
The letters correspond to the numbers on
the keypad of your portable phone.
Each digit is sent immediately.
Operation by voice*
The concept
You can operate your portable phone without
having to remove your hands from the steering
wheel. The system operates on the basis of
voice commands that you will learn easily after
using them a few times. In addition, you are also
supported by instructions or questions.
Symbols used
Saying commands
With the ignition switched on:
1.Press the button on the steering wheel.
A sound signal indicates operating readi-
ness.
2.Say voice commands.
To have the system list the voice com-
mands possible in each case:
{...} Indicates voice commands.
{{...}} Indicates system announcements.
{Options}.