2005 BMW 330XI SEDAN remote start
[x] Cancel search: remote startPage 70 of 223
Controls
69Reference
At a glance
Driving tips
Communications
Navigation
Entertainment
Mobility
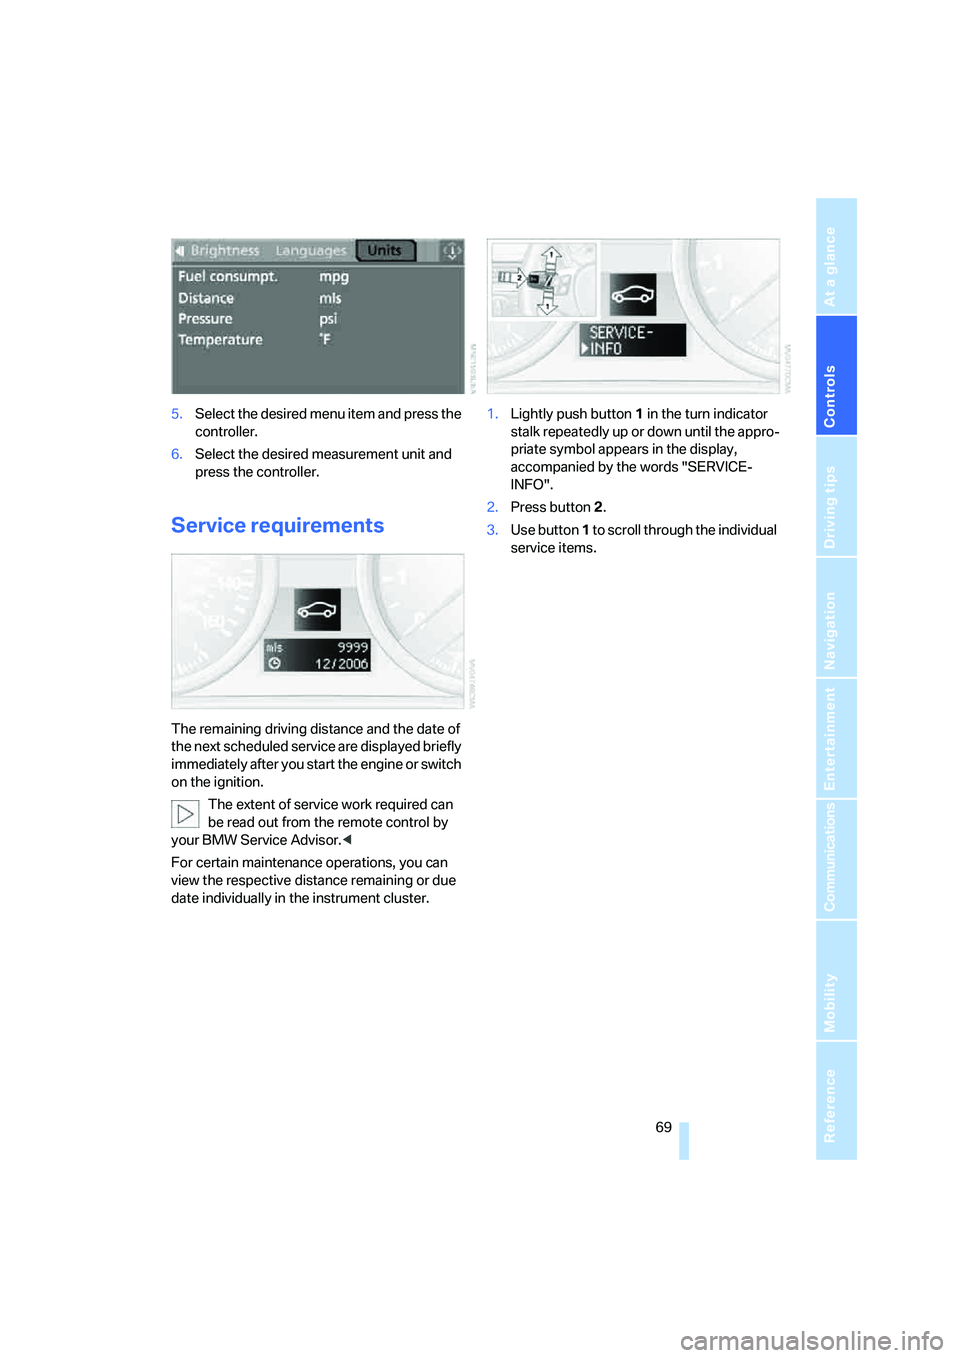
5.Select the desired menu item and press the
controller.
6.Select the desired measurement unit and
press the controller.
Service requirements
The remaining driving distance and the date of
the next scheduled service are displayed briefly
immediately after you start the engine or switch
on the ignition.
The extent of service work required can
be read out from the remote control by
your BMW Service Advisor.<
For certain maintenance operations, you can
view the respective distance remaining or due
date individually in the instrument cluster.1.Lightly push button 1 in the turn indicator
stalk repeatedly up or down until the appro-
priate symbol appears in the display,
accompanied by the words "SERVICE-
INFO".
2.Press button 2.
3.Use button 1 to scroll through the individual
service items.
Page 77 of 223
Everything under control
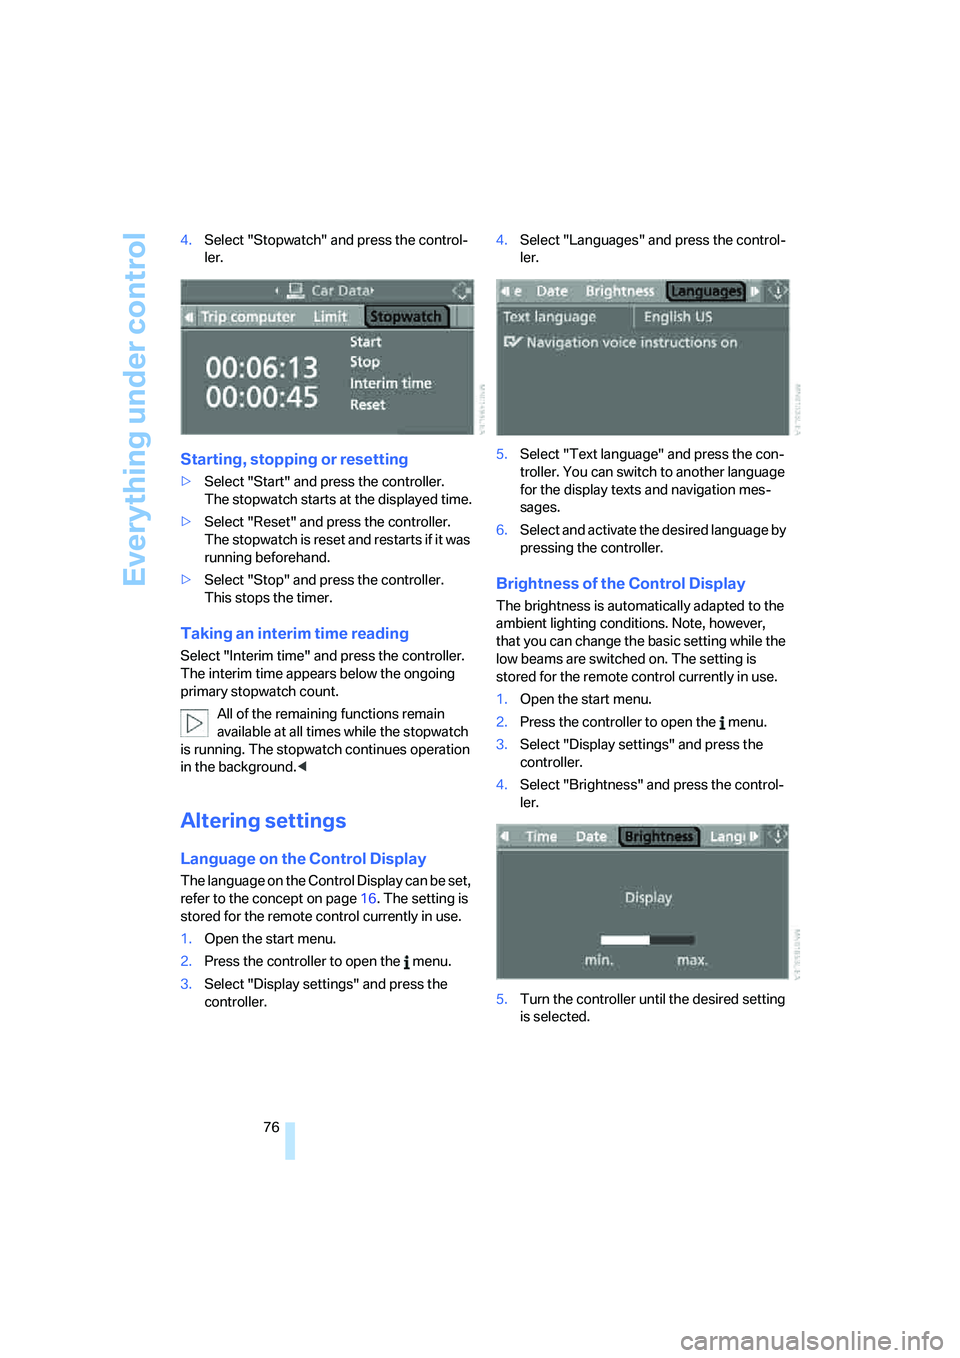
76 4.Select "Stopwatch" and press the control-
ler.
Starting, stopping or resetting
>Select "Start" and press the controller.
The stopwatch starts at the displayed time.
>Select "Reset" and press the controller.
The stopwatch is reset and restarts if it was
running beforehand.
>Select "Stop" and press the controller.
This stops the timer.
Taking an interim time reading
Select "Interim time" and press the controller.
The interim time appears below the ongoing
primary stopwatch count.
All of the remaining functions remain
available at all times while the stopwatch
is running. The stopwatch continues operation
in the background.<
Altering settings
Language on the Control Display
The language on the Control Display can be set,
refer to the concept on page16. The setting is
stored for the remote control currently in use.
1.Open the start menu.
2.Press the controller to open the menu.
3.Select "Display settings" and press the
controller.4.Select "Languages" and press the control-
ler.
5.Select "Text language" and press the con-
troller. You can switch to another language
for the display texts and navigation mes-
sages.
6.Select and activate the desired language by
pressing the controller.
Brightness of the Control Display
The brightness is automatically adapted to the
ambient lighting conditions. Note, however,
that you can change the basic setting while the
low beams are switched on. The setting is
stored for the remote control currently in use.
1.Open the start menu.
2.Press the controller to open the menu.
3.Select "Display settings" and press the
controller.
4.Select "Brightness" and press the control-
ler.
5.Turn the controller until the desired setting
is selected.
Page 78 of 223

Controls
77Reference
At a glance
Driving tips
Communications
Navigation
Entertainment
Mobility
Technology for driving comfort and safety
PDC Park Distance Control*
The concept
The PDC assists you with maneuvering in tight
parking spaces. Acoustic signals and a visual
indicator
warn you of the presence of an object
in front of
* or behind your car. To measure the
distance, there are four ultrasonic sensors in
each bumper. The sensors at the front
* and at
the two rear corners have a range of approx.
24 in/60 cm; the rear middle sensors have
approx. 5 ft/1.50 m.
PDC is a parking aid that can indicate
objects when they are approached
slowly, as is usually the case when parking.
Avoid approaching an object at high speed, as
otherwise physical circumstances may lead to
the system warning being issued too late.<
Automatic mode
With the engine running or the ignition switched
on, the system is activated automatically after
approx. 1 second when you engage reverse
gear or move the automatic transmission selec-
tor lever to position R. Wait this short period
before driving.
Manual operation*
Press the button, the LED lights up.
Deactivating manual mode
Press the button again; the LED goes out.
The system is automatically deactivated once
the vehicle travels approx. 165 ft/50 m or exceeds a speed of roughly 20 mph or 30 km/h;
the LED goes out. You can reactivate the sys-
tem manually as needed.
Signal tones
When nearing an object, its position is indicated
correspondingly by an interval tone. For exam-
ple, the tone sounds at the rear if the system
detects an object behind the car. As the dis-
tance between vehicle and object decreases,
the intervals between the tones become
shorter. If the distance to the nearest object
falls to below roughly 1 ft/30 cm, then a contin-
uous tone sounds.
The warning signal is canceled after approx.
3 seconds, if you are moving parallel to a wall.
Malfunction
The indicator lamp in the instrument
cluster comes on. PDC is malfunc-
tioning. A message appears on the
Control Display. Have the system checked.
To avoid this problem, keep the sensors clean
and free of ice or snow in order to ensure that
they will continue to operate effectively.
Manual mode
The LED above the button flashes in addition.
PDC with optical warning
You can also have the system show distances
to objects on the Control Display. The contours
of distant objects are shown on the Control Dis-
play even before the acoustic signal sounds.
The setting is stored for the remote control cur-
rently in use.
iDrive concept, refer to page16.
1.Open the start menu.
2.Press the controller to open the menu.
3.Select "Vehicle settings" and press the
controller.
Page 85 of 223
Technology for driving comfort and safety
84
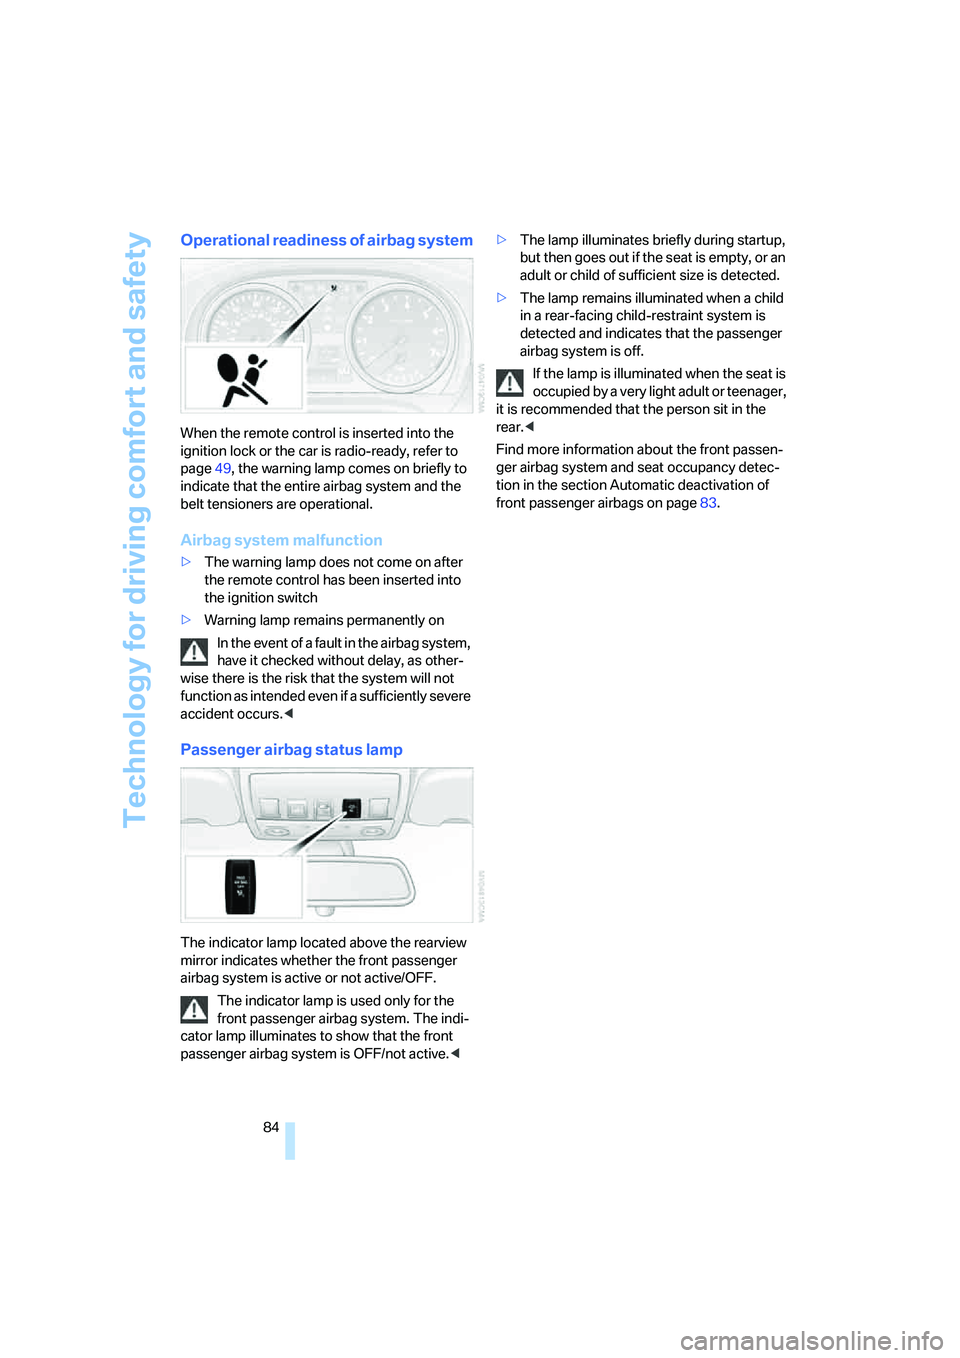
Operational readiness of airbag system
When the remote control is inserted into the
ignition lock or the car is radio-ready, refer to
page49, the warning lamp comes on briefly to
indicate that the entire airbag system and the
belt tensioners are operational.
Airbag system malfunction
>The warning lamp does not come on after
the remote control has been inserted into
the ignition switch
>Warning lamp remains permanently on
In the event of a fault in the airbag system,
have it checked without delay, as other-
wise there is the risk that the system will not
function as intended even if a sufficiently severe
accident occurs.<
Passenger airbag status lamp
The indicator lamp located above the rearview
mirror indicates whether the front passenger
airbag system is active or not active/OFF.
The indicator lamp is used only for the
front passenger airbag system. The indi-
cator lamp illuminates to show that the front
passenger airbag system is OFF/not active.<>The lamp illuminates briefly during startup,
but then goes out if the seat is empty, or an
adult or child of sufficient size is detected.
>The lamp remains illuminated when a child
in a rear-facing child-restraint system is
detected and indicates that the passenger
airbag system is off.
If the lamp is illuminated when the seat is
occupied by a very light adult or teenager,
it is recommended that the person sit in the
rear.<
Find more information about the front passen-
ger airbag system and seat occupancy detec-
tion in the section Automatic deactivation of
front passenger airbags on page83.
Page 88 of 223
Controls
87Reference
At a glance
Driving tips
Communications
Navigation
Entertainment
Mobility
With the remote control removed or with radio
readiness and ignition switched off, refer to
page49, press the stalk beyond its resistance
point in the appropriate direction 3. The flash-
ing turn signals must remain off.
The roadside parking lamps drain the bat-
tery. Do not use them for unduly long
periods of time, as otherwise the battery might
not have enough power to start the engine.<
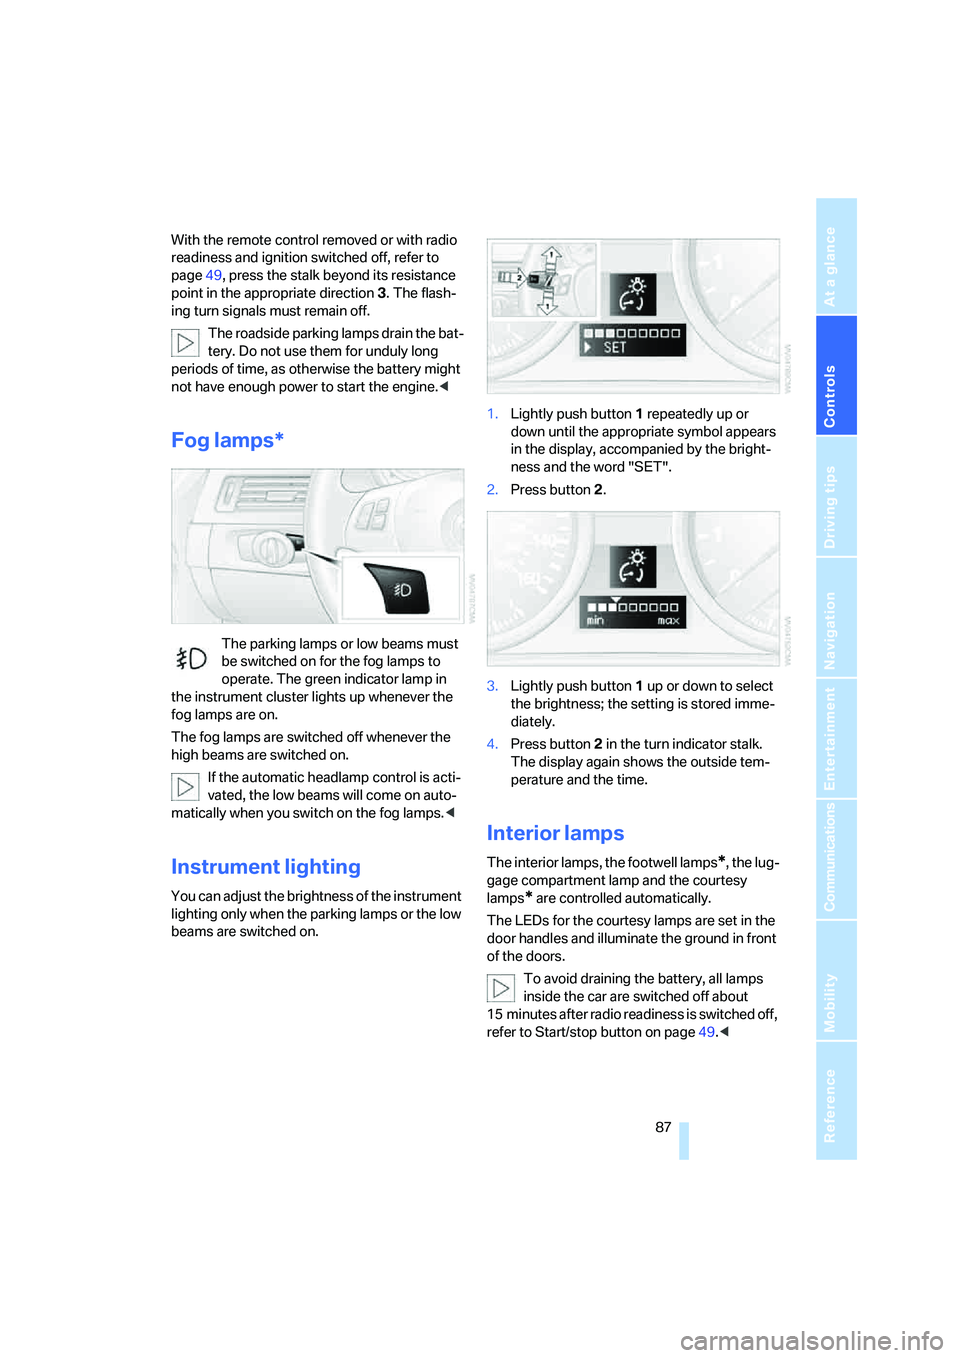
Fog lamps*
The parking lamps or low beams must
be switched on for the fog lamps to
operate. The green indicator lamp in
the instrument cluster lights up whenever the
fog lamps are on.
The fog lamps are switched off whenever the
high beams are switched on.
If the automatic headlamp control is acti-
vated, the low beams will come on auto-
matically when you switch on the fog lamps.<
Instrument lighting
You can adjust the brightness of the instrument
lighting only when the parking lamps or the low
beams are switched on.1.Lightly push button 1 repeatedly up or
down until the appropriate symbol appears
in the display, accompanied by the bright-
ness and the word "SET".
2.Press button 2.
3.Lightly push button 1 up or down to select
the brightness; the setting is stored imme-
diately.
4.Press button 2 in the turn indicator stalk.
The display again shows the outside tem-
perature and the time.
Interior lamps
The interior lamps, the footwell lamps*, the lug-
gage compartment lamp and the courtesy
lamps
* are controlled automatically.
The LEDs for the courtesy lamps
are set in the
door handles and illuminate the ground in front
of the doors.
To avoid draining the battery, all lamps
inside the car are switched off about
15 minutes after radio readiness is switched off,
refer to Start/stop button on page49.<
Page 91 of 223
Controlling the climate for pleasant driving
90
Automatic climate control
Comfortable interior climate
AUTO program7 offers the ideal air distribution
and air flow rate for practically all conditions,
refer to AUTO program below. All you need to
do is select an interior temperature which is
comfortable for you.
The following sections inform you in detail
about how to adjust the settings.
Most settings are stored for the remote control
currently in use, refer also to Personal Profile
settings on page29.
Adjusting air distribution manually
Direct the flow of air to the win-
dows, to the upper body area or to
the footwell.
You can switch the automatic air
distribution back on by pressing the AUTO but-
ton.
Manual fine adjustments in air
distribution
You can set the rate of incoming airflow for
manual air distribution.
iDrive concept, refer to page16.
1.Press the button.
This opens the start menu.
2.Move the controller to the left to call up "Cli-
mate".
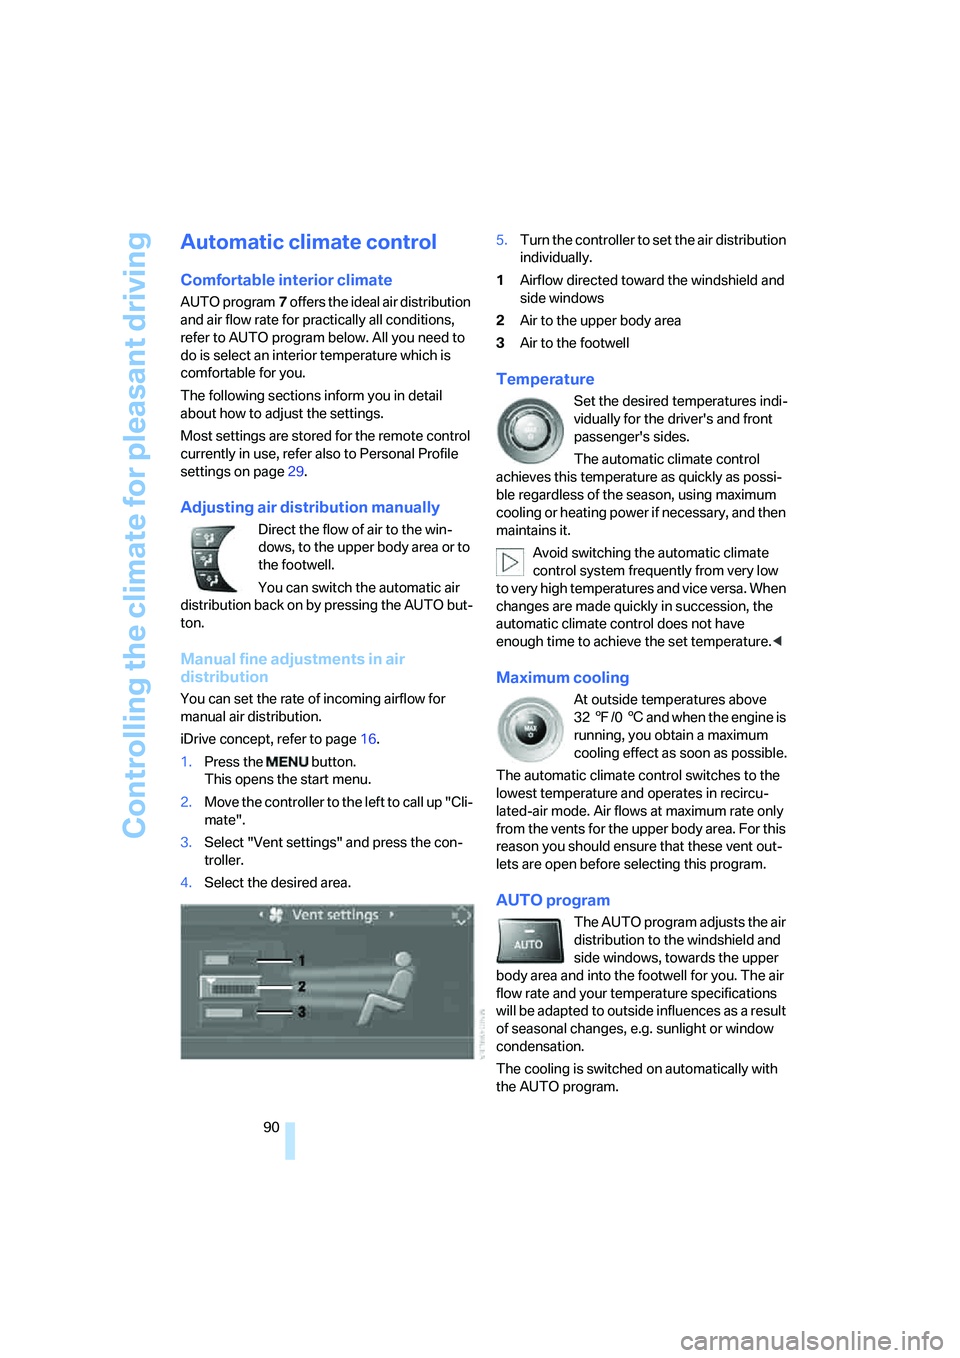
3.Select "Vent settings" and press the con-
troller.
4.Select the desired area.5.Turn the controller to set the air distribution
individually.
1Airflow directed toward the windshield and
side windows
2Air to the upper body area
3Air to the footwell
Temperature
Set the desired temperatures indi-
vidually for the driver's and front
passenger's sides.
The automatic climate control
achieves this temperature as quickly as possi-
ble regardless of the season, using maximum
cooling or heating power if necessary, and then
maintains it.
Avoid switching the automatic climate
control system frequently from very low
to very high temperatures and vice versa. When
changes are made quickly in succession, the
automatic climate control does not have
enough time to achieve the set temperature.<
Maximum cooling
At outside temperatures above
327/06 and when the engine is
running, you obtain a maximum
cooling effect as soon as possible.
The automatic climate control switches to the
lowest temperature and operates in recircu-
lated-air mode. Air flows at maximum rate only
from the vents for the upper body area. For this
reason you should ensure that these vent out-
lets are open before selecting this program.
AUTO program
The AUTO program adjusts the air
distribution to the windshield and
side windows, towards the upper
body area and into the footwell for you. The air
flow rate and your temperature specifications
will be adapted to outside influences as a result
of seasonal changes, e.g. sunlight or window
condensation.
The cooling is switched on automatically with
the AUTO program.
Page 94 of 223
Controls
93Reference
At a glance
Driving tips
Communications
Navigation
Entertainment
Mobility
Practical interior accessories
Integrated universal remote
control*
The concept
The integrated universal remote control can
replace as many as three hand-held transmit-
ters for various remote-controlled devices,
such as door openers and house alarm sys-
tems. The integrated universal remote control
registers and stores signals from the original
hand-held transmitters.
The signal of an original hand-held transmitter
can be programmed on one of the three mem-
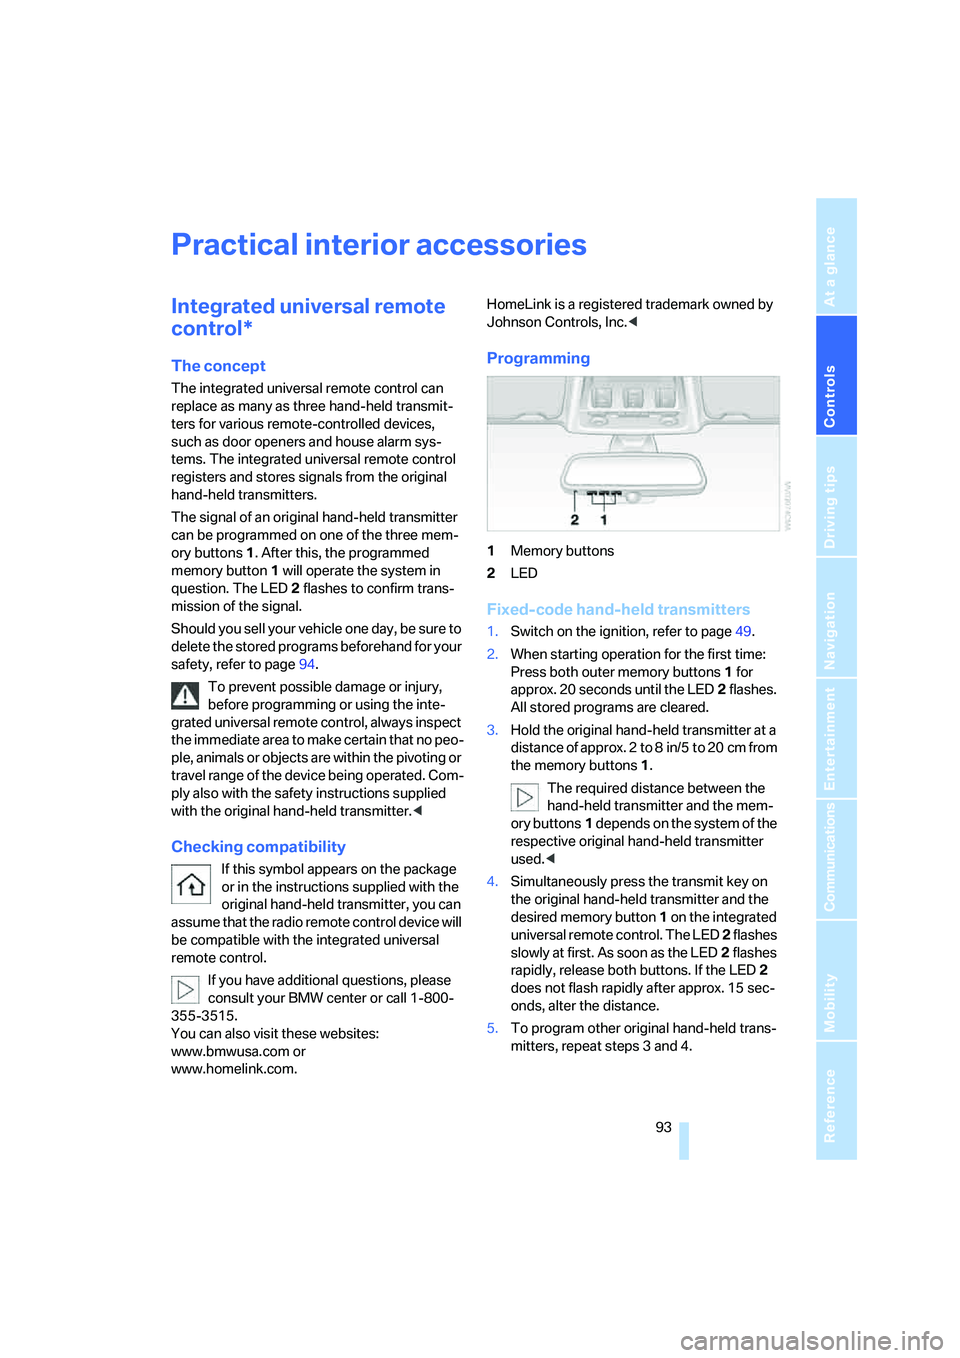
ory buttons1. After this, the programmed
memory button1 will operate the system in
question. The LED2 flashes to confirm trans-
mission of the signal.
Should you sell your vehicle one day, be sure to
delete the stored programs beforehand for your
safety, refer to page94.
To prevent possible damage or injury,
before programming or using the inte-
grated universal remote control, always inspect
the immediate area to make certain that no peo-
ple, animals or objects are within the pivoting or
travel range of the device being operated. Com-
ply also with the safety instructions supplied
with the original hand-held transmitter.<
Checking compatibility
If this symbol appears on the package
or in the instructions supplied with the
original hand-held transmitter, you can
assume that the radio remote control device will
be compatible with the integrated universal
remote control.
If you have additional questions, please
consult your BMW center or call 1-800-
355-3515.
You can also visit these websites:
www.bmwusa.com or
www.homelink.com. HomeLink is a registered trademark owned by
Johnson Controls, Inc.<
Programming
1Memory buttons
2LED
Fixed-code hand-held transmitters
1.Switch on the ignition, refer to page49.
2.When starting operation for the first time:
Press both outer memory buttons1 for
approx. 20 seconds until the LED2 flashes.
All stored programs are cleared.
3.Hold the original hand-held transmitter at a
distance of approx. 2 to 8 in/5 to 20 cm from
the memory buttons1.
The required distance between the
hand-held transmitter and the mem-
ory buttons1 depends on the system of the
respective original hand-held transmitter
used.<
4.Simultaneously press the transmit key on
the original hand-held transmitter and the
desired memory button 1 on the integrated
universal remote control. The LED 2 flashes
slowly at first. As soon as the LED2 flashes
rapidly, release both buttons. If the LED2
does not flash rapidly after approx. 15 sec-
onds, alter the distance.
5.To program other original hand-held trans-
mitters, repeat steps 3 and 4.
Page 129 of 223
Destination guidance
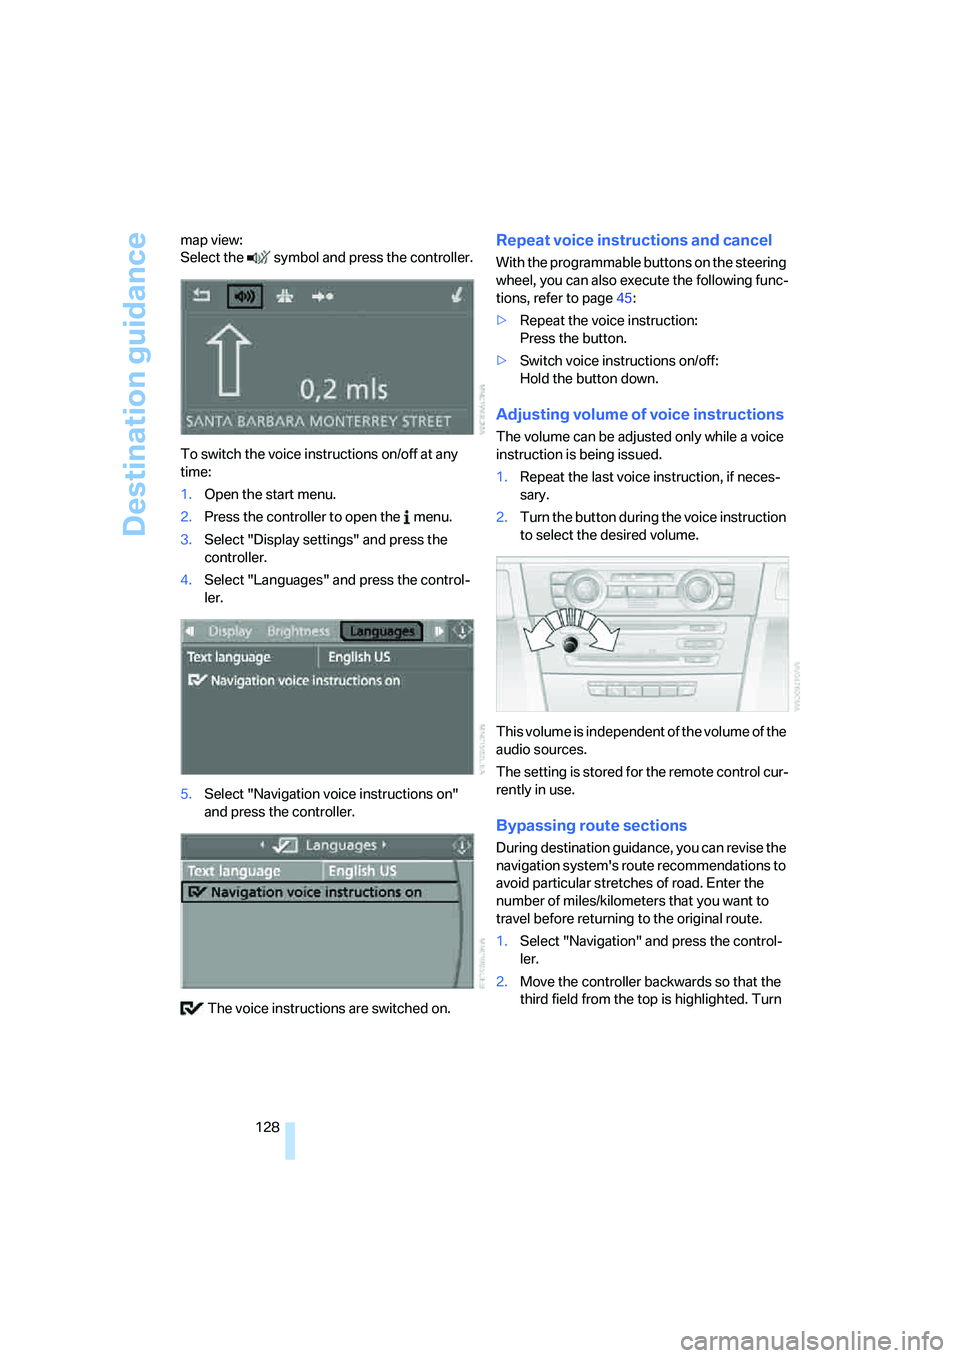
128 map view:
Select the symbol and press the controller.
To switch the voice instructions on/off at any
time:
1.Open the start menu.
2.Press the controller to open the menu.
3.Select "Display settings" and press the
controller.
4.Select "Languages" and press the control-
ler.
5.Select "Navigation voice instructions on"
and press the controller.
The voice instructions are switched on.
Repeat voice instructions and cancel
With the programmable buttons on the steering
wheel, you can also execute the following func-
tions, refer to page45:
>Repeat the voice instruction:
Press the button.
>Switch voice instructions on/off:
Hold the button down.
Adjusting volume of voice instructions
The volume can be adjusted only while a voice
instruction is being issued.
1.Repeat the last voice instruction, if neces-
sary.
2.Turn the button during the voice instruction
to select the desired volume.
This volume is independent of the volume of the
audio sources.
The setting is stored for the remote control cur-
rently in use.
Bypassing route sections
During destination guidance, you can revise the
navigation system's route recommendations to
avoid particular stretches of road. Enter the
number of miles/kilometers that you want to
travel before returning to the original route.
1.Select "Navigation" and press the control-
ler.
2.Move the controller backwards so that the
third field from the top is highlighted. Turn