2005 BMW 330XI IDRIVE SEDAN parking brake
[x] Cancel search: parking brakePage 51 of 223
Driving
50 The exhaust gases contain carbon monoxide,
an odorless and colorless, but highly toxic gas.
Never leave an unattended vehicle with the
engine running, as such a vehicle represents a
potential safety hazard.
Before leaving the car with the engine running,
place the transmission in idle or move the
selector lever to position P and apply the hand-
brake to prevent the car from moving.<
When starting the engine, do not press the
accelerator pedal.
Do not allow the engine to warm up by leaving it
running while the vehicle remains stationary.
Instead, begin to drive immediately at a moder-
ate engine speed.
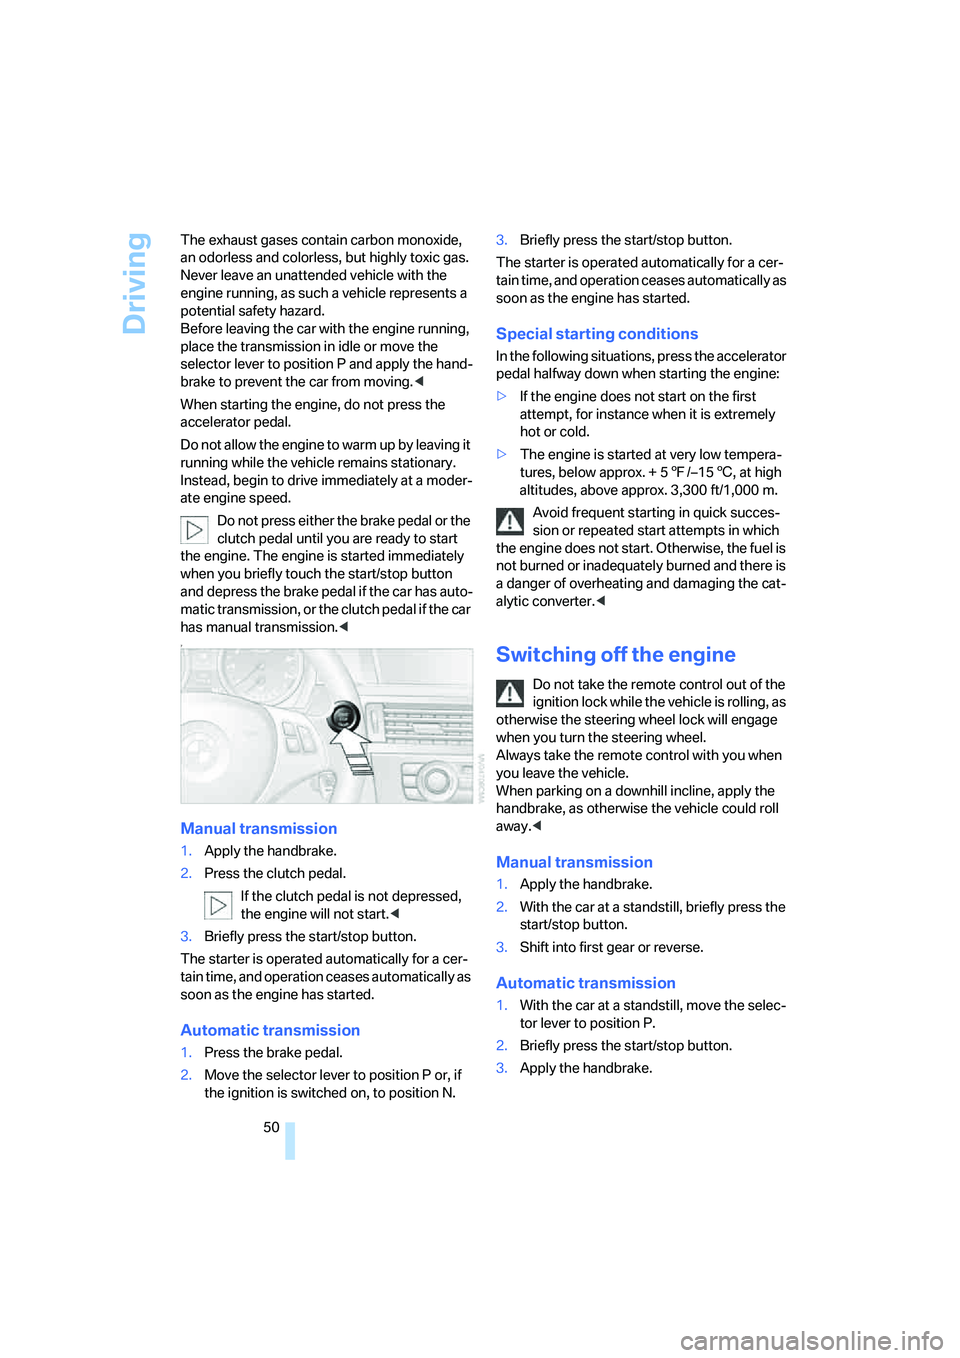
Do not press either the brake pedal or the
clutch pedal until you are ready to start
the engine. The engine is started immediately
when you briefly touch the start/stop button
and depress the brake pedal if the car has auto-
matic transmission, or the clutch pedal if the car
has manual transmission.<
7
Manual transmission
1.Apply the handbrake.
2.Press the clutch pedal.
If the clutch pedal is not depressed,
the engine will not start.<
3.Briefly press the start/stop button.
The starter is operated automatically for a cer-
tain time, and operation ceases automatically as
soon as the engine has started.
Automatic transmission
1.Press the brake pedal.
2.Move the selector lever to position P or, if
the ignition is switched on, to position N.3.Briefly press the start/stop button.
The starter is operated automatically for a cer-
tain time, and operation ceases automatically as
soon as the engine has started.
Special starting conditions
In the following situations, press the accelerator
pedal halfway down when starting the engine:
>If the engine does not start on the first
attempt, for instance when it is extremely
hot or cold.
>The engine is started at very low tempera-
tures, below approx. + 57/–156, at high
altitudes, above approx. 3,300 ft/1,000 m.
Avoid frequent starting in quick succes-
sion or repeated start attempts in which
the engine does not start. Otherwise, the fuel is
not burned or inadequately burned and there is
a danger of overheating and damaging the cat-
alytic converter.<
Switching off the engine
Do not take the remote control out of the
ignition lock while the vehicle is rolling, as
otherwise the steering wheel lock will engage
when you turn the steering wheel.
Always take the remote control with you when
you leave the vehicle.
When parking on a downhill incline, apply the
handbrake, as otherwise the vehicle could roll
away.<
Manual transmission
1.Apply the handbrake.
2.With the car at a standstill, briefly press the
start/stop button.
3.Shift into first gear or reverse.
Automatic transmission
1.With the car at a standstill, move the selec-
tor lever to position P.
2.Briefly press the start/stop button.
3.Apply the handbrake.
Page 52 of 223
Controls
51Reference
At a glance
Driving tips
Communications
Navigation
Entertainment
Mobility
Handbrake
The handbrake is primarily intended to prevent
the vehicle from rolling while parked; it brakes
the rear wheels.
Indicator lamp
The indicator lamp is lit, and when you
drive off an acoustic signal sounds in
addition. The handbrake is still applied.
Indicator lamp for Canadian models.
Applying
The lever locks in position automatically.
Releasing
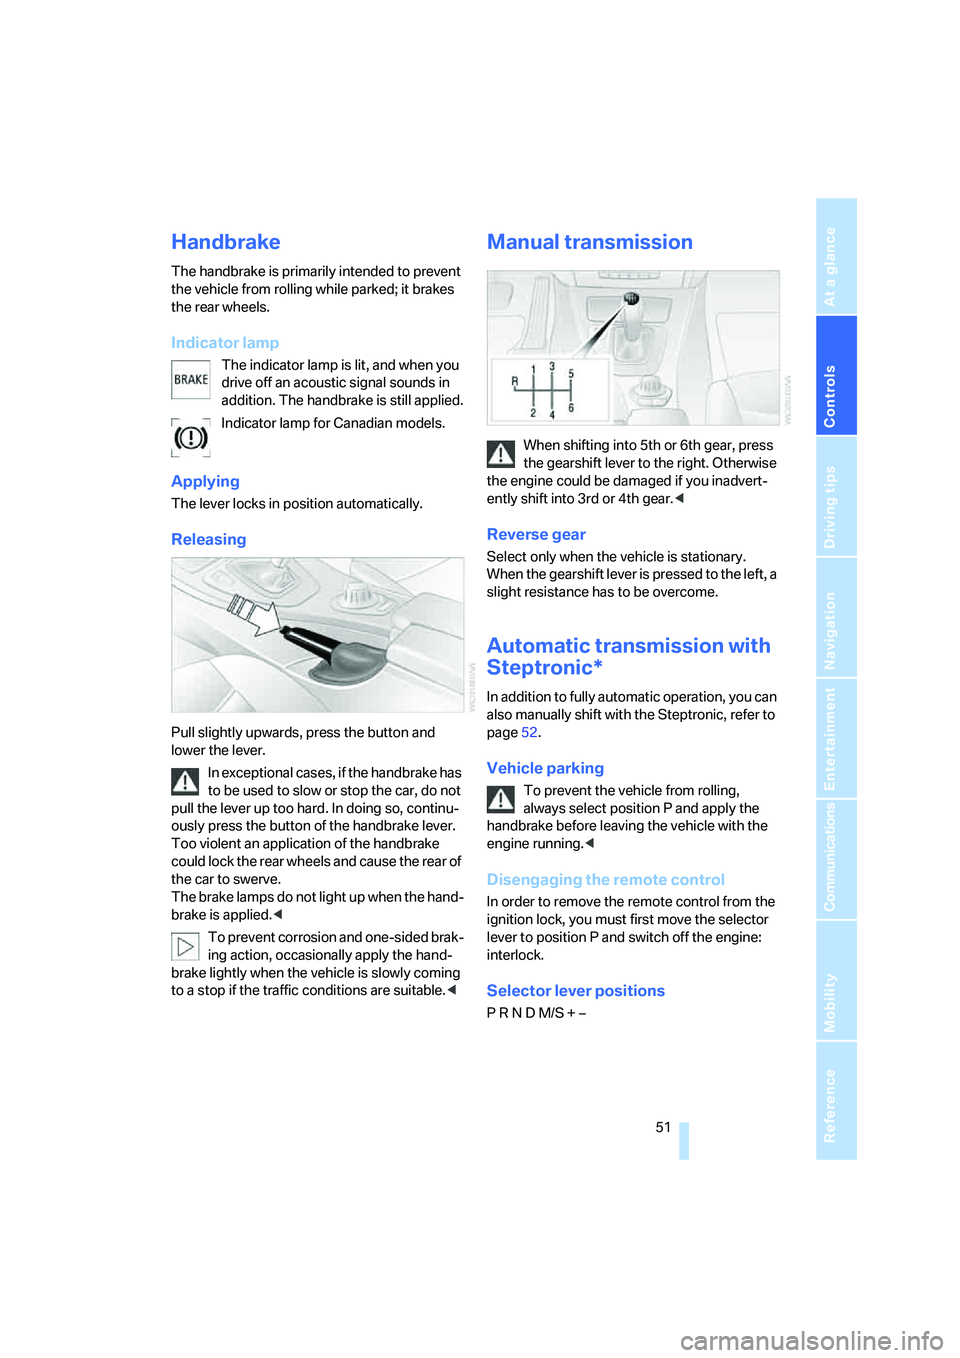
Pull slightly upwards, press the button and
lower the lever.
In exceptional cases, if the handbrake has
to be used to slow or stop the car, do not
pull the lever up too hard. In doing so, continu-
ously press the button of the handbrake lever.
Too violent an application of the handbrake
could lock the rear wheels and cause the rear of
the car to swerve.
The brake lamps do not light up when the hand-
brake is applied.<
To prevent corrosion and one-sided brak-
ing action, occasionally apply the hand-
brake lightly when the vehicle is slowly coming
to a stop if the traffic conditions are suitable.<
Manual transmission
When shifting into 5th or 6th gear, press
the gearshift lever to the right. Otherwise
the engine could be damaged if you inadvert-
ently shift into 3rd or 4th gear.<
Reverse gear
Select only when the vehicle is stationary.
When the gearshift lever is pressed to the left, a
slight resistance has to be overcome.
Automatic transmission with
Steptronic*
In addition to fully automatic operation, you can
also manually shift with the Steptronic, refer to
page52.
Vehicle parking
To prevent the vehicle from rolling,
always select position P and apply the
handbrake before leaving the vehicle with the
engine running.<
Disengaging the remote control
In order to remove the remote control from the
ignition lock, you must first move the selector
lever to position P and switch off the engine:
interlock.
Selector lever positions
P R N D M/S + –
Page 59 of 223
Driving
58 personal responsibility, alertness and aware-
ness in adjusting speed, braking or otherwise
controlling the vehicle. The driver should
decide when to use the system on the basis of
road, traffic, visibility, and weather conditions.
Active cruise control is intended for use on
highway-type roadways where traffic is moving
relatively smoothly. Do not use this system in
city driving; heavy traffic such as during rush
hour; on curvy, winding roads, slippery roads or
roads with sharp curves such as highway off-
ramps; during inclement weather such as snow,
strong rain or fog; or when entering inter-
changes, service/parking areas or toll booths.
It is also important to regulate your vehicle's
speed and distance setting within applicable
legal limits. Always be ready to take action or
apply the brakes if necessary, especially when
the system is actively following a vehicle in front
of you. Otherwise, driving conditions could
result which violate the law or pose a risk of
accident.<
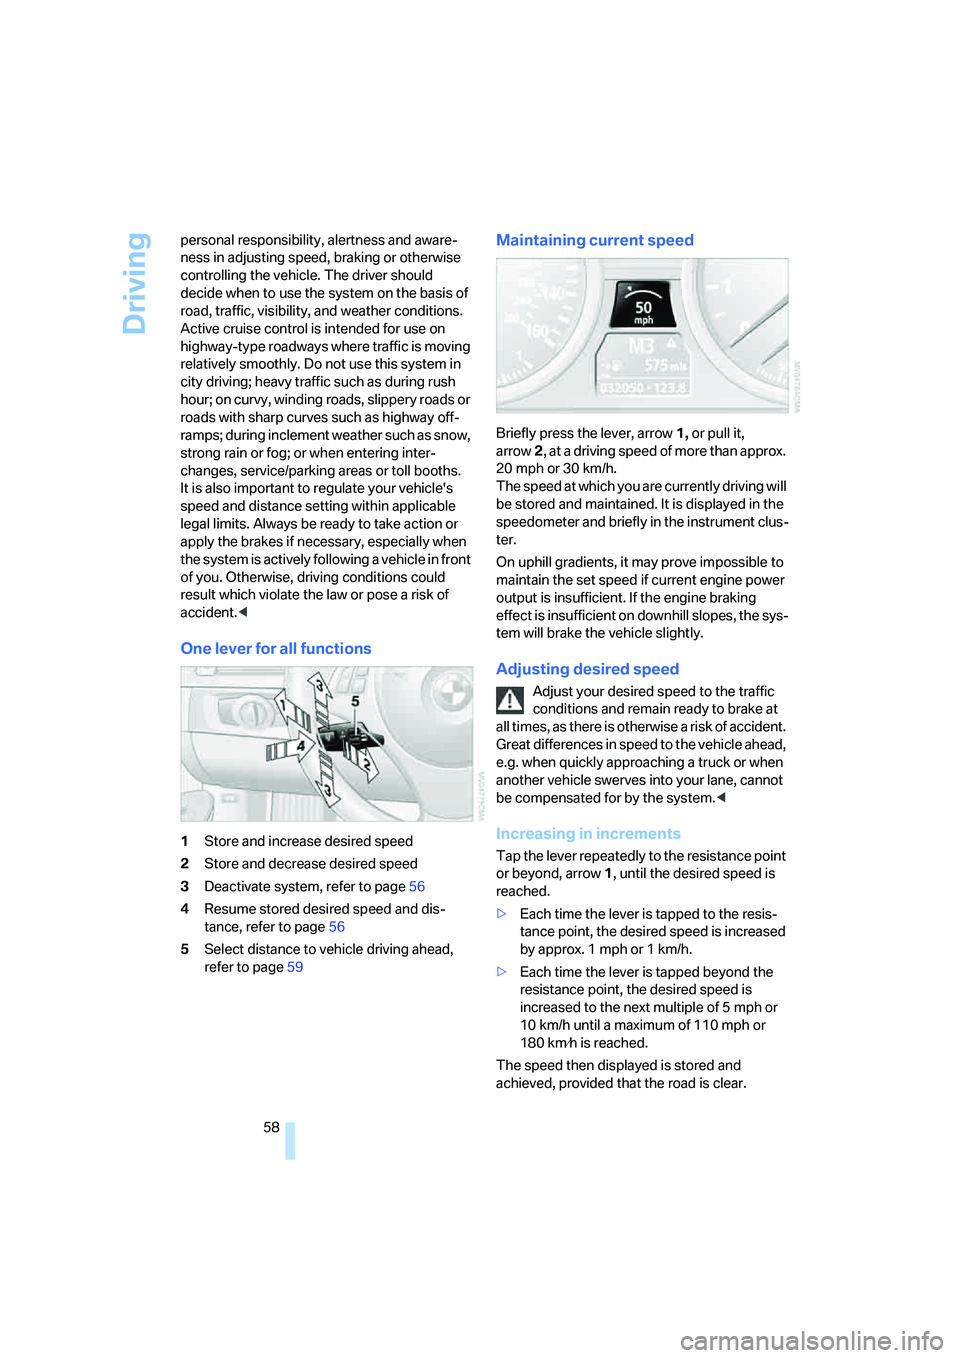
One lever for all functions
1Store and increase desired speed
2Store and decrease desired speed
3Deactivate system, refer to page56
4Resume stored desired speed and dis-
tance, refer to page56
5Select distance to vehicle driving ahead,
refer to page59
Maintaining current speed
Briefly press the lever, arrow1, or pull it,
arrow2, at a driving speed of more than approx.
20 mph or 30 km/h.
The speed at which you are currently driving will
be stored and maintained. It is displayed in the
speedometer and briefly in the instrument clus-
ter.
On uphill gradients, it may prove impossible to
maintain the set speed if current engine power
output is insufficient. If the engine braking
effect is insufficient on downhill slopes, the sys-
tem will brake the vehicle slightly.
Adjusting desired speed
Adjust your desired speed to the traffic
conditions and remain ready to brake at
all times, as there is otherwise a risk of accident.
Great differences in speed to the vehicle ahead,
e.g. when quickly approaching a truck or when
another vehicle swerves into your lane, cannot
be compensated for by the system.<
Increasing in increments
Tap the lever repeatedly to the resistance point
or beyond, arrow1, until the desired speed is
reached.
>Each time the lever is tapped to the resis-
tance point, the desired speed is increased
by approx. 1 mph or 1 km/h.
>Each time the lever is tapped beyond the
resistance point, the desired speed is
increased to the next multiple of 5 mph or
10 km/h until a maximum of 110 mph or
180 km⁄h is reached.
The speed then displayed is stored and
achieved, provided that the road is clear.
Page 83 of 223
Technology for driving comfort and safety
82 ments. It also varies the steering force required
to turn the wheels depending on the speed at
which you are driving.
When you are driving in the low road-speed
range, e.g. in a town or when parking, the steer-
ing angle increases, i.e. the steering becomes
very direct, and less effort is required to turn the
wheels. In the higher speed range, on the other
hand, the steering angle is reduced more and
more. This improves the handling capability of
your BMW over the entire speed range.
In critical situations, the system can make tar-
geted corrections to the steering angle pro-
vided by the driver and thus stabilize the vehicle
before the driver intervenes. This stabilizing
intervention is simultaneously deactivated
when DSC is switched off, refer to page79.
Malfunction
The warning lamps come on. Active
steering is no longer operational. At
low speeds, greater steering wheel
movements are required, whereas at
higher speeds the vehicle reacts more sensi-
tively to steering wheel movements. Drive cau-
tiously and think well ahead. Have the system
checked.
If the warning lamp lights up during the first
engine starting following a power supply inter-
ruption, the system must be activated by being
initialized.
Initializing the system
1.Start the engine.
2.With the vehicle stationary, turn the steer-
ing wheel from the straight-ahead position
to the left as far as it will go and then back to
the straight-ahead position.
3.Switch off the engine.
When you start the engine again, all the func-
tions of Active steering are available once again.
Brake Force Display*
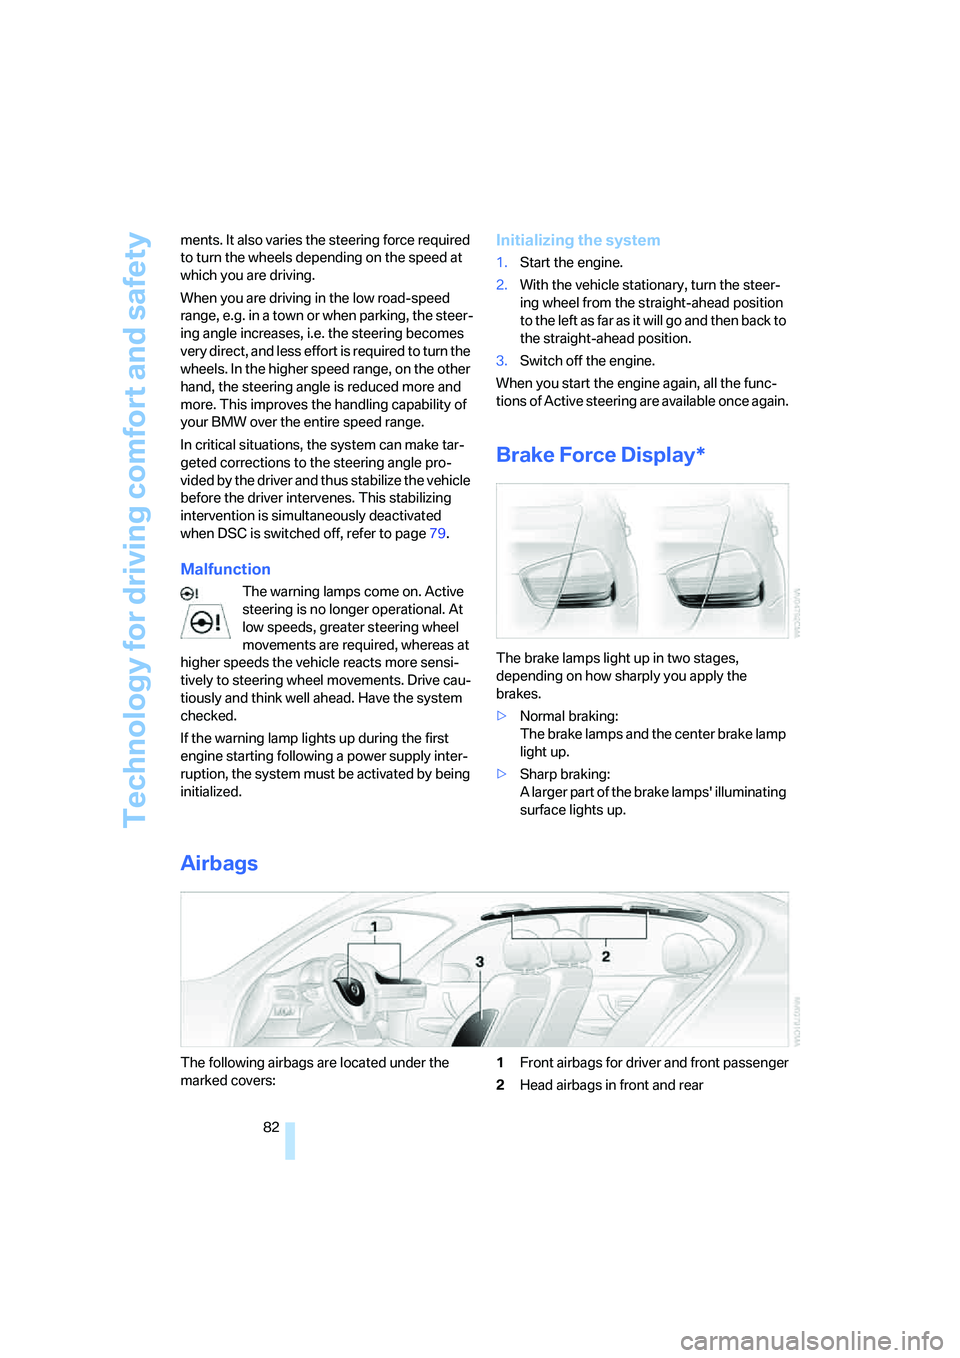
The brake lamps light up in two stages,
depending on how sharply you apply the
brakes.
>Normal braking:
The brake lamps and the center brake lamp
light up.
>Sharp braking:
A larger part of the brake lamps' illuminating
surface lights up.
Airbags
The following airbags are located under the
marked covers:1Front airbags for driver and front passenger
2Head airbags in front and rear
Page 107 of 223
Things to remember when driving
106
Things to remember when driving
Break-in period
Moving parts need breaking-in time to adjust to
each other. Please follow the instructions below
in order to achieve the optimal service life and
economy of operation for your vehicle.
Engine and differential
Up to 1,250 miles/2,000 km:
Attempt to vary both engine and vehicle
speeds, but refrain from exceeding an engine
speed of 4,500 rpm or a driving speed of
100 mph or 160 km/h.
Always obey all official speed limits.
Avoid full-throttle operation and use of the
transmission's kick-down mode.
Once you have driven 1,250 miles/2,000 km,
the engine and vehicle speeds can be gradually
increased.
Tires
Due to technical factors associated with their
manufacture, tires do not achieve their full trac-
tion potential until after an initial break-in
period. Therefore, drive reservedly during the
first 200 miles/300 km.
Brake system
Brakes require an initial break-in period of
approx. 300 miles/500 km to achieve optimized
contact and wear patterns between brake pads
and rotors. Drive with caution during this break-
in period.
Clutch
The function of the clutch reaches its optimal
level only after a distance driven of approx.
300 miles/500 km. During this break-in period,
engage the clutch gently.
Following part replacement
The same break-in procedures should be
observed if any of the components mentioned above have to be renewed in the course of the
vehicle's operating life.
General driving notes
Closing the luggage compartment lid
Operate the vehicle only when the lug-
gage compartment lid is completely
closed. Otherwise, exhaust fumes could enter
the interior of the vehicle.<
If special circumstances make it absolutely nec-
essary to drive with the luggage compartment
lid open:
1.Close all windows and the glass sunroof.
2.Increase the air flow rate of the automatic
climate control considerably, refer to
page91.
Hot exhaust system
As in all vehicles equipped with a catalytic
converter, extremely high temperatures
are generated in this vehicle. Do not remove the
heat shields installed adjacent to various sec-
tions of the exhaust system, and never apply
undercoating to them. When driving, standing
at idle and while parking, take care to avoid pos-
sible contact between the hot exhaust system
and any highly flammable materials such as hay,
leaves, grass, etc. Such contact could lead to a
fire, with the risk of serious personal injuries and
property damage.<
Portable phone in the vehicle
BMW discourages the use of mobile
communications devices, e.g. portable
phones, inside the vehicle without a direct con-
nection to an outside antenna. Otherwise, the
vehicle electronics and mobile communication
device can influence one another. In addition,
there is no assurance that the radiation which
results from transmission will be dissipated
from the vehicle interior.<
Page 191 of 223
Replacing components
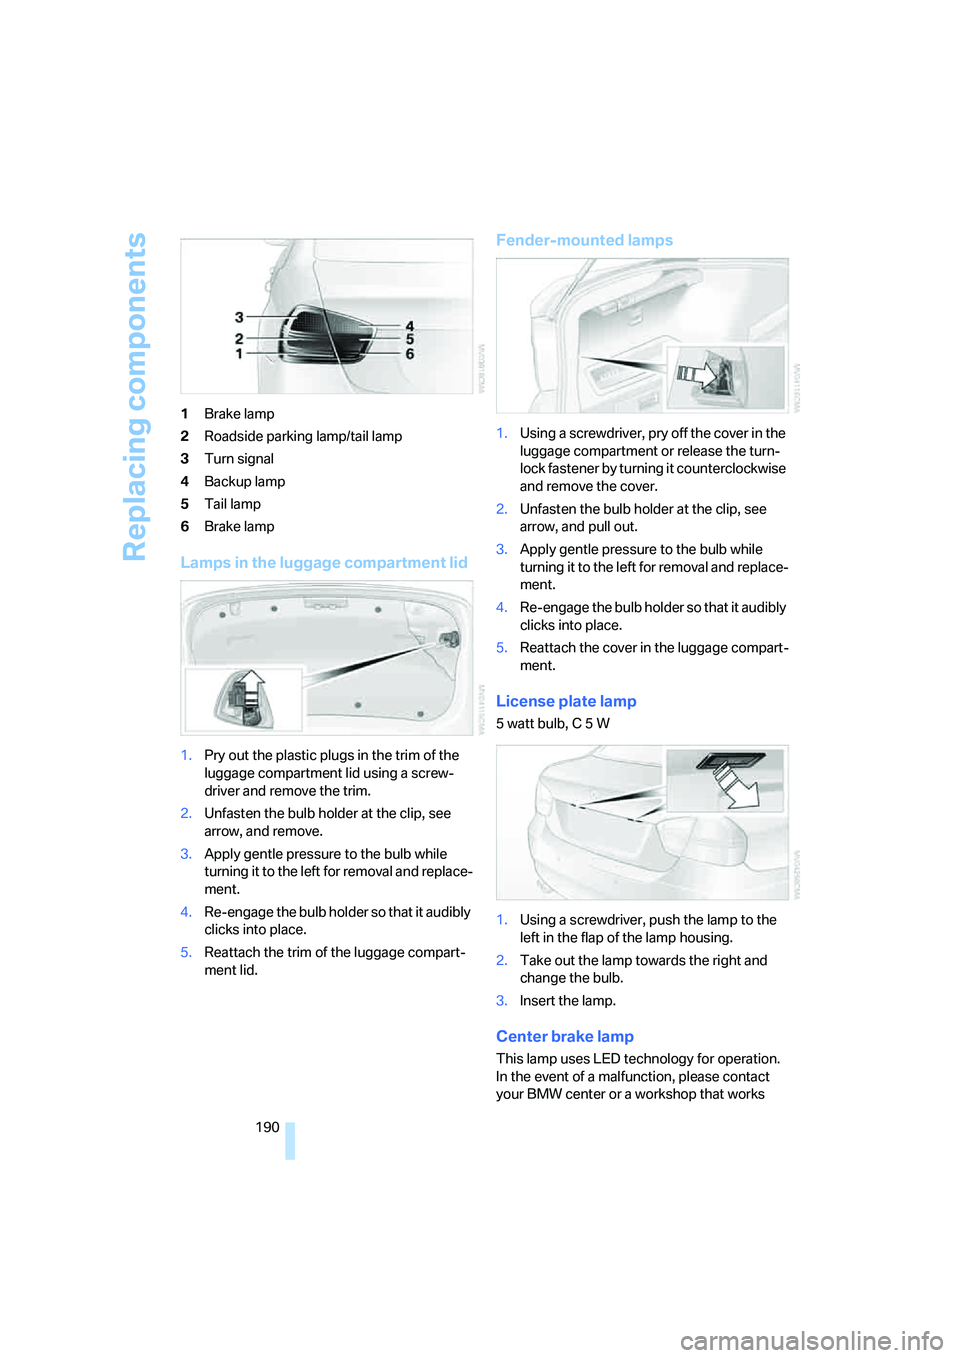
190 1Brake lamp
2Roadside parking lamp/tail lamp
3Turn signal
4Backup lamp
5Tail lamp
6Brake lamp
Lamps in the luggage compartment lid
1.Pry out the plastic plugs in the trim of the
luggage compartment lid using a screw-
driver and remove the trim.
2.Unfasten the bulb holder at the clip, see
arrow, and remove.
3.Apply gentle pressure to the bulb while
turning it to the left for removal and replace-
ment.
4.Re-engage the bulb holder so that it audibly
clicks into place.
5.Reattach the trim of the luggage compart-
ment lid.
Fender-mounted lamps
1.Using a screwdriver, pry off the cover in the
luggage compartment or release the turn-
lock fastener by turning it counterclockwise
and remove the cover.
2.Unfasten the bulb holder at the clip, see
arrow, and pull out.
3.Apply gentle pressure to the bulb while
turning it to the left for removal and replace-
ment.
4.Re-engage the bulb holder so that it audibly
clicks into place.
5.Reattach the cover in the luggage compart-
ment.
License plate lamp
5 watt bulb, C 5 W
1.Using a screwdriver, push the lamp to the
left in the flap of the lamp housing.
2.Take out the lamp towards the right and
change the bulb.
3.Insert the lamp.
Center brake lamp
This lamp uses LED technology for operation.
In the event of a malfunction, please contact
your BMW center or a workshop that works
Page 211 of 223

Everything from A - Z
210 Display lighting, refer to
Instrument lighting87
"Display off"21
Displays, refer to Instrument
cluster12
Displays and controls10
"Display settings"72
Disposal
– of coolant183
– vehicle battery191
Distance control, refer to
Active cruise control57
Distance remaining to service,
refer to Service
requirements69
"Distance to dest."66
Distance warning, refer to
PDC Park Distance
Control77
Door key, refer to Integrated
key/remote control28
Door lock31
Door locking, confirmation
signals31
"Door locks"30
Doors, emergency
operation31
DOT Quality Grades176
Draft-free ventilation92
Drinks holders, refer to Cup
holders98
Drive-off assistant80
Driving lamps, refer to Parking
lamps/low beams85
Driving notes106
Driving route, refer to
Displaying route126
Driving stability control
systems78
Driving through water107
Driving tips, refer to Driving
notes106
Dry air, refer to Cooling
function92
DSC Dynamic Stability
Control78
– indicator lamps79DTC Dynamic Traction
Control79
– indicator lamps79
DVD for navigation114
Dynamic Stability Control
DSC
– indicator lamps79
Dynamic Traction Control
DTC
– indicator lamps79
E
EBV Electronic brake-force
distribution78
Eject button, refer to Buttons
on the CD player134
Electrical malfunction
– door lock31
– fuel filler door168
– glass sunroof37
Electric seat adjustment39
Electronic brake-force
distribution78
Electronic oil level check181
Emergency call193
Emergency operation, refer to
Manual operation
– door lock31
– fuel filler door168
– glass sunroof37
– transmission lock, automatic
transmission53
Emergency release of luggage
compartment lid from
luggage compartment's
interior33
Emergency services, refer to
Roadside Assistance193
Emissions test, refer to
Service requirements69
"Enable services"161
"End call"154
Energy-conscious driving,
refer to Energy Control64
Energy Control64Engine
– breaking in106
– data200
– speed200
– starting49
– switching off50
Engine compartment181
Engine coolant, refer to
Coolant183
Engine oil
– adding183
– BMW Maintenance
System185
– checking level181
– intervals between changes,
refer to Service
requirements69
"Engine oil level"182
Engine output, refer to Engine
data200
Engine speed200
Engine starting, refer to
Starting the engine49
"Enter address"116
Entering destination116
Entering the address115
Entering the intersection117
"Entertainment"134
"Entertainment settings"135
Entry map for destination118
"Equalizer", refer to Tone
control136
Error messages, refer to
Check Control73
"ESN"142
ESP Electronic Stability
Program, refer to DSC
Dynamic Stability
Control78
Event data recorders186
Exhaust system, refer to Hot
exhaust system106
Exterior mirrors43
– adjusting43
– automatic dimming
feature107
– automatic heating44
External audio device97,149
Page 213 of 223

Everything from A - Z
212 Heavy loads, refer to Stowing
cargo109
Height, refer to
Dimensions200
Height adjustment
– seats39
– steering wheel44
High beams86
– indicator lamp13
– replacing bulbs188
High water, refer to Driving
through water107
Hills107
Holders for cups98
"Home address" in
navigation123
Hood180
Horn10
Hot exhaust system106
"Hour memo"72
"House number" in
destination entry117
Hydraulic brake assist, refer to
Dynamic Brake Control78
Hydroplaning107
I
Ice warning64
iDrive16
– adjusting brightness76
– assistance window20
– automatic climate control90
– changing language76
– confirming a selection or
entry19
– date and time, setting72
– displays, menus17
– lists19
– menu guidance17
– operating principle16
– selecting a menu item19
– status information20
– switching menu pages19
– symbols18
Ignition49
– switched off49
– switched on49Ignition key, refer to
Integrated key/remote
control28
Ignition key position 1, refer to
Radio readiness49
Ignition key position 2, refer to
Ignition on49
Ignition lock49
Indicator and warning
lamps13
Individual air distribution90
Individually programmable
buttons on steering
wheel45
Individual settings, refer to
Personal Profile29
Information
– on another location119
– on country119
– on current position119
– on destination location119
"Information" in
navigation119
"Information on
destination"120
"Input map"118
Installation location
– CD changer147
Instructions for navigation
system, refer to Voice
instructions127
Instrument cluster12
Instrument lighting87
Integrated key28
Integrated universal remote
control93
Interesting destination for
navigation119
"Interim time"76
Interior lamps87
– remote control30
Interior motion sensor35
Interior rearview mirror44
– automatic dimming
feature107
Interior rearview mirror with
digital compass94
Interlock52Intermittent mode of the
wipers54
J
Jacking points191
Joystick, refer to iDrive16
Jumpering, refer to Jump
starting194
Jump starting194
K
Key, refer to Integrated key/
remote control28
Key Memory, refer to Personal
Profile29
"Keypad"156
Kick-down52
Knock control168
L
Lamps, refer to Parking lamps/
low beams85
Lamps and bulbs, replacing
bulbs187
"Languages" in
navigation128
"Languages"on the control
display76
Lap-and-shoulder safety
belt43
Lashing eyes, refer to
Securing cargo109
Last destinations, refer to
Destination list120
"Last seat pos."42
LATCH child-restraint fixing
system48
LEDs light-emitting
diodes191
Length, refer to
Dimensions200
License plate lamp, replacing
bulbs190
Light-emitting diodes
LEDs191
Lighter99