2005 BMW 330I SEDAN radio controls
[x] Cancel search: radio controlsPage 88 of 223

Controls
87Reference
At a glance
Driving tips
Communications
Navigation
Entertainment
Mobility
With the remote control removed or with radio
readiness and ignition switched off, refer to
page49, press the stalk beyond its resistance
point in the appropriate direction 3. The flash-
ing turn signals must remain off.
The roadside parking lamps drain the bat-
tery. Do not use them for unduly long
periods of time, as otherwise the battery might
not have enough power to start the engine.<
Fog lamps*
The parking lamps or low beams must
be switched on for the fog lamps to
operate. The green indicator lamp in
the instrument cluster lights up whenever the
fog lamps are on.
The fog lamps are switched off whenever the
high beams are switched on.
If the automatic headlamp control is acti-
vated, the low beams will come on auto-
matically when you switch on the fog lamps.<
Instrument lighting
You can adjust the brightness of the instrument
lighting only when the parking lamps or the low
beams are switched on.1.Lightly push button 1 repeatedly up or
down until the appropriate symbol appears
in the display, accompanied by the bright-
ness and the word "SET".
2.Press button 2.
3.Lightly push button 1 up or down to select
the brightness; the setting is stored imme-
diately.
4.Press button 2 in the turn indicator stalk.
The display again shows the outside tem-
perature and the time.
Interior lamps
The interior lamps, the footwell lamps*, the lug-
gage compartment lamp and the courtesy
lamps
* are controlled automatically.
The LEDs for the courtesy lamps
are set in the
door handles and illuminate the ground in front
of the doors.
To avoid draining the battery, all lamps
inside the car are switched off about
15 minutes after radio readiness is switched off,
refer to Start/stop button on page49.<
Page 94 of 223

Controls
93Reference
At a glance
Driving tips
Communications
Navigation
Entertainment
Mobility
Practical interior accessories
Integrated universal remote
control*
The concept
The integrated universal remote control can
replace as many as three hand-held transmit-
ters for various remote-controlled devices,
such as door openers and house alarm sys-
tems. The integrated universal remote control
registers and stores signals from the original
hand-held transmitters.
The signal of an original hand-held transmitter
can be programmed on one of the three mem-
ory buttons1. After this, the programmed
memory button1 will operate the system in
question. The LED2 flashes to confirm trans-
mission of the signal.
Should you sell your vehicle one day, be sure to
delete the stored programs beforehand for your
safety, refer to page94.
To prevent possible damage or injury,
before programming or using the inte-
grated universal remote control, always inspect
the immediate area to make certain that no peo-
ple, animals or objects are within the pivoting or
travel range of the device being operated. Com-
ply also with the safety instructions supplied
with the original hand-held transmitter.<
Checking compatibility
If this symbol appears on the package
or in the instructions supplied with the
original hand-held transmitter, you can
assume that the radio remote control device will
be compatible with the integrated universal
remote control.
If you have additional questions, please
consult your BMW center or call 1-800-
355-3515.
You can also visit these websites:
www.bmwusa.com or
www.homelink.com. HomeLink is a registered trademark owned by
Johnson Controls, Inc.<
Programming
1Memory buttons
2LED
Fixed-code hand-held transmitters
1.Switch on the ignition, refer to page49.
2.When starting operation for the first time:
Press both outer memory buttons1 for
approx. 20 seconds until the LED2 flashes.
All stored programs are cleared.
3.Hold the original hand-held transmitter at a
distance of approx. 2 to 8 in/5 to 20 cm from
the memory buttons1.
The required distance between the
hand-held transmitter and the mem-
ory buttons1 depends on the system of the
respective original hand-held transmitter
used.<
4.Simultaneously press the transmit key on
the original hand-held transmitter and the
desired memory button 1 on the integrated
universal remote control. The LED 2 flashes
slowly at first. As soon as the LED2 flashes
rapidly, release both buttons. If the LED2
does not flash rapidly after approx. 15 sec-
onds, alter the distance.
5.To program other original hand-held trans-
mitters, repeat steps 3 and 4.
Page 135 of 223

On/off and settings
134
On/off and settings
The following audio sources have shared con-
trols and setting options:
>Radio Professional
>CD player
>CD changer
*
Controls
The audio sources can be operated using:
>Buttons near the CD player
>iDrive
>Buttons
on the steering wheel, refer to
page10
Buttons near the CD player
1Sound output for entertainment on/off, vol-
ume
>Press: switch on/off.
When you switch on, the last set radio
station or CD track is played.
>Turn: adjust volume.
2Drive for audio CDs
3 Eject CD
4Station scan/track search
>Change radio station.
>Select track for CD player and CD
changer.
5Drive for navigation DVD
Operation via iDrive
iDrive concept, refer to page16.1.Press the button.
This opens the start menu.
2.Move the controller backwards to call up
"Entertainment".
You have the following choices:
>"FM" and "AM": radio reception
>"WB": Weather Band station
>"SAT": satellite radio
>"CD": CD player or CD changer
>"Audio Aux": external audio device
>"Set": depending on the audio source,
other adjustments can be made, e.g. with
the radio: update station with strongest
reception, store station, tone control, sam-
ple stations.
From another menu, you can switch
directly to the screen last displayed, refer
to Convenient call-up of menu items on
page18.<
Switching on/off
In order to switch the entertainment sound out-
put on and off:
Press button1 on the CD player.
This symbol on the Control Display indi-
cates that sound output is switched off.
Page 140 of 223

Navigation
Entertainment
Driving tips
139Reference
At a glance
Controls
Communications
Mobility
Buttons on the CD player
Press the button for the corre-
sponding direction.
The system switches to the next displayed sta-
tion.
You can also change stations with buttons on
the steering wheel, refer to page10.
Sampling stations, scan
The stations on the current waveband are auto-
matically sampled in succession.
1.Select "FM" or "AM" and press the control-
ler.
"Set" is selected.
2.Press the controller.
Other menu items are displayed.
3.Select "Scan" and press the controller.
Scan starts.
To stop the scan:
1.Press the controller.
2.Select "Scan" and press the controller.
This cancels the scan search, and the radio
remains on the current station.
Buttons on the CD player
To start scan, hold down the corre-
sponding direction button.
To stop scanning, press the button again.
Selecting frequency manually
With "Manual" you can select stations that are
received in addition to those displayed.1.Select "FM" or "AM" and press the control-
ler.
2.Move the controller forward to change the
field.
3.Select "Manual" and press the controller.
4.Turn the controller to set a certain fre-
quency.
Updating stations with best reception
If on a longer journey you move out of the
reception range of the stations originally
received, you can update the list of stations
received with the strongest signals in the AM
waveband.
1.Select "AM" and press the controller.
2.Move the controller forward to change the
field.
3.Select "Autostore" and press the controller.
"Set" is selected.
4.Press the controller.
Other menu items are displayed.
Page 142 of 223

Navigation
Entertainment
Driving tips
141Reference
At a glance
Controls
Communications
Mobility
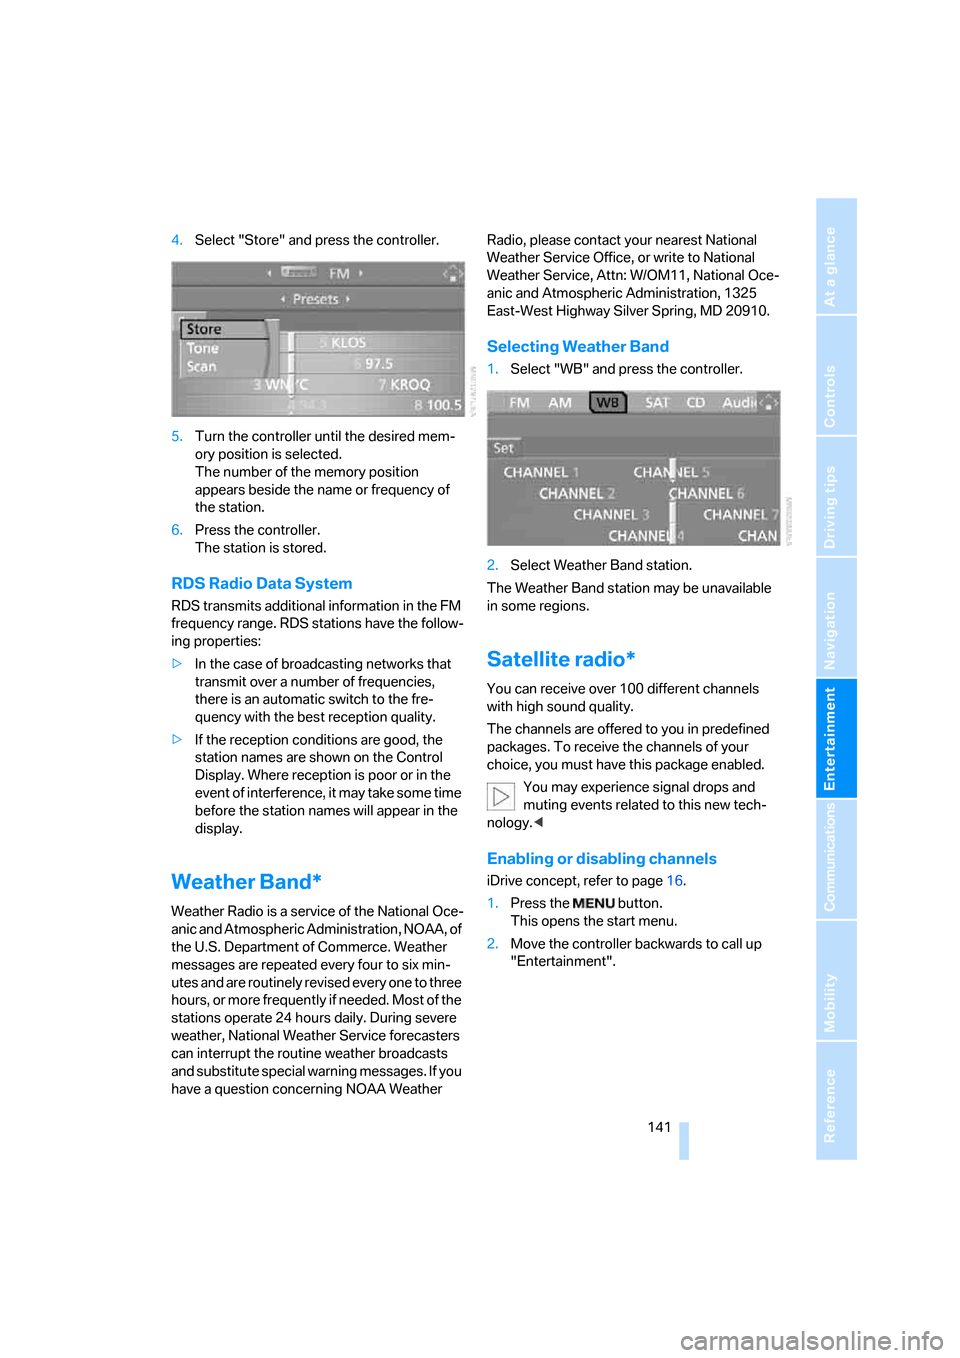
4.Select "Store" and press the controller.
5.Turn the controller until the desired mem-
ory position is selected.
The number of the memory position
appears beside the name or frequency of
the station.
6.Press the controller.
The station is stored.
RDS Radio Data System
RDS transmits additional information in the FM
frequency range. RDS stations have the follow-
ing properties:
>In the case of broadcasting networks that
transmit over a number of frequencies,
there is an automatic switch to the fre-
quency with the best reception quality.
>If the reception conditions are good, the
station names are shown on the Control
Display. Where reception is poor or in the
event of interference, it may take some time
before the station names will appear in the
display.
Weather Band*
Weather Radio is a service of the National Oce-
anic and Atmospheric Administration, NOAA, of
the U.S. Department of Commerce. Weather
messages are repeated every four to six min-
utes and are routinely revised every one to three
hours, or more frequently if needed. Most of the
stations operate 24 hours daily. During severe
weather, National Weather Service forecasters
can interrupt the routine weather broadcasts
and substitute special warning messages. If you
have a question concerning NOAA Weather Radio, please contact your nearest National
Weather Service Office, or write to National
Weather Service, Attn: W/OM11, National Oce-
anic and Atmospheric Administration, 1325
East-West Highway Silver Spring, MD 20910.
Selecting Weather Band
1.Select "WB" and press the controller.
2.Select Weather Band station.
The Weather Band station may be unavailable
in some regions.
Satellite radio*
You can receive over 100 different channels
with high sound quality.
The channels are offered to you in predefined
packages. To receive the channels of your
choice, you must have this package enabled.
You may experience signal drops and
muting events related to this new tech-
nology.<
Enabling or disabling channels
iDrive concept, refer to page16.
1.Press the button.
This opens the start menu.
2.Move the controller backwards to call up
"Entertainment".
Page 194 of 223

Mobility
193Reference
At a glance
Controls
Driving tips
Communications
Navigation
Entertainment
Giving and receiving assistance
Emergency calling*
Conditions for an emergency call:
>Radio readiness is switched on.
>The car phone is logged on to a portable
telephone network.
>The emergency call system is operable.
Initiating an emergency call
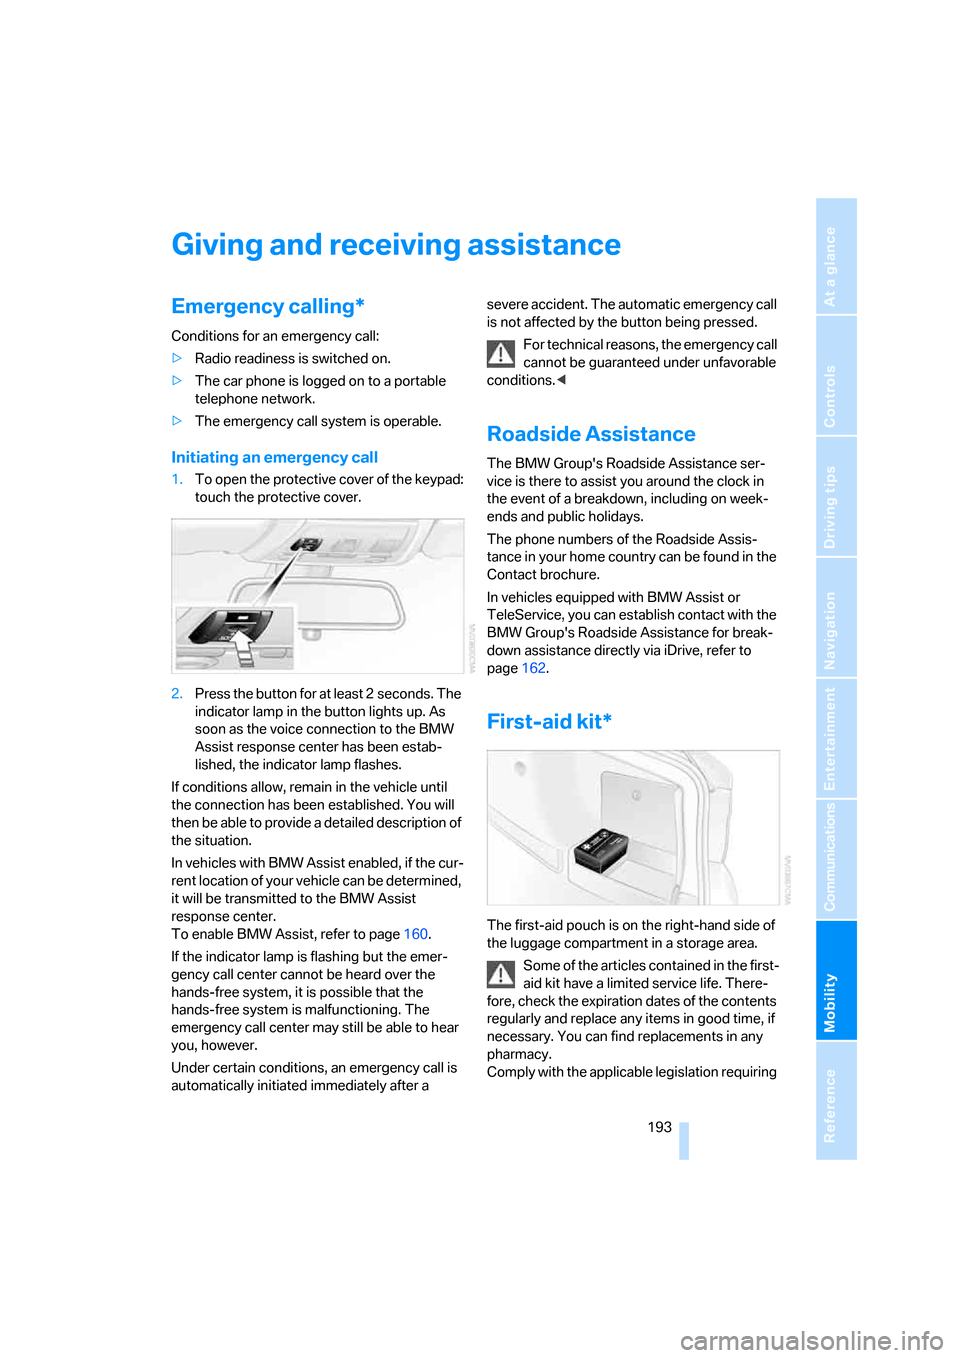
1.To open the protective cover of the keypad:
touch the protective cover.
2.Press the button for at least 2 seconds. The
indicator lamp in the button lights up. As
soon as the voice connection to the BMW
Assist response center has been estab-
lished, the indicator lamp flashes.
If conditions allow, remain in the vehicle until
the connection has been established. You will
then be able to provide a detailed description of
the situation.
In vehicles with BMW Assist enabled, if the cur-
rent location of your vehicle can be determined,
it will be transmitted to the BMW Assist
response center.
To enable BMW Assist, refer to page160.
If the indicator lamp is flashing but the emer-
gency call center cannot be heard over the
hands-free system, it is possible that the
hands-free system is malfunctioning. The
emergency call center may still be able to hear
you, however.
Under certain conditions, an emergency call is
automatically initiated immediately after a severe accident. The automatic emergency call
is not affected by the button being pressed.
For technical reasons, the emergency call
cannot be guaranteed under unfavorable
conditions.<
Roadside Assistance
The BMW Group's Roadside Assistance ser-
vice is there to assist you around the clock in
the event of a breakdown, including on week-
ends and public holidays.
The phone numbers of the Roadside Assis-
tance in your home country can be found in the
Contact brochure.
In vehicles equipped with BMW Assist or
TeleService, you can establish contact with the
BMW Group's Roadside Assistance for break-
down assistance directly via iDrive, refer to
page162.
First-aid kit*
The first-aid pouch is on the right-hand side of
the luggage compartment in a storage area.
Some of the articles contained in the first-
aid kit have a limited service life. There-
fore, check the expiration dates of the contents
regularly and replace any items in good time, if
necessary. You can find replacements in any
pharmacy.
Comply with the applicable legislation requiring
Page 204 of 223

Reference 203
At a glance
Controls
Driving tips
Communications
Navigation
Entertainment
Mobility
Onboard info
Entertainment
To display destination list120{Destination list}
To switch on destination guidance125{Start guidance}
To switch off destination guidance125{Stop guidance}
To display route preferences123{Route preference}
To switch on voice instructions127{Navigation info on}
To switch off voice instructions127{Navigation info off}
To repeat voice instructions128{Repeat navigation info}
To show arrow display126{Arrow display}
Displaying map126{Map}, {Map facing north},
{Map direction of travel} or
{Perspective}
To call up a route117, 126 {Route}
To open "New route"123{New route}
To change scale127{Scale ... miles} or
{Scale ... feet}
Displaying towns/cities and streets along the
route127{Route list}
FunctionCommand
FunctionCommand
To open "Car Data"66{Car Data}
To display onboard info66{Onboard info}
To display trip computer66{Trip computer}
To open speed limit75{Limit}
To open stopwatch75{Stopwatch}
FunctionCommand
Tone control135{Audio}
To switch on radio138{Radio on}
To open "FM"138{FM menu}
To open "AM"138{AM menu}
To open "All stations"138{FM All stations}
To select radio station138{Station} name or
{Choose station}
To open "Presets"138{FM presets} or
{AM presets}
Page 207 of 223

Everything from A - Z
206
Everything from A - Z
Index
"..." Identifies Control Display
texts used to select
individual functions and
refers you to the page where
these texts can be found.
A
ABS Antilock Brake
System78
ACC, refer to Active cruise
control57
Accessories, refer to The
individual vehicle5
Activated-charcoal filter for
automatic climate control92
Active cruise control57
– indicator lamps60
– malfunction61
– selecting distance59
– sensor61
Active steering81
– initializing the system82
– warning lamp82
Adaptive Head Light86
"Add digits" for portable
phone155
Additives
– coolant183
"Address book" in
navigation121
Address for navigation
– deleting122
– entering115
– selecting121
– storing current position121
"Add to destination list"118
Adjusting the temperature
with automatic climate
control90
Adjusting the tone during
audio operation, refer to
Tone control135Adjustment in audio mode
– front-to-rear135
– right/left balance135
Airbags82
– sitting safely38
– warning lamp84
Air distribution
– automatic90
– individual90
Air flow rate91
Airing, refer to Ventilation92
Air pressure, tires170
Air recirculation, refer to
Recirculated-air mode91
"Air recirculation on / off"45
Air vents89
AKI, refer to Fuel
specifications168
Alarm system34
– avoiding unintentional
alarms35
– interior motion sensor35
– switching off an alarm34
– tilt alarm sensor35
"All channels"
142
All-season tires, refer to
Winter tires179
"All stations", calling up on
radio138
"AM", waveband134,138
AM, waveband138
Ambient air, refer to
Recirculated-air mode91
Antenna for portable
phone152
Antifreeze
– coolant183
– washer fluid55
Antilock Brake System ABS
– indicator lamp79
Anti-theft alarm system, refer
to Alarm system34
Anti-theft system29Anti-trapping mechanism
– glass sunroof, electric37
– windows35
Approved axle loads, refer to
Weights201
Approved gross vehicle
weight, refer to Weights201
Armrest, refer to Center
armrest96
Arrival time
– computer66
– destination guidance125
"Arrow display" in
navigation126
Ashtray98
Assist, refer to BMW
Assist160
Assistance systems, refer to
Dynamic Stability Control
DSC78
Assistance window20
AUC Automatic recirculated-
air control91
Audio134
– controls134
– switching on/off134
– tone control135
– volume135
"Audio Aux"134
Audio device, external97
"Audio" tone settings135
"Auto. headlamps"85
Automatic
– air distribution90
– air flow rate90
– cruise control55,57
– headlamp control85
– service notification161
– storing of stations139
Automatic climate control89
– automatic air distribution90
– settings via iDrive90
Automatic curb monitor44