2005 BMW 330I navigation system
[x] Cancel search: navigation systemPage 142 of 223
Navigation
Entertainment
Driving tips
141Reference
At a glance
Controls
Communications
Mobility
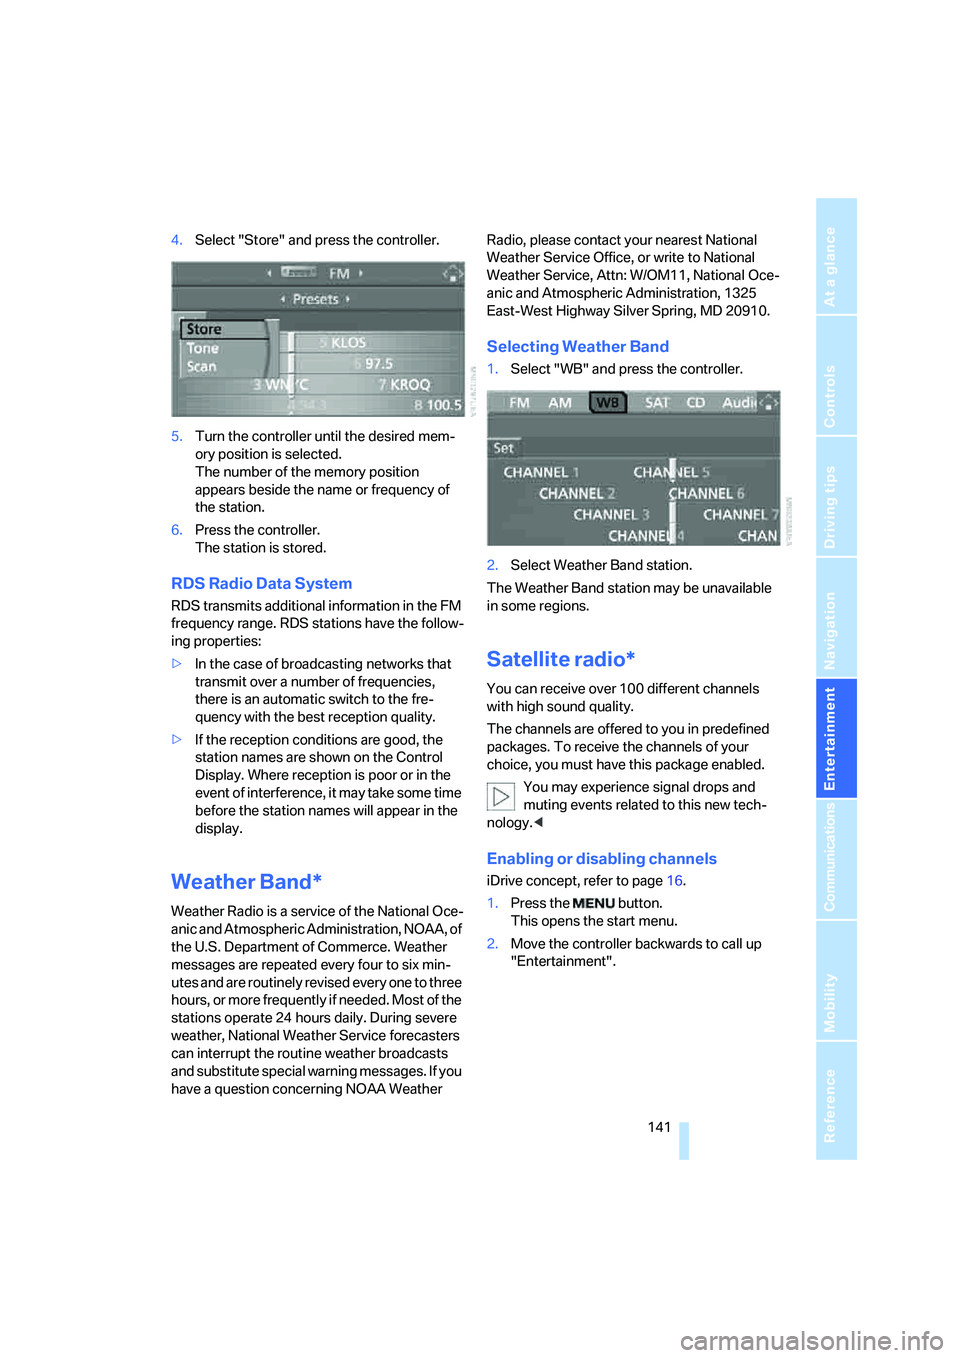
4.Select "Store" and press the controller.
5.Turn the controller until the desired mem-
ory position is selected.
The number of the memory position
appears beside the name or frequency of
the station.
6.Press the controller.
The station is stored.
RDS Radio Data System
RDS transmits additional information in the FM
frequency range. RDS stations have the follow-
ing properties:
>In the case of broadcasting networks that
transmit over a number of frequencies,
there is an automatic switch to the fre-
quency with the best reception quality.
>If the reception conditions are good, the
station names are shown on the Control
Display. Where reception is poor or in the
event of interference, it may take some time
before the station names will appear in the
display.
Weather Band*
Weather Radio is a service of the National Oce-
anic and Atmospheric Administration, NOAA, of
the U.S. Department of Commerce. Weather
messages are repeated every four to six min-
utes and are routinely revised every one to three
hours, or more frequently if needed. Most of the
stations operate 24 hours daily. During severe
weather, National Weather Service forecasters
can interrupt the routine weather broadcasts
and substitute special warning messages. If you
have a question concerning NOAA Weather Radio, please contact your nearest National
Weather Service Office, or write to National
Weather Service, Attn: W/OM11, National Oce-
anic and Atmospheric Administration, 1325
East-West Highway Silver Spring, MD 20910.
Selecting Weather Band
1.Select "WB" and press the controller.
2.Select Weather Band station.
The Weather Band station may be unavailable
in some regions.
Satellite radio*
You can receive over 100 different channels
with high sound quality.
The channels are offered to you in predefined
packages. To receive the channels of your
choice, you must have this package enabled.
You may experience signal drops and
muting events related to this new tech-
nology.<
Enabling or disabling channels
iDrive concept, refer to page16.
1.Press the button.
This opens the start menu.
2.Move the controller backwards to call up
"Entertainment".
Page 150 of 223
Navigation
Entertainment
Driving tips
149Reference
At a glance
Controls
Communications
Mobility
External audio device
You can connect an external audio device, for
instance an MP3 player, and play audio tracks
over the car's loudspeaker system. You can
adjust the tone using iDrive.
Connecting
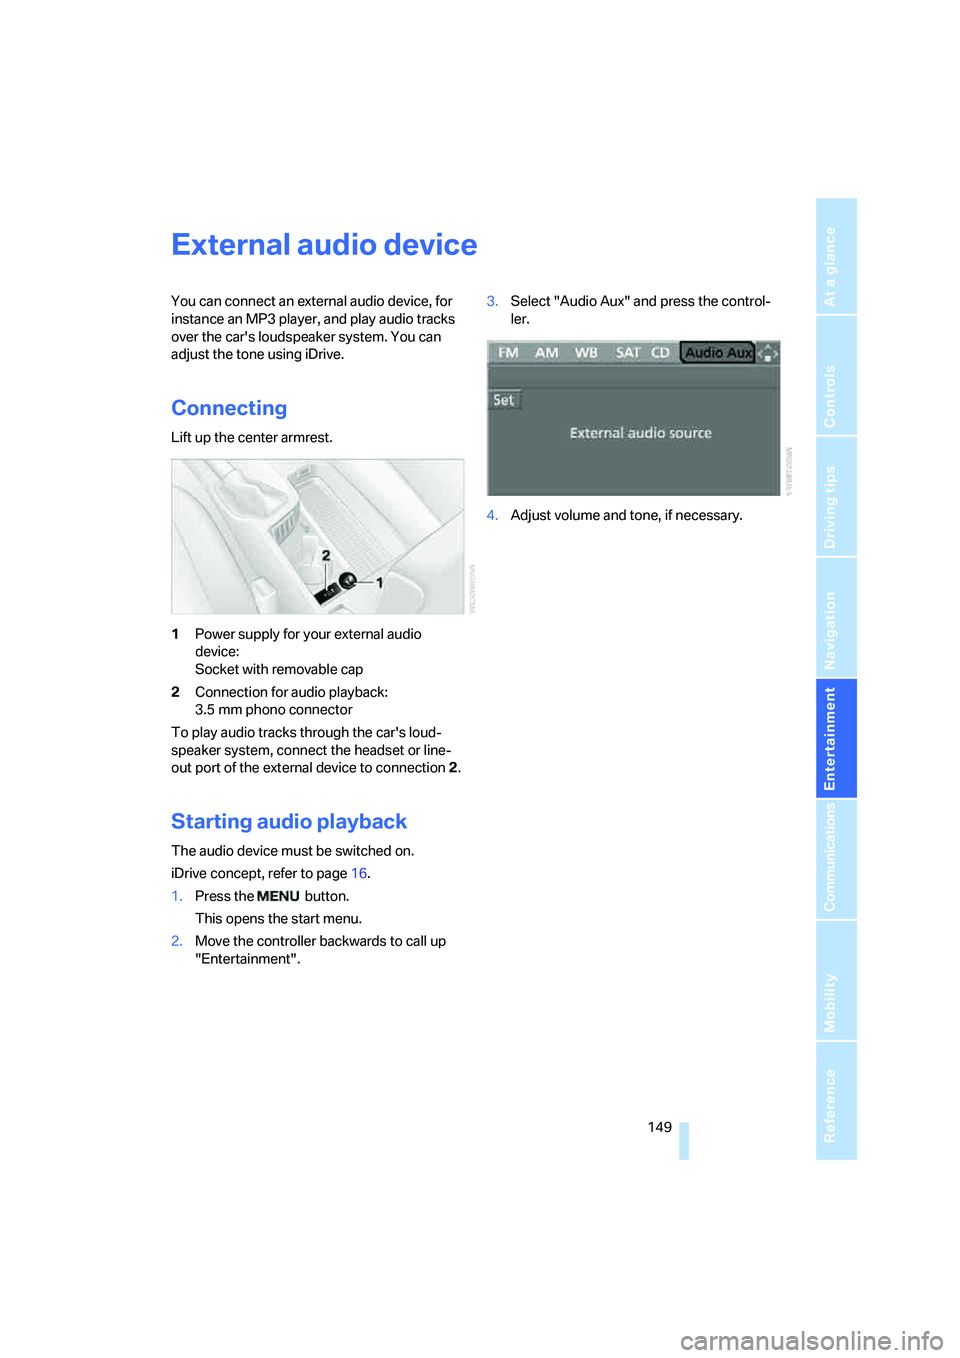
Lift up the center armrest.
1Power supply for your external audio
device:
Socket with removable cap
2Connection for audio playback:
3.5 mm phono connector
To play audio tracks through the car's loud-
speaker system, connect the headset or line-
out port of the external device to connection 2.
Starting audio playback
The audio device must be switched on.
iDrive concept, refer to page16.
1.Press the button.
This opens the start menu.
2.Move the controller backwards to call up
"Entertainment".3.Select "Audio Aux" and press the control-
ler.
4.Adjust volume and tone, if necessary.
Page 154 of 223
153
Entertainment
Reference
At a glance
Controls
Driving tips Communications
Navigation
Mobility
Adjusting volume
Turn the knob during a call to select the desired
volume.
This volume for the hands-free system is main-
tained, even if the other audio sources are set to
minimum volume.
The setting is stored for the remote control cur-
rently in use.
Operation via iDrive
Once the portable phone is connected to the
vehicle via Bluetooth, the following functions
can be used via iDrive:
>Dialing phone numbers
>Phone book
>Top 8
>Redialing
>Displaying accepted calls
>Displaying missed calls
iDrive concept, refer to page16.
1.Press the button.
This opens the start menu.
2.Move the controller forwards to call up
"Communication".
Receiving calls
If you have the phone number of the caller
stored in the phone book and the phone num-
ber is transmitted, the name of the entry is dis-
played.
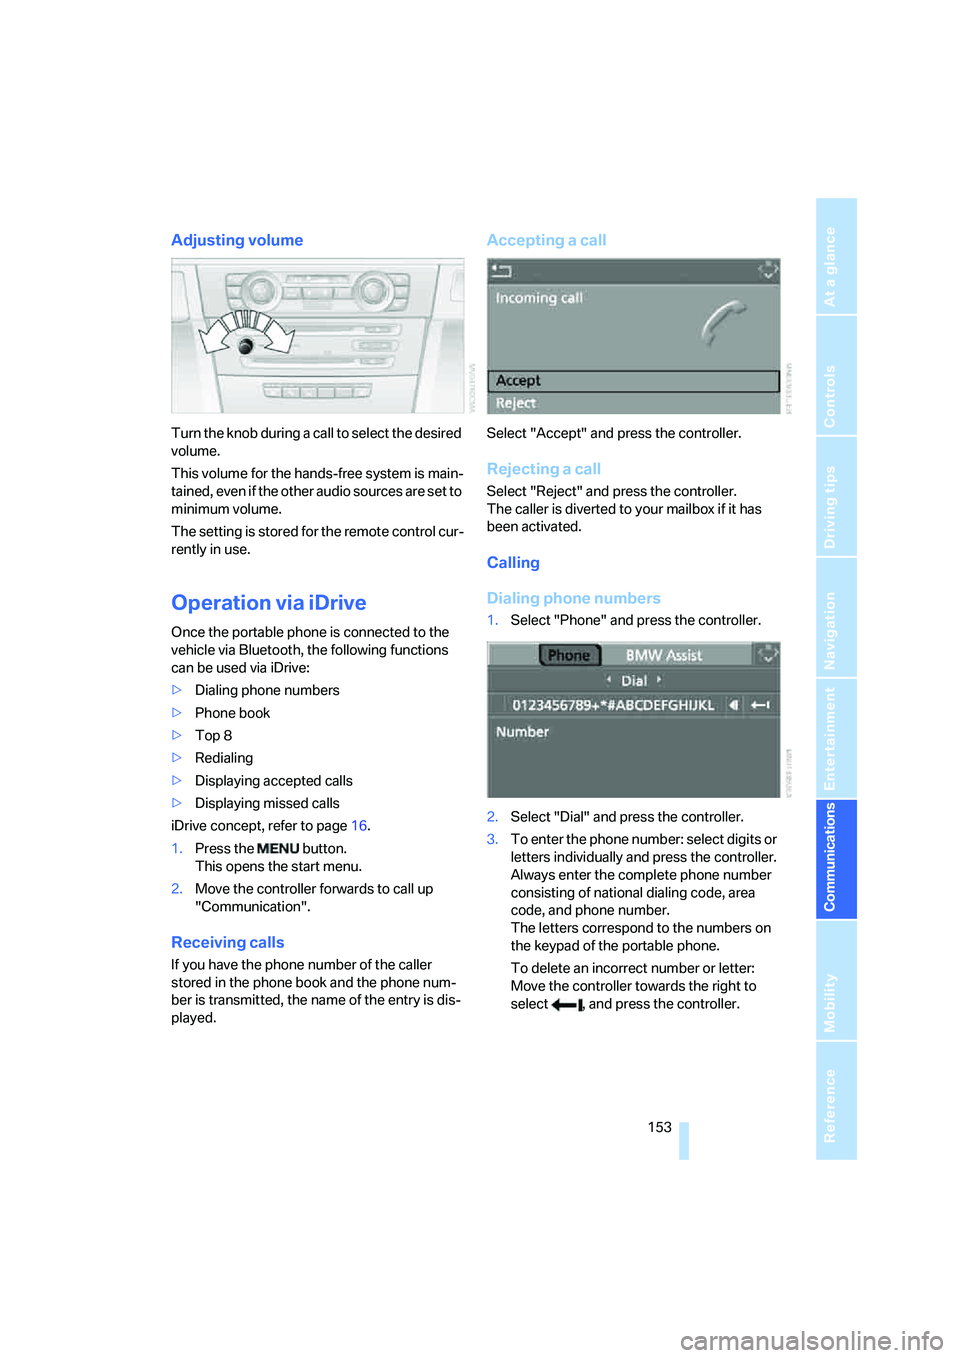
Accepting a call
Select "Accept" and press the controller.
Rejecting a call
Select "Reject" and press the controller.
The caller is diverted to your mailbox if it has
been activated.
Calling
Dialing phone numbers
1.Select "Phone" and press the controller.
2.Select "Dial" and press the controller.
3.To enter the phone number: select digits or
letters individually and press the controller.
Always enter the complete phone number
consisting of national dialing code, area
code, and phone number.
The letters correspond to the numbers on
the keypad of the portable phone.
To delete an incorrect number or letter:
Move the controller towards the right to
select , and press the controller.
Page 156 of 223
155
Entertainment
Reference
At a glance
Controls
Driving tips Communications
Navigation
Mobility
1.Select "Phone" and press the controller.
2.Select "A - Z" and press the controller.
3.Select the desired entry.
4.Press the controller.
Other menu items are displayed.
5.Select "Add digits" and press the controller.
6.To add to the phone number: select digits
individually and press the controller.
7.Select "Dial number" and press the control-
ler.
Lists
Your phone can store phone numbers you have
dialed and incoming calls in lists. If the caller is
entered in the phone book, the name of the
entry is displayed instead of the phone number.
You can select the desired subscriber from the
list and establish the connection.
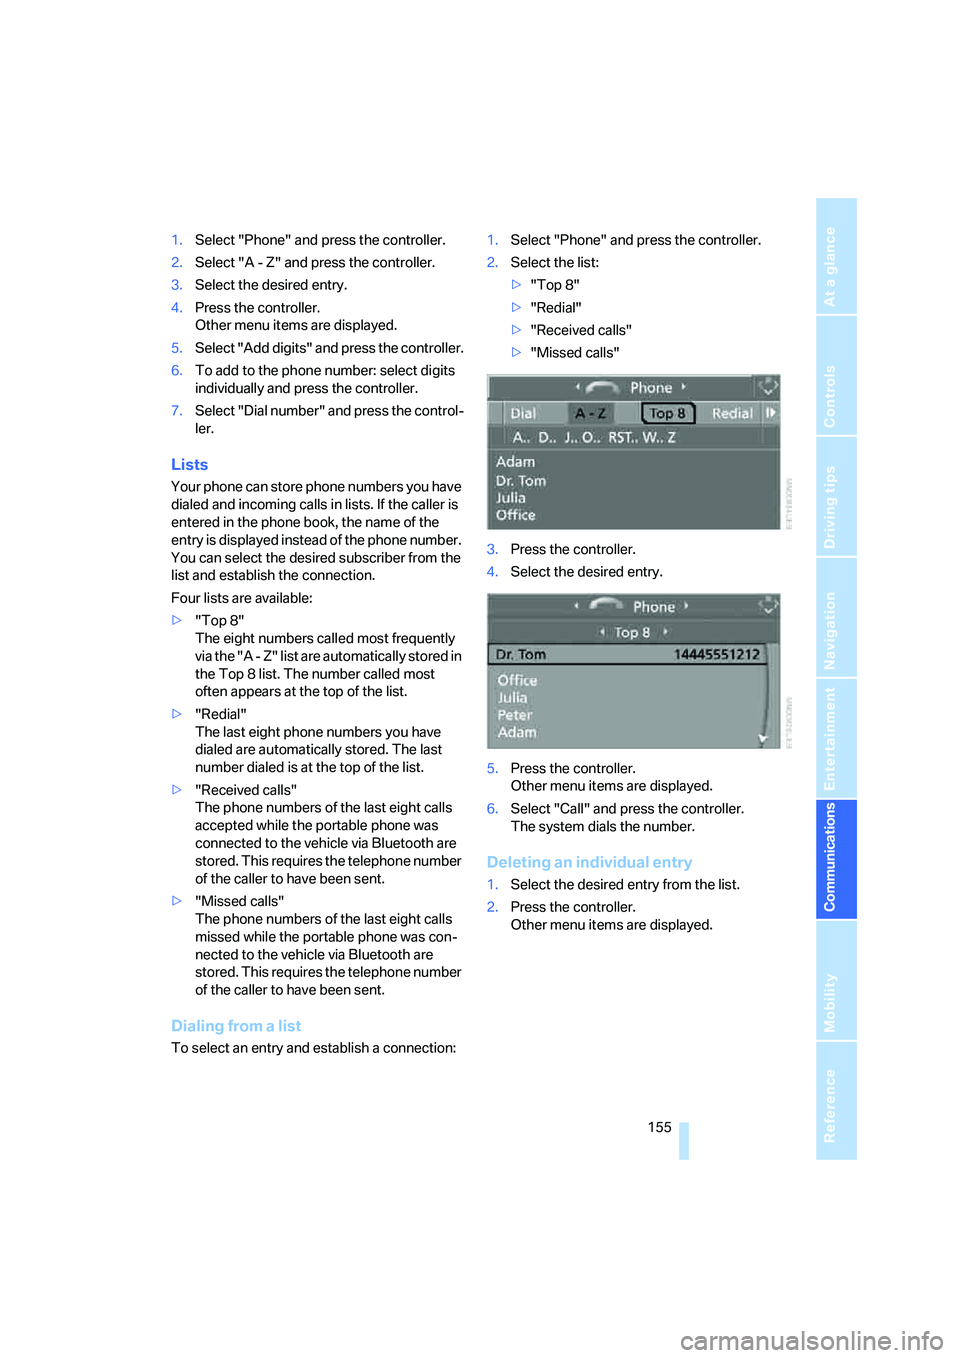
Four lists are available:
>"Top 8"
The eight numbers called most frequently
via the "A - Z" list are automatically stored in
the Top 8 list. The number called most
often appears at the top of the list.
>"Redial"
The last eight phone numbers you have
dialed are automatically stored. The last
number dialed is at the top of the list.
>"Received calls"
The phone numbers of the last eight calls
accepted while the portable phone was
connected to the vehicle via Bluetooth are
stored. This requires the telephone number
of the caller to have been sent.
>"Missed calls"
The phone numbers of the last eight calls
missed while the portable phone was con-
nected to the vehicle via Bluetooth are
stored. This requires the telephone number
of the caller to have been sent.
Dialing from a list
To select an entry and establish a connection:1.Select "Phone" and press the controller.
2.Select the list:
>"Top 8"
>"Redial"
>"Received calls"
>"Missed calls"
3.Press the controller.
4.Select the desired entry.
5.Press the controller.
Other menu items are displayed.
6.Select "Call" and press the controller.
The system dials the number.
Deleting an individual entry
1.Select the desired entry from the list.
2.Press the controller.
Other menu items are displayed.
Page 158 of 223
157
Entertainment
Reference
At a glance
Controls
Driving tips Communications
Navigation
Mobility
Canceling operation by voice
Press button on steering wheel
or
In dialogs where text is spoken, e.g. a name
rather than a command, canceling is only possi-
ble using the button. The dialog is automati-
cally interrupted when an incoming call is
received.
Voice commands
In addition to the commands described in this
Owner's Manual, alternative commands are
often possible for the same functions, e.g.:
The system recognizes digits from zero to nine.
You can say each digit individually or group
them into a sequence of three to five digits to
accelerate the input.{Cancel}.
{Dial name} or {Name}.
Page 160 of 223
159
Entertainment
Reference
At a glance
Controls
Driving tips Communications
Navigation
Mobility
Storing an entry
An entry always consists of a name and phone
number.
Selecting an entry
The connection to the phone number of the
selected entry is established.
Having entries read aloud and selecting
You can have all the entries of your voice phone
book read aloud in the order of input and select
a certain entry to establish a connection:
Redialing
The {Redial} command calls up "Redial".
Deleting an entry
You can delete any entry from the voice phone
book.
Deleting all entries
{Delete phone book} deletes all entries in the
phone book.
Notes
The voice commands in English were
available as of this printing. Other lan-
guages are currently in preparation. To operate
the portable phone via the voice command sys-
tem, refer to page22.<
Important for voice commands
For voice commands, bear in mind the follow-
ing:
>Issue the commands smoothly and at nor-
mal volume, avoiding excessive emphasis
and pauses.
>Keep the doors, windows and glass sunroof
closed to prevent interference from ambi-
ent noise.
>Avoid other sources of noise in the vehicle
while speaking, and ask other vehicle occu-
pants to refrain from talking while you are
using the system. 1.{Save name}.
The dialog for storing a name is
opened.
2.Say the name and repeat it upon
request.
The spoken length of the names in the
phone book must not exceed approx.
2seconds.
3.Say the phone number when prompted.
4.To store the phone number:
{Save}.
1.{Dial name}.
The dialog for selecting an entry is
opened.
2.Say the name when prompted.
3.Confirm the prompt with {Yes}.
1.{Read phone book}.
The dialog for having the phone book
read is opened.
2.{Dial number} when the desired entry is
read aloud.
1.{Delete name}.
The dialog for deleting an entry is
opened.
2.Say the name when prompted.
3.Confirm the prompt with {Yes}.
1.{Delete phone book}.
The dialog for deleting phone book is
opened.
2.Confirm the prompt with {Yes}.
3.Confirm the repeated prompt with
{Yes}.
Page 182 of 223
Mobility
181Reference
At a glance
Controls
Driving tips
Communications
Navigation
Entertainment
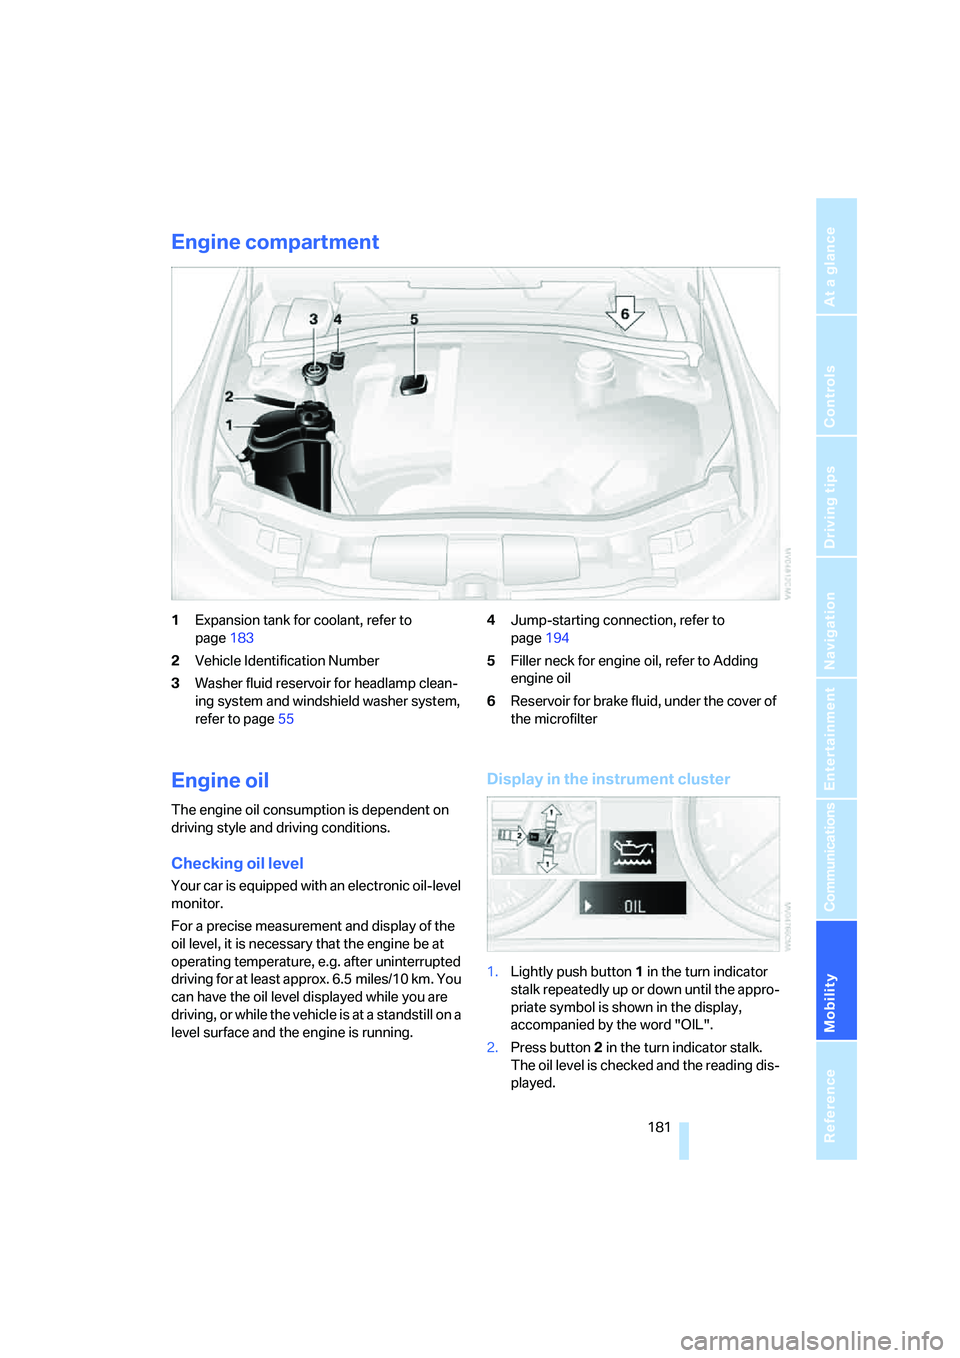
Engine compartment
1Expansion tank for coolant, refer to
page183
2Vehicle Identification Number
3Washer fluid reservoir for headlamp clean-
ing system and windshield washer system,
refer to page554Jump-starting connection, refer to
page194
5Filler neck for engine oil, refer to Adding
engine oil
6Reservoir for brake fluid, under the cover of
the microfilter
Engine oil
The engine oil consumption is dependent on
driving style and driving conditions.
Checking oil level
Your car is equipped with an electronic oil-level
monitor.
For a precise measurement and display of the
oil level, it is necessary that the engine be at
operating temperature, e.g. after uninterrupted
driving for at least approx. 6.5 miles/10 km. You
can have the oil level displayed while you are
driving, or while the vehicle is at a standstill on a
level surface and the engine is running.
Display in the instrument cluster
1.Lightly push button 1 in the turn indicator
stalk repeatedly up or down until the appro-
priate symbol is shown in the display,
accompanied by the word "OIL".
2.Press button 2 in the turn indicator stalk.
The oil level is checked and the reading dis-
played.
Page 184 of 223
Mobility
183Reference
At a glance
Controls
Driving tips
Communications
Navigation
Entertainment
>"Please observe recalculated service inter-
val for engine oil"
Do not add engine oil. You can continue
your journey. Note the newly calculated dis-
tance remaining to the next oil service, refer
to page185. Have the system checked as
soon as possible.
Adding engine oil
Do not add the maximum amount of
1.1 US quarts/1 liter of engine oil until a corre-
sponding message is shown on the Control Dis-
play.
Add oil within the next 125 miles/200 km,
otherwise the engine could be dam-
aged.<
Keep oils, greases, etc. out of the reach of
children and comply with the warnings on
the containers. Otherwise, health hazards may
result.<
Oil change
Have oil changed only at y our B MW c ente r o r a t
a workshop that works according to BMW
repair procedures with correspondingly trained
personnel.
Specified engine oils
The quality of the engine oil selected has critical
significance for the operation and service life of
an engine. BMW continuously approves spe-
cific oils after confirming their suitability for use
in its vehicles with extensive testing.
Use only approved BMW High Performance
Synthetic Oil.
If you are unable to obtain BMW High Perfor-
mance Synthetic Oil, you can add small amounts of another synthetic oil between oil
changes. Use only oils with the API SH specifi-
cation or higher.
Ask your BMW center for details concern-
ing the specific BMW High Performance
Synthetic Oil or synthetic oils which have been
approved.<
You can also call BMW of North America
at 1-800-831-1117 or visit this website:
www.bmwusa.com to obtain this information.
Viscosity ratings
Viscosity is the oil flow rating as defined in SAE
classes.
The selection of the correct SAE class depends
on the climatic conditions in the area where you
typically drive your BMW.
Approved oils are in SAE classes 5W-40
and 5W-30.<
These oils may be used for driving in all ambient
temperatures.
Coolant
Do not add coolant to the cooling system
when the engine is hot. Escaping coolant
can cause burns.<
Coolant is a mixture of water and an additive.
Not all commercially available additives are suit-
able for your BMW. Ask your BMW center for
suitable additives.
Only use suitable additives, as otherwise
engine damage may result. The additives
are hazardous to your health.<
Comply with the appropriate environ-
mental protection regulations when dis-
posing of coolant additives.<
Checking coolant level
1.The engine must be at ambient tempera-
ture.
2.Turn the cap of the expansion tank counter-
clockwise to allow any accumulated pres-
sure to escape, then continue turning to
open.