2005 BMW 325I SEDAN turn signal
[x] Cancel search: turn signalPage 131 of 223

What to do if …
130
What to do if …
What to do if …
>a navigation DVD is inserted, but an instruc-
tion to insert the DVD appears on the Con-
trol Display?
The navigation DVD may not be the correct
DVD for the navigation system. This infor-
mation is indicated on the DVD label.
>you request the current position of your
vehicle, but do not receive a precise dis-
play?
The system is unable to receive enough
GPS signals at your current position owing
to obstructions, your current position is not
yet available on your navigation DVD, or the
system is in the process of calculating your
current position. As a rule, reception is
guaranteed when you are in the open.
>the destination guidance does not accept a
destination?
The data of the destination is not stored on
the navigation DVD that is loaded. Choose a
destination as close as possible to the orig-
inal one.
>the destination guidance does not accept
an address without the street name?
On the navigation DVD, no downtown area
can be determined for the city or town
entered. Enter any street, or a destination
such as the railway station in the selected
town, and then start the destination guid-
ance.
>you want to enter a destination for the des-
tination guidance, but it is not possible to
select the letters for your desired entry?
The data of the destination is not stored on
the navigation DVD that is loaded. In this
case, the system will not offer you any let-
ters to choose from. Choose a destination
as close as possible to the original one.
>the system stops furnishing directions on
which way to turn as you approach intersec-
tions?
You are driving in an area that has not yet
been completely recorded on the naviga-tion DVD. Instead of an arrow indicating a
turn, you will see an arrow which indicates
the general direction of your planned route.
Or you have left the recommended route
and the system requires a few seconds to
calculate a new recommended route.
>the navigation system does not react to
entries?
If the battery was disconnected, it takes
about 10 minutes before the system is once
again operational.
Page 139 of 223

Radio
138
Radio
Your radio provides reception of the FM and AM
wavebands.
Listening to the radio
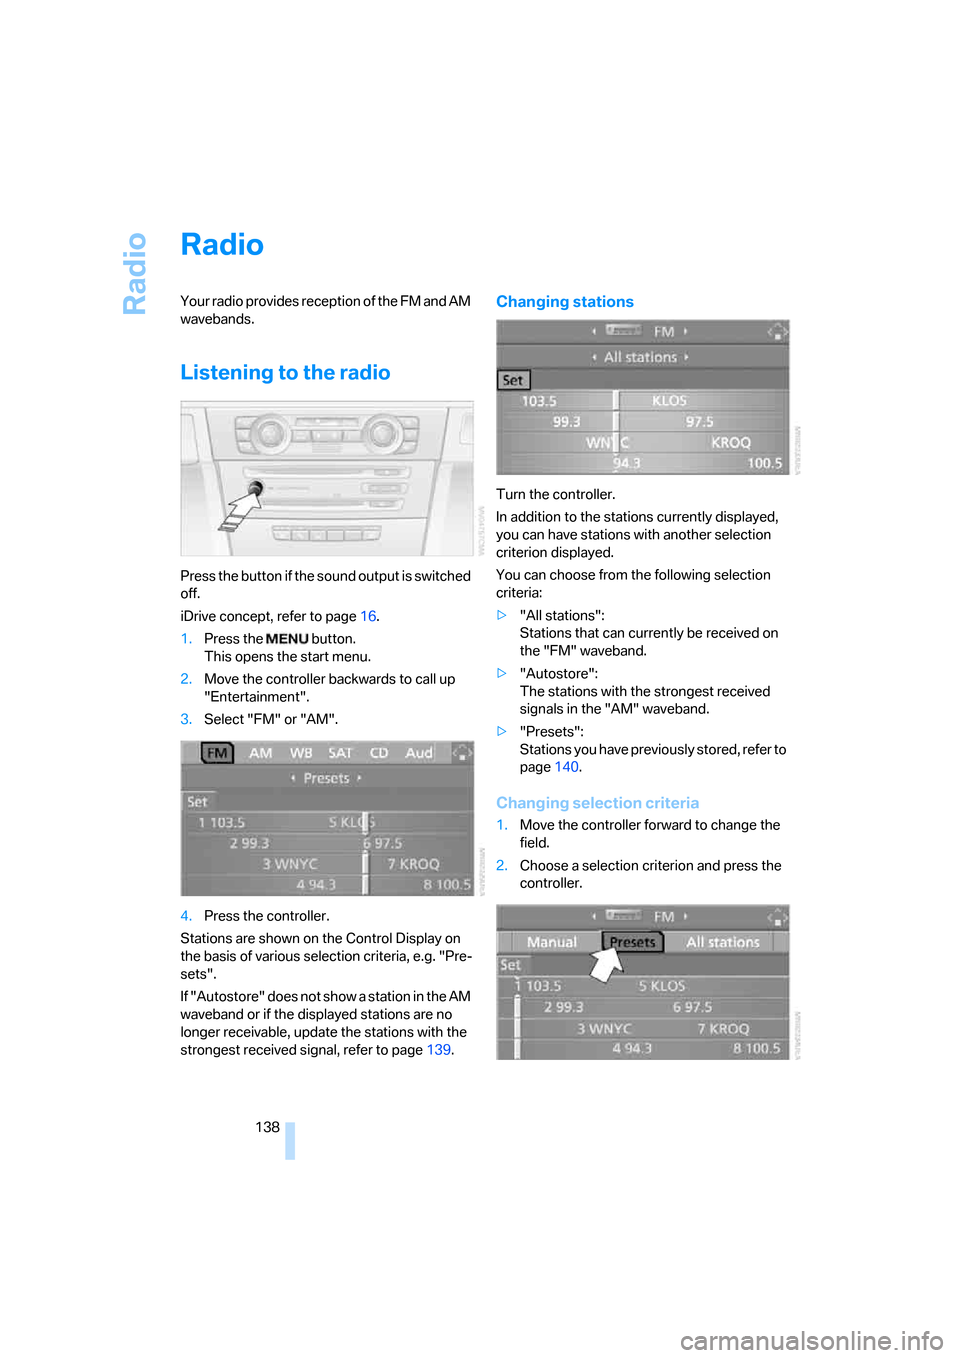
Press the button if the sound output is switched
off.
iDrive concept, refer to page16.
1.Press the button.
This opens the start menu.
2.Move the controller backwards to call up
"Entertainment".
3.Select "FM" or "AM".
4.Press the controller.
Stations are shown on the Control Display on
the basis of various selection criteria, e.g. "Pre-
sets".
If "Autostore" does not show a station in the AM
waveband or if the displayed stations are no
longer receivable, update the stations with the
strongest received signal, refer to page139.
Changing stations
Turn the controller.
In addition to the stations currently displayed,
you can have stations with another selection
criterion displayed.
You can choose from the following selection
criteria:
>"All stations":
Stations that can currently be received on
the "FM" waveband.
>"Autostore":
The stations with the strongest received
signals in the "AM" waveband.
>"Presets":
Stations you have previously stored, refer to
page140.
Changing selection criteria
1.Move the controller forward to change the
field.
2.Choose a selection criterion and press the
controller.
Page 140 of 223

Navigation
Entertainment
Driving tips
139Reference
At a glance
Controls
Communications
Mobility
Buttons on the CD player
Press the button for the corre-
sponding direction.
The system switches to the next displayed sta-
tion.
You can also change stations with buttons on
the steering wheel, refer to page10.
Sampling stations, scan
The stations on the current waveband are auto-
matically sampled in succession.
1.Select "FM" or "AM" and press the control-
ler.
"Set" is selected.
2.Press the controller.
Other menu items are displayed.
3.Select "Scan" and press the controller.
Scan starts.
To stop the scan:
1.Press the controller.
2.Select "Scan" and press the controller.
This cancels the scan search, and the radio
remains on the current station.
Buttons on the CD player
To start scan, hold down the corre-
sponding direction button.
To stop scanning, press the button again.
Selecting frequency manually
With "Manual" you can select stations that are
received in addition to those displayed.1.Select "FM" or "AM" and press the control-
ler.
2.Move the controller forward to change the
field.
3.Select "Manual" and press the controller.
4.Turn the controller to set a certain fre-
quency.
Updating stations with best reception
If on a longer journey you move out of the
reception range of the stations originally
received, you can update the list of stations
received with the strongest signals in the AM
waveband.
1.Select "AM" and press the controller.
2.Move the controller forward to change the
field.
3.Select "Autostore" and press the controller.
"Set" is selected.
4.Press the controller.
Other menu items are displayed.
Page 142 of 223

Navigation
Entertainment
Driving tips
141Reference
At a glance
Controls
Communications
Mobility
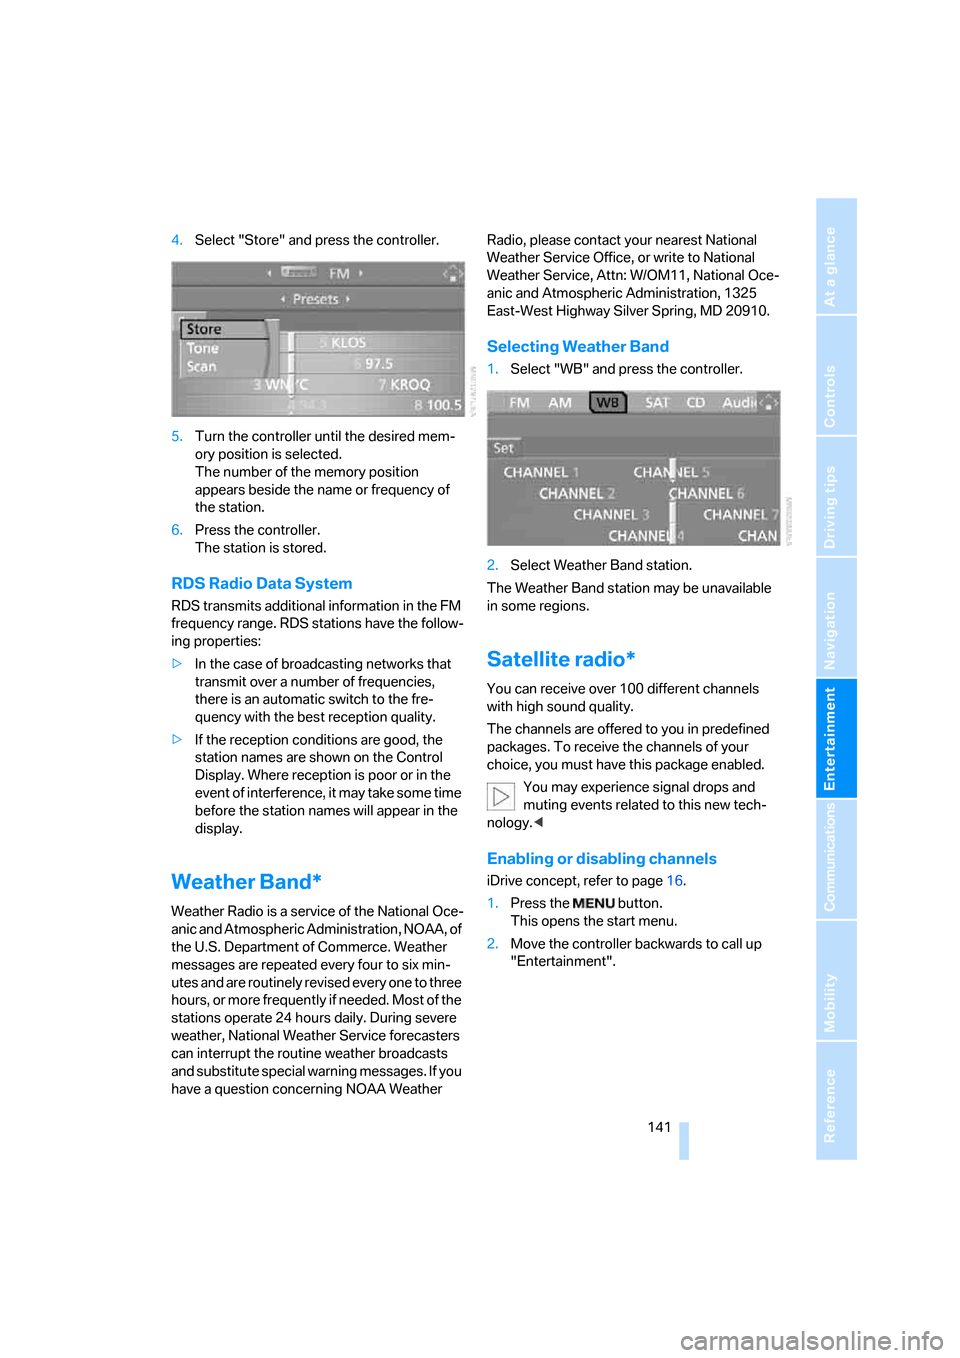
4.Select "Store" and press the controller.
5.Turn the controller until the desired mem-
ory position is selected.
The number of the memory position
appears beside the name or frequency of
the station.
6.Press the controller.
The station is stored.
RDS Radio Data System
RDS transmits additional information in the FM
frequency range. RDS stations have the follow-
ing properties:
>In the case of broadcasting networks that
transmit over a number of frequencies,
there is an automatic switch to the fre-
quency with the best reception quality.
>If the reception conditions are good, the
station names are shown on the Control
Display. Where reception is poor or in the
event of interference, it may take some time
before the station names will appear in the
display.
Weather Band*
Weather Radio is a service of the National Oce-
anic and Atmospheric Administration, NOAA, of
the U.S. Department of Commerce. Weather
messages are repeated every four to six min-
utes and are routinely revised every one to three
hours, or more frequently if needed. Most of the
stations operate 24 hours daily. During severe
weather, National Weather Service forecasters
can interrupt the routine weather broadcasts
and substitute special warning messages. If you
have a question concerning NOAA Weather Radio, please contact your nearest National
Weather Service Office, or write to National
Weather Service, Attn: W/OM11, National Oce-
anic and Atmospheric Administration, 1325
East-West Highway Silver Spring, MD 20910.
Selecting Weather Band
1.Select "WB" and press the controller.
2.Select Weather Band station.
The Weather Band station may be unavailable
in some regions.
Satellite radio*
You can receive over 100 different channels
with high sound quality.
The channels are offered to you in predefined
packages. To receive the channels of your
choice, you must have this package enabled.
You may experience signal drops and
muting events related to this new tech-
nology.<
Enabling or disabling channels
iDrive concept, refer to page16.
1.Press the button.
This opens the start menu.
2.Move the controller backwards to call up
"Entertainment".
Page 189 of 223

Replacing components
188 journey with great care, provided that local leg-
islation does not prohibit this.
Have work on the xenon lighting system
performed only by your BMW center or a
workshop that works according to BMW repair
procedures with correspondingly trained per-
sonnel. Due to the high electrical voltages
present, there is a risk of potentially fatal acci-
dents if work is performed inappropriate.<
Parking lamps, roadside parking lamps
In the event of a malfunction, please contact
your BMW center or a workshop that works
according to BMW repair procedures with cor-
respondingly trained personnel.
Halogen lamps
H7 bulb, 55 watts
Always wear gloves and eye protection;
the atmosphere within the H7 bulb is
pressurized. Otherwise there is a risk of injury if
the bulb is damaged.<
There are separate headlamp covers for low-
beam headlamps and high-beam headlamps.
Be careful when installing the covers, as
otherwise leaks could occur and cause
damage to the headlamp system.<
For checking and adjusting headlamp
aim, please contact your BMW center.<
Access to the lamps
The high-beam headlamp can be accessed
from the engine compartment, whereas the
low-beam headlamp is accessed through a flap
in the wheel well.1Cover for high-beam headlamp
2Cover for low-beam headlamp
3Turn signal
To remove the covers:
1.Fold the respective wire bracket to the side,
see arrows.
2.Flip open the cover and take it out of the
guide.
Follow the same steps in reverse order to reat-
tach the covers.
Access through the wheel well
Only for low-beam headlamps and turn signals:
1.Turn the wheel inwards.
2.Open the flap in the wheel well.
Changing low-beam and high-beam
bulbs
1.Remove the relevant cover for the head-
lamp.
2.Disconnect the plug from the lamp.
Page 190 of 223

Mobility
189Reference
At a glance
Controls
Driving tips
Communications
Navigation
Entertainment
3.Push the wire bracket to the side out of the
mounting, arrow1, and fold it down,
arrow2.
4.Remove the bulb.
5.Insert the new bulb.
6.Fold up the wire bracket and clamp it.
7.Connect the plug.
8.Reattach the cover.
Parking lamps, roadside parking lamps
5 watt bulb, W 5 W
1.Remove the cover for the high-beam head-
lamp.
2.Pull out the bulb holder, see arrow.
3.Remove and replace the bulb.
4.Insert the bulb holder.
5.Reattach the cover.
Turn signals, front
21 watt bulb, PY 21 W
or PY 21 W Silver Vision1.Turn bulb holder1 to the left and remove.
2.Apply gentle pressure to the bulb while
turning it to the left for removal and replace-
ment.
3.Insert bulb holder1.
4.Attach the flap to the wheel well.
Side-mounted turn signals
5 watt bulb, WY 5 W
or WY 5 W-ST (Silver Top)
1.Press back against the front edge of the
light with the tip of your finger, then pivot it
out.
2.Extract the bulb for replacement.
3.Insert the lamp.
Tail lamps
21 watt bulbs, P 21 W
The tail lamps are divided into two parts. One
part is in the luggage compartment lid, the other
is in the fender.
Page 191 of 223

Replacing components
190 1Brake lamp
2Roadside parking lamp/tail lamp
3Turn signal
4Backup lamp
5Tail lamp
6Brake lamp
Lamps in the luggage compartment lid
1.Pry out the plastic plugs in the trim of the
luggage compartment lid using a screw-
driver and remove the trim.
2.Unfasten the bulb holder at the clip, see
arrow, and remove.
3.Apply gentle pressure to the bulb while
turning it to the left for removal and replace-
ment.
4.Re-engage the bulb holder so that it audibly
clicks into place.
5.Reattach the trim of the luggage compart-
ment lid.
Fender-mounted lamps
1.Using a screwdriver, pry off the cover in the
luggage compartment or release the turn-
lock fastener by turning it counterclockwise
and remove the cover.
2.Unfasten the bulb holder at the clip, see
arrow, and pull out.
3.Apply gentle pressure to the bulb while
turning it to the left for removal and replace-
ment.
4.Re-engage the bulb holder so that it audibly
clicks into place.
5.Reattach the cover in the luggage compart-
ment.
License plate lamp
5 watt bulb, C 5 W
1.Using a screwdriver, push the lamp to the
left in the flap of the lamp housing.
2.Take out the lamp towards the right and
change the bulb.
3.Insert the lamp.
Center brake lamp
This lamp uses LED technology for operation.
In the event of a malfunction, please contact
your BMW center or a workshop that works
Page 196 of 223

Mobility
195Reference
At a glance
Controls
Driving tips
Communications
Navigation
Entertainment
nal of the battery or to the engine or body
ground of the vehicle to be started.
Starting the engine
1.Start the engine of the donor vehicle and
allow it to run for a few minutes at an
increased idle speed.
2.Start the engine on the other vehicle in the
usual way.
If the first start attempt is not successful,
wait a few minutes before another attempt
in order to allow the discharged battery to
recharge.
3.Let the engines run for a few minutes.
4.Disconnect the jumper cables by reversing
the above connecting sequence.
If necessary, have your BMW center check and
recharge the battery.
Never use spray fluids to start the
engine.<
Tow-starting, towing away
Always observe all applicable towing laws
and regulations.<
Never allow passengers to ride in a towed
vehicle for any reason.<
Using a tow fitting
The screw-in tow fitting must always be carried
on the car. It can be screwed in at the front or
rear of the BMW.
It is stored in the onboard tool kit underneath
the cover on the right-hand side of the luggage
compartment, refer to page187.
In order to avoid damaging the tow fitting and
the vehicle, please follow these instructions:
use only the tow fitting provided with the vehi-
cle and screw it all the way in. Use the tow fitting
for towing only on roads. Avoid lateral loading of
the tow fitting, e.g. do not lift the vehicle by the
tow fitting.
Access to screw thread
Rectangular cover panel in bumper:
Press on the upper edges of the cover panel.
Front
Rear
Being towed
Make sure that the ignition is switched on,
refer to page49, as the low beams, tail
lamps, turn signals and windshield wipers
would no longer be available. If the electrical
system fails, do not attempt to tow away or tow-
start the vehicle. The electric steering wheel
lock cannot be disengaged and the car is not
steerable. Jump starting, refer to page194.
Power steering assistance is not available when
the engine is not running. Thus, braking and
steering will require increased effort.<
Switch on the hazard warning flashers, depend-
ing on local regulations.
Vehicles with manual transmission
Gearshift lever in neutral position.