Page 129 of 223

Destination guidance
128 map view:
Select the symbol and press the controller.
To switch the voice instructions on/off at any
time:
1.Open the start menu.
2.Press the controller to open the menu.
3.Select "Display settings" and press the
controller.
4.Select "Languages" and press the control-
ler.
5.Select "Navigation voice instructions on"
and press the controller.
The voice instructions are switched on.
Repeat voice instructions and cancel
With the programmable buttons on the steering
wheel, you can also execute the following func-
tions, refer to page45:
>Repeat the voice instruction:
Press the button.
>Switch voice instructions on/off:
Hold the button down.
Adjusting volume of voice instructions
The volume can be adjusted only while a voice
instruction is being issued.
1.Repeat the last voice instruction, if neces-
sary.
2.Turn the button during the voice instruction
to select the desired volume.
This volume is independent of the volume of the
audio sources.
The setting is stored for the remote control cur-
rently in use.
Bypassing route sections
During destination guidance, you can revise the
navigation system's route recommendations to
avoid particular stretches of road. Enter the
number of miles/kilometers that you want to
travel before returning to the original route.
1.Select "Navigation" and press the control-
ler.
2.Move the controller backwards so that the
third field from the top is highlighted. Turn
Page 135 of 223

On/off and settings
134
On/off and settings
The following audio sources have shared con-
trols and setting options:
>Radio Professional
>CD player
>CD changer
*
Controls
The audio sources can be operated using:
>Buttons near the CD player
>iDrive
>Buttons
on the steering wheel, refer to
page10
Buttons near the CD player
1Sound output for entertainment on/off, vol-
ume
>Press: switch on/off.
When you switch on, the last set radio
station or CD track is played.
>Turn: adjust volume.
2Drive for audio CDs
3 Eject CD
4Station scan/track search
>Change radio station.
>Select track for CD player and CD
changer.
5Drive for navigation DVD
Operation via iDrive
iDrive concept, refer to page16.1.Press the button.
This opens the start menu.
2.Move the controller backwards to call up
"Entertainment".
You have the following choices:
>"FM" and "AM": radio reception
>"WB": Weather Band station
>"SAT": satellite radio
>"CD": CD player or CD changer
>"Audio Aux": external audio device
>"Set": depending on the audio source,
other adjustments can be made, e.g. with
the radio: update station with strongest
reception, store station, tone control, sam-
ple stations.
From another menu, you can switch
directly to the screen last displayed, refer
to Convenient call-up of menu items on
page18.<
Switching on/off
In order to switch the entertainment sound out-
put on and off:
Press button1 on the CD player.
This symbol on the Control Display indi-
cates that sound output is switched off.
Page 136 of 223

Navigation
Entertainment
Driving tips
135Reference
At a glance
Controls
Communications
Mobility
Adjusting volume
Turn knob1 on the CD player until the desired
volume is obtained.
You can also adjust the volume with buttons on
the steering wheel, refer to page10.
The setting is stored for the remote control cur-
rently in use.
Tone control
You can alter various tone settings, e.g. treble
and bass or the speed-dependent volume
increase.
The tone settings are applied to all audio
sources.
The settings are stored for the remote control
currently in use.
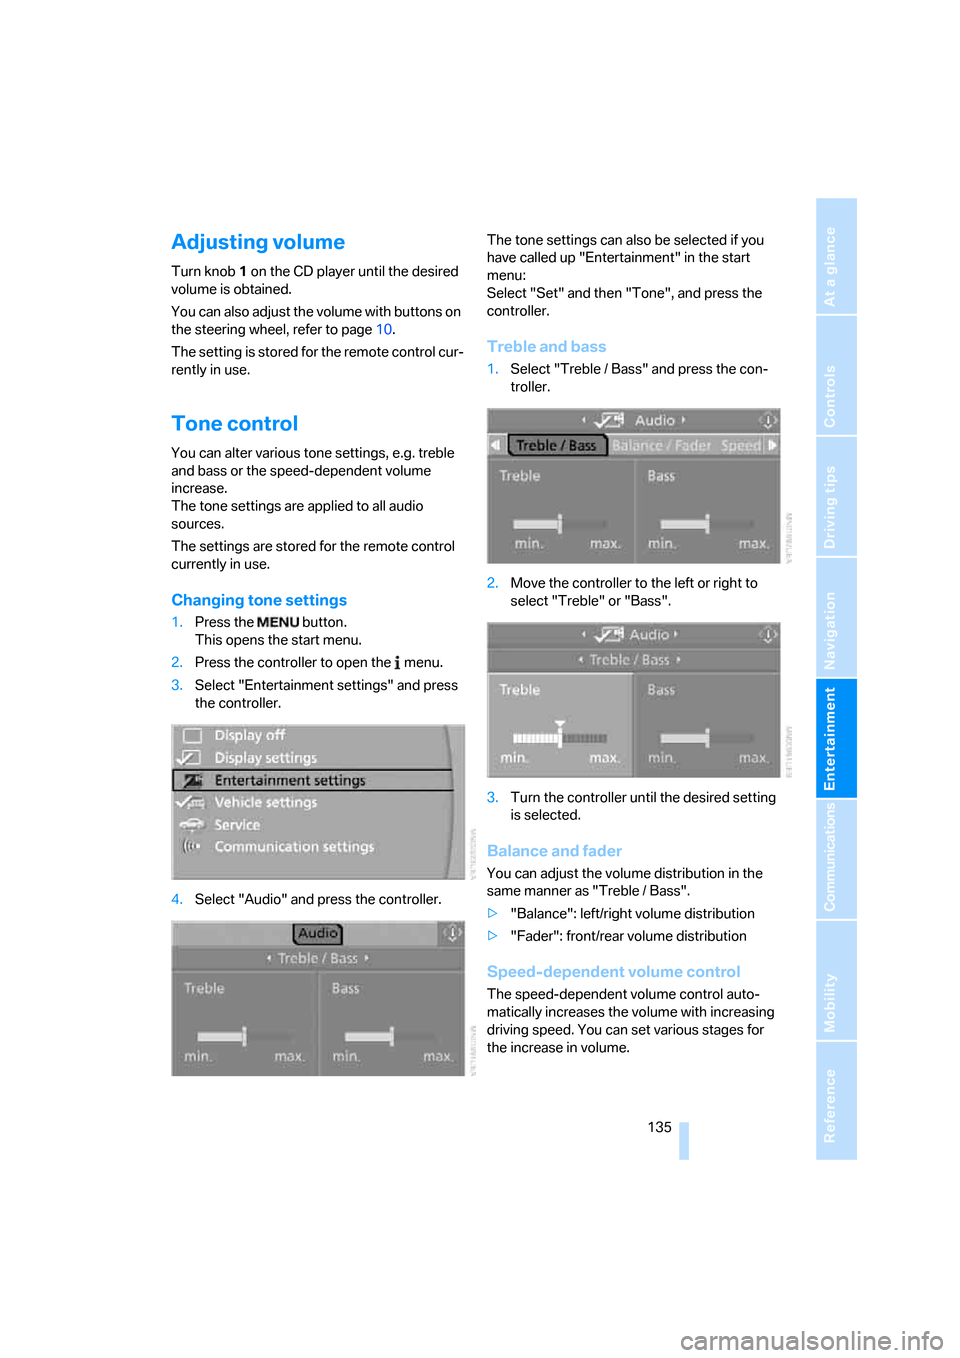
Changing tone settings
1.Press the button.
This opens the start menu.
2.Press the controller to open the menu.
3.Select "Entertainment settings" and press
the controller.
4.Select "Audio" and press the controller.The tone settings can also be selected if you
have called up "Entertainment" in the start
menu:
Select "Set" and then "Tone", and press the
controller.
Treble and bass
1.Select "Treble / Bass" and press the con-
troller.
2.Move the controller to the left or right to
select "Treble" or "Bass".
3.Turn the controller until the desired setting
is selected.
Balance and fader
You can adjust the volume distribution in the
same manner as "Treble / Bass".
>"Balance": left/right volume distribution
>"Fader": front/rear volume distribution
Speed-dependent volume control
The speed-dependent volume control auto-
matically increases the volume with increasing
driving speed. You can set various stages for
the increase in volume.
Page 138 of 223
Navigation
Entertainment
Driving tips
137Reference
At a glance
Controls
Communications
Mobility
Resetting tone settings
You can reset all tone settings to the default
setting.
1.Open the start menu.
2.Press the controller to open the menu.
3.Select "Entertainment settings" and press
the controller.
4.Select "Audio" and press the controller.
5.Select "Reset" and press the controller.
Page 146 of 223

Navigation
Entertainment
Driving tips
145Reference
At a glance
Controls
Communications
Mobility
CD player and CD changer
Listening to CDs
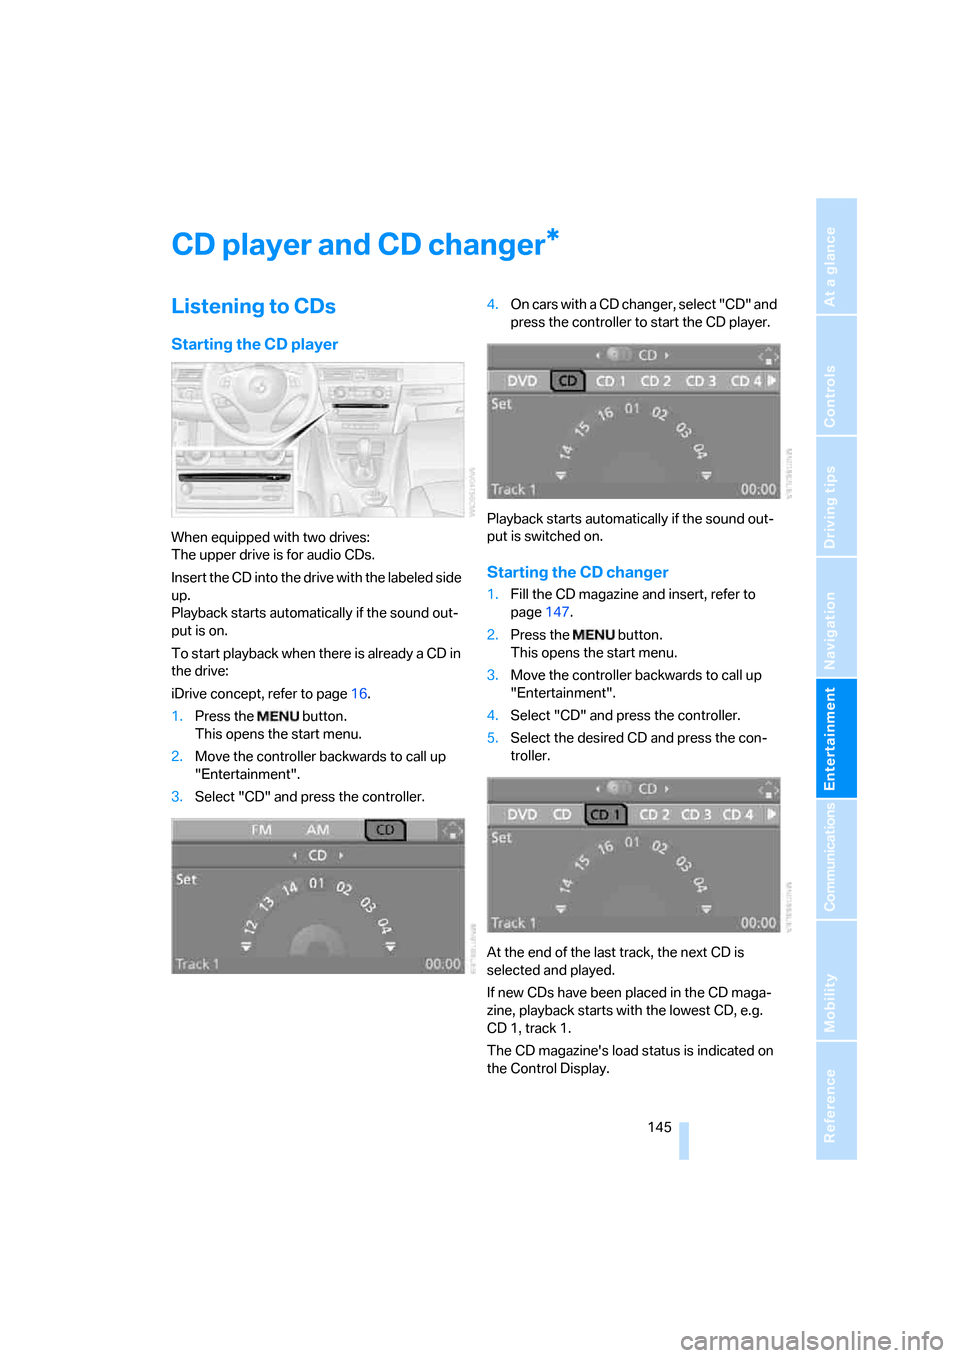
Starting the CD player
When equipped with two drives:
The upper drive is for audio CDs.
Insert the CD into the drive with the labeled side
up.
Playback starts automatically if the sound out-
put is on.
To start playback when there is already a CD in
the drive:
iDrive concept, refer to page16.
1.Press the button.
This opens the start menu.
2.Move the controller backwards to call up
"Entertainment".
3.Select "CD" and press the controller.4.O n c a r s w i t h a C D c h a n g e r , s e l e c t " C D " a n d
press the controller to start the CD player.
Playback starts automatically if the sound out-
put is switched on.
Starting the CD changer
1.Fill the CD magazine and insert, refer to
page147.
2.Press the button.
This opens the start menu.
3.Move the controller backwards to call up
"Entertainment".
4.Select "CD" and press the controller.
5.Select the desired CD and press the con-
troller.
At the end of the last track, the next CD is
selected and played.
If new CDs have been placed in the CD maga-
zine, playback starts with the lowest CD, e.g.
CD 1, track 1.
The CD magazine's load status is indicated on
the Control Display.
*
Page 150 of 223
Navigation
Entertainment
Driving tips
149Reference
At a glance
Controls
Communications
Mobility
External audio device
You can connect an external audio device, for
instance an MP3 player, and play audio tracks
over the car's loudspeaker system. You can
adjust the tone using iDrive.
Connecting
Lift up the center armrest.
1Power supply for your external audio
device:
Socket with removable cap
2Connection for audio playback:
3.5 mm phono connector
To play audio tracks through the car's loud-
speaker system, connect the headset or line-
out port of the external device to connection 2.
Starting audio playback
The audio device must be switched on.
iDrive concept, refer to page16.
1.Press the button.
This opens the start menu.
2.Move the controller backwards to call up
"Entertainment".3.Select "Audio Aux" and press the control-
ler.
4.Adjust volume and tone, if necessary.
Page 154 of 223

153
Entertainment
Reference
At a glance
Controls
Driving tips Communications
Navigation
Mobility
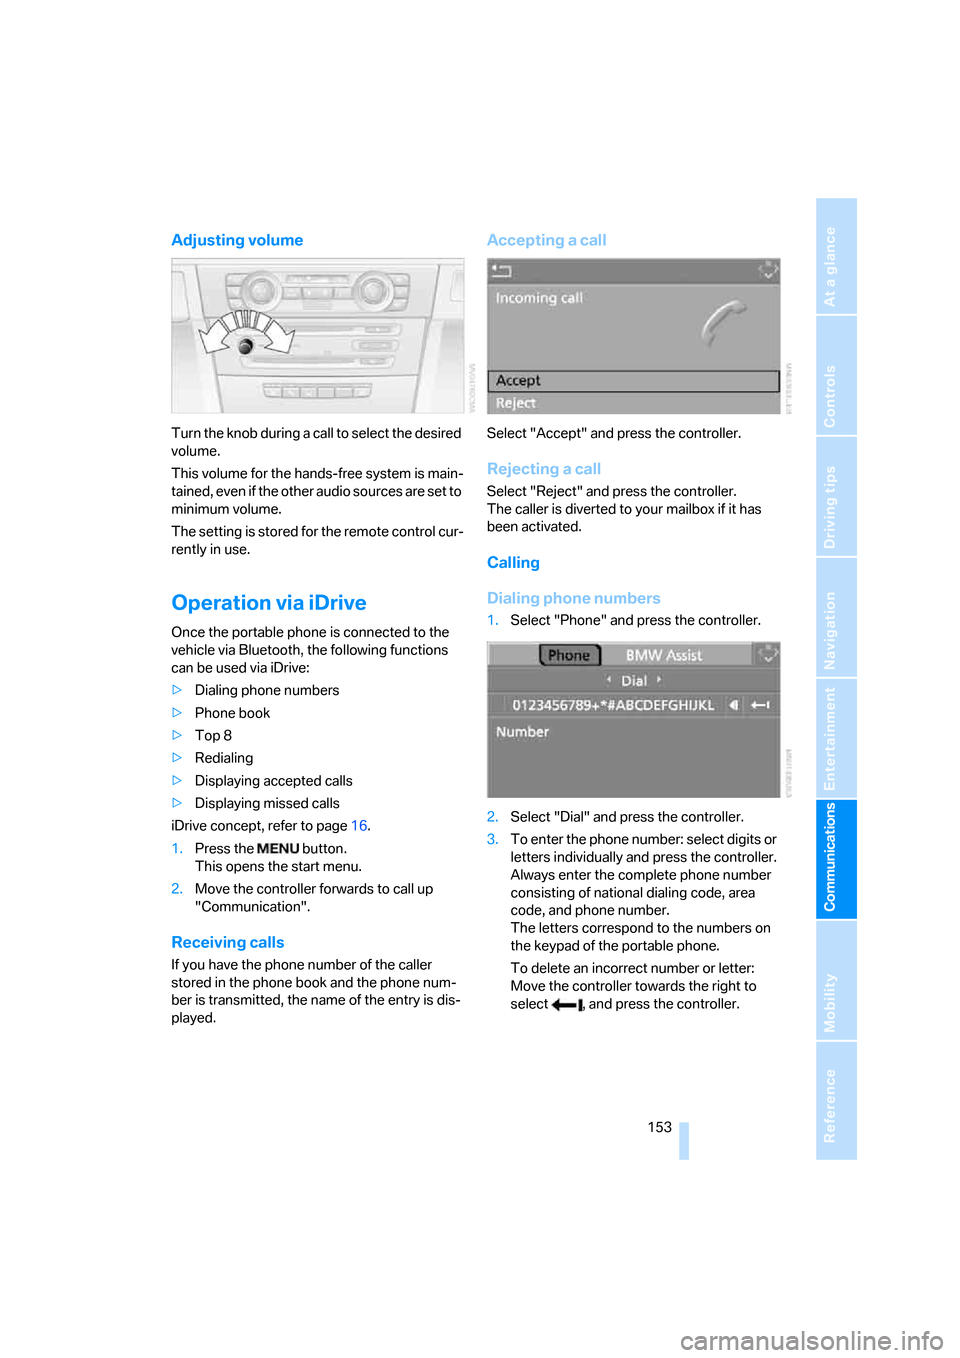
Adjusting volume
Turn the knob during a call to select the desired
volume.
This volume for the hands-free system is main-
tained, even if the other audio sources are set to
minimum volume.
The setting is stored for the remote control cur-
rently in use.
Operation via iDrive
Once the portable phone is connected to the
vehicle via Bluetooth, the following functions
can be used via iDrive:
>Dialing phone numbers
>Phone book
>Top 8
>Redialing
>Displaying accepted calls
>Displaying missed calls
iDrive concept, refer to page16.
1.Press the button.
This opens the start menu.
2.Move the controller forwards to call up
"Communication".
Receiving calls
If you have the phone number of the caller
stored in the phone book and the phone num-
ber is transmitted, the name of the entry is dis-
played.
Accepting a call
Select "Accept" and press the controller.
Rejecting a call
Select "Reject" and press the controller.
The caller is diverted to your mailbox if it has
been activated.
Calling
Dialing phone numbers
1.Select "Phone" and press the controller.
2.Select "Dial" and press the controller.
3.To enter the phone number: select digits or
letters individually and press the controller.
Always enter the complete phone number
consisting of national dialing code, area
code, and phone number.
The letters correspond to the numbers on
the keypad of the portable phone.
To delete an incorrect number or letter:
Move the controller towards the right to
select , and press the controller.
Page 159 of 223

Telephoning
158
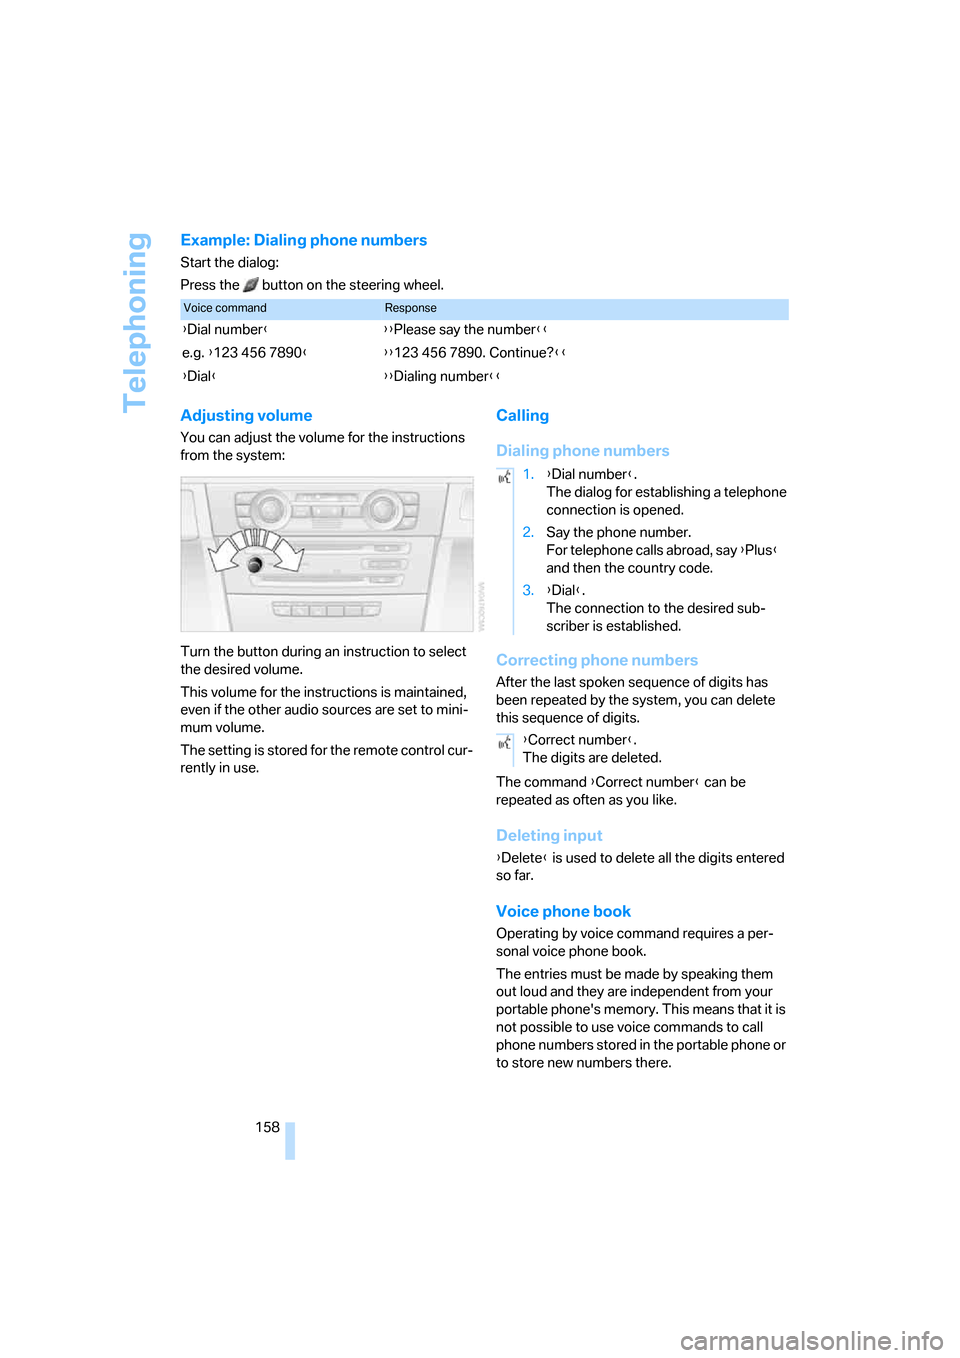
Example: Dialing phone numbers
Start the dialog:
Press the button on the steering wheel.
Adjusting volume
You can adjust the volume for the instructions
from the system:
Turn the button during an instruction to select
the desired volume.
This volume for the instructions is maintained,
even if the other audio sources are set to mini-
mum volume.
The setting is stored for the remote control cur-
rently in use.
Calling
Dialing phone numbers
Correcting phone numbers
After the last spoken sequence of digits has
been repeated by the system, you can delete
this sequence of digits.
The command {Correct number} can be
repeated as often as you like.
Deleting input
{Delete} is used to delete all the digits entered
so far.
Voice phone book
Operating by voice command requires a per-
sonal voice phone book.
The entries must be made by speaking them
out loud and they are independent from your
portable phone's memory. This means that it is
not possible to use voice commands to call
phone numbers stored in the portable phone or
to store new numbers there.
Voice commandResponse
{Dial number}{{Please say the number}}
e.g. {123 456 7890}{{123 456 7890. Continue?}}
{Dial}{{Dialing number}}
1.{Dial number}.
The dialog for establishing a telephone
connection is opened.
2.Say the phone number.
For telephone calls abroad, say {Plus}
and then the country code.
3.{Dial}.
The connection to the desired sub-
scriber is established.
{Correct number}.
The digits are deleted.