2005 BMW 325I instrument cluster
[x] Cancel search: instrument clusterPage 69 of 166

Reference
At a glance
Controls
Driving tips
Mobility
67
Technology for driving comfort and safety
PDC Park Distance Control*
The concept
The PDC assists you with maneuvering in tight
parking spaces. Acoustic signals warn you of
the presence of an object in front of
* or behind
your car. To measure the distance, there are
four ultrasonic sensors in each bumper.
An acoustic warning sounds once an object is
closer than approx. 2 ft/60 cm to the front sen-
sors
* or both rear corner sensors, or closer than
approx. 5 ft/1.50 m to the rear center sensors.
PDC is a parking aid that can indicate
objects when they are approached
slowly, as is usually the case when parking.
Avoid approaching an object at high speed, oth-
erwise physical circumstances may lead to the
system warning being issued too late.<
Automatic mode
With the engine running or the ignition switched
on, the system is activated automatically after
approx. 1 second when you engage reverse
gear or move the automatic transmission selec-
tor lever to position R. Wait this short period
before driving.
Switching on manually
Press the button, the LED lights up.
Switching off manually
Press the button again; the LED goes out.The system is automatically deactivated once
the vehicle travels approx. 165 ft/50 m or
exceeds a speed of approx. 20 mph or 30 km/h;
the LED goes out. You can reactivate the sys-
tem as needed.
Signal tones
When nearing an object, its position is indicated
correspondingly by an interval tone. For exam-
ple, the tone sounds at the rear if the system
detects an object behind the car. As the dis-
tance between vehicle and object decreases,
the intervals between the tones become
shorter. If the distance to the nearest object
falls to below roughly 1 ft/30 cm, then a contin-
uous tone sounds.
The warning signal is canceled after approx.
3 seconds, if you are moving parallel to a wall.
Malfunction
The indicator lamp in the instrument
cluster comes on. PDC is malfunc-
tioning. Have the system checked.
To avoid this problem, keep the sensors clean
and free of ice or snow in order to ensure that
they will continue to operate effectively. When
using a high-pressure cleaner, do not spray the
sensors for extended periods of time and only
from a distance of at least 4 in/10 cm.
Manual mode
The LED above the button flashes in addition.
System limitations
Even with PDC, final responsibility for
estimating the distance between the
vehicle and any obstructions always remains
with the driver. Even when sensors are pro-
vided, there is a blind spot in which objects can
no longer be detected. The system is also sub-
ject to the physical limits that apply to all forms
of ultrasonic measurement, such as those
encountered with trailer towbars and couplings,
Page 70 of 166

Technology for driving comfort and safety
68 thin and wedge-shaped objects, etc. Low
objects already indicated, such as a curb, may
enter the sensors' dead areas before a continu-
ous audible signal is given. Higher, protruding
objects, such as ledges, may not be detectable.
Loud sound sources outside or inside the car
can drown out the PDC signal.<
Driving stability control
systems
Your BMW has a number of systems that help
to maintain the vehicle's stability even in
adverse driving conditions.
ABS Antilock Brake System
ABS prevents locking of the wheels during
braking. Safe steering response is maintained
even during full braking. Active safety is thus
increased.
The ABS is operational every time you start the
engine. Braking safely, refer to page99.
Electronic brake-force distribution
The system controls the brake pressure in the
rear wheels to ensure stable braking behavior.
DBC Dynamic Brake Control
When you apply the brakes rapidly, this system
automatically produces the maximum braking
force boost and thus helps to achieve the short-
est possible braking distance during full brak-
ing. This system exploits all of the benefits pro-
vided by ABS.
Do not reduce the pressure on the brake for the
duration of the brake application. If the brake is
released, DBC will be switched off.
DSC Dynamic Stability Control
DSC prevents the driving wheels from losing
traction when you pull away from rest or accel-
erate. DSC also recognizes unstable driving
conditions, for example if the rear of the car is
about to swerve or if momentum is acting at an
angle past the front wheels. In these cases,
DSC helps the vehicle maintain a safe course within physical limits by reducing engine output
and through braking actions at the individual
wheels.
The laws of physics cannot be repealed,
even with DSC. An appropriate driving
style always remains the responsibility of the
driver. Therefore, do not reduce the additional
safety margin again by taking risks.<
Deactivating DSC
Press the button for at least 3 seconds; the indi-
cator lamps for DSC in the instrument cluster
light up. Dynamic Traction Control DTC and
DSC have been simultaneously deactivated.
Stabilizing and drive-output promoting actions
are no longer executed.
To increase vehicle stability, activate DSC again
as soon as possible.
Activating DSC
Press the button again; the indicator lamps in
the instrument cluster go out.
To control
If the indicator lamp flashes:
DSC controls the drive forces and
brake forces.
If the indicator lamps are on:
DSC has been completely deacti-
vated.
DTC Dynamic Traction Control
DTC is a version of DSC in which the drive out-
put is optimized for particular road conditions,
e.g. unplowed snow-covered roads. The sys-
tem assures the maximal drive output, but with
Page 71 of 166

Reference
At a glance
Controls
Driving tips
Mobility
69
reduced driving stability. It is therefore neces-
sary to drive with appropriate caution.
You may find it useful to briefly activate DTC
under the following special circumstances:
>When driving uphill on snow-covered roads,
in slush or on unplowed, snow-covered
roads
>When rocking a stuck vehicle free or start-
ing off in deep snow or on loose ground
>When driving with snow chains
Activating DTC
Briefly press the button; the DTC indicator
lamps in the instrument cluster come on.
To control
If the indicator lamp flashes:
DTC controls the drive forces and
brake forces.
If the indicator lamps are on:
DTC has been activated.
Deactivating DTC
Press the button again; the DTC indicator
lamps in the instrument cluster go out.
xDrive 325xi, 330xi
xDrive is your BMW's four-wheel-drive system.
The combined efforts of xDrive and DSC help to
further optimize traction and driving dynamics.
The xDrive four-wheel-drive system distributes
driving power variably to the front and rear axles
depending on the driving situation and road
conditions.
Malfunction
In case of any of the malfunctions
described below, drive cautiously and
think well ahead. Avoid driving on rough tracks
and pressing the accelerator pedal down to full
throttle or kick-down position, otherwise the
drive system could be damaged or accidents
could result.<
The warning lamps come on. xDrive
has failed.
Have the system checked as soon as
possible.
The warning lamps come on. xDrive
and DSC have failed.
Have the system checked as soon as
possible.
Hill Descent Control HDC 325xi, 330xi
HDC is a downhill driving assistant that reduces
your speed on steep downhill gradients and
makes it even easier to control your BMW's
handling under these conditions. The vehicle
then moves slightly faster than double walking
speed without the driver needing to intervene.
HDC can be activated as long as you are driving
under approx. 20 mph or 35 km/h. When driving
downhill at a speed of under approx. 20 mph or
35 km/h, the vehicle's speed is automatically
reduced to slightly more than double walking
speed and maintained.
Increasing or decreasing speed
By accelerating or braking you can change the
speed within a range from approx. 3 to 15 mph,
approx. 5 to 25 km/h.
You can specify a target speed within the same
range using the cruise control stalk.
Page 72 of 166

Technology for driving comfort and safety
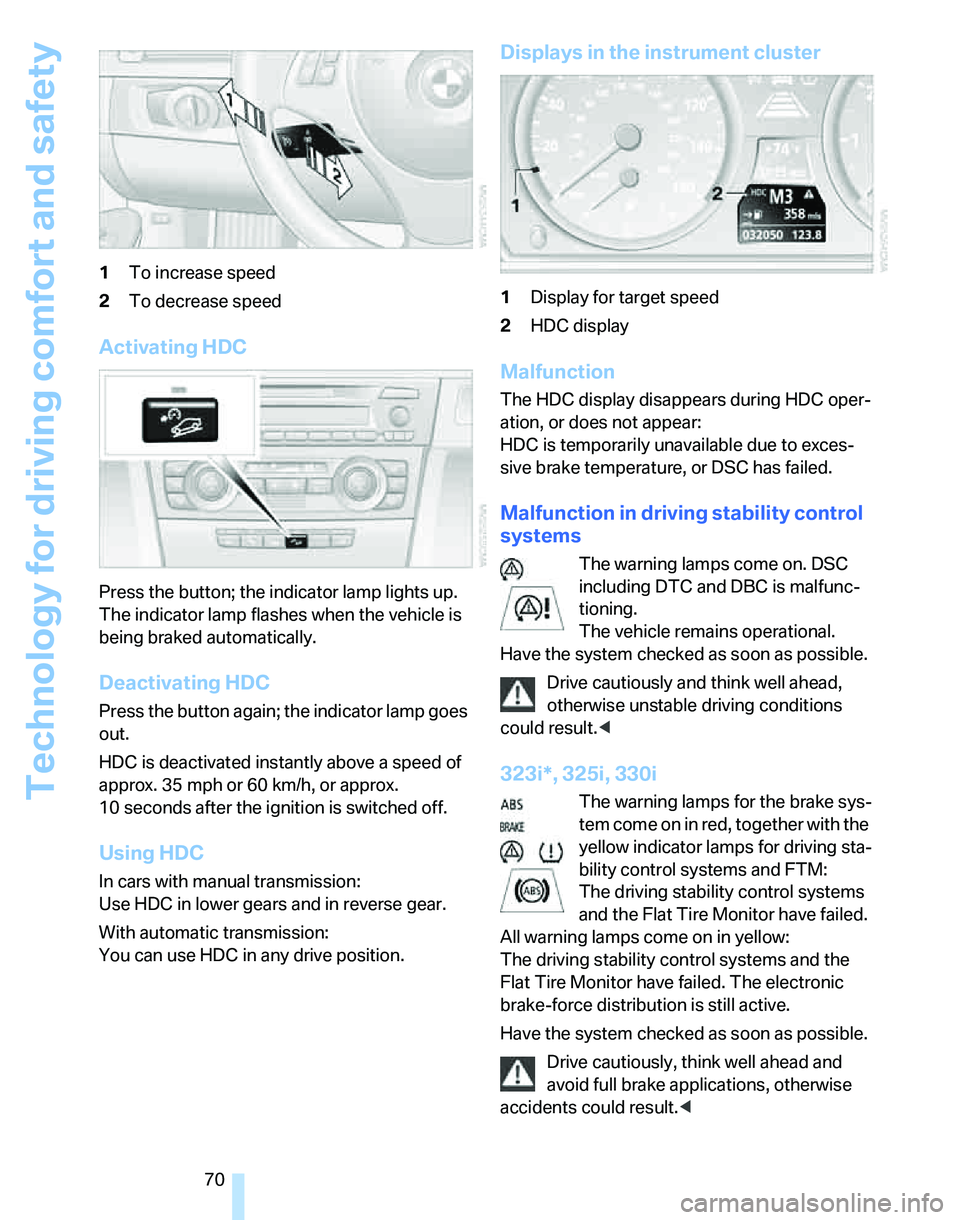
70 1To increase speed
2To decrease speed
Activating HDC
Press the button; the indicator lamp lights up.
The indicator lamp flashes when the vehicle is
being braked automatically.
Deactivating HDC
Press the button again; the indicator lamp goes
out.
HDC is deactivated instantly above a speed of
approx. 35 mph or 60 km/h, or approx.
10 seconds after the ignition is switched off.
Using HDC
In cars with manual transmission:
Use HDC in lower gears and in reverse gear.
With automatic transmission:
You can use HDC in any drive position.
Displays in the instrument cluster
1Display for target speed
2HDC display
Malfunction
The HDC display disappears during HDC oper-
ation, or does not appear:
HDC is temporarily unavailable due to exces-
sive brake temperature, or DSC has failed.
Malfunction in driving stability control
systems
The warning lamps come on. DSC
including DTC and DBC is malfunc-
tioning.
The vehicle remains operational.
Have the system checked as soon as possible.
Drive cautiously and think well ahead,
otherwise unstable driving conditions
could result.<
323i*, 325i, 330i
The warning lamps for the brake sys-
tem come on in red, together with the
yellow indicator lamps for driving sta-
bility control systems and FTM:
The driving stability control systems
and the Flat Tire Monitor have failed.
All warning lamps come on in yellow:
The driving stability control systems and the
Flat Tire Monitor have failed. The electronic
brake-force distribution is still active.
Have the system checked as soon as possible.
Drive cautiously, think well ahead and
avoid full brake applications, otherwise
accidents could result.<
Page 80 of 166

Lamps
78 of the road surface. Depending on the steering
angle and other parameters, the light from the
headlamp follows the course of the road.
Activating Adaptive Head Light
With the ignition on, turn the light switch to the
automatic headlamp control position, refer to
page76.
To avoid dazzling the drivers of oncoming vehi-
cles, Adaptive Head Light is not active when the
car is driven in reverse, and directs the light to
the front passenger's side when the vehicle is at
a standstill.
Malfunction
The LED next to the symbol for automatic head-
lamp control flashes. Adaptive Head Light is
malfunctioning or has failed. Have the system
checked as soon as possible.
High beams/roadside parking
lamps
1High beams
2Headlamp flasher
3Roadside parking lamps
*
Roadside parking lamps, left or right*
There is an additional option of switching on the
lamps on the side of the car facing the road
when parked, if permitted in the country of use.
After parking the vehicle, press the lever up or
down beyond the pressure point, arrow 3.
The roadside parking lamps drain the bat-
tery. Therefore, do not leave them on for
unduly long periods of time, otherwise the bat-tery might not have enough power to start the
engine.<
Fog lamps*
The parking lamps or low beams must
be switched on for the fog lamps to
operate. The green indicator lamp in
the instrument cluster lights up whenever the
fog lamps are on.
Depending on your vehicle's equipment ver-
sion, the fog lamps are switched off when you
activate the headlamp flasher or switch on the
high beams
*.
If the automatic headlamp control is acti-
vated, the low beams will come on auto-
matically when you switch on the fog lamps.<
Instrument lighting
You can adjust the brightness of the instrument
lighting only when the parking lamps or the low
beams are switched on.
1.Lightly push button 1 up or down repeat-
edly until the appropriate symbol appears in
Page 121 of 166

Reference
At a glance
Controls
Driving tips
Mobility
119
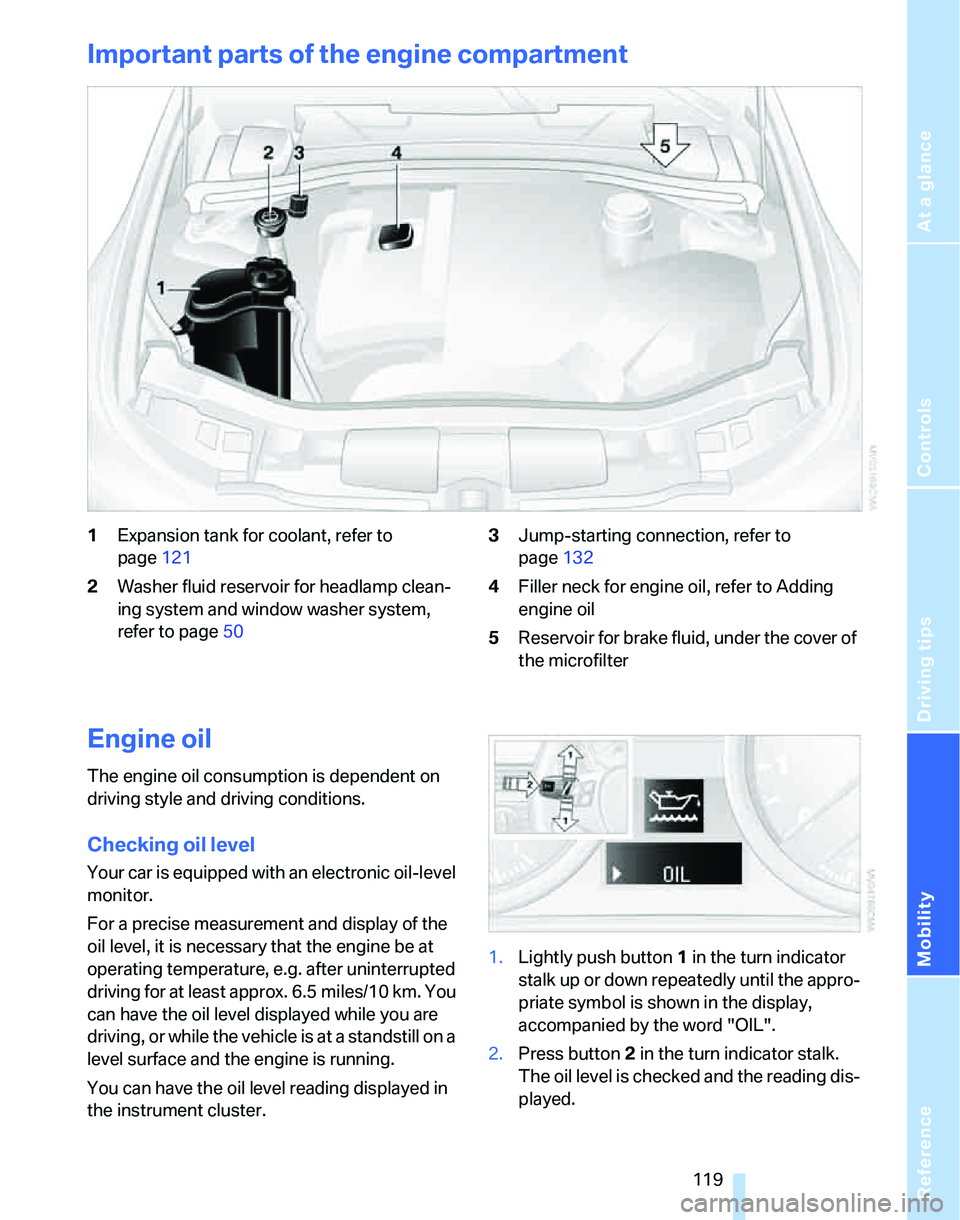
Important parts of the engine compartment
1Expansion tank for coolant, refer to
page121
2Washer fluid reservoir for headlamp clean-
ing system and window washer system,
refer to page503Jump-starting connection, refer to
page132
4Filler neck for engine oil, refer to Adding
engine oil
5Reservoir for brake fluid, under the cover of
the microfilter
Engine oil
The engine oil consumption is dependent on
driving style and driving conditions.
Checking oil level
Your car is equipped with an electronic oil-level
monitor.
For a precise measurement and display of the
oil level, it is necessary that the engine be at
operating temperature, e.g. after uninterrupted
driving for at least approx. 6.5 miles/10 km. You
can have the oil level displayed while you are
driving, or while the vehicle is at a standstill on a
level surface and the engine is running.
You can have the oil level reading displayed in
the instrument cluster.1.Lightly push button 1 in the turn indicator
stalk up or down repeatedly until the appro-
priate symbol is shown in the display,
accompanied by the word "OIL".
2.Press button 2 in the turn indicator stalk.
The oil level is checked and the reading dis-
played.
Page 122 of 166

Under the hood
120
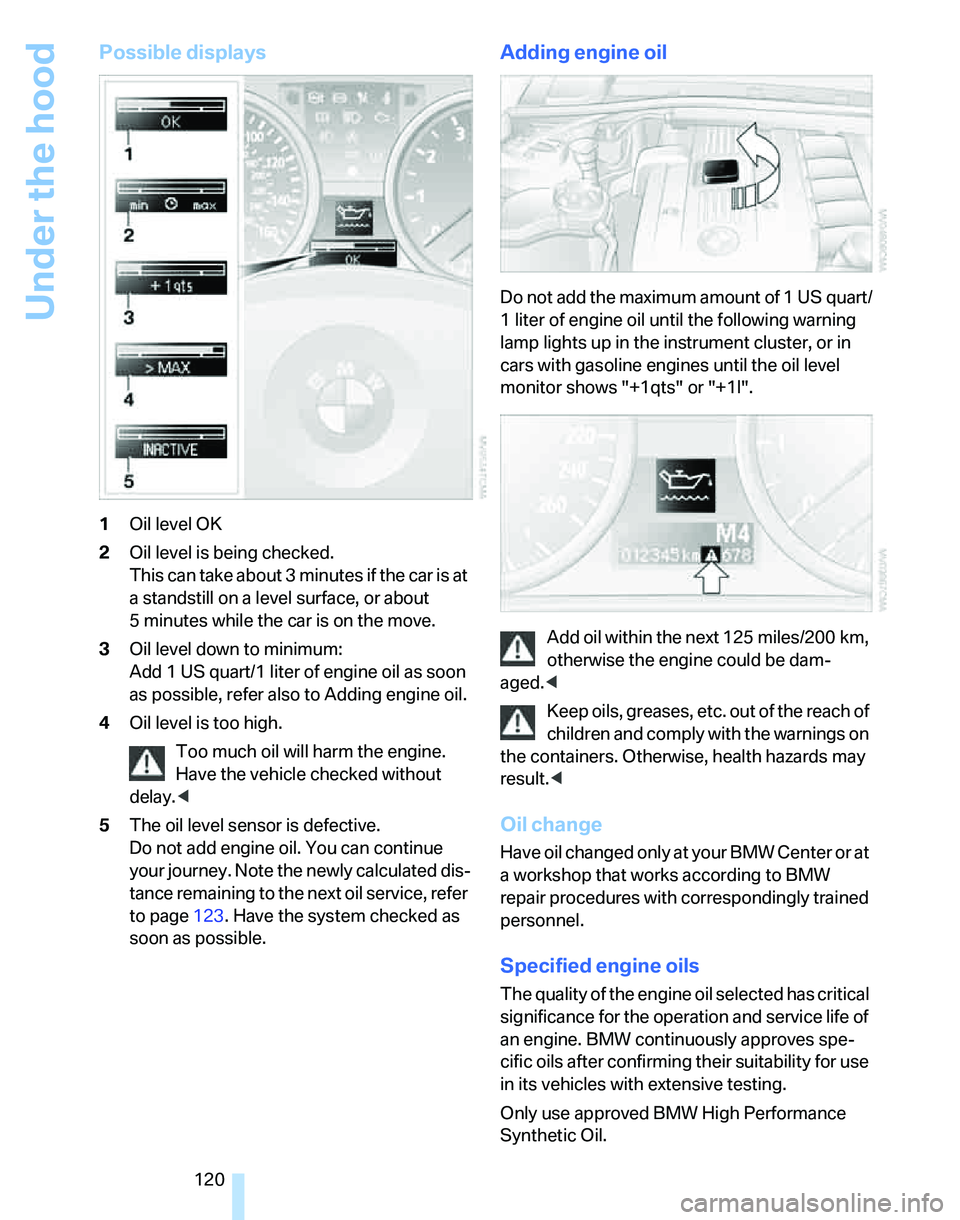
Possible displays
1Oil level OK
2Oil level is being checked.
This can take about 3 minutes if the car is at
a standstill on a level surface, or about
5 minutes while the car is on the move.
3Oil level down to minimum:
Add 1US quart/1liter of engine oil as soon
as possible, refer also to Adding engine oil.
4Oil level is too high.
Too much oil will harm the engine.
Have the vehicle checked without
delay.<
5The oil level sensor is defective.
Do not add engine oil. You can continue
your journey. Note the newly calculated dis-
tance remaining to the next oil service, refer
to page123. Have the system checked as
soon as possible.
Adding engine oil
Do not add the maximum amount of 1 US quart/
1 liter of engine oil until the following warning
lamp lights up in the instrument cluster, or in
cars with gasoline engines until the oil level
monitor shows "+1qts" or "+1l".
Add oil within the next 125 miles/200 km,
otherwise the engine could be dam-
aged.<
Keep oils, greases, etc. out of the reach of
children and comply with the warnings on
the containers. Otherwise, health hazards may
result.<
Oil change
Have oil changed only at your BMW Center or at
a workshop that works according to BMW
repair procedures with correspondingly trained
personnel.
Specified engine oils
The quality of the engine oil selected has critical
significance for the operation and service life of
an engine. BMW continuously approves spe-
cific oils after confirming their suitability for use
in its vehicles with extensive testing.
Only use approved BMW High Performance
Synthetic Oil.
Page 125 of 166

Reference
At a glance
Controls
Driving tips
Mobility
123
Maintenance
BMW Maintenance System
The BMW Maintenance System supports the
preservation of the traffic and operating safety
of your BMW. The service schedule also
includes operations related to the vehicle's
comfort and convenience features, such as
replacement of the filters for the inside air. The
objective is to optimize efforts with respect to
minimal vehicle maintenance costs.
If and when you come to sell your BMW, a com-
prehensive record of servicing will prove a sig-
nificant benefit.
CBS Condition Based Service
Sensors and special algorithms take the differ-
ent driving conditions of your BMW into
account. Condition Based Service uses this to
determine the current and future service
requirements. By letting you define a service
and maintenance regimen that reflects your
own individual requirements, the system builds
the basis for trouble-free driving.
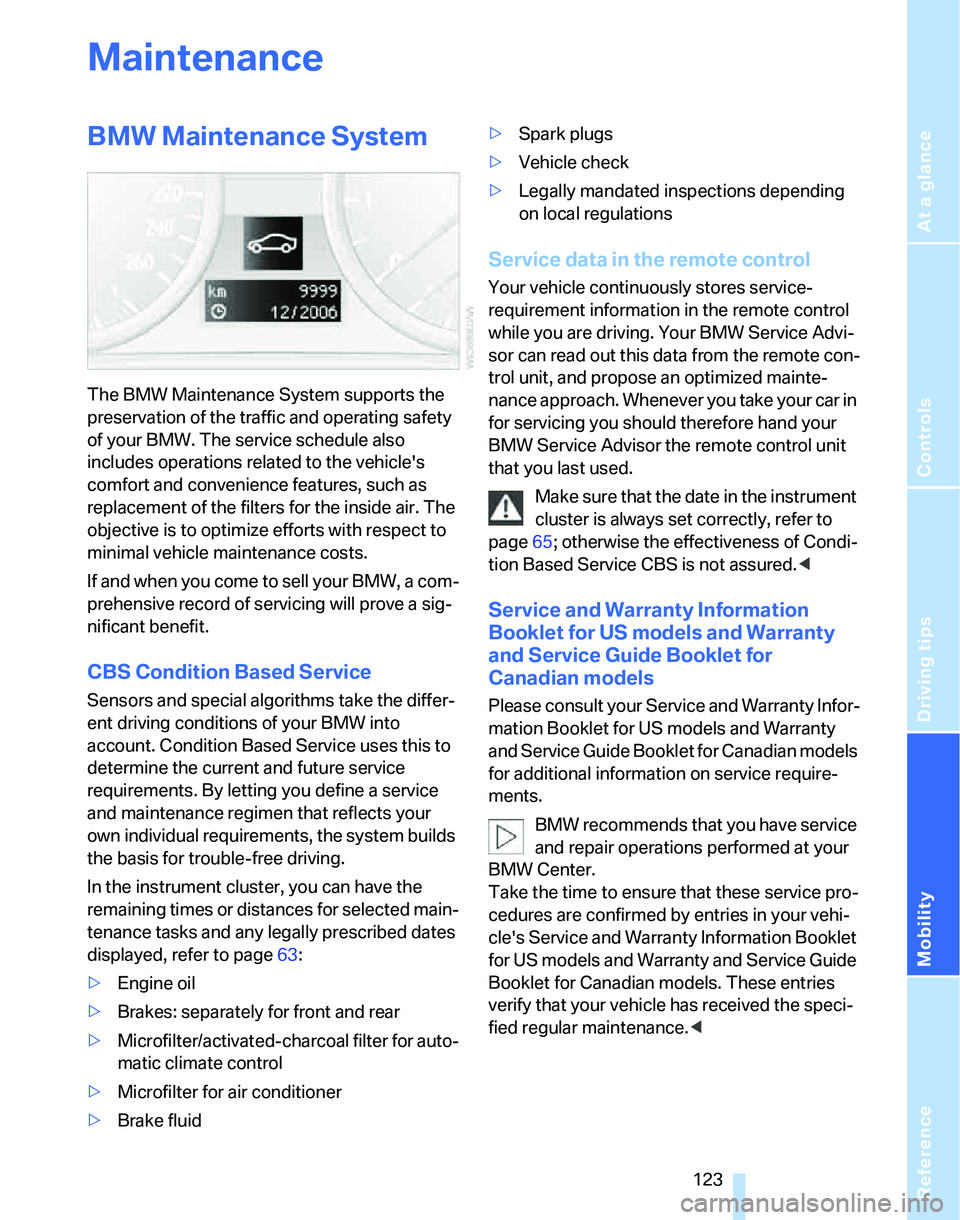
In the instrument cluster, you can have the
remaining times or distances for selected main-
tenance tasks and any legally prescribed dates
displayed, refer to page63:
>Engine oil
>Brakes: separately for front and rear
>Microfilter/activated-charcoal filter
for auto-
matic climate control
>Microfilter
for air conditioner
>Brake fluid>Spark plugs
>Vehicle check
>Legally mandated inspections depending
on local regulations
Service data in the remote control
Your vehicle continuously stores service-
requirement information in the remote control
while you are driving. Your BMW Service Advi-
sor can read out this data from the remote con-
trol unit, and propose an optimized mainte-
nance approach. Whenever you take your car in
for servicing you should therefore hand your
BMW Service Advisor the remote control unit
that you last used.
Make sure that the date in the instrument
cluster is always set correctly, refer to
page65; otherwise the effectiveness of Condi-
tion Based Service CBS is not assured.<
Service and Warranty Information
Booklet for US models and Warranty
and Service Guide Booklet for
Canadian models
Please consult your Service and Warranty Infor-
mation Booklet for US models and Warranty
and Service Guide Booklet for Canadian models
for additional information on service require-
ments.
BMW recommends that you have service
and repair operations performed at your
BMW Center.
Take the time to ensure that these service pro-
cedures are confirmed by entries in your vehi-
cle's Service and Warranty Information Booklet
for US models and Warranty and Service Guide
Booklet for Canadian models. These entries
verify that your vehicle has received the speci-
fied regular maintenance.<