2005 BMW 325I radio controls
[x] Cancel search: radio controlsPage 88 of 166

Practical interior accessories
86
Practical interior accessories
Integrated universal remote
control*
The concept
The integrated universal remote control can
replace as many as three hand-held transmit-
ters for various remote-controlled devices,
such as door openers and house alarm sys-
tems. The integrated universal remote control
registers and stores signals from the original
hand-held transmitters.
The signal of an original hand-held transmitter
can be programmed on one of the three mem-
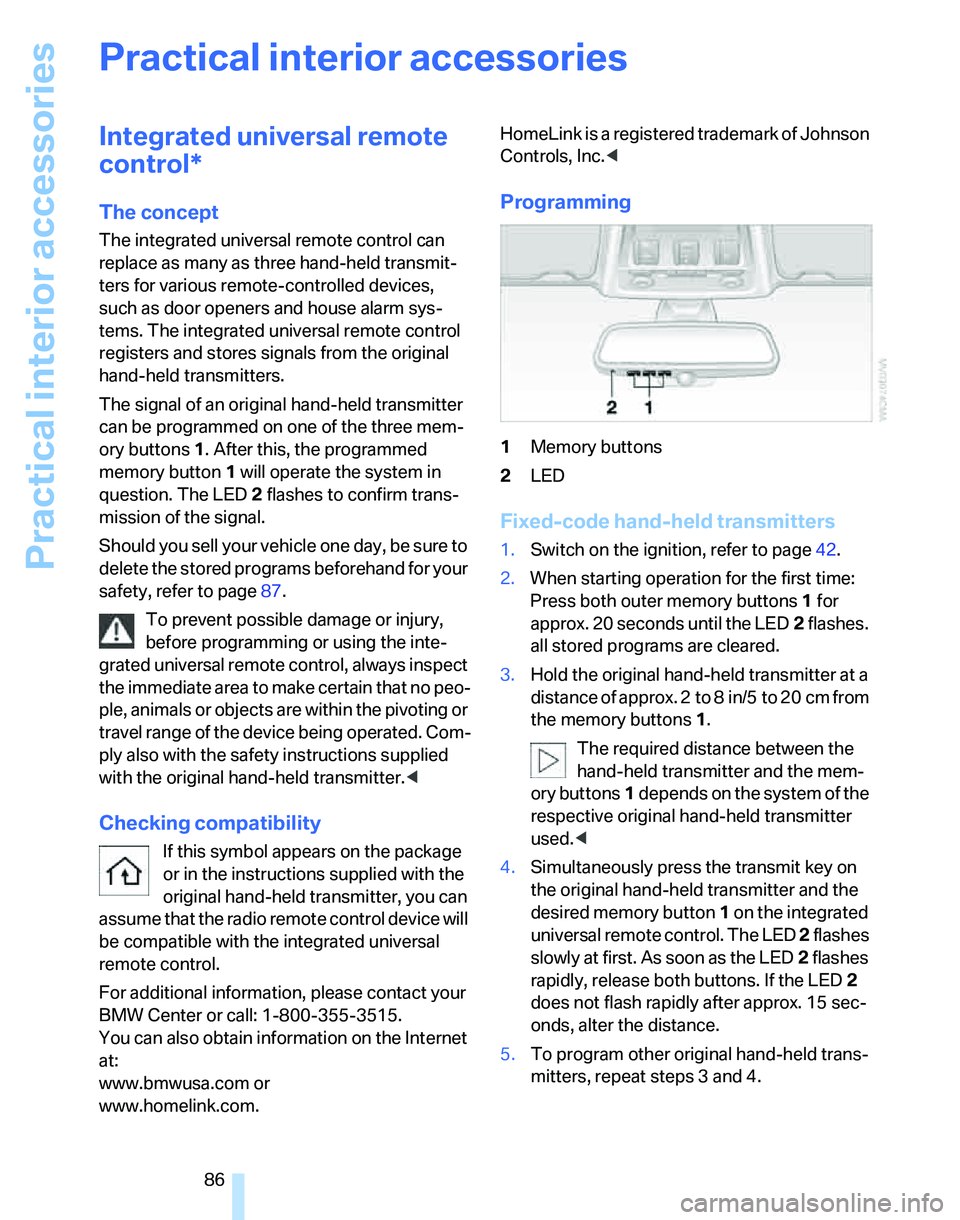
ory buttons1. After this, the programmed
memory button1 will operate the system in
question. The LED2 flashes to confirm trans-
mission of the signal.
Should you sell your vehicle one day, be sure to
delete the stored programs beforehand for your
safety, refer to page87.
To prevent possible damage or injury,
before programming or using the inte-
grated universal remote control, always inspect
the immediate area to make certain that no peo-
ple, animals or objects are within the pivoting or
travel range of the device being operated. Com-
ply also with the safety instructions supplied
with the original hand-held transmitter.<
Checking compatibility
If this symbol appears on the package
or in the instructions supplied with the
original hand-held transmitter, you can
assume that the radio remote control device will
be compatible with the integrated universal
remote control.
For additional information, please contact your
BMW Center or call: 1-800-355-3515.
You can also obtain information on the Internet
at:
www.bmwusa.com or
www.homelink.com. HomeLink is a registered trademark of Johnson
Controls, Inc.<
Programming
1Memory buttons
2LED
Fixed-code hand-held transmitters
1.Switch on the ignition, refer to page42.
2.When starting operation for the first time:
Press both outer memory buttons1 for
approx. 20 seconds until the LED2 flashes.
all stored programs are cleared.
3.Hold the original hand-held transmitter at a
distance of approx. 2 to 8 in/5 to 20 cm from
the memory buttons1.
The required distance between the
hand-held transmitter and the mem-
ory buttons1 depends on the system of the
respective original hand-held transmitter
used.<
4.Simultaneously press the transmit key on
the original hand-held transmitter and the
desired memory button 1 on the integrated
universal remote control. The LED 2 flashes
slowly at first. As soon as the LED2 flashes
rapidly, release both buttons. If the LED2
does not flash rapidly after approx. 15 sec-
onds, alter the distance.
5.To program other original hand-held trans-
mitters, repeat steps 3 and 4.
Page 131 of 166

Reference
At a glance
Controls
Driving tips
Mobility
129
according to BMW repair procedures with cor-
respondingly trained personnel.
Changing wheels
Your BMW is equipped with Run-Flat Tires as
standard. This removes the need to change a
wheel immediately in the event of a puncture.
The symbol identifying Run-Flat Tires is a circle
with the letters RSC on the sidewall, refer to
Run-Flat Tires, page116.
When mounting new tires or changing over
from summer to winter tires and vice versa,
mount Run-Flat Tires for your own safety. In the
event of a flat, moreover, no spare wheel is
available. Your BMW Center will be glad to
advise you. Refer also to New wheels and tires,
page116.
The tools for changing wheels are avail-
able as optional accessories from your
BMW Center.<
Jack mounting points
The jacking points are at the positions shown in
the illustration.
Vehicle battery
Battery care
The battery is 100 % maintenance-free, the
electrolyte will last for the life of the battery
when the vehicle is operated in a temperate cli-
mate. Your BMW Center will be glad to advise in
all matters concerning the battery.
Charging the battery
Only charge the battery in the vehicle via the
terminals in the engine compartment with the
engine off. Connections, refer to Jump starting
on page132.
Disposal
Have old batteries disposed of by your
BMW Center or hand them in to a recy-
cling center. Maintain the battery in an upright
position for transport and storage. Always
secure the battery against tipping over during
transport.<
Power failure
After a temporary power loss, the functioning of
some equipment may be limited and require ini-
tialization. Individual settings may likewise have
been lost and will have to be reprogrammed:
>Time and date
These values must be updated, refer to
page64.
>Radio
Stations must be stored again, refer to the
separate Owner's Manual for Radio.
>Seat and mirror memory
The positions must be stored again, refer to
page35.
>Inside rearview mirror with digital compass
The system must be calibrated, refer to
page88.
Fuses
Never attempt to repair a blown fuse and
do not replace a defective fuse with a sub-
stitute of another color or amperage rating, oth-
erwise this could lead to a circuit overload, ulti-
mately resulting in a fire in the vehicle.<
Page 133 of 166

Reference
At a glance
Controls
Driving tips
Mobility
131
Giving and receiving assistance
Emergency calling*
Conditions for an emergency call:
>Full preparation package mobile phone
>BMW Assist is enabled. Enabling
BMW Assist, refer to separate Owner's
Manual.
>Radio readiness is on.
>The car phone is logged on to a mobile tele-
phone network.
>The emergency call system is operable.
If your subscription contract with BMW Assist
expires, the car phone can be deactivated by a
BMW Center without having to schedule an
appointment at a workshop. Once the car
phone has been deactivated, emergency calls
are not possible. The car phone can be reacti-
vated by a BMW Center after signing a new
contract.
Initiating an emergency call
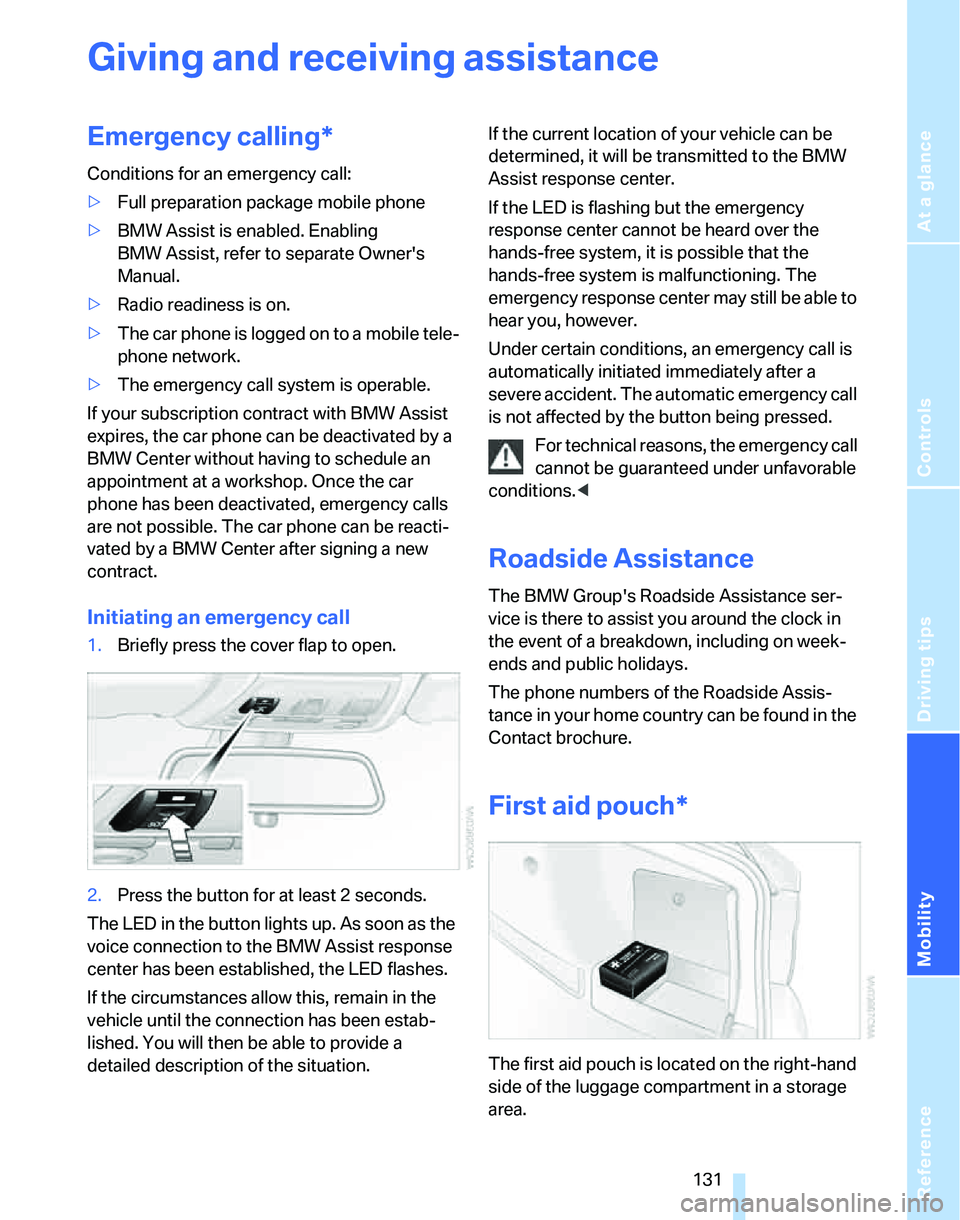
1.Briefly press the cover flap to open.
2.Press the button for at least 2 seconds.
The LED in the button lights up. As soon as the
voice connection to the BMW Assist response
center has been established, the LED flashes.
If the circumstances allow this, remain in the
vehicle until the connection has been estab-
lished. You will then be able to provide a
detailed description of the situation.If the current location of your vehicle can be
determined, it will be transmitted to the BMW
Assist response center.
If the LED is flashing but the emergency
response center cannot be heard over the
hands-free system, it is possible that the
hands-free system is malfunctioning. The
emergency response center may still be able to
hear you, however.
Under certain conditions, an emergency call is
automatically initiated immediately after a
severe accident. The automatic emergency call
is not affected by the button being pressed.
For technical reasons, the emergency call
cannot be guaranteed under unfavorable
conditions.<
Roadside Assistance
The BMW Group's Roadside Assistance ser-
vice is there to assist you around the clock in
the event of a breakdown, including on week-
ends and public holidays.
The phone numbers of the Roadside Assis-
tance in your home country can be found in the
Contact brochure.
First aid pouch*
The first aid pouch is located on the right-hand
side of the luggage compartment in a storage
area.
Page 135 of 166

Reference
At a glance
Controls
Driving tips
Mobility
133
Your BMW has a special nut as body ground
or negative pole.
5.Attach the second terminal clamp of the
minus/– jumper cable to the negative termi-
nal of the battery or to the engine or body
ground of the vehicle to be started.
Starting the engine
1.Start the engine of the donor vehicle and
allow it to run for a few minutes at slightly
increased idle speed.
2.Start the engine on the other vehicle in the
usual way.
If the first start attempt is not successful,
wait a few minutes before another attempt
in order to allow the discharged battery to
recharge.
3.Let the engines run for a few minutes.
4.Disconnect the jumper cables by reversing
the above connecting sequence.
If necessary, have the battery checked and
recharged.
Never use spray fluids to start the
engine.<
Tow-starting, towing away
Observe the applicable laws and regula-
tions for tow-starting and towing vehi-
cles.<
Do not transport any occupants other
than the driver in a vehicle that is being
towed.<
Using a tow fitting
The screw-in tow fitting must always be carried
in the car. It can be screwed in at the front or
rear of the BMW.
It is stored in the onboard tool kit underneath
the cover on the right-hand side of the luggage
compartment, refer to page125.
Use only the tow fitting provided with the
vehicle and screw it all the way in. Use the
tow fitting for towing on paved roads only. Avoid
lateral loading of the tow fitting, e.g. do not lift
the vehicle by the tow fitting. Otherwise the tow
fitting and the vehicle could be damaged.<
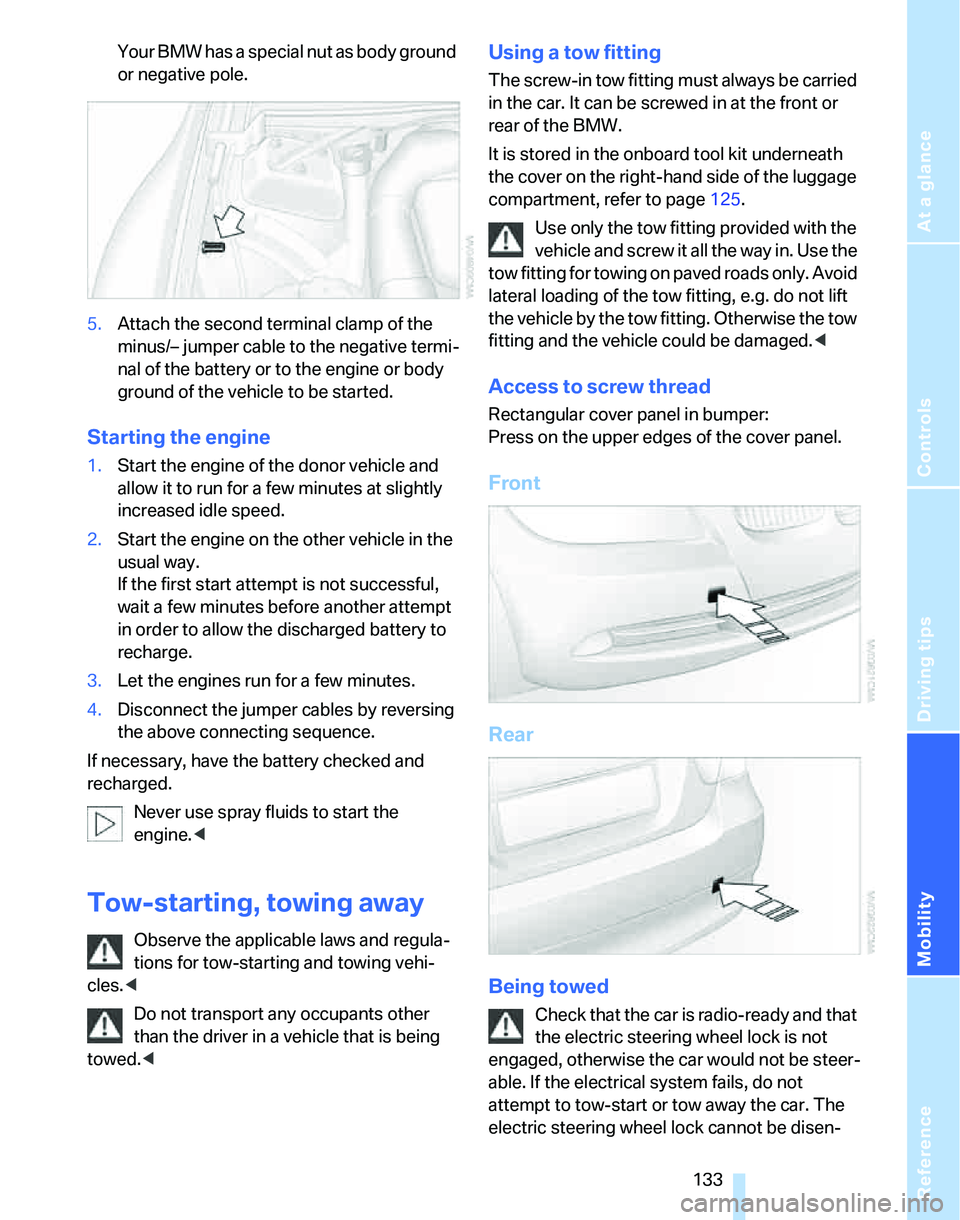
Access to screw thread
Rectangular cover panel in bumper:
Press on the upper edges of the cover panel.
Front
Rear
Being towed
Check that the car is radio-ready and that
the electric steering wheel lock is not
engaged, otherwise the car would not be steer-
able. If the electrical system fails, do not
attempt to tow-start or tow away the car. The
electric steering wheel lock cannot be disen-
Page 159 of 166

Reference
At a glance
Controls
Driving tips
Mobility
157
Homepage4
Hood118
Horn10
Hot exhaust system98
Hydraulic brake assist, refer to
Dynamic Brake Control68
Hydroplaning99
I
Ice warning59
Ignition42
– switched off42
– switched on42
Ignition key, refer to
Integrated key/remote
control18
Ignition key position 1, refer to
Radio readiness42
Ignition key position 2, refer to
Ignition on42
Ignition lock42
Indicator and warning
lamps13,136
Individual air distribution81
Individual settings, refer to
Personal Profile19
Initializing
– compass, refer to
Calibrating88
– Flat Tire Monitor FTM72
– glass sunroof29
Instrument cluster12
Instrument lighting78
Instrument panel, refer to
Cockpit10
Integrated key18
Integrated universal remote
control86
Interior lamps79
– remote control20
Interior motion sensor25
Interior rearview mirror37
– automatic dimming
feature99
Interior rearview mirror with
digital compass87
Interlock47Intermittent mode of the
wipers50
J
Jacking points129
Jumpering, refer to Jump
starting132
Jump starting132
K
Key, refer to Integrated key/
remote control18
Keyless Go, refer to
Convenient access25
Keyless opening and closing,
refer to Convenient
access25
Key Memory, refer to Personal
Profile19
Kick-down48
– automatic transmission with
Steptronic48
– sequential manual gearbox
SMG46
Knock control106
L
Lamps, refer to Parking lamps/
low beams76
Lamps and bulbs, replacing
bulbs125
Lap-and-shoulder safety
belt36
Lashing eyes, refer to
Securing cargo101
LATCH child-restraint fixing
system40
LEDs light-emitting
diodes125
Length, refer to
Dimensions149
License plate lamp, replacing
bulbs128
Light-emitting diodes
LEDs125
Lighter91Lighting
– instruments78
– lamps and bulbs125
– of the vehicle, refer to
Lamps76
Light switch76
Limit145
Loading
– securing cargo101
Load securing equipment,
refer to Securing cargo101
Lock buttons in the doors,
refer to Locking23
Locking
– adjusting confirmation
signal21
– from inside23
– from outside20
– without remote control, refer
to Convenient access25
Locking and unlocking doors
– from inside22
– from outside20
Low beams76
– automatic76
– replacing bulbs126
Lower back support, refer to
Lumbar support32
Luggage compartment
– capacity150
– convenient access26
– folding up the floor panel93
– lamp79
– opening from inside23
– opening from outside23
Luggage compartment lid23
– convenient access26
– unlocking with remote
control21
Luggage compartment lid,
refer to Tailgate23
Luggage compartment net,
refer to Securing cargo101
Luggage rack, refer to Roof-
mounted luggage rack101
Lumbar support32
Page 161 of 166

Reference
At a glance
Controls
Driving tips
Mobility
159
Parts and accessories, refer to
The individual vehicle5
Passenger-side mirror tilt
function37
Pathway lighting76
PDC Park Distance Control67
Personal Profile19
Placing a call, refer to
telephone owner's manual
Pollen
– refer to Microfilter/activated-
charcoal filter for automatic
climate control85
– refer to Microfilter for air
conditioner82
Power failure129
Power windows28
– safety switch28
Power windows, refer to
Windows27
Pressure, tires108
Pressure monitoring, tires71
– Flat Tire Monitor71
Protection function, refer to
Anti-trapping mechanism
– glass sunroof, electric29
– windows28
Providing medical assistance,
refer to First add pouch131
Puncture
– Flat Tire Monitor71
R
Radio key, refer to Integrated
key/Remote control18
Radio position, refer to Radio
readiness42
Radio readiness42
– switched off42
– switched on42
Rain sensor50
Reading lamps79
Rear lamps, refer to Tail
lamps127
– replacing bulbs128Rear seats
– adjusting head restraints34
– folding head restraint down
and up34
Rear turn signals
– replacing bulbs128
Rear ventilation85
Rearview mirror, refer to
Mirrors37
Rear window defroster81,85
Rear window roller blind, refer
to Roller sun blinds89
Rear window safety switch28
Rechargeable flashlight89
Recirculated-air mode81,84
Recirculation of air, refer to
Recirculated-air
mode81,84
Reclining seat, refer to
Backrest32
Refueling106
Releasing
– hood118
Remaining distance, refer to
Cruising range60
Remote control18
– battery renewal27
– convenient access25
– garage door opener86
– luggage compartment lid21
– malfunctions21,27
– service data123
Replacement remote
control18
Replacing bulbs, refer to
Lamps and bulbs125
Replacing tires, refer to New
wheels and tires116
Reporting an accident, refer to
Initiating an emergency
call131
Reporting safety defects6
Reserve warning, refer to Fuel
gauge60
Reservoir for washer
systems
50
Residual heat mode84Restraint systems
– for children39
– refer to Safety belts36
Reverse gear
– automatic transmission with
Steptronic48
– manual transmission45
– sequential manual gearbox
SMG45
Roadside Assistance131
Roadside parking lamps78
– replacing bulbs127
Roadworthiness test, refer to
Service requirements63
Roller blind
– sun blinds89
Roof load capacity150
Roof-mounted luggage
rack101
Rope, refer to Tow-starting,
towing away134
RSC Runflat System
Component, refer to Run-
Flat Tires116
Runflat System Component
RSC, refer to Run-Flat
Tires116
Run-Flat Tires116
– continuing driving with a
damaged tire72
– flat tire72
– new tires116
– replacing tires116
– tire pressures108
– winter tires117
Runflat Tyres, refer to Run-
Flat Tires116
S
Safety-belt height
adjustment36
Safety belts36
– damage36
– indicator lamp36
– reminder36
– sitting safely31