Page 147 of 194
 142Av o id ro u t eYou can select this function once calculated route guidance
is active.
–Press the Route control button in the navigation menu.
– Select Avoid route from here")
Navigation (NAV) 142Av o id ro u t eYou can select this function once calculated route guidance
is active.
–Press the Route control button in the navigation menu.
– Select Avoid route from here �page 139, fig.145.
– By rotating and pressing the control knob, select the
section on the presently calculated route from the
vehicle position.
– By pressing the control knob, you confirm the section
you wish to avoid.The Navigation System will calculate an alternative route for the
section of the route you wish to avoid.
If you stop route guidance and restart it, the blocked out section
entered is cancelled and has to be reset if required.
Tips
�
If the Avoid route from here fun ction is greyed out or the Na vig a-
tion System does not calculate an alternate route, local conditions
are making this impossible.
�
If the recommended detour route is not followed, the system
automatically calculates a new route from the current position
without given further consideration to the previously closed
section.
Map control buttonGeneral
There are various displays for maps and information
with different options possible.Fig. 149 Navigation: Map display with an IPD areaPossible map displays are:�
Map and information display during route guidance with inac-
tive side menu
�page 143.
�
Map display with active side menu
�page 144
If light grey lines
�fig.149 are shown on the map display, this
means that IPD sections/areas are being shown. IPD means “in-
progress-data”, i.e data collection is incomplete and consequently
they cannot be included for route guidance. These IPD
sections/areas are on the Navigation DVD and are represented on
Page 148 of 194
143
General operation
RADIO, CD
NAME, TEL
NAV, INFO
CAR, SETUP the map by light grey lines
�f i g .1 4 9 . Th e r e i s n o r o u t e g u i d a n c e f o r
IPD sections, instea")
Navigation (NAV)143
General operation
RADIO, CD
NAME, TEL
NAV, INFO
CAR, SETUP the map by light grey lines
�f i g .1 4 9 . Th e r e i s n o r o u t e g u i d a n c e f o r
IPD sections, instead you are guided by directional arrows
�fig.149. These directional arrows point in the compass direc-
tion/a direct line to the destination.
I f y o u s h o u l d b e s t a r t i n g y o u r r o u t e g u i d a n c e i n a n I P D a r e a , y o u w i l l
initially be guided by directional arrows. As soon as you leave the
IPD area, route guidance will start . In
�page 142, fig.149 an
example is shown of a directional arrow in an IPD area.
If your destination should lie in an IPD area, the Navigation System
will guid e you up to the star t of the IPD area. In the IPD area you will
be guided by directional arrows.
If your route guidance includes an IPD area, you will be advised of
this by a voice message when route guidance starts (“It is possible
that there a re un fore seen tra ffic reg ulations on the way to the des ti-
nation.”).
Tips
Route guidance is additionally shown by directional arrows in the
instrument cluster display
�page 113 or
�page 114. In an IPD
area, the directional arrows in the instrument cluster display point
in the compass direction/a direct line to the destination.
Map and information displayFig. 150 Navigation: Example of map display with inactive side menu
Fig. 151 Navigation: Example of map display with activated turn list
A�
A1
Page 165 of 194
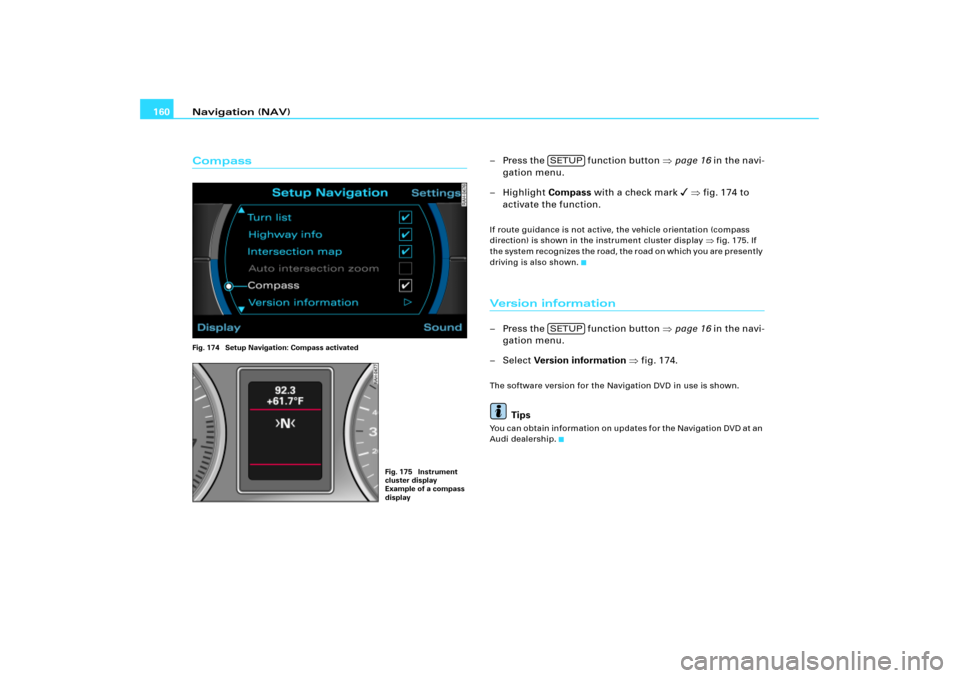
Navigation (NAV) 160CompassFig. 174 Setup Navigation: Compass activated
– Press the function button �page 16 in the navi-
gation menu.
– Highlight Compass with a check mark
� �fig.174 to
activate the function.
If route guidance is not active, the vehicle orientation (compass
direction) is shown in the instrument cluster display
�fig.175. If
the system recognizes the road, the road on which you are presently
driving is also shown.
Version information– Press the function button �page 16 in the navi-
gation menu.
– Select Version information �fig.174.The software version for the Navigation DVD in use is shown.
Tips
You can obtain information on updates for the Navigation DVD at an
Audi dealership.
Fig. 175 Instrument
cluster display
Example of a compass
display
SETUPSETUP
Page 167 of 194
 162
– In a destination input menu �page 117, fig.121, enter
the desired location data.
– Press the function button �page 16 in the navi-
gation menu.
– Select Set position/di")
Navigation (NAV) 162
– In a destination input menu �page 117, fig.121, enter
the desired location data.
– Press the function button �page 16 in the navi-
gation menu.
– Select Set position/direction �page 161, fig.176.
– Using the crosshairs �page 149 on the map, select the
desired starting point for route guidance on the map.
– In the active side meu, select OK �page 161, fig.177.
– Set the direction of the location �page 161, fig.178 by
rotating the control knob.
– When you press the control knob, the system automati-
cally jumps back to the the Setup Navigation menu.You can calculate the route from another position than the present
vehicle location.
We recommend entering the data for the starting point into a desti-
nation input menu
�page 117, fig.121 before you select the Set
position/direction. That way, the system will jump to the point
e n t e r e d i n t h e m a p d i s p l a y. I t i s e a s i e r t o s e t t h e l o c a t i o n o n t h e m a p
from this point.
You can search for the starting point using the crosshairs
�page 149.
You can enter the starting point manually to calculate future routes.
When you have set the location manually on the map, you can
switch to a destination input menu to enter the destination data.
Start route guidance in Demo mode to simulate route guidance �page 161.
Tips
It is only possible to set the location manually and to start route
guidance in Demo mode for a simulation if you vehicle is not
moving and GPS reception is not available
�page 110 (e.g. in an
underground parking garage).
SETUP
Page 175 of 194

SETUP 170The following submenus are available in the Setup
function:
Tips
You can read about system-specific Setup settings functions in the
description for each primary function.
Settings control buttonSetting the menu language
Display texts can be shown in different languages.Fig. 181 Setup: Menu language setting–Press the Settings control button in the Setup menu.
– Select Menu language �fig.181.
– Select the desired menu language.The display texts for the Navigation System are changed to the
selected language. The language for the audible navigation
commands are also changed.
The following languages can be selected:
Control button
functions �
page 169,
fig. 180
Setup submenus
Settings
Menu language
Distance unit
Time/Date format
Factory settings
Delete user data
Sound
Balance
Fader
Tr e b l e
Bass
DSP
a)b)
Volume settings (Navigation info)
a)Digital Signal Processingb)Vehicles with a BOSE® sound system in conjunction with an AudioPilot do
n o t h av e a D SP f un ct i o n. I n th is c as e y o ur v e hi cl e is equ ip p ed w i th d y n am ic
noise compensation �page 94.
Display
Switch off display
Brightness
A1A�A3
Page 177 of 194

SETUP 172
– Choose between the display 12h and 24h.
Setting date format
–Press the Settings control button in the Setup menu.
– Select Time/Date format �page 171, fig.182.
– Select Date format �page 171, fig.183.
– Choose between the display MM/DD for the format
“Month/Day” or DD.MM for the format “Day.Month”.The instruments cluster acts as the source for the time and date
display.
If the instrument cluster source is not available for some reason, the
time and date are received via the GPS. In this case GPS shows
under the menu item Time source GPS time can be set through the
menu item GMT +/-
Tips
If the instrument cluster source should not be available, please
contact an Audi dealership or authorized facililty.
Factory settings
Settings can be reset to prespecified default settings in
this function.Fig. 184 Setup: Settings factory settings–Press the Settings control button in the Setup menu.
– Select Factory settings �fig.184.
–Confirm Reset system to factory presets? with Ye s. The
settings (e.g. Setup Navigation and route criteria) are
reset to default settings.User data are not deleted.
Page 178 of 194
SETUP173
General operation
RADIO, CD
NAME, TEL
NAV, INFO
CAR, SETUP
Delete user data
User data in the Navigation System can be deleted.–Press the Settings control button in the Setup menu.
–Select Delete user data �page 172, fig.184.
–Confirm Are you sure you want to delete all user data??
with Ye s. User data (e.g. directory data, previous destina-
tions, radio memory list) are deleted.Sound control buttonSound settingsThe explanations for the sound settings start with section �page 92.
Display control buttonSwitch off displayFig. 185 Setup: Switch off displaySwitch off display
–Press the Display control button in the Setup menu.
– Select Switch off display �fig.185. The display is
switched off, the systems for navigation remain active.
Switch on display
– Press or rotate the control knob �page 17, or
–Press a �page 16 function button, or
Page 179 of 194
SETUP 174
– Press the button or
� button �page 12 to
switch the display on again.
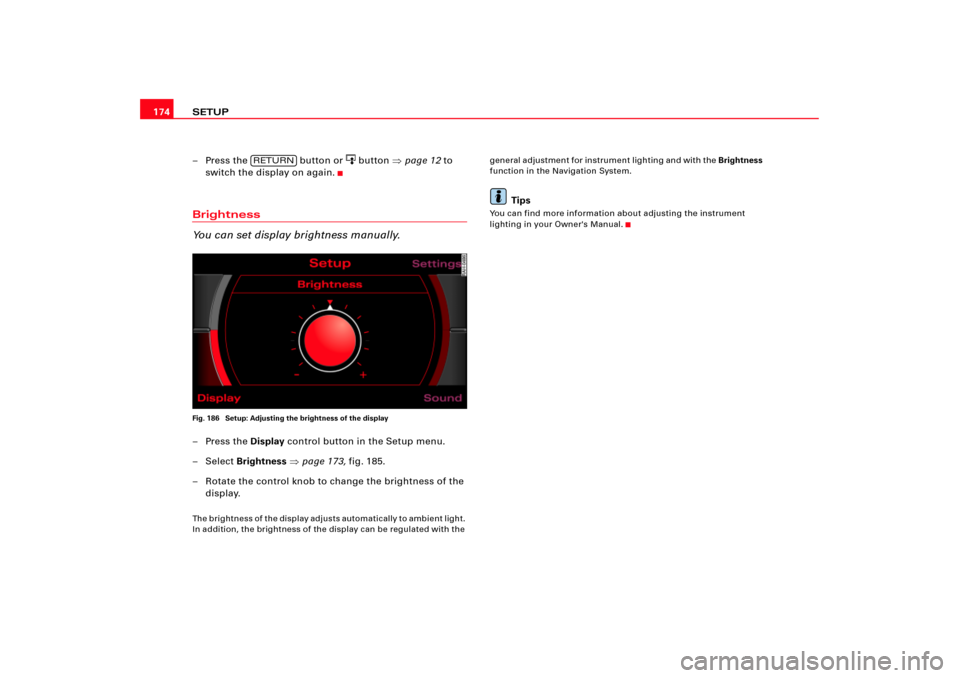
Brightness
You can set display brightness manually.Fig. 186 Setup: Adjusting the brightness of the display–Press the Display control button in the Setup menu.
– Select Brightness �page 173, fig.185.
– Rotate the control knob to change the brightness of the
display.Th e b r i g h t n e s s o f t h e d i s p l a y a d j u s t s a u t o m a t i c a l l y t o a m b i e n t l i g h t .
In addition, the brightness of the display can be regulated with the general adjustment for instrument lighting and with the Brightness
function in the Navigation System.
Tips
You can find more information about adjusting the instrument
lighting in your Owner's Manual.
RETURN