Page 6 of 243
�Î
�Î
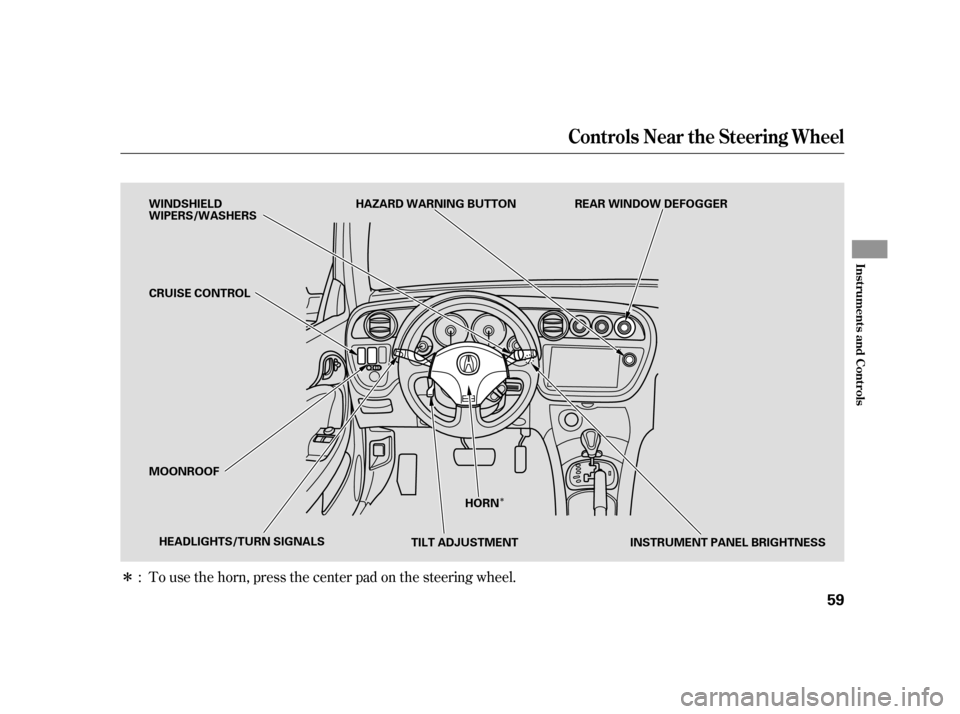
To use the horn, press the center pad of the steering wheel.
:
Your Vehicle at a Glance
Your Vehicle at a Glance
5
TILT ADJUSTMENT INSTRUMENT PANEL
BRIGHTNESS WINDSHIELD WIPERS/
WASHERS
REAR WINDOW DEFOGGER
CRUISE CONTROL
MOONROOF
HEADLIGHTS/TURN SIGNALS HAZARD WARNING BUTTON
(P. 115) (P.
62) (P.62)
(P. 60)
(P. 62)
(P. 63)
(P. 61)
(P.
79)
HORN
Page 50 of 243

This section gives inf ormation about
the controls and displays that
contribute to the daily operation of
your vehicle. All the essential
controls are within easy reach............................
Control Locations .50
............................
Instrument Panel .51
..........
Instrument Panel Indicators . 52
.............................................
Gauges .57
.....................................
Odometer .57
...................................
Trip Meter .57
..................................
Fuel Gauge .58
...................
Temperature Gauge . 58
..........
Check Fuel Cap Indicator . 58
Controls Near the Steering ...........................................
Wheel .59
.
Windshield Wipers and Washers . 60
...........
Turn Signal and Headlights . 61
........
Instrument Panel Brightness . 62
.................
Hazard Warning Button . 62
.................
Rear Window Def ogger . 62
..........
Steering Wheel Adjustment . 63
...............................
Keys and Locks .64
........................
Immobilizer System .65
................................
Ignition Switch .66
......................................
Door Locks .67
.........
Power Door/Hatch Locks . 67
............................................
Hatch .68
.......................
Remote Transmitter .69
.................................................
Seats .71
....................................
Seat Heaters .74 ...........................
Cargo Area Cover .75
..............................
Power Windows .77
.........................................
Moonroof .79
.............................................
Mirrors .79
.................................
Parking Brake .81
...........
Interior Convenience Items . 82
.......................
Beverage Holders .83
..........
Accessory Power Sockets . 83
...............
Console Compartment . 84
....................................
Glove Box .84
..............................
Vanity Mirror .85
....................................
Coat Hook .85
.................................
Interior Lights .86
Instruments and Controls
Inst rument s and Cont rols
49
Page 55 of 243

Only on models equipped with CruiseControl System
This indicator comes on when you
set the cruise control. See page f or inf ormation on operating the
cruise control.
This indicator comes on if either
door is not closed tightly.
This indicator comes on as a
reminder that you must ref uel soon.
The lef t or right turn signal indicator
blinks when you signal a lane change
or turn. If the indicator does not
blink or blinks rapidly, it usually
means one of the turn signal bulbs is
burned out (see page ). Replace
the bulb as soon as possible, since
other drivers cannot see that you are
signaling.
When you press on the Hazard
Warning button, both turn signal
indicators blink. All turn signals on
the outside of the vehicle should
flash.
This indicator comes on with the
high beam headlights. For more
inf ormation, see page .This indicator comes on f or a f ew
seconds when you turn the ignition
switch to ON (II). It will go of f if you
have inserted a properly-coded
ignition key. If it is not a properly-
coded key, the indicator will blink
and the engine will not start (see
page ).
This indicator also blinks several
times when you turn the ignition
switch f rom ON (II) to ACCESSORY
(I) or LOCK (0).
115
61
174
65
Instrument Panel Indicators
Cruise Control Indicator
Door-open Indicator
Low Fuel Indicator
Turn Signal and
Hazard Warning
Indicators
High Beam Indicator Immobilizer System
Indicator
54
Page 56 of 243

with the headlight switch off and the
parking brake set. It should go of f if
youturnontheheadlightsorrelease
the parking brake. If")
This indicator comes on when you
turn the ignition switch to ON (II)
with the headlight switch off and the
parking brake set. It should go of f if
youturnontheheadlightsorrelease
the parking brake. If it comes on at
any other time, it means there is a
problem with the DRL. There may
also be a problem with the high
beam headlights.This indicator comes on when the
washer f luid level is low. Add washer
fluidwhenyouseethisindicator
come on (see page ).
This indicator reminds you that it is
time to take your vehicle in for
scheduled maintenance.
Ref er to the Maintenance Schedules
f or Normal and Severe Driving
Conditions on pages and .
For the f irst 8,000 miles (12,800 km)
after the Maintenance Required
Indicator is reset, it will come on f or
2 seconds when you turn the ignition
switch to ON (II).
Between 8,000 miles (12,800 km)
and 10,000 miles (16,000 km), it will
come on f or 2 seconds when you
f irst turn the ignition switch to ON
(II), and then f lash f or 10 seconds.
167
157158
Canadian models only Canadian models only
Instrument Panel Indicators
‘‘Daytime Running
Lights’’ IndicatorWasher L evel Indicator
Maintenance Required
Indicator
Inst rument s and Cont rols
55
Page 60 of 243
�Î
�ÎTo use the horn, press the center pad on the steering wheel.
:
Controls Near the Steering Wheel
Inst rument s and Cont rols
59
WINDSHIELD
WIPERS/WASHERS
TILT ADJUSTMENT
MOONROOF REAR WINDOW DEFOGGER
CRUISE CONTROL
INSTRUMENT PANEL BRIGHTNESS
HAZARD WARNING BUTTON
HEADLIGHTS/TURN SIGNALS HORN
Page 62 of 243

�µ
�µ
�µ
Turn Signal
Of f
Parking and interior lights
Headlight on
High beams
Flashhighbeams Turning the
switch to the ‘‘ ’’ position turns
on the parking lights, taillights,
instrument panel lights, side-marker
lights, and rear license plate lights.
Turning the switch to the ‘‘ ’’
position turns on the headlights. If
you leave the lights on with the key
removed f rom the ignition switch,
you will hear a reminder beeper
when you open the driver’s door.
To turn on the high
beams, push the lef t lever f orward
until it clicks. The blue high beam
indicator will come on (see page ).
Pull it back to return to low beams.
To f lash the high beams, pull the
lever back lightly, then release it.
The high beams will stay on as long
as you hold the lever back.
Push down on the
lef t lever to signal a lef t turn and up
to signal a right turn. To signal a lane
change, push lightly on the lever and
hold it. The lever will return to center when you release it or
complete a turn.
With the headlight switch off, the
high beam headlights come on with
reduced brightness when you turn
the ignition switch to ON (II) and
release the parking brake. They
remain on until you turn the ignition
switch of f , even if you set the
parking brake.
The headlights revert to normal
operation when you turn them on
with the switch.
1.
2.
3.
4.
5.
6. 54
Canadian model only
Turn Signal and Headlights Daytime Running L ights
Headlights On
High Beams
Turn Signal
Turn Signal and Headlights
Inst rument s and Cont rols
61
Page 80 of 243
 position. Push and hold theswitch to open the moonroof .
Release the switch when the
moonroof reac")
Usetheswitchonthedashboardto
open and close the moonroof . The
ignition switch must be in the ON
(II) position. Push and hold theswitch to open the moonroof .
Release the switch when the
moonroof reaches the desired
position. To close the moonroof ,
press and hold the switch. Keep the inside and outside mirrors
clean and adjusted f or best visibility.
Be sure to adjust the mirrors bef ore
you start driving.
The inside mirror has day and night
positions. The night position reduces
glare f rom headlights behind you.
Flip the tab on the bottom edge of
the mirror to select the day or night
position.
CONT INUED
U.S.: All models
Canada: Premium and Type-S models only
Moonroof Mirrors
Moonroof , Mirrors
Inst rument s and Cont rols
79
TAB
Closing the moonroof on
someone’s hands or fingers can
cause serious injury.
Make sure passengers are
clear of the moonroof before
closing it.
If you try to open the moonroof in
below-f reezing temperatures, or when
it is covered with snow or ice, you can
damage the moonroof panel or motor.
Page 115 of 243

The security system helps to protect
your vehicle and valuables f rom thef t.
The horn sounds and a combination
of headlights, parking lights, side
marker lights, and taillights f lash if
someone attempts to break into your
vehicle. This alarm continues for 2
minutes, then the alarm stops. To
reset an alarming system bef ore the
2 minutes have elapsed, unlock
either door with the key or the
remote transmitter.
The security system sets
automatically, 15 seconds after you
lock the doors, hood, and hatch. The
security system indicator starts
blinking immediately to show you
the system is setting itself.Once the security system is set,
opening either door (without using
the key or the remote transmitter),
or the hood, will cause it to alarm. It
also alarms if the radio is removed
f rom the dashboard or the wiring is
cut.The security system will not set if
the hood, hatch, or either door is not
f ully closed. If the system will not set,
check the Door-open Indicator on
the instrument panel (see page ),
to see if the doors and the hatch are
f ully closed. Since it is not part of the
monitor display, manually check the
hood.
Do not attempt to alter this system
or add other devices to it.
54
Security System
114
SECURITY SYSTEM INDICATOR