Page 140 of 312
You can use the remote control to
select the entertainment source
(radio, CD player, or DVD player/
Auxiliary device). The selected
source will be shown in the display.
Make sure the rear control operation
has not been disabled with the RR
CTRL knob on the f ront panel.
When using the remote control,
point it at the rear control panel in
the ceiling.
ThePLAY/PROG,PAUSE,SKIP,
and FWD/REW buttons work the
same f unction as the f ront and rear
control panel buttons.
ThePLAY/PROG,PAUSE,SKIP,
and FWD/REW buttons work the
same f unction as the f ront and rear
control panel buttons. Using the Remote Control
To Play a CD or Radio
To Play a DVD
Rear Entertainment System
138
SOURCE SELECTION
BUTTONSSEEK/SKIP BUTTONS
DISP BUTTON
POWER (T/C) BUTTON
REW/FWD BUTTONS
STOP BUTTON
PAUSE BUTTON
TITLE/CAPTER BUTTON
SET-UP BUTTON
MENU BUTTON
RETURN BUTTON PLAY/PROG BUTTON
XM MODE BUTTON
Page 141 of 312

�µ�µ �µ�µ
�Ý �Û
Pressthisbutton
to stop playing a DVD.
Some DVDs have menus that allow
you to select a dubbed language,
subtitles, a chapter list, previews, etc.
Themenucontentswillvaryfrom
DVD to DVD.
Usethe,,,and buttons to select the desired
menu option. Then press ENT to
enter your selection. Use the and buttons to change
pages. You can also use the
numbered buttons to enter the two-
digit number of a menu option. You
do not have to press ENT. Press the
button again to close the window. To change the
color, contrast, aspect ratio, and
brightness of the video screen, press
the DISP button. The current setting
of one will be displayed on the
screen each time you press the
button. Use the and buttons to change the setting
as desired. The display will disappear
f rom the screen several seconds
af ter you stop adjusting the setting. In the MENU
selection mode, pressing the
RETURN button for less than 2
seconds changes the MENU display
to the previous page. Pressing the
RETURN button for more than 2
seconds while a DVD is playing
brings the system into the TITLE
enter mode. When you enter your
selection, the DVD player will start
playing f rom the selected title.
STOP Button
MENU and TITLE Buttons
DISP Button
RETURN Button
Rear Entertainment System
Features
139
Page 143 of 312

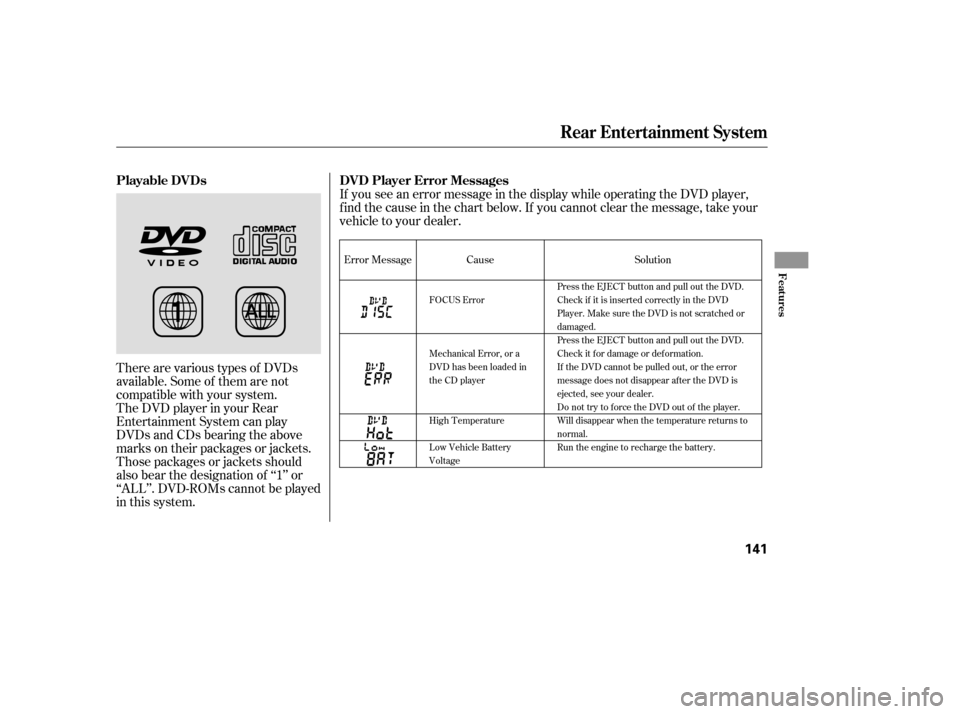
There are various types of DVDs
available. Some of them are not
compatible with your system.
The DVD player in your Rear
Entertainment System can play
DVDs and CDs bearing the above
marks on their packages or jackets.
Those packages or jackets should
also bear the designation of ‘‘1’’ or
‘‘ALL’’. DVD-ROMs cannot be played
in this system.If you see an error message in the display while operating the DVD player,
f ind the cause in the chart below. If you cannot clear the message, take your
vehicle to your dealer.
Error Message
Cause Solution
FOCUS Error
Mechanical Error, or a
DVD has been loaded in
the CD player
High Temperature
Low Vehicle Battery
VoltagePress the EJECT button and pull out the DVD.
Check if it is inserted correctly in the DVD
Player.MakesuretheDVDisnotscratchedor
damaged.
Press the EJECT button and pull out the DVD.
Check it for damage or deformation.
If the DVD cannot be pulled out, or the error
message does not disappear after the DVD is
ejected, see your dealer.
Do not try to force the DVD out of the player.
Will disappear when the temperature returns to
normal.
Run the engine to recharge the battery.
Playable DVDs
DVD Player Error Messages
Rear Entertainment System
Features
141
Page 147 of 312

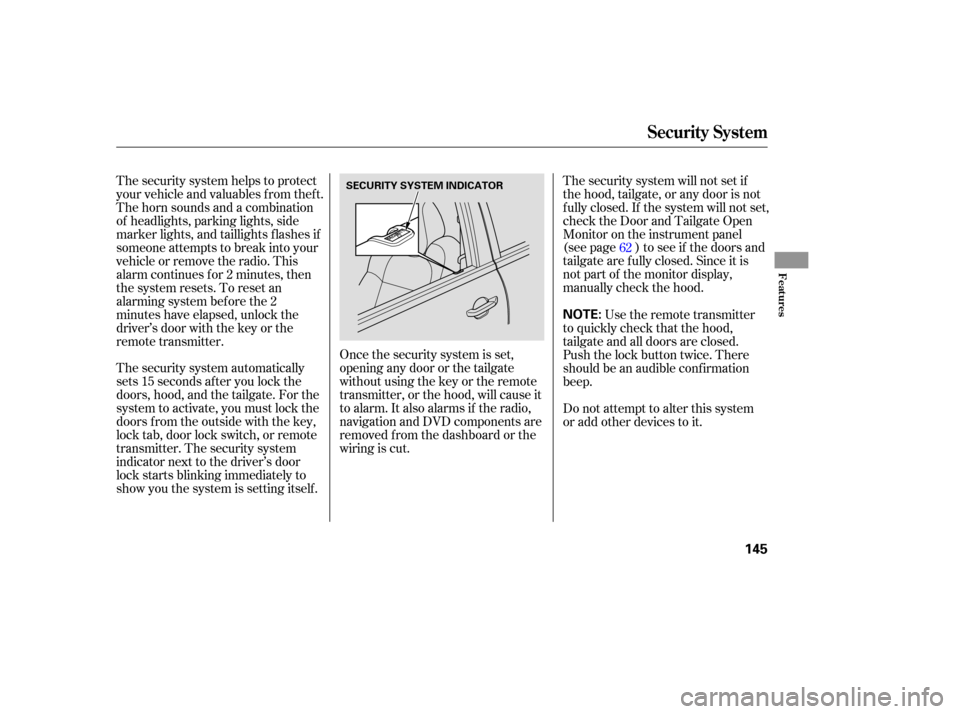
The security system automatically
sets 15 seconds after you lock the
doors, hood, and the tailgate. For the
system to activate, you must lock the
doors f rom the outside with the key,
lock tab, door lock switch, or remote
transmitter. The security system
indicator next to the driver’s door
lock starts blinking immediately to
show you the system is setting itself .The security system will not set if
the hood, tailgate, or any door is not
f ully closed. If the system will not set,
check the Door and Tailgate Open
Monitor on the instrument panel
(see page ) to see if the doors and
tailgate are f ully closed. Since it is
notpartofthemonitordisplay,
manually check the hood.
The security system helps to protect
your vehicle and valuables f rom thef t.
The horn sounds and a combination
of headlights, parking lights, side
marker lights, and taillights f lashes if
someone attempts to break into your
vehicleorremovetheradio.This
alarm continues f or 2 minutes, then
the system resets. To reset an
alarming system bef ore the 2
minutes have elapsed, unlock the
driver’s door with the key or the
remote transmitter.
Once the security system is set,
opening any door or the tailgate
without using the key or the remote
transmitter, or the hood, will cause it
to alarm. It also alarms if the radio,
navigation and DVD components are
removed f rom the dashboard or the
wiring is cut. Use the remote transmitter
to quickly check that the hood,
tailgate and all doors are closed.
Push the lock button twice. There
should be an audible conf irmation
beep.
Do not attempt to alter this system
or add other devices to it. 62
Security System
Features
145
NOTE:
SECURITY SYSTEM INDICATOR
Page 151 of 312
�µ�´
Trip Computer
Features
149
INSTANTANEOUS
FUEL MILEAGE
CLOCK
BUTTON
TRIP
BUTTON
RESET
BUTTON
DISPLAY BRIGHTNESS
CONTROL /CALIBRATE BUTTON
/ZONE BUTTONRESET, SET BUTTONCOMPASS
OUTSIDE
TEMPERATURE
CLOCK
Page 152 of 312

Clock
Direction of travel
Outside temperature
Instantaneous f uel mileageTheAvgdisplayshowsyouthe
average f uel economy since you
last reset the display.
The E/T is the elapsed time that
the ignition has been on. It
automatically resets to 0.0 when it
reaches twelve hours. This display
can be reset at any time.
The display also has manual
f unctions f or the Climate Control
System. Ref er to page .
All models of MDX have a trip
computer. To operate the trip
computer on models with the
navigation system, ref er to the
navigation manual.
The Trip Computer displays the
f ollowing inf ormation.
The temperature sensor is located
in the f ront bumper, and can be
affected by heat from the road
surf ace, engine heat, and the
exhaust f rom the surrounding
traf f ic. Because of these
conditions, it may take a while f or
the temperature to read correctly. The Range, or estimated distance
you can travel on the fuel
remaining in the tank estimated
f rom the f uel economy you have
gotten over the last several miles
(kilometers).
The Trip display shows you the
total distance you have driven
since it was last reset.
Press the TRIP button to show either
the range and Avg f uel economy, or
the E/T and Trip odometer.
To reset the Avg f uel economy, E/T,
and Trip odometer, press and hold
the RESET button until you hear a
beep.
The outside temperature, f uel
economy, range, and trip odometer
can be displayed in either English or
Metric units. To change between
units, press the TRIP button and
hold it f or f ive seconds.
106
(Without Navigation System)
Changing and Resetting the
Display
Changing Units of Measurement
Trip Computer
150
Page 153 of 312
To set the clock:Push the CLOCK button. The
hours digits will start blinking. If
you want to only set the minutes,
go to step 4. To change the hours to a lower
number, press and hold the
MODE button. To change the
hours to a higher number, press
andholdtheA/Cbutton.
When the hours reach the desired
number, release the button.
To set the minutes, press the
CLOCK button again. The
minutes digits will start blinking.
Use the MODE or A/C button to
set the minutes to the desired
number.
Press the CLOCK button again.
The clock will return to its normal
display.
For example:
1:06 will reset to 1:00
1:52 will reset to 2:00 You can quickly set the time to the
nearest hour. Press the CLOCK
button, then press the RESET button.
If the displayed time is before the
half hour, it will reset back to the
previous hour. If the displayed time
is af ter the half hour, it will reset
f orward to the next hour.
1. 2.
3.
4.
5.
6.
Setting the Clock
Trip Computer
Features
151
Page 154 of 312

�µ�µ�µ�µ
�µ�µ
The compass may need to be
manually calibrated af ter exposure to
a strong magnetic field. If the
compassseemstobecontinually
showing the wrong direction and is
not self -calibrating, do the f ollowing. You should do this procedure
in an open area, away from buildings,
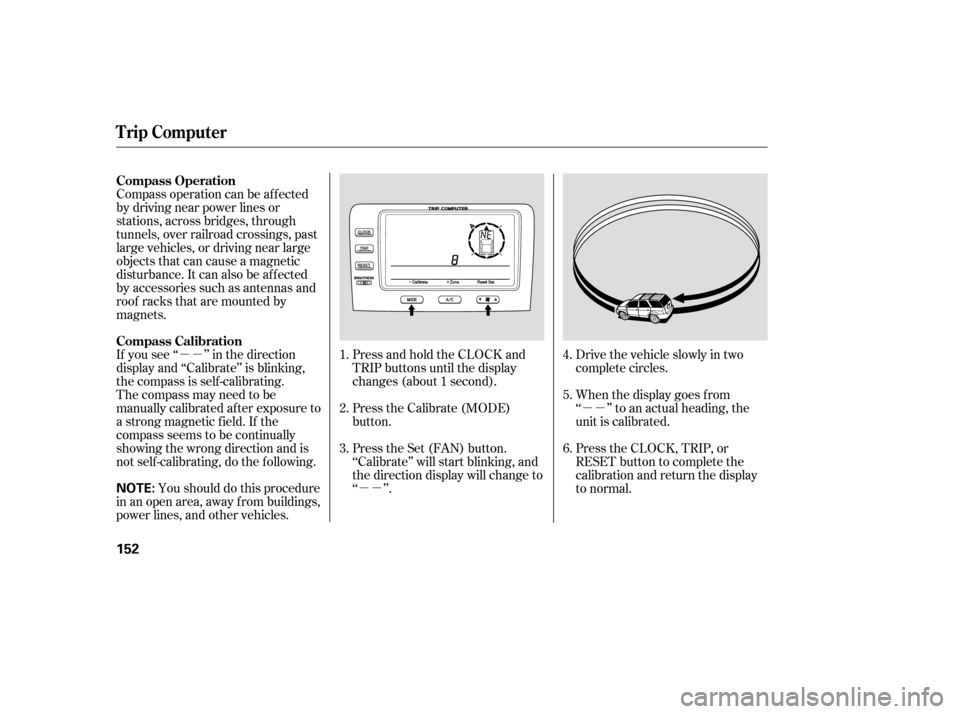
power lines, and other vehicles. Press and hold the CLOCK and
TRIP buttons until the display
changes (about 1 second).
Press the Calibrate (MODE)
button.
Press the Set (FAN) button.
‘‘Calibrate’’ will start blinking, and
the direction display will change to
‘‘ ’’.
Drive the vehicle slowly in two
complete circles.
When the display goes f rom
‘‘ ’’ to an actual heading, the
unit is calibrated.
Press the CLOCK, TRIP, or
RESET button to complete the
calibration and return the display
to normal.
Compass operation can be af f ected
by driving near power lines or
stations, across bridges, through
tunnels, over railroad crossings, past
large vehicles, or driving near large
objects that can cause a magnetic
disturbance. It can also be af f ected
by accessories such as antennas and
roof racks that are mounted by
magnets.
If you see ‘‘ ’’ in the direction
display and ‘‘Calibrate’’ is blinking,
the compass is self -calibrating.
1.
2.
3.4.
5.
6.
Compass Operation
Compass Calibration
Trip Computer
152
NOTE: