Page 78 of 312
 and
release the parking brake. They
remain on until you turn the ig")
With the headlight switch off, the
high beam headlights come on with
reduced brightness when you turn
the ignition switch to ON (II) and
release the parking brake. They
remain on until you turn the ignition
of f , even if you set the parking brake.
The headlights revert to normal
operation when you turn them on
with the switch.Push the red button to the right of
the display to turn on the hazard
warning lights (f our-way f lashers).
This causes all f our outside turn
signals and both indicators in the
instrument panel to f lash. Use the
hazard warning lights if you need to
park in a dangerous area near heavy
traf f ic, or if your vehicle is disabled.
The dial on the instrument panel
controls the brightness of the
instrument panel lights, the blue
lighting in the upper console and the
f ront f oot wells.
Canadian Models
Daytime Running L ights
Instrument Panel Brightness Hazard Warning Button
Headlights, Instrument Panel Brightness, Hazard Warning Button
76
INSTRUMENT PANEL BRIGHTNESS
CONTROL DIAL
Page 88 of 312
�µ
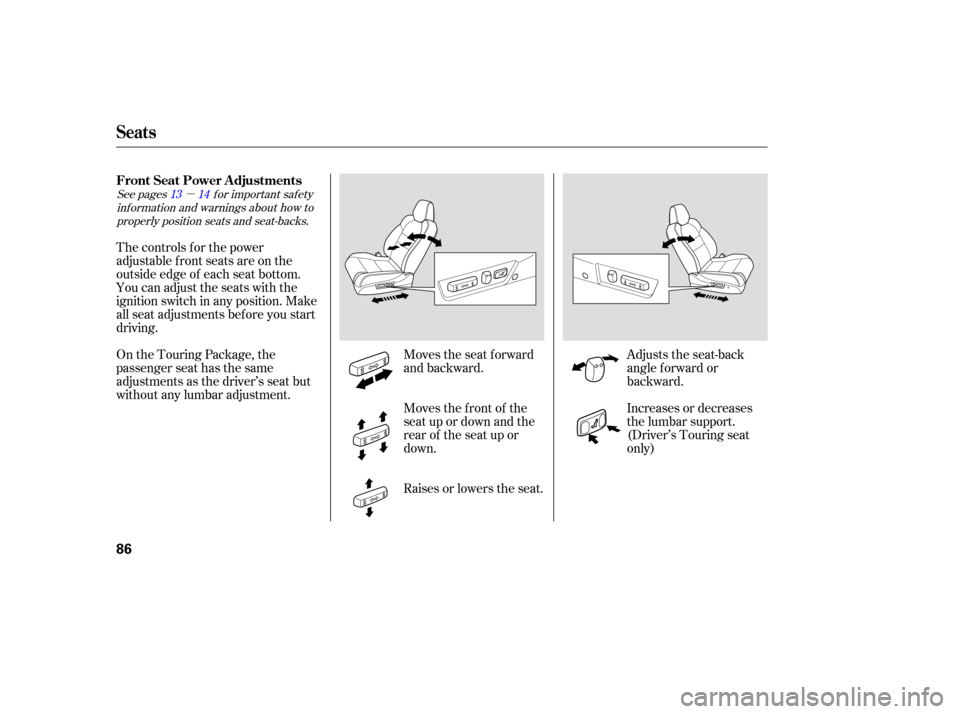
See pages f or important saf ety
inf ormation and warnings about how toproperly position seats and seat-backs. 13 14
The controls f or the power
adjustable front seats are on the
outside edge of each seat bottom.
You can adjust the seats with the
ignition switch in any position. Make
all seat adjustments bef ore you start
driving.
Adjusts the seat-back
angle f orward or
backward.
Moves the seat forward
and backward.
Increases or decreases
the lumbar support.
(Driver’s Touring seat
only)
Moves the f ront of the
seat up or down and the
rear of the seat up or
down.
Raises or lowers the seat.
On the Touring Package, the
passenger seat has the same
adjustments as the driver’s seat but
without any lumbar adjustment.
Seats
Front Seat Power A djustments
86
Page 89 of 312
�µ
To adjust the seat forward and
backward, pull up on the lever under
the seat cushion’s f ront edge. Move
the seat to the desired position and
releasethelever.Trytomovethe
seat to make sure it is locked in
position.Vary the lumbar support by moving
the lever on the right side of the
seat-back. Move the lever forward or
backward to adjust the lumbar
support through its f ull range.
To change the seat-back angle of the
f ront seats, pull up on the lever on
the outside of the seat bottom. Make all seat adjustments bef ore
you start driving.
See pages f or important saf ety inf ormation and warnings about how toproperly position seats and seat-backs.
Without Touring Package
Without Touring Package
13 14
Seats
Driver’s Manual L umbar Support
Passenger Manual Seat
Adjustments
Inst rument s and Cont rols
87
Page 90 of 312

See page f or important saf etyinf ormation and a warning about how toproperly position the head restraints. 15
Theyaremosteffectivewhenyou
adjust them so the back of the
occupant’s head rests against the
center of the restraint. Your vehicle is equipped with head
restraints in all seating positions to
help protect you and your
passengers f rom whiplash and other
injuries. To unlatch the detachable anchor,
insert a key into the slot on the side
of the small buckle. Line up the
triangle marks on the plate and
buckle when reattaching the belt and
buckle.
The head restraints adjust f or height.
You need both hands to adjust the
restraint. Do not attempt to adjust it
while driving. To raise it, pull upward.
To lower the restraint, push the
release button sideways and push
the restraint down.
Head Restraints
Detachable Seat Belt Anchors
Seats
88
RELEASE BUTTON SMALL LATCH PLATE
TRIANGULAR MARKS
Using a seat belt with the
detachable anchor unlatched
increases the chance of serious
injury or death in a crash.
Before using the seat belt,
make sure the detachable
anchor is correctly latched.
Page 207 of 312

Each tire has its own pressure
sensor. If the air pressure of a tire
becomes signif icantly low, the
sensor in that tire immediately sends
a signal that causes the low tire
pressure indicator and the
appropriate tire on the tire pressure
monitor to come on. Your vehicle is equipped with a tire
pressure monitoring system (TPMS)
that turns on every time you start the
engine and monitors the pressure in
your tires while driving.When the tire pressure monitoring
system warning light is lit, one or
more of your tires is signif icantly
under-inf lated. You should stop and
check your tires as soon as possible.
If you think you can saf ely drive a
short distance to a service station,
proceed slowly, and inf late the tire to
the recommended pressure shown
on the driver’s doorjamb.
If the tire is f lat, or if the tire
pressure is too low to continue
driving, replace the tire with the
compact spare tire.Driving on a signif icantly under-
inf lated tire causes the tire to
overheat and can lead to tire failure.
Under-inf lation also reduces f uel
efficiency and tire tread life, and may
af f ect the vehicle’s handling and
stopping ability.
Although your tire pressure is
monitored, each tire should be
checked monthly, including the
spare.
Check the pressure with the tires
cold, af ter the vehicle has been
parked f or at least 2 hours.
Set to the recommended inf lation
pressure as specif ied on the vehicle
placard and in the owner’s manual
(see page ).
252
Tire Pressure Monitoring System (TPMS)
Low Tire Pressure
Indicator
Driving
205
Page 259 of 312

�µ
Check the condition of the battery
monthlybylookingatthetest
indicator window. The label on the
battery explains the test indicator’s
colors. Check the terminals f or corrosion (a
white or yellowish powder). To
remove it, cover the terminals with a
solution of baking soda and water. It
will bubble up and turn brown. When
this stops, wash it of f with plain
water. Dry off the battery with a
cloth or paper towel. Coat the
terminals with grease to help prevent
f urther corrosion.
Battery posts,
terminals, and related accessories
contain lead and lead compounds. If you need to connect the battery to
a charger, disconnect both cables to
prevent damaging your vehicle’s
electrical system. Always disconnect
the negative ( ) cable first, and
reconnect it last.
If additional battery maintenance is
needed, see your dealer or a
qualif ied technician.
WARNING:
Wash your hands af ter handling.
Checking the Battery
Maint enance
257
TEST INDICATOR WINDOW
The battery gives off explosive
hydrogen gas during normal
operation.
A spark or flame can cause the
battery to explode with enough
force to kill or seriously hurt you.
Wear protective clothing and a
face shield, or have a skilled
mechanic do the battery
maintenance.
Page 263 of 312
If you have a f lat tire while driving,
stop in a saf e place to change it.
Drive slowly along the shoulder until
you get to an exit or an area to stop
that is far away from the traffic lanes.Park the vehicle on f irm, level, and
non-slippery ground. Put the
transmission in Park. Apply the
parking brake.Turn on the hazard warning lights,
and turn the ignition switch to
LOCK (0). Have all the
passengers get out of the vehicle
while you change the tire.
2.
1.
CONT INUED
Changing a Flat T ire
T aking Care of t he Unexpect ed
261
JACK
TOOLS SPARE TIRE
The vehicle can easily roll off
the jack, seriously injuring
anyone underneath.
Follow the directions for
changing a tire exactly, and
never get under the vehicle
when it is supported only by the
jack.
Page 270 of 312

�´�´
Are you using the proper starting
procedure? Ref er to
on page .
Do you have f uel? Check the f uel
gauge; the warning indicator may
not be working.
There may be an electrical
problem, such as no power to the
f uel pump. Check all the f uses
(see page ).
If youfindnothingwrong,youwill
need a qualif ied technician to f ind
the problem. See on page . Although this seems like a simple
procedure, you should take several
precautions.
To jump start your vehicle:
You cannot start your vehicle by
pushing or pulling it. Connect one jumper cable to the
positive ( ) terminal on your
vehicle’s battery. Connect the
other end to the positive ( )
terminal on the booster battery. Put the transmission in Neutral or
Park, and set the parking brake. Turn of f all the electrical acces-
sories: heater, A/C, climate
control, audio system, lights, etc. Open the hood, and check the
physical condition of the battery.
In very cold weather, check the
condition of the electrolyte. If it
seems slushy or f rozen, do not try
jump starting until it thaws.
1.
2.
3.
276
274199
Starting the
Engine
Emergency
Towing Jump Starting
If the Engine Won’t Start, Jump Starting
268
A battery can explode if you do
not follow the correct procedure,
seriously injuring anyone
nearby.
Keep all sparks, open flames,
and smoking materials away
from the battery.
If a battery sits in extreme cold, the
electrolyte inside can f reeze.
Attempting to jump start with a f rozen
battery can cause it to rupture.