Page 378 of 457

7-34
FUEL INJECTION SYSTEMFI
Fault code No.Er-1SymptomNo signal are received from the ECU.
Er-2SymptomNo signal are received from the ECU within the specified duration.
Er-3SymptomData from the ECU cannot be received correctly.
Er-4SymptomNon-registered data has been received from the meter.
Used diagnostic code No. – –
OrderInspection operation item and probable
causeOperation item and countermeasureReinstatement
method
1Connected condition of connector
Inspect the coupler for any pins that
may have pulled out.
Check the locking condition of the
coupler.If there is a malfunction, repair it and connect it
securely.
Cylinder identification sensor coupler
Main wiring harness ECU coupler
Sub-wire harness couplerReinstated by
turning the
main switch
ON.
2Open or short circuit in wiring harness
and / or sub lead.Repair or replace if there is an open or short
circuit.
Between sensor coupler and ECU coupler
Yellow / Blue – Yellow / Blue
Black / White – Black / White
3Malfunction in meterReplace the meter.
4Malfunction in ECUReplace the ECU.
ProCarManuals.com
Page 379 of 457
7-35
Order Job / Part Q’ty Remarks
1
2
3
4
5
6
7
8Removing the throttle bodies
Seat
Fuel tank
Air filter case
Sub-wire harness coupler
Coolant temperature sensor coupler
Thermo wax inlet hose
Thermo wax outlet hose
Idle adjust screw wire
Throttle body joint clamp
Throttle bodies
Throttle cables2
1
1
1
1
4
1
2Remove the parts in the order listed.
Refer to “SEAT” in chapter 3.
Refer to “FUEL TANK” in chapter 3.
Refer to “AIR FILTER CASE” in chapter 3.
Disconnect.
Disconnect.
Loosen.
If it loosens too much, the nut will sepa-
rate.
Disconnect.
NOTE:
THROTTLE BODIESFI
THROTTLE BODIES
ProCarManuals.com
Page 380 of 457
7-36
Order Job / Part Q’ty Remarks
9
10
11Throttle body joint
Heat protector
Fuel hose4
1
1To install the throttle body joint, make
sure to install it to the cylinder with the
same figures corresponding to the fig-
ures stated on the throttle body joint.
For installation, reverse the removal
procedure.
NOTE:
THROTTLE BODIESFI
ProCarManuals.com
Page 381 of 457
7-37
Order Job / Part Q’ty Remarks
1
2
3
4
5
6
7
8
9
10
11
12
13
14
15Removing the injectors
Throttle position sensor coupler
Sub-throttle position sensor coupler
Sub-throttle motor assembly coupler
Intake air pressure sensor coupler
Cylinder #1-injector coupler
Cylinder #2-injector coupler
Cylinder #3-injector coupler
Cylinder #4-injector coupler
Sub wire harness
Negative pressure hose
Intake air pressure sensor
Fuel distributor
Injector
Spring
Thermo wax assembly1
1
1
1
1
1
1
1
1
1
1
1
4
1
1Remove the parts in the order listed.
Disconnect.
Disconnect.
Disconnect.
Disconnect.
Disconnect.
Disconnect.
Disconnect.
Disconnect.
THROTTLE BODIESFI
INJECTORS
ProCarManuals.com
Page 382 of 457
7-38
THROTTLE BODIESFI
Order Job / Part Q’ty Remarks
16
17
18
19
20
21
22
23Idle adjust screw wire
Cotter pin
Washer
Link
Sub-throttle servo motor assembly
Throttle position sensor
Fuel pressure regulator
Throttle body assembly1
2
2
1
1
1
1
1
For installation, reverse the removal
procedure.
ProCarManuals.com
Page 383 of 457
7-39
THROTTLE BODIESFI
CAUTION:
EAS00911
The throttle bodies should not be disas-
sembled.
EAS00912
CHECKING THE INJECTORS
1. Check:
�injectors
Damage � Replace.
EAS00913
CHECKING THE THROTTLE BODIES
1. Check:
�throttle bodies
Cracks / damage � Replace the throttle bo-
dies as a set.
2. Check:
�fuel passages
Obstructions � Clean.
a. Wash the throttle bodies in a petroleum-
based solvent.
Do not use any caustic carburetor cleaning
solution.
b. Blow out all of the passages with com-
pressed air.
EAS00095
CHECKING THE THROTTLE BODY JOINTS
The following procedure applies to all of the
throttle body joints and intake manifolds.
1. Remove:
�throttle bodies
Refer to “THROTTLE BODIES”.
2. Check:
�throttle body joints
1
Cracks / damage � Replace.
3. Install:
�throttle bodies
Refer to “THROTTLE BODIES”.
ProCarManuals.com
Page 384 of 457

7-40
THROTTLE BODIESFI
NOTE: CHECKING THE PRESSURE REGULATOR
1. Check:
�pressure regulator
Damage � Replace.
CHECKING THE FUEL PUMP AND
PRESSURE REGULATOR OPERATION
1. Check:
�pressure regulator operation
a. Remove the fuel tank.
Refer to “FUEL TANK” in chapter 3.
b. Disconnect the negative pressure hose
1
from the pressure regulator at the joint.
c. Connect the vacuum / pressure pump gauge
set
2 onto the negative pressure hose from
the pressure regulator.
d. Connect the pressure gauge
3 and adapter
4 onto the fuel injection pipe.
Vacuum / pressure pump gauge set
90890-06756, YB-35956
Pressure gauge
90890-03153, YU-03153
Adapter
90890-03176, YM-03176
e. Install the fuel tank.
Refer to “FUEL TANK” in chapter 3.
f. Start the engine.
g. Measure the fuel pressure.
Fuel pressure
294 kPa (2.94 kg / cm
2, 42.6 psi)
h. Use the vacuum pressure pump gauge set to
adjust the fuel pressure in relation to the vac-
uum pressure as described below.
The vacuum pressure should not exceed 100
kPa (760 mmHg, 29.9 inHg).
ProCarManuals.com
Page 385 of 457

7-41
THROTTLE BODIESFI
NOTE:
Increase the vacuum pressure �
Fuel pressure is decreased
Decrease the vacuum pressure �
Fuel pressure is increased
Faulty � Replace the pressure regulator.
EAS00916
CHECKING AND ADJUSTING THE
THROTTLE POSITION SENSOR
Before adjusting the throttle position sensor, the
engine idling speed should be properly ad-
justed.
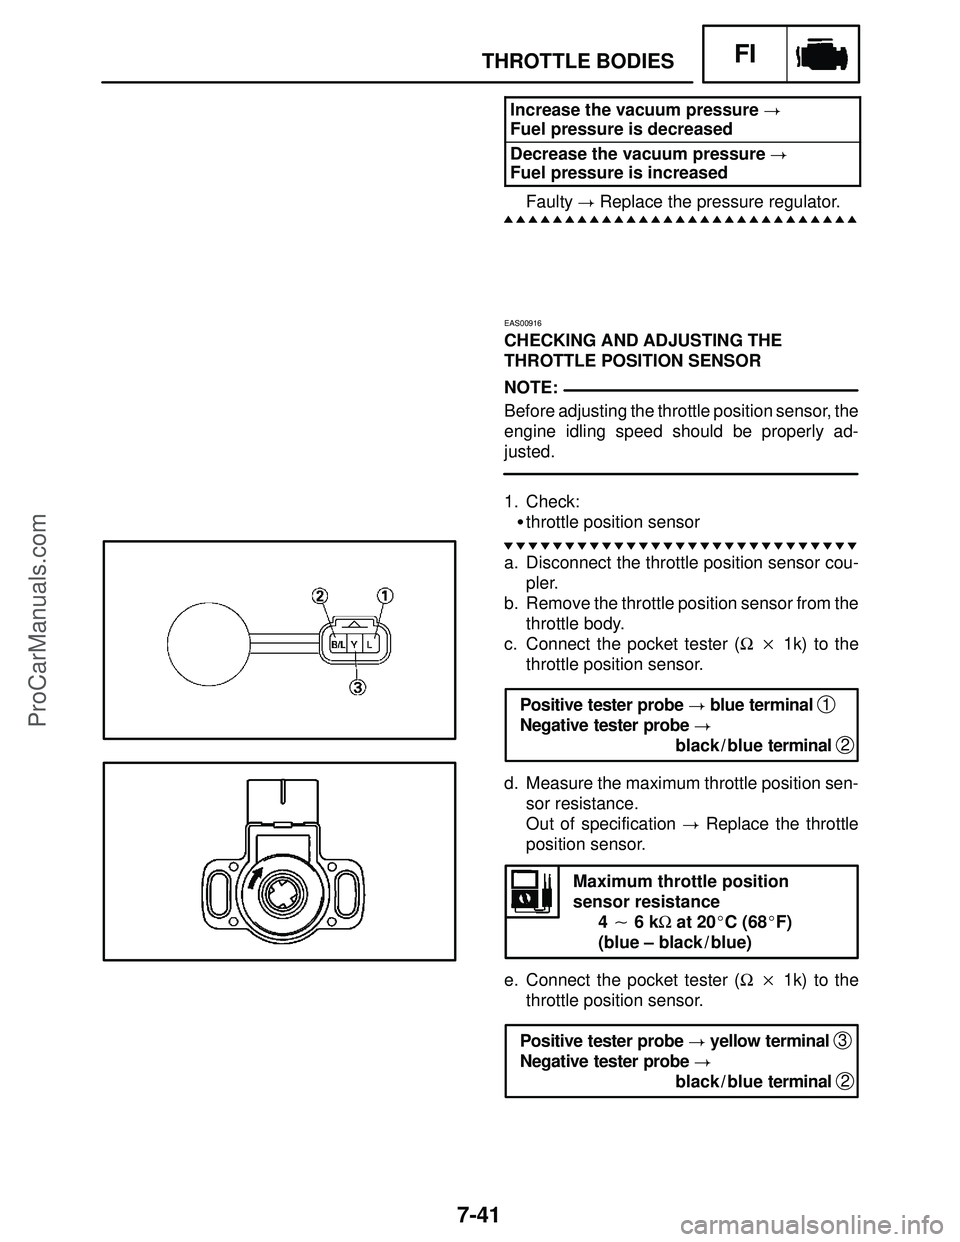
1. Check:
�throttle position sensor
a. Disconnect the throttle position sensor cou-
pler.
b. Remove the throttle position sensor from the
throttle body.
c. Connect the pocket tester (Ω � 1k) to the
throttle position sensor.
Positive tester probe � blue terminal
1
Negative tester probe �
black / blue terminal
2
d. Measure the maximum throttle position sen-
sor resistance.
Out of specification � Replace the throttle
position sensor.
Maximum throttle position
sensor resistance
4 � 6 kΩ at 20�C (68�F)
(blue – black / blue)
e. Connect the pocket tester (Ω � 1k) to the
throttle position sensor.
Positive tester probe � yellow terminal
3
Negative tester probe �
black / blue terminal
2
ProCarManuals.com