Page 164 of 754

4Throttle cable (pull)
5Ignition coil
6Negative battery lead
7Starter motor lead
8Coolant reservoir tank
brea")
2 - 25
SPECCABLE ROUTING DIAGRAM
1Hot starter cable
2Clutch cable
3Throttle cable (return)
4Throttle cable (pull)
5Ignition coil
6Negative battery lead
7Starter motor lead
8Coolant reservoir tank
breather hose
9Rectifier/regulator
0Cable holder
ACoolant reservoir hose
BRectifier/regulator lead
CClamp
DCDI unit lead
ECDI unit
FCDI unit band
GCDI unit stay (frame)
HCable bracketÅPass the throttle cables, clutch
cable and hot starter cable through
the cable guides.
ıPass the throttle cables, clutch
cable and hot starter cable between
the radiator and frame, then over
the middle radiator mounting boss.
ÇPass the throttle cables and clutch
cable on the outside of the ignition
coil.
ÎPass the carburetor breather hose
(throttle cable cover) through the
hose holder.
‰Fasten the coolant reservoir tank
breather hose and carburetor
breather hoses together with a
plastic locking tie.ÏFasten the grommet of the clutch
cable with the cable holder.
ÌFasten the rectifier/regulator lead to
the frame with a plastic locking tie
and cut off the tie end.
ÓFasten the CDI unit lead to the
frame with a plastic locking tie ends
at the lower of the frame and cut off
the tie end.
ÈInsert the CDI unit band over the
CDI unit stay (frame) as far as pos-
sible.
ÔFasten the starter motor lead and
negative battery lead to the cable
bracket in its slot with a plastic lock-
ing tie and cut off the tie end.
Do not allow the rectifier/regulator
lead to slacken.
Page 173 of 754

3 - 2
INSP
ADJ
MAINTENANCE INTERVALS
SHIFT FORK, SHIFT CAM, GUIDE BAR
Inspect
●
Inspect wear
ROTOR NUT
Retighten
●
●
MUFFLER
Inspect and retighten
Clean
Replace
●
●
●
●
* Whichever comes first
*SPARK ARRESTER
Clean
(Every
six
months)
●
CRANK
Inspect and clean
●
●
CARBURETOR
Inspect, adjust and clean
●
●
SPARK PLUG
Inspect and clean
Replace
●
●
●
DRIVE CHAIN
Lubricate, slack, alignment
Replace
●
●
●
Use chain lube
Chain slack: 40 ~ 50 mm
(1.57 ~ 1.97 in)
COOLING SYSTEM
Check coolant level and leakage
Check radiator cap operation
Replace coolant
Inspect hoses
●
●
●
●
●
Every two years
OUTSIDE NUTS AND BOLTS
Retighten
●
●
Refer to “STARTING
AND BREAK-IN” section
in the CHAPTER 1.
AIR FILTER
Clean and lubricate
Replace
●
●
●
Use foam air-filter oil or
equivalent oil
OIL FILTER
Replace
●
●
OIL STRAINER (frame)
Clean
●
FRAME
Clean and inspect
●
●
FUEL TANK, COCK
Clean and inspect
●
●
BRAKES
Adjust lever position and pedal height
Lubricate pivot point
Check brake disc surface
Check fluid level and leakage
Retighten brake disc bolts, caliper
bolts, master cylinder bolts and union
bolts
Replace pads
Replace brake fluid
●
●
●
●
●
●
●
●
●
●
●
●
Every one year ItemAfter
break-inEvery
race
Every
third
(or
500 km)Every
fifth
(or
1,000 km)
As re-
quiredRemarks
3
Page 184 of 754

3 - 4
INSP
ADJ
PRE-OPERATION INSPECTION AND MAINTENANCE
EC320000
PRE-OPERATION INSPECTION AND MAINTENANCE
Before riding for break-in operation, practice or a race, make sure the machine is in good operating
condition.
Before using this machine, check the following points.
GENERAL INSPECTION AND MAINTENANCE
Item Routine Page
CoolantCheck that coolant is filled up to the radiator filler cap.
Check the cooling system for leakage.P.3-5 ~ 9
FuelCheck that a fresh gasoline is filled in the fuel tank. Check the
fuel line for leakage.P.1-14
Engine oilCheck that the oil level is correct. Check the crankcase and
frame oil line for leakage.P.3-14 ~ 18
Gear shifter and clutchCheck that gears can be shifted correctly in order and that the
clutch operates smoothly.P.3-10
Throttle grip/HousingCheck that the throttle grip operation and free play are correctly
adjusted. Lubricate the throttle grip and housing, if necessary.P.3-10 ~ 11
Brakes Check the play of front brake and effect of front and rear brake. P.3-26 ~ 32
ChainCheck chain slack and alignment. Check that the chain is lubri-
cated properly.P.3-33 ~ 36
WheelsCheck for excessive wear and tire pressure. Check for loose
spokes and have no excessive play.P.3-44 ~ 45
SteeringCheck that the handlebar can be turned smoothly and have no
excessive play.P.3-45 ~ 46
Front forks and rear shock
absorberCheck that they operate smoothly and there is no oil leakage. P.3-36 ~ 43
Cables (wires)Check that the clutch and throttle cables move smoothly. Check
that they are not caught when the handlebars are turned or
when the front forks travel up and down.—
Muffler Check that the muffler is tightly mounted and has no cracks.—
Sprocket Check that the driven sprocket tightening bolt is not loose. P.3-33
Lubrication Check for smooth operation. Lubricate if necessary. P.3-47
Bolts and nuts Check the chassis and engine for loose bolts and nuts. P.1-19
Lead connectorsCheck that the AC magneto, CDI unit, and ignition coil are con-
nected tightly.P.1-6
SettingsIs the machine set suitably for the condition of the racing course
and weather or by taking into account the results of test runs
before racing? Are inspection and maintenance completely
done?P.7-1 ~ 21
Page 188 of 754

3 - 5
INSP
ADJ
EC350000
ENGINE
COOLANT LEVEL INSPECTION
WARNING
Do not remove the radiator cap 1, drain
bolt and hoses when the engine and radia-
tor are hot. Scalding hot fluid and steam
may be blown out under pressure, which
could cause serious injury.
When the engine has cooled, place a thick
towel over the radiator cap, slowly rotate
the cap counterclockwise to the detent.
This procedure allows any residual pres-
sure to escape. When the hissing sound
has stopped, press down on the cap while
turning counterclockwise and remove it.
CAUTION:
Hard water or salt water is harmful to the
engine parts. You may use distilled water, if
you can’t get soft water.
1. Place the machine on a level place, and
hold it in an upright position.
2. Inspect:
�Coolant level
Coolant level should be between the
maximum a and minimum b marks.
Coolant level is below the “LOW” level
line → Add soft water (tap water) up to
the proper level.
3. Start the engine and let it warm up for
several minutes.
4. Turn off the engine and check the coolant
level again.
NOTE:
Before checking the coolant level, wait a few
minutes until the coolant settles.
LOWFULLCOOLANT
a
b
COOLANT REPLACEMENT
WARNING
Do not remove the radiator cap when the
engine is hot.
ENGINE/COOLANT LEVEL INSPECTION/
COOLANT REPLACEMENT
Page 190 of 754
3 - 6
INSP
ADJ
COOLANT REPLACEMENT
CAUTION:
Take care so that coolant does not splash
on painted surfaces. If it splashes, wash it
away with water.
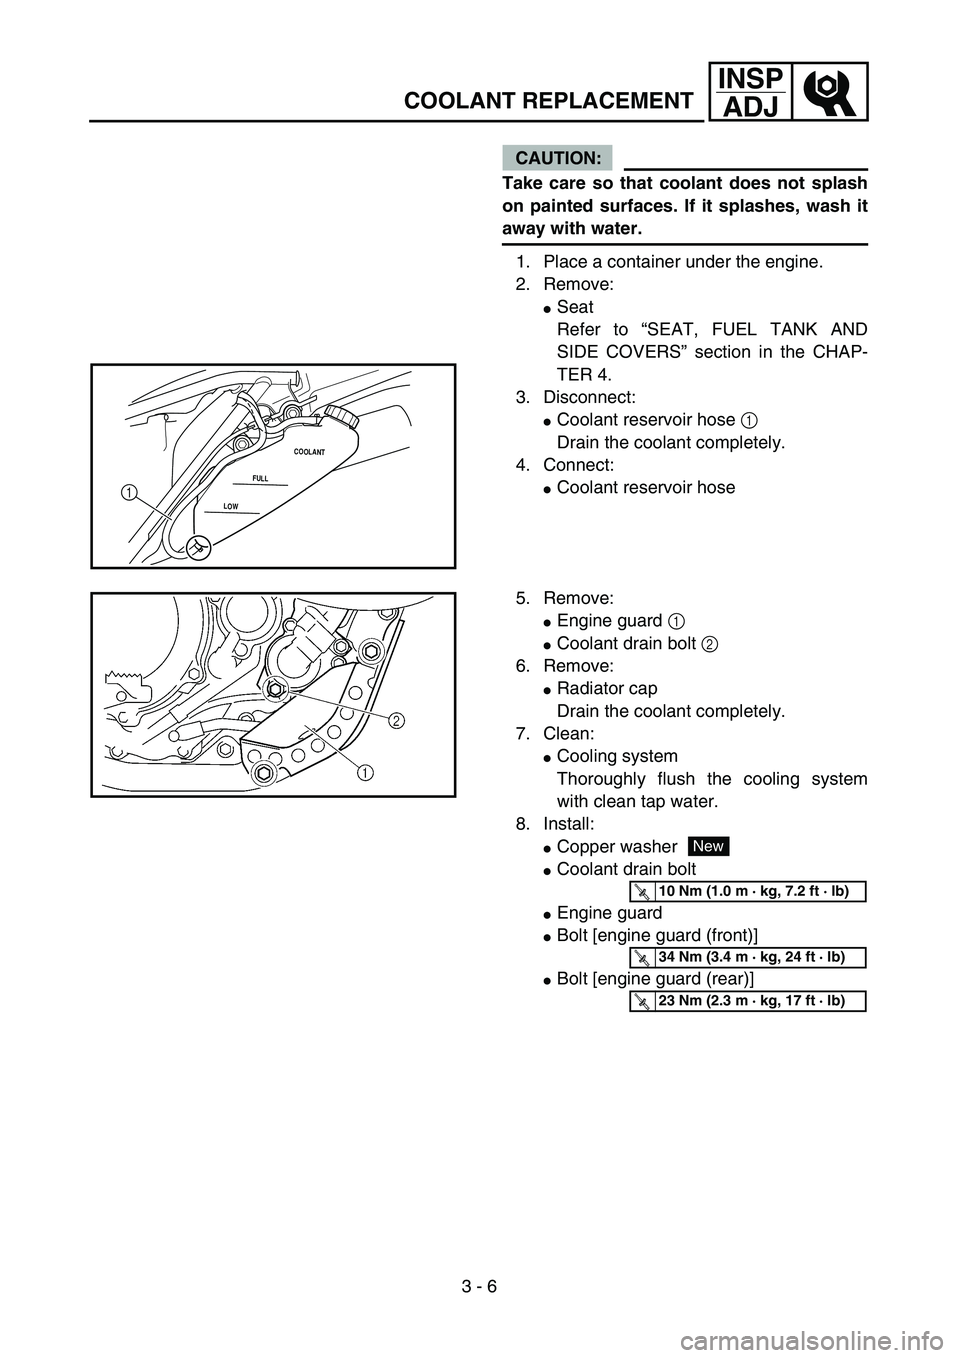
1. Place a container under the engine.
2. Remove:
�Seat
Refer to “SEAT, FUEL TANK AND
SIDE COVERS” section in the CHAP-
TER 4.
3. Disconnect:
�Coolant reservoir hose 1
Drain the coolant completely.
4. Connect:
�Coolant reservoir hoseLOWFULLCOOLANT1
5. Remove:
�Engine guard 1
�Coolant drain bolt 2
6. Remove:
�Radiator cap
Drain the coolant completely.
7. Clean:
�Cooling system
Thoroughly flush the cooling system
with clean tap water.
8. Install:
�Copper washer
�Coolant drain bolt
�Engine guard
�Bolt [engine guard (front)]
�Bolt [engine guard (rear)]
New
T R..10 Nm (1.0 m · kg, 7.2 ft · lb)
T R..34 Nm (3.4 m · kg, 24 ft · lb)
T R..23 Nm (2.3 m · kg, 17 ft · lb)
Page 192 of 754
3 - 7
INSP
ADJ
COOLANT REPLACEMENT
9. Fill:
�Radiator
�Engine
To specified level.
CAUTION:
�Do not mix more than one type of ethyl-
ene glycol antifreeze containing corro-
sion inhibitors for aluminum engine.
�Do not use water containing impurities or oil.
Recommended coolant:
High quality ethylene glycol
anti-freeze containing
anti-corrosion for
aluminum engine
Coolant 1 and water
(soft water) 2 mixing ratio:
50%/50%
Coolant capacity:
1.25 L (1.10 Imp qt, 1.32 US qt)
Handling notes of coolant:
The coolant is harmful so it should be han-
dled with special care.
WARNING
�When coolant splashes to your eye.
Thoroughly wash your eye with water
and see your doctor.
�When coolant splashes to your clothes.
Quickly wash it away with water and
then with soap.
�When coolant is swallowed.
Quickly make him vomit and take him
to a doctor.
10. Install:
�Radiator cap
11. Fill:
�Coolant reservoir tank
Midway a between maximum and min-
imum marks on the tank.
LOWFULLCOOLANTa
Page 194 of 754
3 - 8
INSP
ADJRADIATOR CAP INSPECTION/
RADIATOR CAP OPENING PRESSURE INSPECTION
12. Install:
�Coolant reservoir cap
13. Start the engine and let it warm up for
several minutes.
14. Turn off the engine and inspect the cool-
ant level.
Refer to “COOLANT LEVEL INSPEC-
TION” section.
NOTE:
Before checking the coolant level wait a few
minutes until the coolant settles.
EC355000
RADIATOR CAP INSPECTION
1. Inspect:
�Seal (radiator cap) 1
�Valve and valve seat 2
Crack/damage → Replace.
Exist fur deposits 3 → Clean or
replace.
EC356001
RADIATOR CAP OPENING PRESSURE
INSPECTION
1. Attach:
�Radiator cap tester 1 and adapter 2
NOTE:
Apply water on the radiator cap seal.
3Radiator cap
2. Apply the specified pressure.
Radiator cap tester:
YU-24460-01/90890-01325
Adapter:
YU-33984/90890-01352
Radiator cap opening pressure:
110 kPa (1.1 kg/cm2, 15.6 psi)
Page 196 of 754
3 - 9
INSP
ADJ
COOLING SYSTEM INSPECTION
3. Inspect:
�Pressure
Impossible to maintain the specified
pressure for 10 seconds → Replace.
EC357002
COOLING SYSTEM INSPECTION
1. Inspect:
�Coolant level
2. Attach:
�Radiator cap tester 1 and adapter 2
3. Apply the specified pressure.
NOTE:
�Do not apply pressure more than specified
pressure.
�Radiator should be filled fully.
4. Inspect:
�Pressure
Impossible to maintain the specified
pressure for 10 seconds → Repair.
�Radiator
�Radiator hose joint
Coolant leakage → Repair or replace.
�Radiator hose
Swelling → Replace.
Radiator cap tester:
YU-24460-01/90890-01325
Adapter:
YU-33984/90890-01352
Standard pressure:
180 kPa (1.8 kg/cm2, 25.6 psi)