Page 38 of 754
 GEN
INFO
1 - 7
EC140001
SPECIAL TOOLS
The proper special tools are necessary for complete and accurate tune-up and assembly. Using the
correct special tool will help prevent damage caused by the use o")
GEN
INFO
1 - 7
EC140001
SPECIAL TOOLS
The proper special tools are necessary for complete and accurate tune-up and assembly. Using the
correct special tool will help prevent damage caused by the use of improper tools or improvised
techniques. The shape and part number used for the special tool differ by country, so two types are
provided. Refer to the list provided to avoid errors when placing an order.
NOTE:
�For U.S.A. and Canada, use part number starting with “YM-”, “YU-” or “ACC-”.
�For others, use part number starting with “90890-”.
Part number Tool name/How to use Illustration
YU-1135-A, 90890-01135 Crankcase separating tool
These tool is used to remove the crankshaft from
either case.YU-1135-A 90890-01135
YU-3097, 90890-01252
YU-1256Dial gauge and stand
Stand
These tools are used to check each part for runout or
bend.YU-3097
YU-125690890-01252
YU-90050, 90890-01274
YU-90050, 90890-01275
YM-91044, 90890-04081
YU-90063, 90890-01278Crankshaft installing tool
Crankshaft installing pot
Crankshaft installing bolt
Spacer (crankshaft installer)
Adapter (M12)
These tools are used to install the crankshaft.YU-90050
YU-90063
YM-9104490890-01274
90890-01275
90890-01278
90890-04081
YU-1304, 90890-01304 Piston pin puller
This tool is used to remove the piston pin.YU-1304 90890-01304
YU-24460-01, 90890-01325
YU-33984, 90890-01352Radiator cap tester
Adapter
These tools are used for checking the cooling sys-
tem.YU-24460-01
YU-3398490890-01325
90890-01352
YU-33975, 90890-01403 Ring nut wrench
This tool is used when tighten the steering ring nut to
specification.YU-33975 90890-01403
YM-1423, 90890-01423 Damper rod holder
Use this tool to remove and install the damper rod.YM-1423 90890-01423
SPECIAL TOOLS
Page 84 of 754
SPEC
2 - 9
MAINTENANCE SPECIFICATIONS
Lubrication system:
Oil filter type Paper type ----
Oil pump type Trochoid type ----
Tip clearance “A”0.12 mm or less
(0.0047 in or less)0.20 mm
(0.008 in)
Tip clearance “B”0.09 ~ 0.17 mm
(0.0035 ~ 0.0067 in)0.24 mm
(0.009 in)
Side clearance 0.03 ~ 0.10 mm
(0.0012 ~ 0.0039 in)0.17 mm
(0.007 in)
Bypass valve setting pressure 40 ~ 80 kPa (0.4 ~ 0.8 kg/cm
2
,
5.69 ~ 11.38 psi)----
Cooling:
Radiator core size
Width 127.8 mm (5.0 in) ----
Height 260 mm (10.2 in) ----
Thickness 32 mm (1.26 in) ----
Radiator cap opening pressure 110 kPa (1.1 kg/cm
2
, 15.6 psi) ----
Radiator capacity (total) 0.78 L (0.69 Imp qt, 0.82 US qt) ----
Water pump
Type Single-suction centrifugal pump ----Item Standard Limit
Page 173 of 754

3 - 2
INSP
ADJ
MAINTENANCE INTERVALS
SHIFT FORK, SHIFT CAM, GUIDE BAR
Inspect
●
Inspect wear
ROTOR NUT
Retighten
●
●
MUFFLER
Inspect and retighten
Clean
Replace
●
●")
3 - 2
INSP
ADJ
MAINTENANCE INTERVALS
SHIFT FORK, SHIFT CAM, GUIDE BAR
Inspect
●
Inspect wear
ROTOR NUT
Retighten
●
●
MUFFLER
Inspect and retighten
Clean
Replace
●
●
●
●
* Whichever comes first
*SPARK ARRESTER
Clean
(Every
six
months)
●
CRANK
Inspect and clean
●
●
CARBURETOR
Inspect, adjust and clean
●
●
SPARK PLUG
Inspect and clean
Replace
●
●
●
DRIVE CHAIN
Lubricate, slack, alignment
Replace
●
●
●
Use chain lube
Chain slack: 40 ~ 50 mm
(1.57 ~ 1.97 in)
COOLING SYSTEM
Check coolant level and leakage
Check radiator cap operation
Replace coolant
Inspect hoses
●
●
●
●
●
Every two years
OUTSIDE NUTS AND BOLTS
Retighten
●
●
Refer to “STARTING
AND BREAK-IN” section
in the CHAPTER 1.
AIR FILTER
Clean and lubricate
Replace
●
●
●
Use foam air-filter oil or
equivalent oil
OIL FILTER
Replace
●
●
OIL STRAINER (frame)
Clean
●
FRAME
Clean and inspect
●
●
FUEL TANK, COCK
Clean and inspect
●
●
BRAKES
Adjust lever position and pedal height
Lubricate pivot point
Check brake disc surface
Check fluid level and leakage
Retighten brake disc bolts, caliper
bolts, master cylinder bolts and union
bolts
Replace pads
Replace brake fluid
●
●
●
●
●
●
●
●
●
●
●
●
Every one year ItemAfter
break-inEvery
race
Every
third
(or
500 km)Every
fifth
(or
1,000 km)
As re-
quiredRemarks
3
Page 184 of 754
 3 - 4
INSP
ADJ
PRE-OPERATION INSPECTION AND MAINTENANCE
EC320000
PRE-OPERATION INSPECTION AND MAINTENANCE
Before riding for break-in operation, practice or a race, make sure the machine is in good ope")
3 - 4
INSP
ADJ
PRE-OPERATION INSPECTION AND MAINTENANCE
EC320000
PRE-OPERATION INSPECTION AND MAINTENANCE
Before riding for break-in operation, practice or a race, make sure the machine is in good operating
condition.
Before using this machine, check the following points.
GENERAL INSPECTION AND MAINTENANCE
Item Routine Page
CoolantCheck that coolant is filled up to the radiator filler cap.
Check the cooling system for leakage.P.3-5 ~ 9
FuelCheck that a fresh gasoline is filled in the fuel tank. Check the
fuel line for leakage.P.1-14
Engine oilCheck that the oil level is correct. Check the crankcase and
frame oil line for leakage.P.3-14 ~ 18
Gear shifter and clutchCheck that gears can be shifted correctly in order and that the
clutch operates smoothly.P.3-10
Throttle grip/HousingCheck that the throttle grip operation and free play are correctly
adjusted. Lubricate the throttle grip and housing, if necessary.P.3-10 ~ 11
Brakes Check the play of front brake and effect of front and rear brake. P.3-26 ~ 32
ChainCheck chain slack and alignment. Check that the chain is lubri-
cated properly.P.3-33 ~ 36
WheelsCheck for excessive wear and tire pressure. Check for loose
spokes and have no excessive play.P.3-44 ~ 45
SteeringCheck that the handlebar can be turned smoothly and have no
excessive play.P.3-45 ~ 46
Front forks and rear shock
absorberCheck that they operate smoothly and there is no oil leakage. P.3-36 ~ 43
Cables (wires)Check that the clutch and throttle cables move smoothly. Check
that they are not caught when the handlebars are turned or
when the front forks travel up and down.—
Muffler Check that the muffler is tightly mounted and has no cracks.—
Sprocket Check that the driven sprocket tightening bolt is not loose. P.3-33
Lubrication Check for smooth operation. Lubricate if necessary. P.3-47
Bolts and nuts Check the chassis and engine for loose bolts and nuts. P.1-19
Lead connectorsCheck that the AC magneto, CDI unit, and ignition coil are con-
nected tightly.P.1-6
SettingsIs the machine set suitably for the condition of the racing course
and weather or by taking into account the results of test runs
before racing? Are inspection and maintenance completely
done?P.7-1 ~ 21
Page 190 of 754
3 - 6
INSP
ADJ
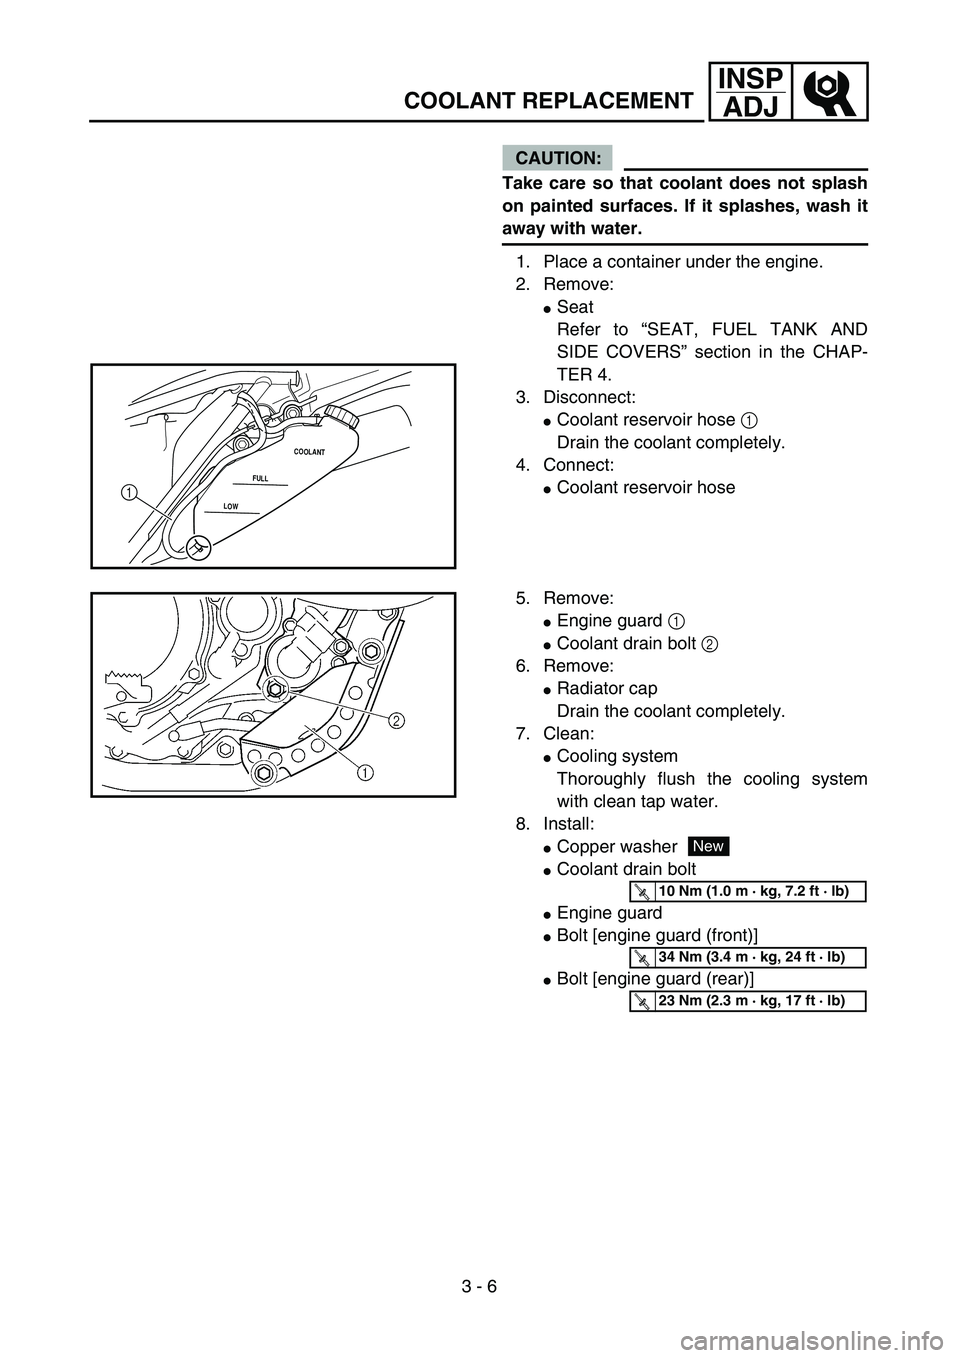
COOLANT REPLACEMENT
CAUTION:
Take care so that coolant does not splash
on painted surfaces. If it splashes, wash it
away with water.
1. Place a container under the engine.
2. Remove:
�Seat
Refer to “SEAT, FUEL TANK AND
SIDE COVERS” section in the CHAP-
TER 4.
3. Disconnect:
�Coolant reservoir hose 1
Drain the coolant completely.
4. Connect:
�Coolant reservoir hoseLOWFULLCOOLANT1
5. Remove:
�Engine guard 1
�Coolant drain bolt 2
6. Remove:
�Radiator cap
Drain the coolant completely.
7. Clean:
�Cooling system
Thoroughly flush the cooling system
with clean tap water.
8. Install:
�Copper washer
�Coolant drain bolt
�Engine guard
�Bolt [engine guard (front)]
�Bolt [engine guard (rear)]
New
T R..10 Nm (1.0 m · kg, 7.2 ft · lb)
T R..34 Nm (3.4 m · kg, 24 ft · lb)
T R..23 Nm (2.3 m · kg, 17 ft · lb)
Page 196 of 754
3 - 9
INSP
ADJ
COOLING SYSTEM INSPECTION
3. Inspect:
�Pressure
Impossible to maintain the specified
pressure for 10 seconds → Replace.
EC357002
COOLING SYSTEM INSPECTION
1. Inspect:
�Coolant level
2. Attach:
�Radiator cap tester 1 and adapter 2
3. Apply the specified pressure.
NOTE:
�Do not apply pressure more than specified
pressure.
�Radiator should be filled fully.
4. Inspect:
�Pressure
Impossible to maintain the specified
pressure for 10 seconds → Repair.
�Radiator
�Radiator hose joint
Coolant leakage → Repair or replace.
�Radiator hose
Swelling → Replace.
Radiator cap tester:
YU-24460-01/90890-01325
Adapter:
YU-33984/90890-01352
Standard pressure:
180 kPa (1.8 kg/cm2, 25.6 psi)
 SPEC
2 - 9
MAINTENANCE SPECIFICATIONS
Lubrication system:
Oil filter type Paper type ----
Oil pump type Trochoid type ----
Tip clearance “A”0.12 mm or less
(0.0047 in or less)0.20 mm
(0.008")