Page 452 of 610

REMOVAL POINTS
Brake fluid
1. Remove:
�Brake master cylinder cap 1
NOTE:
Do not remove the diaphragm.
2. Connect the transparent hose 2 to the
bleed scre")
5 - 14
CHASFRONT BRAKE (TT-R125LW/TT-R125LWE)
REMOVAL POINTS
Brake fluid
1. Remove:
�Brake master cylinder cap 1
NOTE:
Do not remove the diaphragm.
2. Connect the transparent hose 2 to the
bleed screw 1 and place a suitable con-
tainer under its end.
3. Loosen the bleed screw and drain the
brake fluid while pulling in the lever.
CAUTION:
�Do not reuse the drained brake fluid.
�Brake fluid may erode painted surfaces or
plastic parts. Always clean up spilled
fluid immediately.
Brake caliper
1. Remove:
�Brake caliper 1
NOTE:
Turn the brake caliper counterclockwise and
pull out it from the guide pin 2 on the brake
caliper bracket.
Brake caliper piston
1. Remove:
�Brake caliper piston
Use compressed air and proceed care-
fully.
WARNING
�Cover piston with rag and use extreme
caution when expelling piston from cylin-
der.
�Never attempt to pry out piston.
Brake caliper piston removal steps:
�Insert a piece of rag into the brake caliper
to lock one brake caliper.
�Carefully force the piston out of the brake
caliper cylinder with compressed air.
Page 454 of 610
5 - 15
CHAS
Brake caliper piston seal kit
1. Remove:
�Brake caliper dust seal 1
�Brake caliper piston seal 2
NOTE:
Remove the brake caliper piston seals and
brake caliper dust seals by pushing them with
a finger.
CAUTION:
Never attempt to pry out brake caliper pis-
ton seals and brake caliper dust seals.
WARNING
Replace the brake caliper piston seals and
brake caliper dust seals whenever a brake
caliper is disassembled.
INSPECTION
Brake master cylinder
1. Inspect:
�Brake master cylinder inner surface a
Wear/scratches → Replace brake mas-
ter cylinder assembly.
Stains → Clean.
WARNING
Use only new brake fluid.
2. Inspect:
�Diaphragm 1
Crack/damage → Replace.
3. Inspect:
�Brake master cylinder piston 1
�Brake master cylinder cup 2
Wear/damage/score marks → Replace
brake master cylinder kit.
FRONT BRAKE (TT-R125LW/TT-R125LWE)
Page 458 of 610

ASSEMBLY AND INSTALLATION
WARNING
�All internal parts should be cleaned in
new brake fluid only.
�Internal parts should be lubricated with
brake fluid whe")
5 - 17
CHASFRONT BRAKE (TT-R125LW/TT-R125LWE)
ASSEMBLY AND INSTALLATION
WARNING
�All internal parts should be cleaned in
new brake fluid only.
�Internal parts should be lubricated with
brake fluid when installed.
�Replace the brake caliper piston seals
and brake caliper dust seals whenever a
brake caliper is disassembled.
Brake caliper piston
1. Clean:
�Brake caliper
�Brake caliper piston seal
�Brake caliper dust seal
�Brake caliper piston
Clean them with brake fluid.
2. Install:
�Brake caliper piston seal 1
�Brake caliper dust seal 2
WARNING
Always use new brake caliper piston seals
and brake caliper dust seals.
NOTE:
Fit the brake caliper piston seals and brake
caliper dust seals onto the slot on brake cali-
per correctly.
New
New
3. Install:
�Brake caliper piston 1
NOTE:
Apply the brake fluid on the brake caliper pis-
ton wall.
CAUTION:
�Install the brake caliper piston with its
shallow depressed side a facing the
brake caliper.
�Never force to insert.
Brake caliper
1. Install:
�Sleeve boot 1.
On brake caliper bracket 2.
Page 460 of 610
5 - 18
CHASFRONT BRAKE (TT-R125LW/TT-R125LWE)
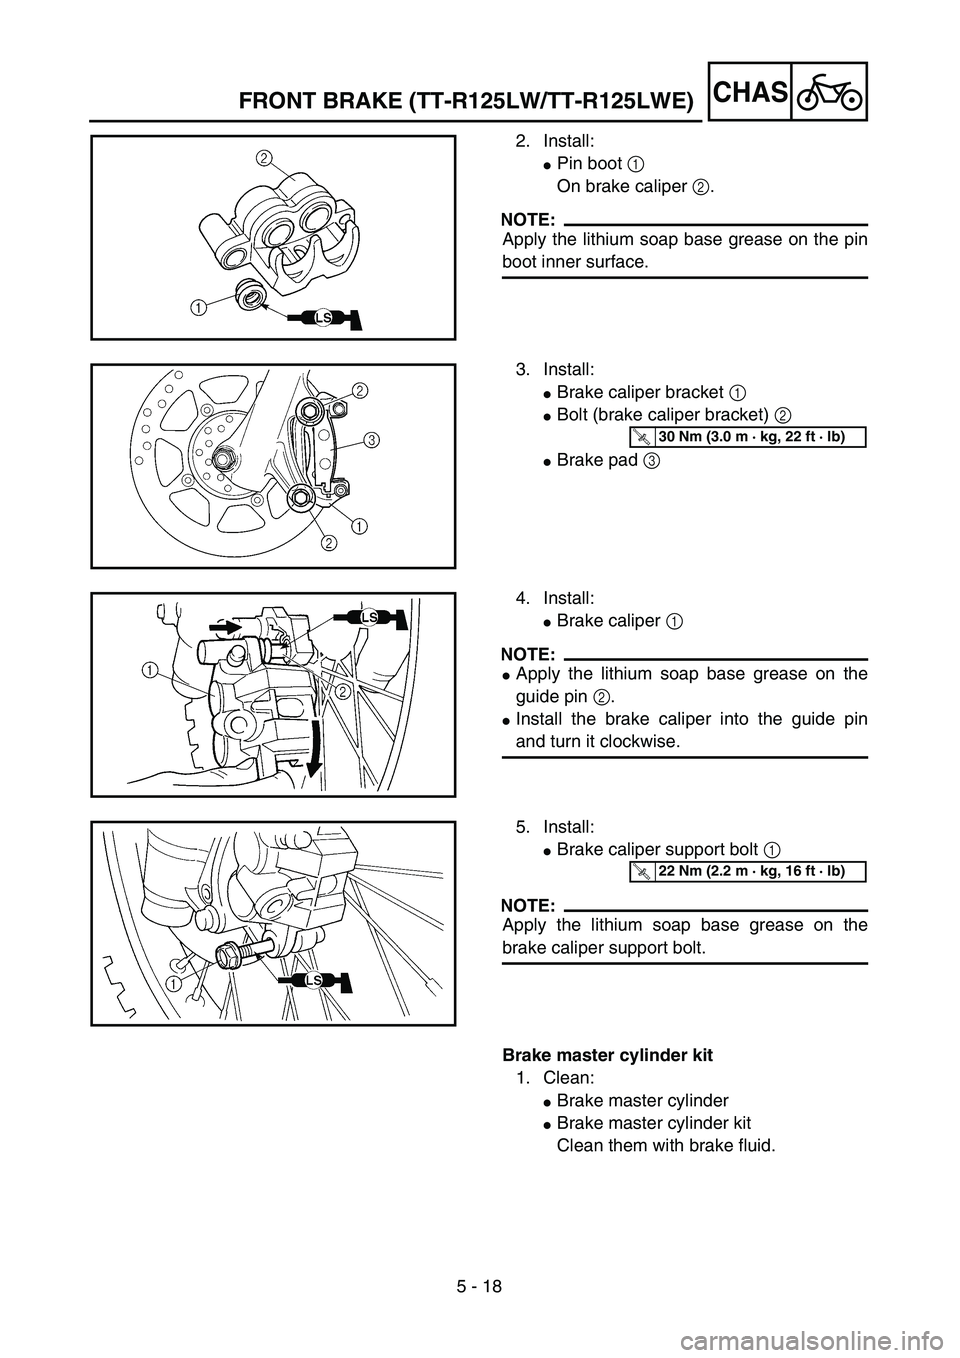
2. Install:
�Pin boot 1
On brake caliper 2.
NOTE:
Apply the lithium soap base grease on the pin
boot inner surface.
3. Install:
�Brake caliper bracket 1
�Bolt (brake caliper bracket) 2
�Brake pad 3
T R..30 Nm (3.0 m · kg, 22 ft · lb)
4. Install:
�Brake caliper 1
NOTE:
�Apply the lithium soap base grease on the
guide pin 2.
�Install the brake caliper into the guide pin
and turn it clockwise.
5. Install:
�Brake caliper support bolt 1
NOTE:
Apply the lithium soap base grease on the
brake caliper support bolt.
T R..22 Nm (2.2 m · kg, 16 ft · lb)
Brake master cylinder kit
1. Clean:
�Brake master cylinder
�Brake master cylinder kit
Clean them with brake fluid.
Page 462 of 610
5 - 19
CHASFRONT BRAKE (TT-R125LW/TT-R125LWE)
2. Install:
�Brake master cylinder cup (primary) 1
�Brake master cylinder cup (secondary) 2
On brake master cylinder piston 3.
NOTE:
Apply the brake fluid on the brake master cyl-
inder cup.
WARNING
After installing, cylinder cup should be
installed as shown direction. Wrong instal-
lation cause improper brake performance.
3. Install:
�Spring 1
On brake master cylinder piston 2.
NOTE:
Install the spring at the smaller diameter side.
4. Install:
�Brake master cylinder kit 1
�Washer 2
�Circlip 3
�Brake master cylinder boot 4
On brake master cylinder 5
NOTE:
�Apply the brake fluid on the brake master
cylinder kit.
�When installing the circlip, use a long nose
circlip pliers.
Page 468 of 610
5 - 22
CHAS
Brake fluid
1. Fill:
�Brake fluid
Until the fluid level reaches “LOWER”
level line a.
WARNING
�Use only the designated quality brake
fluid:
otherwise, the rubber seals may deterio-
rate, causing leakage and poor brake per-
formance.
�Refill with the same type of brake fluid;
mixing fluids may result in a harmful chem-
ical reaction and lead to poor performance.
�Be careful that water does not enter the
brake master cylinder when refilling.
Water will significantly lower the boiling
point of the fluid and may result in vapor
lock.
CAUTION:
Brake fluid may erode painted surfaces or
plastic parts. Always clean up spilled fluid
immediately.
Recommended brake fluid:
DOT #4
2. Air bleed:
�Brake system
Refer to “BRAKE SYSTEM AIR
BLEEDING” section in the CHAPTER
3.
3. Inspect:
�Brake fluid level
Fluid at lower level → Fill up.
Refer to “BRAKE FLUID LEVEL
INSPECTION” section in the CHAP-
TER 3.
FRONT BRAKE (TT-R125LW/TT-R125LWE)
Page 470 of 610
5 - 23
CHAS
4. Install:
�Diaphragm
�Brake master cylinder cap 1
�Screw (brake master cylinder cap) 2
CAUTION:
After installation, while pulling in the lever,
check whether there is any brake fluid leak-
ing where the union bolts are installed
respectively at the brake master cylinder
and brake caliper.
T R..2 Nm (0.2 m · kg, 1.4 ft · lb)
FRONT BRAKE (TT-R125LW/TT-R125LWE)