2004 YAMAHA AEROX50 engine oil
[x] Cancel search: engine oilPage 45 of 84

PERIODIC MAINTENANCE AND MINOR REPAIR
6
• Check tread depth and for damage.
9 * Tires• Replace if necessary.
√√√√ √
• Check air pressure.
• Correct if necessary.
10 * Wheel bearings• Check bearing for looseness or damage.√√√√
11 * Steering bearings• Check bearing play and steering for roughness.√√√√√• Lubricate with lithium-soap-based grease. Every 24,000 km
12 * Chassis fasteners• Make sure that all nuts, bolts and screws are
√√√√ √
properly tightened.
13 Centerstand• Check operation.
√√√√ √
• Lubricate.
14 * Front fork• Check operation and for oil leakage.√√√√
15 * Shock absorber assembly• Check operation and shock absorber for oil leakage.√√√√
16 * Carburetor• Check starter (chocke) operation.
√√√√√ √
• Adjust engine idling speed.
17 * Autolube pump• Check operation.
√√√√
• Bleed if necessary.
18 Final transmission oil• Check vehicle for oil leakage.√√ √• Change.√√√
19 * V-belt• Replace. Every 10,000 km
20 * Front and rear brake
• Check operation.√√√√√ √
switches
ODOMETER READING (x 1,000 km)
NO. ITEMCHECK OR MAINTENANCE JOB
1
ANNUAL
CHECK
6121824
6-3
Page 49 of 84

PERIODIC MAINTENANCE AND MINOR REPAIR
6
EWA00062
•Make sure that no foreign
material enters the final trans-
mission case.
•Make sure that no oil gets on
the tire or wheel.
7. Check the final transmission case
for oil leakage. If oil is leaking,
check for the cause.
WARNING
EAU04228
Final transmission oil
The final transmission case must be
checked for oil leakage before each
ride. If any leakage is found, have a
Yamaha dealer check and repair the
scooter. In addition, the final transmis-
sion oil must be changed as follows at
the intervals specified in the periodic
maintenance and lubrication chart.
1. Start the engine, warm it up by
riding the scooter for several mi-
nutes, and then stop the engine.2. Place the scooter on the
centerstand.
3. Place an oil pan under the final
transmission case to collect the
used oil.
4. Remove the oil filler cap and drain
bolt to drain the oil from the final
transmission case.
5. Install the final transmission oil
drain bolt, and then tighten it to
the specified torque.
Tightening torque:
Final transmission oil drain bolt:
18 Nm (1.8 m
•kgf)
6. Add the specified amount of the
recommended final transmission
oil, and then install and tighten the
oil filler cap.
Recommended final transmission
oil:
See page 8-1.
Oil quantity:
0.13 L
12ZAUM0273
1. Final transmission oil drain bolt
2. Oil filler cap
6-7
Page 52 of 84
PERIODIC MAINTENANCE AND MINOR REPAIR
6
1
4 32
ZAUM0156
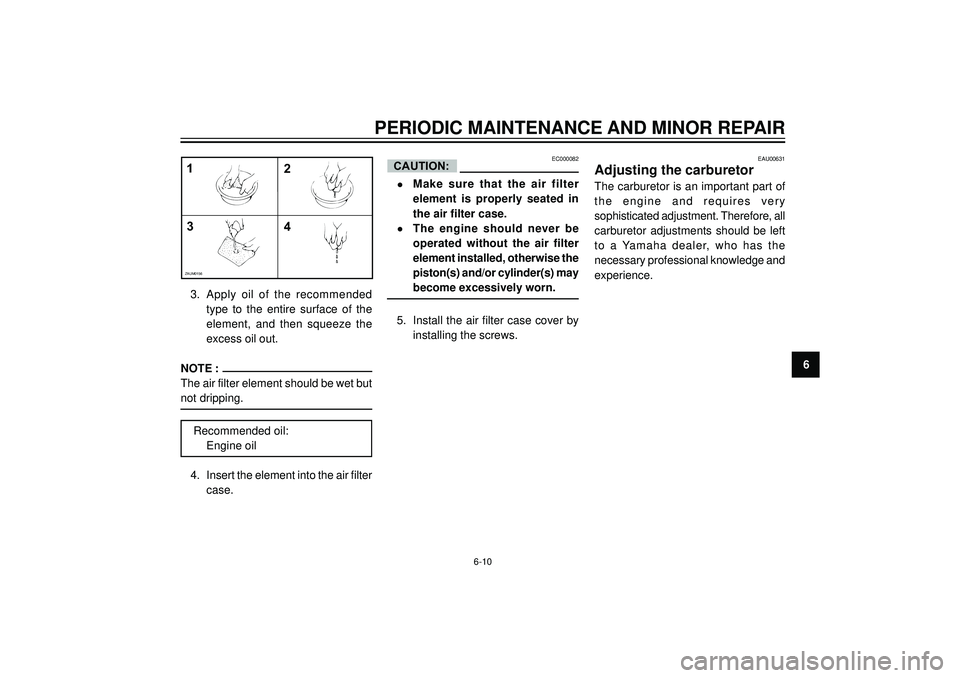
3. Apply oil of the recommended
type to the entire surface of the
element, and then squeeze the
excess oil out.
NOTE :
The air filter element should be wet but
not dripping.
Recommended oil:
Engine oil
4. Insert the element into the air filter
case.
CAUTION:EC000082
•Make sure that the air filter
element is properly seated in
the air filter case.
•The engine should never be
operated without the air filter
element installed, otherwise the
piston(s) and/or cylinder(s) may
become excessively worn.
5. Install the air filter case cover by
installing the screws.
6-10
EAU00631
Adjusting the carburetor
The carburetor is an important part of
the engine and requires very
sophisticated adjustment. Therefore, all
carburetor adjustments should be left
to a Yamaha dealer, who has the
necessary professional knowledge and
experience.
Page 57 of 84
PERIODIC MAINTENANCE AND MINOR REPAIR
6Observe these precautions:
•When checking the fluid level,
make sure that the top of the
master cylinder is level by turning
the handlebars.
•Use only the recommended
quality brake fluid, otherwise the
rubber seals may deteriorate,
causing leakage and poor braking
performance.
Recommended brake fluid:
DOT 4
NOTE :
If DOT 4 is not available, DOT 3 can be
used.
•Refill with the same type of brake
fluid. Mixing fluids may result in a
harmful chemical reaction and
lead to poor braking performance.
•Be careful that water does not
enter the master cylinder when
refilling. Water will significantly
lower the boiling point of the fluid
and may result in vapor lock.
•Brake fluid may deteriorate
painted surfaces or plastic parts.
Always clean up spilled fluid
immediately.
•As the brake pads wear, it is nor-
mal for the brake fluid level to
gradually go down. However, if the
brake fluid level goes down
suddenly, have a Yamaha dealer
check the cause.
EAUM0008*
Changing the brake fluid
Have a Yamaha dealer change the
brake fluid at the intervals specified in
the periodic maintenance and
lubrication chart. In addition, have the
brake hoses replaced every four years
or whenever there are damaged or
leaking.
6-15
EAU00774
Adjusting the Autolube pump
The Autolube pump is a vital and
sophisticated component of the engine,
which must be adjusted by a Yamaha
dealer at the intervals specified in the
periodic maintenance and lubrication
chart.
Page 58 of 84
PERIODIC MAINTENANCE AND MINOR REPAIR
6
ZAUM0061
EAU03118
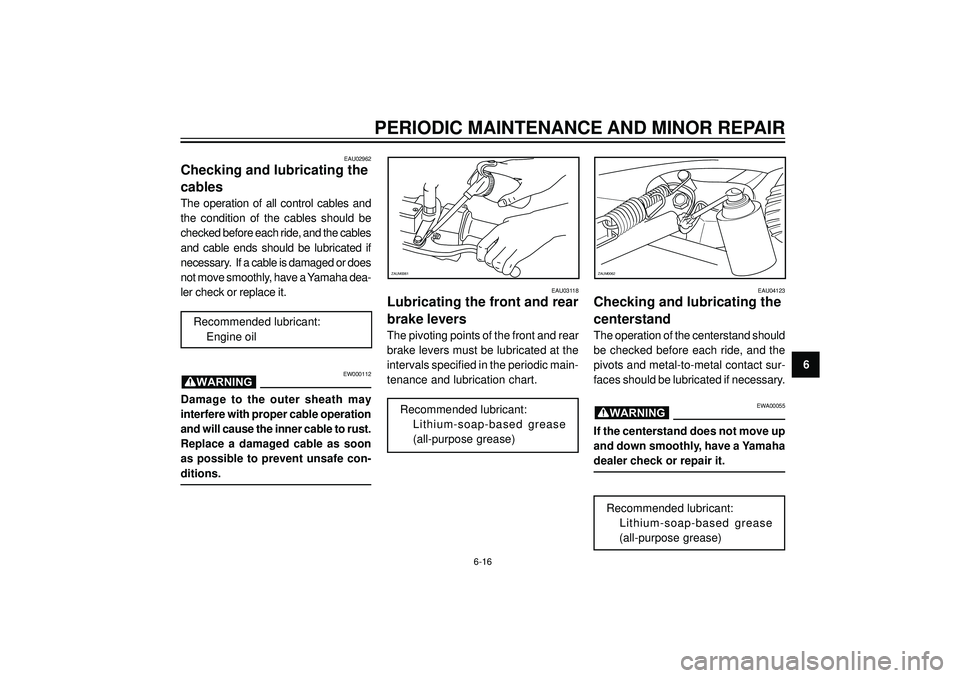
Lubricating the front and rear
brake levers
The pivoting points of the front and rear
brake levers must be lubricated at the
intervals specified in the periodic main-
tenance and lubrication chart.
Recommended lubricant:
Lithium-soap-based grease
(all-purpose grease)
ZAUM0062
EAU04123
Checking and lubricating the
centerstand
The operation of the centerstand should
be checked before each ride, and the
pivots and metal-to-metal contact sur-
faces should be lubricated if necessary.
EWA00055
If the centerstand does not move up
and down smoothly, have a Yamaha
dealer check or repair it.
Recommended lubricant:
Lithium-soap-based grease
(all-purpose grease)
WARNING
6-16
EAU02962
Checking and lubricating the
cables
The operation of all control cables and
the condition of the cables should be
checked before each ride, and the cables
and cable ends should be lubricated if
necessary. If a cable is damaged or does
not move smoothly, have a Yamaha dea-
ler check or replace it.
Recommended lubricant:
Engine oil
EW000112
Damage to the outer sheath may
interfere with proper cable operation
and will cause the inner cable to rust.
Replace a damaged cable as soon
as possible to prevent unsafe con-
ditions.
WARNING
Page 59 of 84
PERIODIC MAINTENANCE AND MINOR REPAIR
6
EAU02939
Checking the front fork
The condition and operation of the front
fork must be checked as follows at the
intervals specified in the periodic main-
tenance and lubrication chart.
To check the condition
EW000115
Securely support the scooter so that
there is no danger of it falling over.
Check the inner tubes for scratches,
damage and excessive oil leakage.
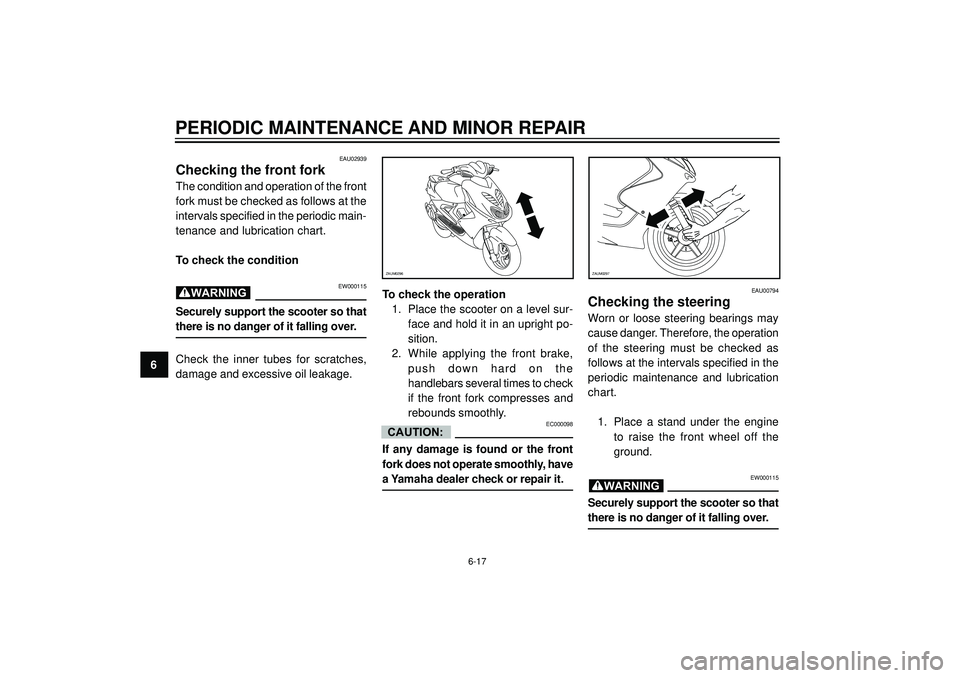
WARNINGTo check the operation
1. Place the scooter on a level sur-
face and hold it in an upright po-
sition.
2. While applying the front brake,
push down hard on the
handlebars several times to check
if the front fork compresses and
rebounds smoothly.
EC000098
If any damage is found or the front
fork does not operate smoothly, have
a Yamaha dealer check or repair it.
CAUTION:
EAU00794
Checking the steering
Worn or loose steering bearings may
cause danger. Therefore, the operation
of the steering must be checked as
follows at the intervals specified in the
periodic maintenance and lubrication
chart.
1. Place a stand under the engine
to raise the front wheel off the
ground.
EW000115
Securely support the scooter so that
there is no danger of it falling over.
WARNING
6-17
ZAUM0296ZAUM0297
Page 69 of 84
SCOOTER CARE AND STORAGE
7
Care
While the open design of a scooter
reveals the attractiveness of the
technology, it also makes it more
vulnerable. Rust and corrosion can
develop even if high-quality
components are used. A rusty exhaust
pipe may go unnoticed on a car,
however, it detracts from the overall
appearance of a scooter. Frequent and
proper care does not only comply with
the terms of the warranty, but it will also
keep your scooter looking good, extend
its life and optimize its performance.Before cleaning
1. Cover the muffler outlet with a
plastic bag after the engine has
cooled down.
2. Make sure that all caps and covers
as well as all electrical couplers
and connectors, including the
spark plug cap, are tightly
installed.
3. Remove extremely stubborn dirt,
like oil burnt onto the crankcase,
with a degreasing agent and a
brush, but never apply such
products onto seals, gaskets and
wheel axles. Always rinse the dirt
and degreaser off with water.CleaningECA00011
•Avoid using strong acidic wheel
cleaners, especially on spoked
wheels. If such products are
used on hard-to-remove dirt, do
not leave the cleaner on the
affected area any longer than
instructed. Also, thoroughly
rinse the area off with water,
immediately dry it, and then
apply a corrosion protection
spray.
•Improper cleaning can damage
windshields, cowlings, panels
and other plastic parts. Use
only a soft, clean cloth or
sponge with mild detergent and
water to clean plastic.
CAUTION:
7-1
Page 72 of 84
SCOOTER CARE AND STORAGE
7 Long-term
Before storing your scooter for several
months:
1. Follow all the instructions in the
"Care" section of this chapter.
2. Drain the carburetor float chamber
by loosening the drain bolt; this will
prevent fuel deposits from building
up. Pour the drained fuel into the fuel
tank.
3. Fill up the fuel tank and add fuel
stabilizer (if available) to prevent the
fuel tank from rusting and the fuel
from deteriorating.
4. Perform the following steps to protect
the cylinder, piston rings, etc. from
corrosion.
a. Remove the spark plug cap
and spark plug.
b. Pour a teaspoonful of engine oil
into the spark plug bore.c. Install the spark plug cap onto
the spark plug, and then place
the spark plug on the cylinder
head so that the electrodes are
grounded. (This will limit
sparking during the next step.)
d. Turn the engine over several
times with the starter. (This will
coat the cylinder wall with oil.)
e. Remove the spark plug cap
from the spark plug, and then
install the spark plug and the
spark plug cap.
EWA00003
To prevent damage or injury from
sparking, make sure to ground the
spark plug electrodes while turning
the engine over.
5. Lubricate all control cables and
the pivoting points of all levers and
pedals as well as of the sidestand/
centerstand.6. Check and, if necessary, correct
the tire air pressure, and then lift
the scooter so that both of its
wheels are off the ground.
Alternatively, turn the wheels a
little every month in order to
prevent the tires from becoming
degraded in one spot.
7. Cover the muffler outlet with a
plastic bag to prevent moisture
from entering it.
8. Remove the battery and fully
charge it. Store it in a cool, dry
place and charge it once a month.
Do not store the battery in an
excessively cold or warm place
(less than 0 °C or more than 30
°C). For more information on
storing the battery, see page 6-19.
NOTE :
Make any necessary repairs before
storing the scooter.
WARNING
7-4