2004 VOLVO XC90 warning lights
[x] Cancel search: warning lightsPage 6 of 245

2004 VOLVO XC90
5. Temperature gauge 24
6. Odometer/Trip odometer/Cruise control indicator 24, 37
7. Speedometer iv
8. Turn signal indicator lights 24
9. Tachometer 24
10. Ambient temperature gauge, clock, gear indicator 24
11. Fuel gauge 24
12. Indicator and warning symbols 25
13. Panel vents 47
14. Glove compartment 65
15. Hazard warning flashers 35
16. Audio system 159
17. Switches in the center console 29
18. Climate system controls 48
19. Windshield wiper/washer lever 33
20. Audio control buttons in steering wheel 161
21. Instrument panel 24
22. Horn iv
23. Cruise control buttons in steering wheel 37
24. Turn signals, High/low beams 32
25. Front fog lights, Rear fog light 30
26. Parking brake pedal 38
27. Parking brake release handle 38
28. Button for unlocking fuel filler door 30
29. Reading lights 61
30. Courtesy light 61
31. Moonroof control (option) 43
32. Seat belt reminder 27
33. Rearview mirror 42
34. Central locking button 75
35. Lockout switch for rear seat power windows 41
36. Power window controls 40
37. Sideview mirror controls 42
WARNING!
If your vehicle is involved in an accident, unseen damage may affect you\
r vehicle's driveability and
safety.
Contents
file:///K|/ownersdocs/2004/2004_XC90/04xc90_00.htm (6 of 7)12/30/2006 \
4:35:10 PM
Page 39 of 245

2004 VOLVO XC90
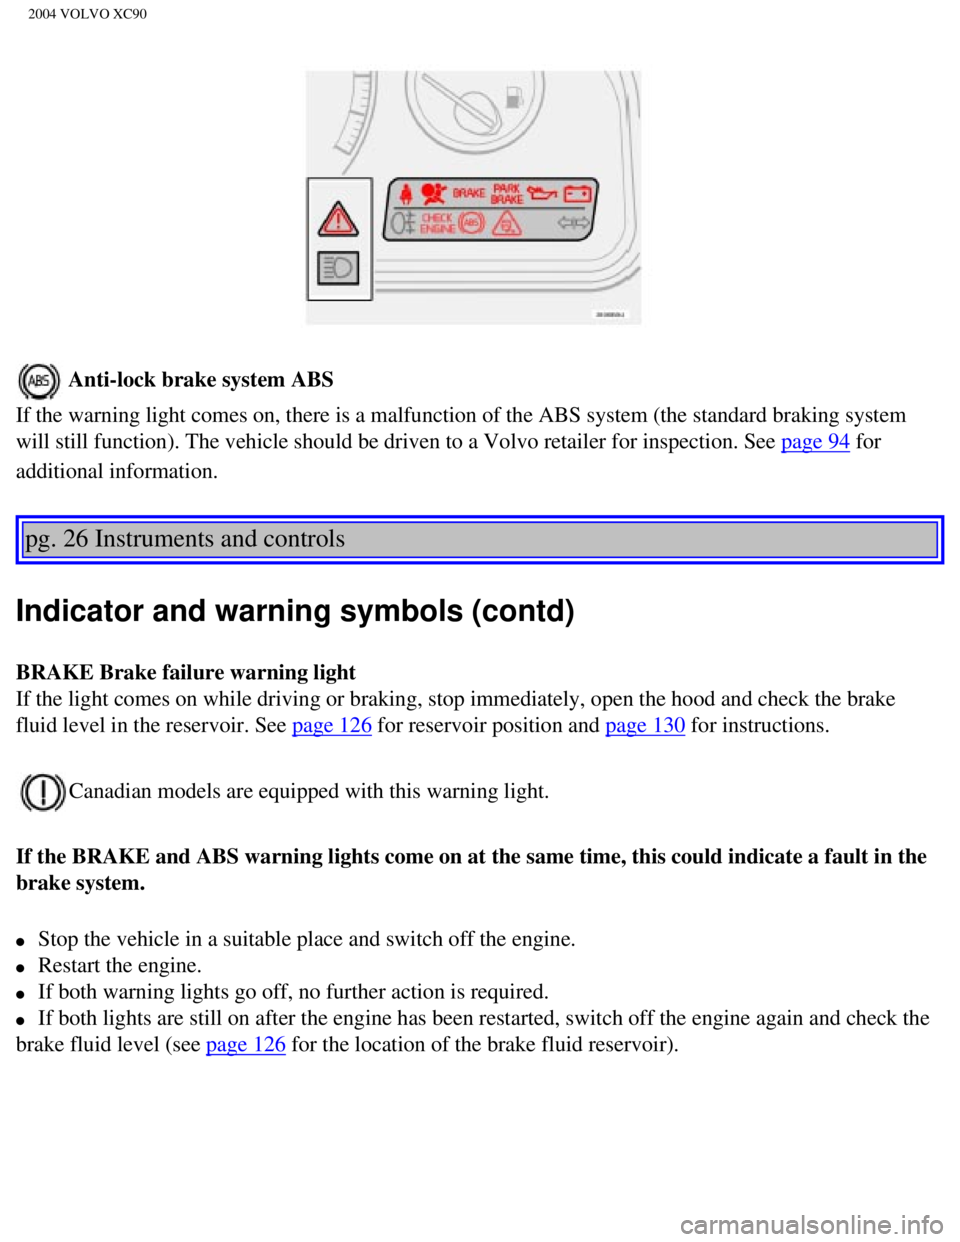
Anti-lock brake system ABS
If the warning light comes on, there is a malfunction of the ABS system \
(the standard braking system
will still function). The vehicle should be driven to a Volvo retailer \
for inspection. See
page 94 for
additional information.
pg. 26 Instruments and controls
Indicator and warning symbols (contd)
BRAKE Brake failure warning light
If the light comes on while driving or braking, stop immediately, open t\
he hood and check the brake
fluid level in the reservoir. See
page 126 for reservoir position and page 130 for instructions.
Canadian models are equipped with this warning light.
If the BRAKE and ABS warning lights come on at the same time, this could\
indicate a fault in the
brake system.
l Stop the vehicle in a suitable place and switch off the engine.
l Restart the engine.
l If both warning lights go off, no further action is required.
l If both lights are still on after the engine has been restarted, switch \
off the engine again and check the
brake fluid level (see
page 126 for the location of the brake fluid reservoir).
file:///K|/ownersdocs/2004/2004_XC90/04xc90_02a.htm (4 of 16)12/30/200\
6 4:35:14 PM
Page 41 of 245

2004 VOLVO XC90
Fault in the DSTC system
If the yellow indicator light remains on, there is a fault in the system\
. The text ANTI-SKID SERVICE
REQUIRED will be displayed.
l Stop the vehicle in a safe place and switch off the engine. Restart the \
engine.
l If the indicator light goes off, no further action is necessary.
If the indicator light remains on, drive to an authorized Volvo retailer\
to have the system inspected.
pg. 27 Instruments and controls
Indicator and warning symbols (contd)
Supplemental Restraint system (SRS)
If the light comes on (or stays on after the vehicle has started), the\
SRS diagnostic system has detected a
fault. Drive to an authorized Volvo retailer for an inspection of the sy\
stem. See the SRS section for more
information.
Generator warning light
If the light comes on while the engine is running, have the charging sys\
tem checked.
Seat belt reminder This symbol lights up to indicate that the driver has not fastened his/\
her seat
belt.
PARKING BRAKE
This light will be on when the parking brake is applied. The parking bra\
ke lever is situated between the
front seats.
Canadian models are equipped with this symbol.
Rear fog light
This light indicates that the fog light is on.
Turn signal indicator - trailer (certain models)
If you are towing a trailer, this light will flash simultaneously with t\
he turn signals on the trailer. If the
light does not flash when signaling, neither the trailer's turn signals \
nor the vehicle's turn signals are
file:///K|/ownersdocs/2004/2004_XC90/04xc90_02a.htm (6 of 16)12/30/200\
6 4:35:14 PM
Page 44 of 245

2004 VOLVO XC90
The positions of these buttons may vary, depending on the specifications\
of your vehicle
1. Rear Parking Assistants (option)
This system provides an audible warning if you back the vehicle to withi\
n approximately 5 feet (1.5
meters) of an object. See
page 97 for more information.
NOTE: The system activates automatically when the engine is started, and can b\
e deactivated by
pressing this button (e.g. when towing a trailer) or reactivated if ne\
cessary.
2. Folding sideview mirrors (option)
Press the button and release it to fold the sideview mirrors in or out. \
On certain models, when the button
is pressed, there may be a long pause before the mirrors move. Pressing \
the button again during this
pause may erase your first button press. If this happens, wait ten secon\
ds and press the button one more
time. The mirrors cannot be adjusted during the first ten seconds after \
they have been folded out. NOTE:
If the sideview mirrors have been inadvertently pushed out of position (\
in a car wash, parking lot, etc.)
manually return them to normal position. If mirror adjustment does not s\
eem to operate after manual
folding, reset the folding mirrors as follows:
l Turn the ignition key to position II.
l Manually fold the mirror(s) to the normal position.
l Press the button to fold both mirrors in.
l Press the button again to fold the mirrors out to their normal position.\
3. Auxiliary lights
This button is used to switch on auxiliary lights (if installed). An L\
ED in the switch will light up to
indicate that the auxiliary lights are illuminated.
4. Dynamic Stability Traction Control system (DSTC)
This button is used to switch off DSTC's stability Control function. Whe\
n the LED in the button is ON,
all DSTC functions are active. See
pages 95 and 96 for additional information.
WARNING!
The Please be aware that the vehicle's handling characteristics may be a\
ffected if the Stability Control
function is switched off.
file:///K|/ownersdocs/2004/2004_XC90/04xc90_02a.htm (9 of 16)12/30/200\
6 4:35:14 PM
Page 123 of 245

2004 VOLVO XC90
Driving in rain and slush or passing through an automatic car wash can c\
ause water to collect on the
brake discs and pads. This will cause a delay in braking effect when the\
pedal is depressed. To avoid
such a delay when the brakes are needed, depress the pedal occasionally \
when driving through rain,
slush, etc. This will remove the water from the brakes. Check that brake\
application feels normal. This
should also be done after washing or starting in very damp or cold weath\
er.
Severe strain on the brake system
The brakes will be subject to severe strain when driving in mountains or\
hilly areas, or when towing a
trailer. Vehicle speed is usually slower, which means that the cooling o\
f the brakes is less efficient than
when driving on level roads. To reduce the strain on the brakes, shift i\
nto a lower gear and let the engine
help with the braking. Do not forget that if you are towing a trailer, t\
he brakes will be subjected to a
greater than normal load.
pg. 94 Starting and driving
Brake system (contd)
Anti-lock brakes (ABS)
If the warning lamp lights up there is a malfunction of the ABS system (\
the standard braking system will
however function) and the vehicle should be driven cautiously to a Volv\
o retailer for inspection. The
Anti-lock Braking System (ABS) helps to improve vehicle control (stop\
ping and steering) during severe
braking conditions by limiting brake lockup. When the system "senses" im\
pending lockup, braking
pressure is automatically modulated in order to help prevent lockup, whi\
ch could lead to a skid.
This system performs a self-diagnostic test when the engine is started a\
nd when the vehicle first
reaches a speed of approximately 12 mph (20 km/h). The brake pedal will pulsate several times and a
sound may be audible from the ABS control module. This is normal.
To obtain optimal effect from the ABS system, constant pressure should b\
e kept on the brake pedal,
keep constant pressure on the brake pedal. Do not pump the brake pedal.
The switching of the ABS modulator will be audible and the brake pedal w\
ill pulsate during braking.
Please be aware that ABS does not increase the absolute braking potentia\
l of the vehicle. While control
will be enhanced, ABS will not shorten stopping distances on slippery su\
rfaces.
ABS with EBD (Electronic Brake Force Distribution)
EBD is an integrated part of the ABS system. EBD regulates the hydraulic\
pressure to the rear brakes to
help provide optimal braking capacity. The brake pedal will pulsate duri\
ng braking, which is normal.
file:///K|/ownersdocs/2004/2004_XC90/04xc90_06b.htm (2 of 17)12/30/200\
6 4:35:23 PM
Page 124 of 245

2004 VOLVO XC90
If the BRAKE and ABS warning lights come on at the same time, this could\
indicate a fault in the brake
system.
l Stop the vehicle in a suitable place and switch off the engine.
l Restart the engine.
l If both warning lights go off, no further action is required.
l If both lights are still on after the engine has been restarted, switch \
off the engine again and check the
brake fluid level (see
page 126 for the location of the brake fluid reservoir).
l If the brake fluid level is above the MIN mark, drive carefully to an au\
thorized Volvo retailer and
have the brake system inspected.
WARNING!
If the fluid level is below the MIN mark in the reservoir or if a "Brake\
failure - Service urgent"
message is displayed in the text window: DO NOT DRIVE. Have the vehicle \
towed to a Volvo
retailer and have the brake system inspected.
pg. 95 Starting and driving
Dynamic Stability Traction Control (DSTC)
The DSTC system on the Volvo XC90 consists of a number of functions:
1. Traction control (TC)
This function is designed to help reduce wheel spin by transferring powe\
r from a drive wheel that begins
to lose traction to the wheel on the opposite side of the vehicle (on t\
he same axle). TC monitors and
compares the rotational speed of the drive wheels. If one of the drive w\
heels shows a tendency to spin,
the difference in speed is immediately detected. This triggers the Anti-\
lock Brake System, which brakes
the spinning wheel until the difference in rotational speed is corrected\
.
TC is most active at low speeds, and a pulsating sound will be audible w\
hen the system is regulating
wheel spin. This is quite normal.
This is one of the DSTC system's permanent functions and is not affected\
when the DSTC button on the
center control panel is pressed.
2. Spin control (SC)
The spin control function is designed to help prevent the drive wheels f\
rom spinning while the vehicle is
accelerating. This is done by temporarily reducing engine torque to the \
drive wheels, which helps
file:///K|/ownersdocs/2004/2004_XC90/04xc90_06b.htm (3 of 17)12/30/200\
6 4:35:23 PM
Page 138 of 245

2004 VOLVO XC90
l Check all lights, including high beams.
l Reflective warning triangles are legally required in some states/provinc\
es.
l Have a word with your Volvo retailer if you intend to drive in countries\
where it may be difficult to
obtain the correct fuel.
l Consider your destination. If you will be driving through an area where \
snow or ice are likely to
occur, consider snow tires.
* To prevent injury from contact with hot surfaces, do not inspect your \
vehicle's transmission fluid
yourself. Have your vehicle's transmission fluid level inspected by a qu\
alified Volvo service technician.
Contents | Top of Page
file:///K|/ownersdocs/2004/2004_XC90/04xc90_06b.htm (17 of 17)12/30/20\
06 4:35:23 PM
Page 176 of 245

2004 VOLVO XC90
9. License plate lighting/parking light in headlight/side marker light, \
rear W5W
Side turn signal W5W (amber bulb)
10. Fog lights, front 55W H1
11. Fog light, rear 21W BA5
12. Parking lights, rear P21/4W
l Never touch the glass of bulbs 1, 2, 3, 10 with your fingers. Grease and\
oils from
your fingers evaporate in the heat and will leave a deposit on the refle\
ctor, quickly
damaging it.
l Bi-Xenon headlight bulbs (option) contain trace amounts of mercury. Th\
ese
bulbs should always be disposed of by an authorized Volvo retailer.
WARNING!
Bi-Xenon headlights (option) - due to the high voltage used by these h\
eadlights, these bulbs should
only be replaced by an authorized Volvo service technician.
pg. 136 Maintenance
Retaining pins
Replacing high/low beams/turn signal/parking light bulbs
The entire lamp housing must be lifted out when replacing these bulbs.
To lift out the lamp housing:
1. Switch off the ignition.
2. Open the hood.
3. Pull up the retaining pins (see the illustration above).
file:///K|/ownersdocs/2004/2004_XC90/04xc90_09b.htm (6 of 23)12/30/200\
6 4:35:28 PM