2004 VOLVO XC90 AUX
[x] Cancel search: AUXPage 36 of 245

2004 VOLVO XC90
2 0 0 4
VOLVO XC90
Instruments and controls
pg. 23 Instruments and controls
Instrument panel24
Indicator and warning symbols25
Switches in center console29
Lighting panel30
Lighting panel, Manually unlocking the fuel filler door31
Turn signals, Steering wheel adjustment32
Windshield wipers33
Tailgate wiper/washer34
Hazard warning flashers, rear window/sideview mirror defroster, heated f\
ront seats35
Trip computer (option)36
Cruise control37
Parking brake, Opening/closing the hood38
Opening the tailgate, Auxiliary 12-volt sockets39
Electrically operated windows40
Rearview mirror/power folding sideview mirror42
Power moonroof (option)43
file:///K|/ownersdocs/2004/2004_XC90/04xc90_02a.htm (1 of 16)12/30/200\
6 4:35:14 PM
Page 44 of 245

2004 VOLVO XC90
The positions of these buttons may vary, depending on the specifications\
of your vehicle
1. Rear Parking Assistants (option)
This system provides an audible warning if you back the vehicle to withi\
n approximately 5 feet (1.5
meters) of an object. See
page 97 for more information.
NOTE: The system activates automatically when the engine is started, and can b\
e deactivated by
pressing this button (e.g. when towing a trailer) or reactivated if ne\
cessary.
2. Folding sideview mirrors (option)
Press the button and release it to fold the sideview mirrors in or out. \
On certain models, when the button
is pressed, there may be a long pause before the mirrors move. Pressing \
the button again during this
pause may erase your first button press. If this happens, wait ten secon\
ds and press the button one more
time. The mirrors cannot be adjusted during the first ten seconds after \
they have been folded out. NOTE:
If the sideview mirrors have been inadvertently pushed out of position (\
in a car wash, parking lot, etc.)
manually return them to normal position. If mirror adjustment does not s\
eem to operate after manual
folding, reset the folding mirrors as follows:
l Turn the ignition key to position II.
l Manually fold the mirror(s) to the normal position.
l Press the button to fold both mirrors in.
l Press the button again to fold the mirrors out to their normal position.\
3. Auxiliary lights
This button is used to switch on auxiliary lights (if installed). An L\
ED in the switch will light up to
indicate that the auxiliary lights are illuminated.
4. Dynamic Stability Traction Control system (DSTC)
This button is used to switch off DSTC's stability Control function. Whe\
n the LED in the button is ON,
all DSTC functions are active. See
pages 95 and 96 for additional information.
WARNING!
The Please be aware that the vehicle's handling characteristics may be a\
ffected if the Stability Control
function is switched off.
file:///K|/ownersdocs/2004/2004_XC90/04xc90_02a.htm (9 of 16)12/30/200\
6 4:35:14 PM
Page 45 of 245

2004 VOLVO XC90
5. Rear seat air conditioning (option)
This button controls the optional rear seat air conditioning system on s\
even-seat models.
6. Temporarily disconnecting the alarm sensors (option)
See
page 79 for more details.
7. Not in use
8. 12 volt socket
This 12 volt socket can be used to plug in certain accessories such as c\
ellular telephones, etc. The
ignition key must be in position 1 (or higher) for the auxiliary socke\
t to function.
NOTE: The auxiliary sockets can also be used for cigarette lighters, which are\
available as accessories
at your Volvo retailer.
pg. 30 Instruments and controls
Lighting panel
A - Headlights and parking lights
All lighting off.
Models with daytime running lights:
Low beam headlights will automatically come on if the ignition key is in\
position II. Front and rear
parking lights, tail lights, side marker lights, and license plate light\
s will also be on. Volvo recommends
the use of daytime running lights. If, however, you would prefer to have\
these lights turned off (USA
only), please consult your Volvo retailer. Please note that the use of \
daytime running lights is mandatory
in Canada.
NOTE: Bi-Xenon headlights (option): Turn the headlight switch to position 0\
to activate a daylight
sensor, which automatically switches the low beams on or off, depending \
on ambient light conditions.
When driving in daylight, the headlights will switch off and the daytime\
running lights will come on. In
darkness, the daytime running lights will switch off and the Bi-Xenon he\
adlights will switch on.
Parking lights on. The parking lights should be switched off when you leave the vehicle to \
help avoid battery drain.
file:///K|/ownersdocs/2004/2004_XC90/04xc90_02a.htm (10 of 16)12/30/20\
06 4:35:14 PM
Page 58 of 245

2004 VOLVO XC90
WARNING!
Always use the parking brake when parking. On hills, also turn the front\
wheels toward the curb.The
indicator light in the instrument panel will light up even if the parkin\
g brake is applied only slightly.
Be sure to press down on the pedal sufficiently.
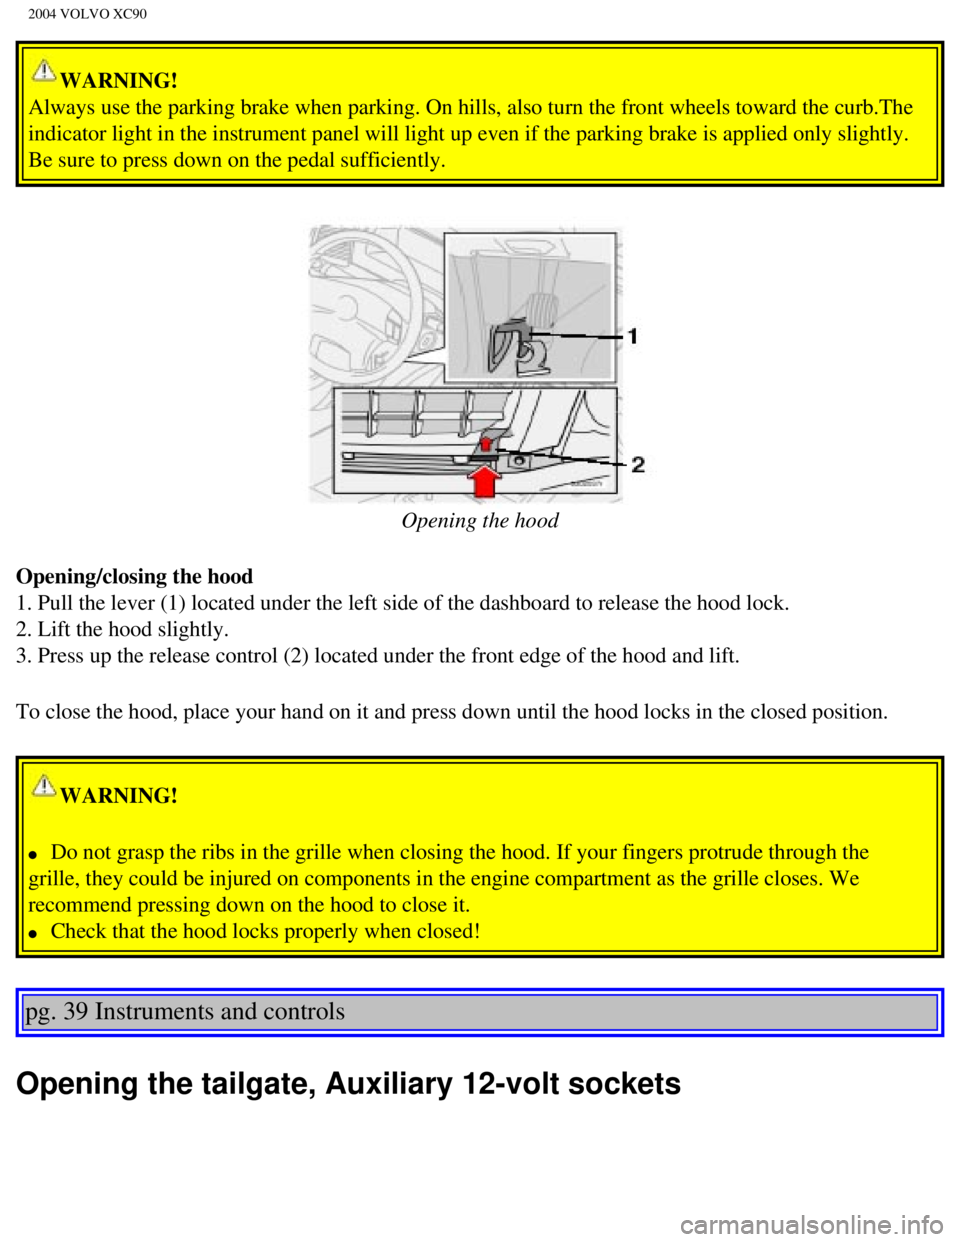
Opening the hood
Opening/closing the hood
1. Pull the lever (1) located under the left side of the dashboard to \
release the hood lock.
2. Lift the hood slightly.
3. Press up the release control (2) located under the front edge of th\
e hood and lift.
To close the hood, place your hand on it and press down until the hood l\
ocks in the closed position.
WARNING!
l Do not grasp the ribs in the grille when closing the hood. If your finge\
rs protrude through the
grille, they could be injured on components in the engine compartment as\
the grille closes. We
recommend pressing down on the hood to close it.
l Check that the hood locks properly when closed!
pg. 39 Instruments and controls
Opening the tailgate, Auxiliary 12-volt sockets
file:///K|/ownersdocs/2004/2004_XC90/04xc90_02b.htm (7 of 16)12/30/200\
6 4:35:15 PM
Page 59 of 245

2004 VOLVO XC90
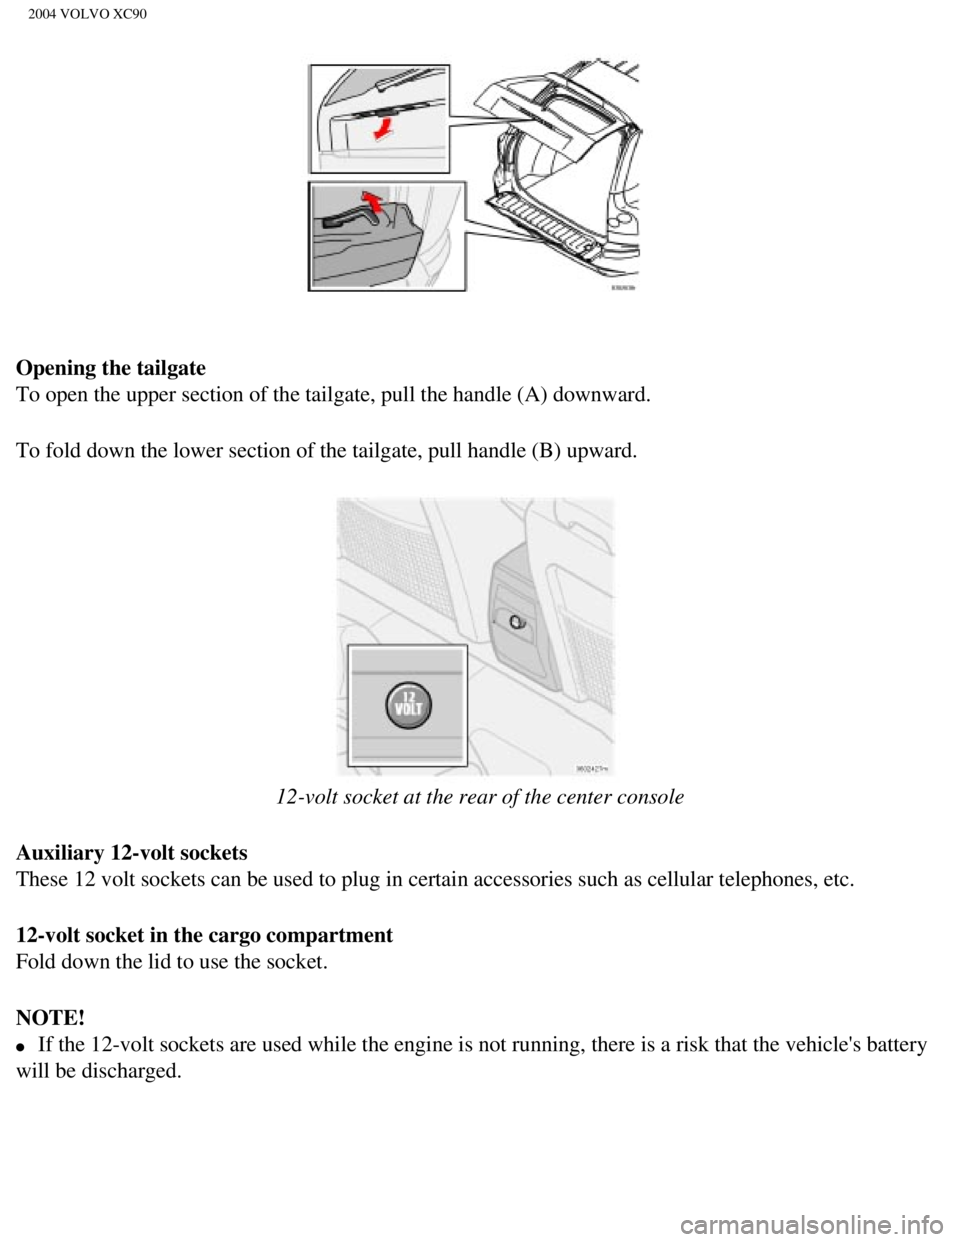
Opening the tailgate
To open the upper section of the tailgate, pull the handle (A) downwar\
d.
To fold down the lower section of the tailgate, pull handle (B) upward\
.
12-volt socket at the rear of the center console
Auxiliary 12-volt sockets
These 12 volt sockets can be used to plug in certain accessories such as\
cellular telephones, etc.
12-volt socket in the cargo compartment
Fold down the lid to use the socket.
NOTE!
l If the 12-volt sockets are used while the engine is not running, there i\
s a risk that the vehicle's battery
will be discharged.
file:///K|/ownersdocs/2004/2004_XC90/04xc90_02b.htm (8 of 16)12/30/200\
6 4:35:15 PM
Page 60 of 245

2004 VOLVO XC90
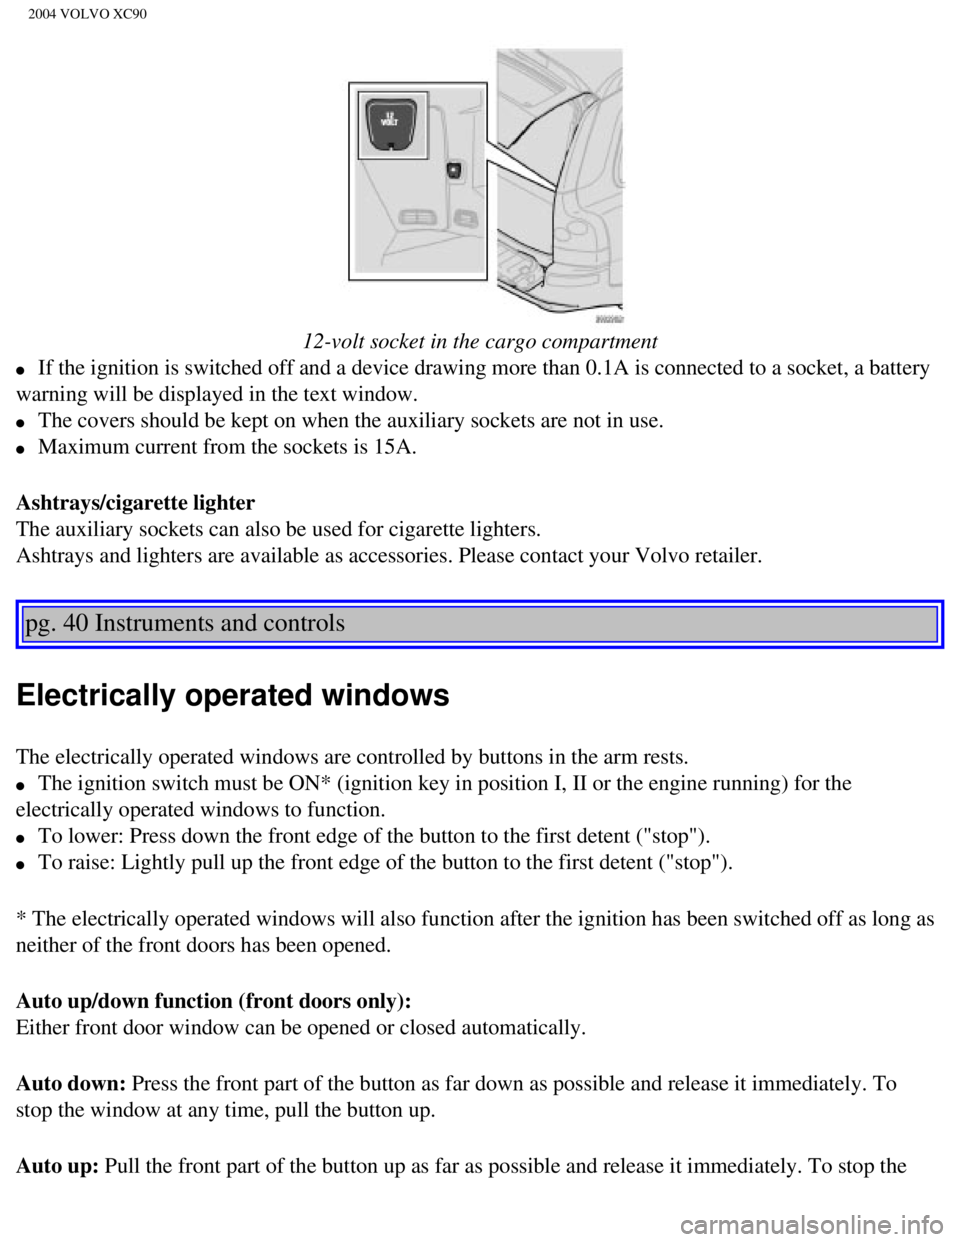
12-volt socket in the cargo compartment
l If the ignition is switched off and a device drawing more than 0.1A is c\
onnected to a socket, a battery
warning will be displayed in the text window.
l The covers should be kept on when the auxiliary sockets are not in use. \
l Maximum current from the sockets is 15A.
Ashtrays/cigarette lighter
The auxiliary sockets can also be used for cigarette lighters.
Ashtrays and lighters are available as accessories. Please contact your \
Volvo retailer.
pg. 40 Instruments and controls
Electrically operated windows
The electrically operated windows are controlled by buttons in the arm r\
ests.
l The ignition switch must be ON* (ignition key in position I, II or the \
engine running) for the
electrically operated windows to function.
l To lower: Press down the front edge of the button to the first detent (\
"stop").
l To raise: Lightly pull up the front edge of the button to the first dete\
nt ("stop").
* The electrically operated windows will also function after the ignitio\
n has been switched off as long as
neither of the front doors has been opened.
Auto up/down function (front doors only):
Either front door window can be opened or closed automatically.
Auto down: Press the front part of the button as far down as possible and release i\
t immediately. To
stop the window at any time, pull the button up.
Auto up: Pull the front part of the button up as far as possible and release it i\
mmediately. To stop the
file:///K|/ownersdocs/2004/2004_XC90/04xc90_02b.htm (9 of 16)12/30/200\
6 4:35:15 PM
Page 129 of 245

2004 VOLVO XC90
B Screw the towing eyelet (C) in place (B), first by hand and then us\
ing the tire iron until it is securely
in place.
After the vehicle has been towed, the eyelet should be removed and retur\
ned to the tool bag. Press the
cover back into position.
Precautions when the vehicle is in tow
l The steering wheel must be unlocked. Turn the ignition key to position I\
or II.
l The gear selector must be in position N.
l Maximum speed: 50 mph (80 km/h). Do not exceed the maximum allowable t\
owing speed.
l Maximum distance with front wheels on ground: 50 miles (80 km).
l While the vehicle is being towed, try to keep the tow rope taut at all t\
imes.
l The vehicle should only be towed in forward direction.
CAUTION
- Please check with state and local authorities before attempting this t\
ype of towing, as vehicles being
towed are subject to regulations regarding maximum towing speed, length \
and type of towing device,
lighting, etc.
- If the vehicle's battery is dead, do not attempt to start the vehicle \
by pushing or pulling it as this will
damage the three-way catalytic converter(s). The engine must be jump s\
tarted using an auxiliary
battery (see
page 100).
- If the vehicle is being towed on a flat bed truck, the towing eyelets \
must not be used to secure the
vehicle on the flat bed. Consult the tow truck operator.
WARNING!
- Remember that the power brakes and power steering will not function wh\
en engine is not running.
The braking and steering systems will function but the brake pedal press\
ure required is 3 - 4 times
above normal and greater steering effort must be exerted.
- The towing eyelets must not be used for pulling the vehicle out of a d\
itch or for any similar purpose
involving severe strain. Do not use the towing eyelets to pull the vehic\
le up onto a flat bed tow truck.
pg. 99 Starting and driving
file:///K|/ownersdocs/2004/2004_XC90/04xc90_06b.htm (8 of 17)12/30/200\
6 4:35:23 PM
Page 131 of 245

2004 VOLVO XC90
Jump starting
Follow these instructions to jump start your vehicle's dead battery or t\
o jump start another vehicle's dead
battery using your vehicle.
Although your vehicle's battery is located under the floor of the cargo \
area, jumper cables should be
connected in the engine compartment, to the points shown in the illustrations.
If the 12-volt auxiliary battery to be used is in another vehicle, check\
that the vehicles are not touching
to prevent premature completion of a circuit. Be sure to follow jump sta\
rting instructions provided for
the other vehicle.
To jump start your vehicle:
l Switch off the ignition.
l First connect the auxiliary battery positive (+) terminal (1) to the\
positive (+) terminal in your
vehicle's engine compartment (2), located under a small black plastic \
cover attached to the fuse box
cover, marked with a "+" sign.
Remove the cover on the main fuse box if necessary to access this termin\
al. Then connect the auxiliary
battery's negative (- ) terminal (3) to the ground point in your veh\
icle's engine compartment (4).
l Start the engine in the assisting vehicle, then start the engine in the \
vehicle with dead battery.
l After the engine has started, first remove the negative (-) terminal j\
umper cable. Then remove the
positive (+) terminal jumper cable.
WARNING!
PROPOSITION 65 WARNING!
Battery posts, terminals, and related accessories contain lead and lead \
compounds, chemicals known
to the state of California to cause cancer and reproductive harm. Wash h\
ands after handling
file:///K|/ownersdocs/2004/2004_XC90/04xc90_06b.htm (10 of 17)12/30/20\
06 4:35:23 PM