2004 VOLVO XC90 warning
[x] Cancel search: warningPage 30 of 245

2004 VOLVO XC90
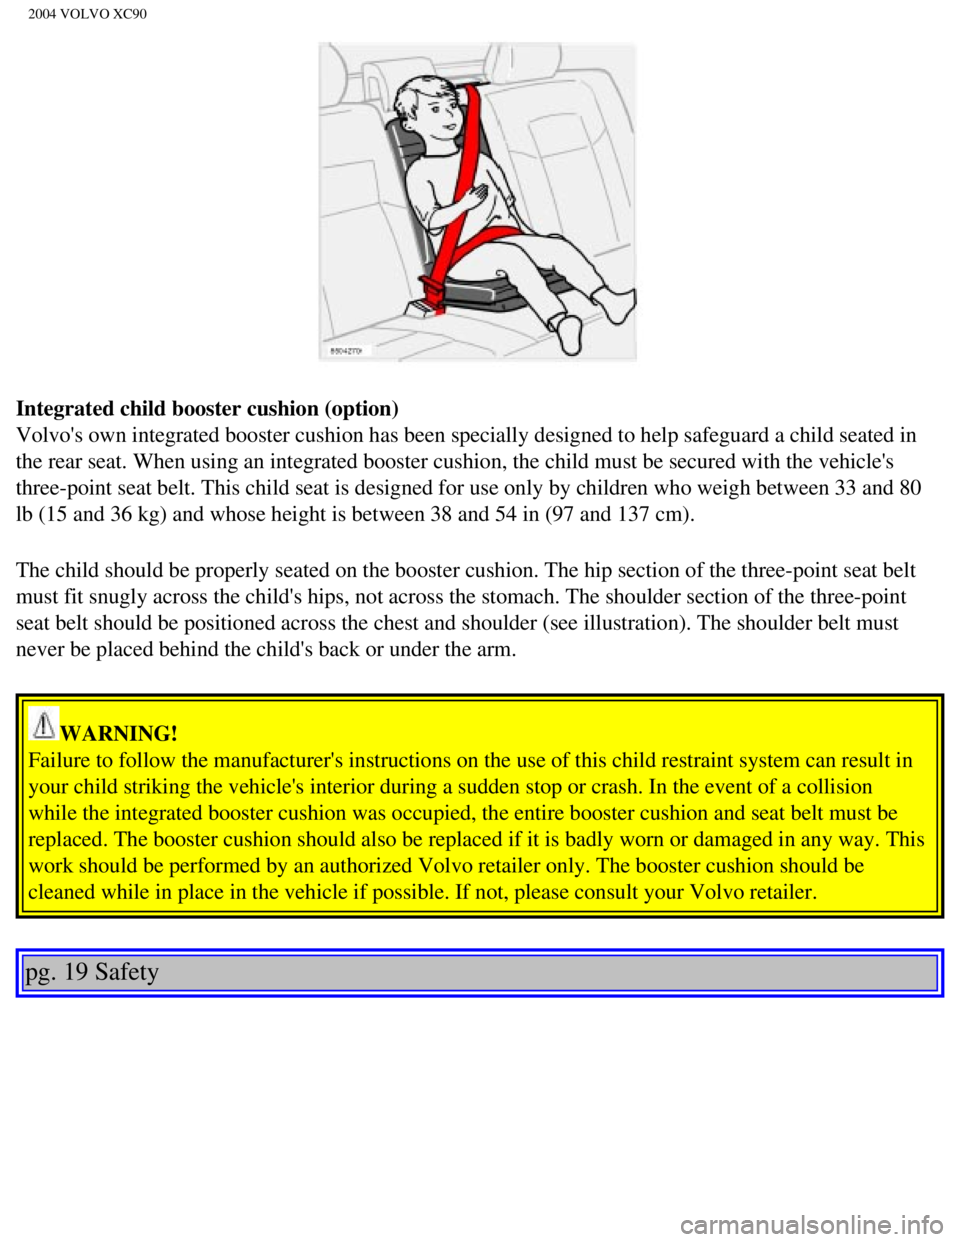
Integrated child booster cushion (option)
Volvo's own integrated booster cushion has been specially designed to he\
lp safeguard a child seated in
the rear seat. When using an integrated booster cushion, the child must \
be secured with the vehicle's
three-point seat belt. This child seat is designed for use only by child\
ren who weigh between 33 and 80
lb (15 and 36 kg) and whose height is between 38 and 54 in (97 and 13\
7 cm).
The child should be properly seated on the booster cushion. The hip sect\
ion of the three-point seat belt
must fit snugly across the child's hips, not across the stomach. The sho\
ulder section of the three-point
seat belt should be positioned across the chest and shoulder (see illus\
tration). The shoulder belt must
never be placed behind the child's back or under the arm.
WARNING!
Failure to follow the manufacturer's instructions on the use of this chi\
ld restraint system can result in
your child striking the vehicle's interior during a sudden stop or crash\
. In the event of a collision
while the integrated booster cushion was occupied, the entire booster cu\
shion and seat belt must be
replaced. The booster cushion should also be replaced if it is badly wor\
n or damaged in any way. This
work should be performed by an authorized Volvo retailer only. The boost\
er cushion should be
cleaned while in place in the vehicle if possible. If not, please consul\
t your Volvo retailer.
pg. 19 Safety
file:///K|/ownersdocs/2004/2004_XC90/04xc90_01b.htm (11 of 16)12/30/20\
06 4:35:12 PM
Page 32 of 245

2004 VOLVO XC90
Volvo vehicles are equipped with child restraint top tether anchorages i\
n the rear seats (second row of
seats in seven-seat models). Refer to the child seat manufacturer's ins\
tructions for information on
securing the child seat.
WARNING!
Child Restraint Anchorages are designed to withstand only those loads im\
posed by correctly fitted
Child Restraints. Under no circumstances are they to be used for adult s\
eat belts or harnesses. The
anchorages are not able to withstand excessive forces on them in the eve\
nt of collision if full harness
seat belts or adult seat belts are installed to them. An adult who uses \
a belt anchored in a Child
Restraint Anchorage runs a great risk of suffering severe injuries shoul\
d a collision occur. Do not
install rear speakers which would require the removal of the top tether \
anchors or interfere with the
proper use of the top tether strap.
pg. 20 Safety
Child safety (contd)
Keeping child seats in place (ALR/ ELR*)
To make child seat installation easier, each seat belt (except for the \
driver's belt) is equipped with a
locking mechanism to help keep the seat belt taut.
When attaching the seat belt to a child seat:
l Attach the seat belt to the child seat according to the child seat manuf\
acturer's instructions.
l Pull the seat belt out as far as possible.
l Insert the seat belt latch plate into the buckle (lock) in the usual w\
ay.
l Release the seat belt and pull it taut around the child seat.
A sound from the seat belt retractor will be audible at this time and is\
normal.
The belt will now be locked in place.
This function is automatically disabled when the seat belt is unlocked a\
nd the belt is fully retracted.
WARNING!
Do not use child safety seats or child booster cushions/backrests in the\
front passenger's seat. We also
recommend that children who have outgrown these devices sit in the rear \
seat with the seat belt
properly fastened.
file:///K|/ownersdocs/2004/2004_XC90/04xc90_01b.htm (13 of 16)12/30/20\
06 4:35:12 PM
Page 36 of 245

2004 VOLVO XC90
2 0 0 4
VOLVO XC90
Instruments and controls
pg. 23 Instruments and controls
Instrument panel24
Indicator and warning symbols25
Switches in center console29
Lighting panel30
Lighting panel, Manually unlocking the fuel filler door31
Turn signals, Steering wheel adjustment32
Windshield wipers33
Tailgate wiper/washer34
Hazard warning flashers, rear window/sideview mirror defroster, heated f\
ront seats35
Trip computer (option)36
Cruise control37
Parking brake, Opening/closing the hood38
Opening the tailgate, Auxiliary 12-volt sockets39
Electrically operated windows40
Rearview mirror/power folding sideview mirror42
Power moonroof (option)43
file:///K|/ownersdocs/2004/2004_XC90/04xc90_02a.htm (1 of 16)12/30/200\
6 4:35:14 PM
Page 37 of 245

2004 VOLVO XC90
pg. 24 Instruments and controls
Instrument panel
1. Turn signal indicators - right - left
2. Text window
The text window displays information and warning messages.
3. Temperature gauge
The pointer should be approximately midway on the gauge when driving. Do not drive the vehicle if
the warning light is on. The text window will provide you with additional information. If the en\
gine
temperature remains high, check coolant level - see
page 125.
4. Trip odometer
The trip odometers are used for measuring shorter distances. The right-h\
and digit gives tenth of a mile/
kilometer. Press the button for more than 2 seconds to reset. Change bet\
ween trip odometers 1 and 2
using one short press on the button.
5. Odometer
6. Speedometer
7. Warning symbol
8. High beam indicator
9. Tachometer
The tachometer shows engine speed in thousands of revolutions per minute\
(rpm). Do not drive
file:///K|/ownersdocs/2004/2004_XC90/04xc90_02a.htm (2 of 16)12/30/200\
6 4:35:14 PM
Page 38 of 245

2004 VOLVO XC90
continuously with the needle in the red area of the dial, which indicate\
s maximum allowable engine rpm
range. Instead, shift to a higher gear or slow the vehicle down. The eng\
ine management system will
automatically prevent excessively high engines speeds. This will be noti\
ceable as a pronounced
unevenness in engine speed.
10. Gear and driving mode indicator
The currently selected driving mode is displayed here. If you use the op\
tional Geartronic function on the
automatic transmission, the currently selected gear will be displayed.
11. Ambient temperature gauge
This display indicates the air temperature outside your vehicle. A "snow\
flake" symbol in the text
window is displayed when the temperature is in the range of 23 -36° F\
(-5 -+2° C). Please note that this
symbol does not indicate a fault with your vehicle. At low speeds or whe\
n the vehicle is not moving, the
temperature readings may be slightly higher than the actual ambient temp\
erature.
12. Clock/set button
Turn the button to set the clock.
13. Fuel gauge
The fuel tank holds approximately 19 US gals (72 liters). When a warni\
ng light in the gauge comes on,
there are approximately 1.8 US gal. (8 liters) of fuel remaining in th\
e tank.
14. Indicator and warning symbols
pg. 25 Instruments and controls
Indicator and warning symbols
The indicator and warning symbols light up when you turn the ignition ke\
y to the driving position
(position II) before starting. This shows that the symbols are functio\
ning. When the engine starts, all
symbols go out. If the engine is not started within 5 seconds, all symbo\
ls except CHECK ENGINE and
go out. The symbol for the parking brake goes out when the parking brak\
e is released.
Warning symbol
in center of instrument panel
This symbol shines as a red or yellow light depending on the severity of\
the fault that has been detected.
Red symbol -Stop the vehicle as soon as possible in a suitable location and read th\
e message shown in
the text window.
Yellow symbol -Follow the instructions shown in the text window.
file:///K|/ownersdocs/2004/2004_XC90/04xc90_02a.htm (3 of 16)12/30/200\
6 4:35:14 PM
Page 39 of 245

2004 VOLVO XC90
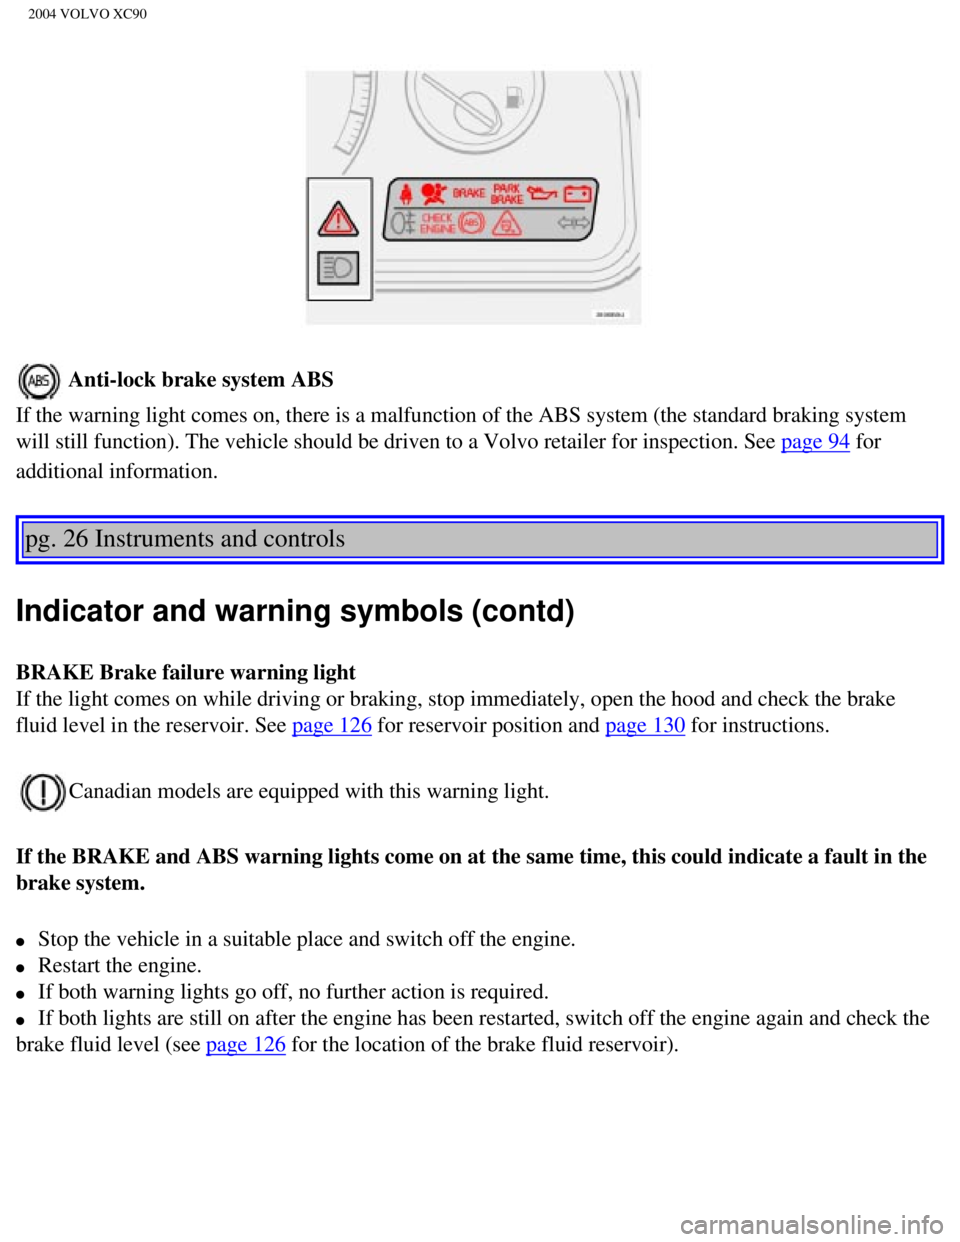
Anti-lock brake system ABS
If the warning light comes on, there is a malfunction of the ABS system \
(the standard braking system
will still function). The vehicle should be driven to a Volvo retailer \
for inspection. See
page 94 for
additional information.
pg. 26 Instruments and controls
Indicator and warning symbols (contd)
BRAKE Brake failure warning light
If the light comes on while driving or braking, stop immediately, open t\
he hood and check the brake
fluid level in the reservoir. See
page 126 for reservoir position and page 130 for instructions.
Canadian models are equipped with this warning light.
If the BRAKE and ABS warning lights come on at the same time, this could\
indicate a fault in the
brake system.
l Stop the vehicle in a suitable place and switch off the engine.
l Restart the engine.
l If both warning lights go off, no further action is required.
l If both lights are still on after the engine has been restarted, switch \
off the engine again and check the
brake fluid level (see
page 126 for the location of the brake fluid reservoir).
file:///K|/ownersdocs/2004/2004_XC90/04xc90_02a.htm (4 of 16)12/30/200\
6 4:35:14 PM
Page 40 of 245

2004 VOLVO XC90
WARNING!
The If the fluid level is below the MIN mark in the reservoir or if a "B\
rake failure - Service urgent"
message is displayed in the text window: DO NOT DRIVE. Have the vehicle \
towed to an authorized
Volvo retailer and have the brake system inspected.
l If the brake fluid level is above the MIN mark, drive carefully to an au\
thorized Volvo retailer and
have the brake system inspected Volvo retailer and have the brake system\
inspected.
DSTC
The Dynamic Stability and Traction Control system (DSTC) is explained \
in greater detail on
pages 95
and 96. This system consists of several functions:
Risk for slippery conditions
If the warning light comes on and stays on, this indicates that traction\
with the road surface is reduced.
Drive with caution.
If this light flashes, it indicates that the DSTC system is working to restore traction to on\
e or more of the
wheels.
Reduced Stability Control
If the green indicator light in the DSTC button goes out, DSTC has reduc\
ed effect because the system
had been switched off with the button in the center console. The text DS\
TC SPIN CONTROL OFF will
be displayed in the text window.
Reduced anti-spin function
If the yellow indicator light comes on and remains on, DSTC's Stability \
Control function has been
switched off due to excessively high brake temperature. The text TRACTIO\
N CONTROL
TEMPORARILY OFF will be displayed in the text window.
file:///K|/ownersdocs/2004/2004_XC90/04xc90_02a.htm (5 of 16)12/30/200\
6 4:35:14 PM
Page 41 of 245

2004 VOLVO XC90
Fault in the DSTC system
If the yellow indicator light remains on, there is a fault in the system\
. The text ANTI-SKID SERVICE
REQUIRED will be displayed.
l Stop the vehicle in a safe place and switch off the engine. Restart the \
engine.
l If the indicator light goes off, no further action is necessary.
If the indicator light remains on, drive to an authorized Volvo retailer\
to have the system inspected.
pg. 27 Instruments and controls
Indicator and warning symbols (contd)
Supplemental Restraint system (SRS)
If the light comes on (or stays on after the vehicle has started), the\
SRS diagnostic system has detected a
fault. Drive to an authorized Volvo retailer for an inspection of the sy\
stem. See the SRS section for more
information.
Generator warning light
If the light comes on while the engine is running, have the charging sys\
tem checked.
Seat belt reminder This symbol lights up to indicate that the driver has not fastened his/\
her seat
belt.
PARKING BRAKE
This light will be on when the parking brake is applied. The parking bra\
ke lever is situated between the
front seats.
Canadian models are equipped with this symbol.
Rear fog light
This light indicates that the fog light is on.
Turn signal indicator - trailer (certain models)
If you are towing a trailer, this light will flash simultaneously with t\
he turn signals on the trailer. If the
light does not flash when signaling, neither the trailer's turn signals \
nor the vehicle's turn signals are
file:///K|/ownersdocs/2004/2004_XC90/04xc90_02a.htm (6 of 16)12/30/200\
6 4:35:14 PM