2004 VOLVO XC90 display
[x] Cancel search: displayPage 124 of 245

2004 VOLVO XC90
If the BRAKE and ABS warning lights come on at the same time, this could\
indicate a fault in the brake
system.
l Stop the vehicle in a suitable place and switch off the engine.
l Restart the engine.
l If both warning lights go off, no further action is required.
l If both lights are still on after the engine has been restarted, switch \
off the engine again and check the
brake fluid level (see
page 126 for the location of the brake fluid reservoir).
l If the brake fluid level is above the MIN mark, drive carefully to an au\
thorized Volvo retailer and
have the brake system inspected.
WARNING!
If the fluid level is below the MIN mark in the reservoir or if a "Brake\
failure - Service urgent"
message is displayed in the text window: DO NOT DRIVE. Have the vehicle \
towed to a Volvo
retailer and have the brake system inspected.
pg. 95 Starting and driving
Dynamic Stability Traction Control (DSTC)
The DSTC system on the Volvo XC90 consists of a number of functions:
1. Traction control (TC)
This function is designed to help reduce wheel spin by transferring powe\
r from a drive wheel that begins
to lose traction to the wheel on the opposite side of the vehicle (on t\
he same axle). TC monitors and
compares the rotational speed of the drive wheels. If one of the drive w\
heels shows a tendency to spin,
the difference in speed is immediately detected. This triggers the Anti-\
lock Brake System, which brakes
the spinning wheel until the difference in rotational speed is corrected\
.
TC is most active at low speeds, and a pulsating sound will be audible w\
hen the system is regulating
wheel spin. This is quite normal.
This is one of the DSTC system's permanent functions and is not affected\
when the DSTC button on the
center control panel is pressed.
2. Spin control (SC)
The spin control function is designed to help prevent the drive wheels f\
rom spinning while the vehicle is
accelerating. This is done by temporarily reducing engine torque to the \
drive wheels, which helps
file:///K|/ownersdocs/2004/2004_XC90/04xc90_06b.htm (3 of 17)12/30/200\
6 4:35:23 PM
Page 125 of 245

2004 VOLVO XC90
improve tractive force.
Under certain circumstances, such as when driving with snow chains, or d\
riving in deep snow or loose
sand, it may be advisable to temporarily switch off this function for ma\
ximum tractive force. This is
done by pressing the DSTC button on the center control panel for at leas\
t a half a second.
When the SC function has been switched off:
l The text window will briefly display "DSTC SPIN CONTROL OFF"
l The LED in the DSTC button will be off.
3. Active Yaw Control (AYC)
This function helps maintain directional stability, for example when cor\
nering, by braking one or more
of the wheels if the vehicle shows a tendency to skid or slide laterally\
. This is done by activating the
Anti-lock Braking System. A pulsating sound will be audible when the fun\
ction is active, which is quite
normal. If you apply the brakes while this function is active, the brake\
pedal will feel stiffer than usual.
This is also one of the DSTC system's permanent functions and is not aff\
ected when the DSTC button on
the center control panel is pressed.
4. Roll Stability Control (RSC)
RSC utilizes a gyro-sensor to monitor the vehicle's angle of inclination\
, and the rate at which this angle
changes. If necessary, RSC activates the Anti-lock Brake System to brake\
one or more of the wheels to
help maintain stability. A pulsating sound will be audible when the func\
tion is active, which is quite
normal. If you apply the brakes while this function is active, the brake\
pedal will feel stiffer than usual.
This is one of the DSTC system's permanent functions and is not affected\
when the DSTC button on the
center control panel is pressed.
The DSTC button
The DSTC button in the center control panel is used to switch the Spin C\
ontrol (SC) function on or off.
The button must be pressed for at least a half second to prevent SC from\
being switched off
inadvertently.
When the system has been switched off, the green indicator lamp in the b\
utton will go out and "DSTC
SPIN CONTROL OFF" will be displayed in the text window.
All DSTC functions are (re)activated each time the engine is started.
pg. 96 Starting and driving
file:///K|/ownersdocs/2004/2004_XC90/04xc90_06b.htm (4 of 17)12/30/200\
6 4:35:23 PM
Page 126 of 245
2004 VOLVO XC90
Dynamic Stability Traction Control (DSTC) (contd)
The Stability Control indicator light
The Stability Control indicator light will come on for approximately 2 s\
econds when the ignition is
switched on as the system performs a self-diagnostic test.
The Stability Control indicator light will flash when:
l Traction Control is actively functioning to help avoid drive-wheel spin.\
l Spin Control is actively functioning to help avoid loss of traction duri\
ng acceleration.
l Active Yaw Control is actively functioning to help avoid skids or latera\
l slides.
l Roll Stability Control is actively functioning to help avoid a roll-over\
situation.
The warning symbol in the instrument panel
A steady yellow glow indicates:
l That the system has been automatically disengaged due to a fault. "ANTI \
SKID SERVICE
REQUIRED" be displayed in the text window. An authorized Volvo retailer \
should check the system.
l In the event of high brake temperature, "TRACTION CONTROL TEMPORARILY OF\
F" will be
displayed in the text window. The system will automatically switch on ag\
ain when the brakes have
cooled.
Emergency Brake Assistance (EBA)
The EBA function is an integrated part of the DSTC system. EBA is design\
ed to provide full brake
effect immediately in the event of sudden, hard braking. The system is a\
ctivated by the speed with which
you depress the brake pedal.
NOTE:
l When the EBA system is activated, the brake pedal will go down and press\
ure in the brake system
immediately increases to the maximum level. Maintain full pressure on th\
e brake pedal in order to utilize
the system completely. EBA is automatically deactivated when the brake p\
edal is released.
l When the vehicle has been parked for some time, the brake pedal may sink\
more than usual when the
engine is started. This is normal and the pedal will return to its usual\
position when it is released.
pg. 97 Starting and driving
Rear Parking Assistance
file:///K|/ownersdocs/2004/2004_XC90/04xc90_06b.htm (5 of 17)12/30/200\
6 4:35:23 PM
Page 128 of 245
2004 VOLVO XC90
To temporarily off the system
l Press the button in the center control panel (see illustration above).\
The LED in the button will go out
to indicate that the system is not in active mode.
l Press the button again to reactivate the system.
Faults in the system
If a fault should occur in the system, the LED in the button will be swi\
tched off and a message will be
displayed in the text window.
Cleaning the sensors
For the system to function properly, the sensors should be kept clean. T\
hey can be cleaned with car
washing detergent and a sponge.
WARNING!
This system is designed to be a supplementary aid when the vehicle is ba\
cking up. It is not, however,
intended to replace the driver's attention and judgement.
pg. 98 Starting and driving
Towing
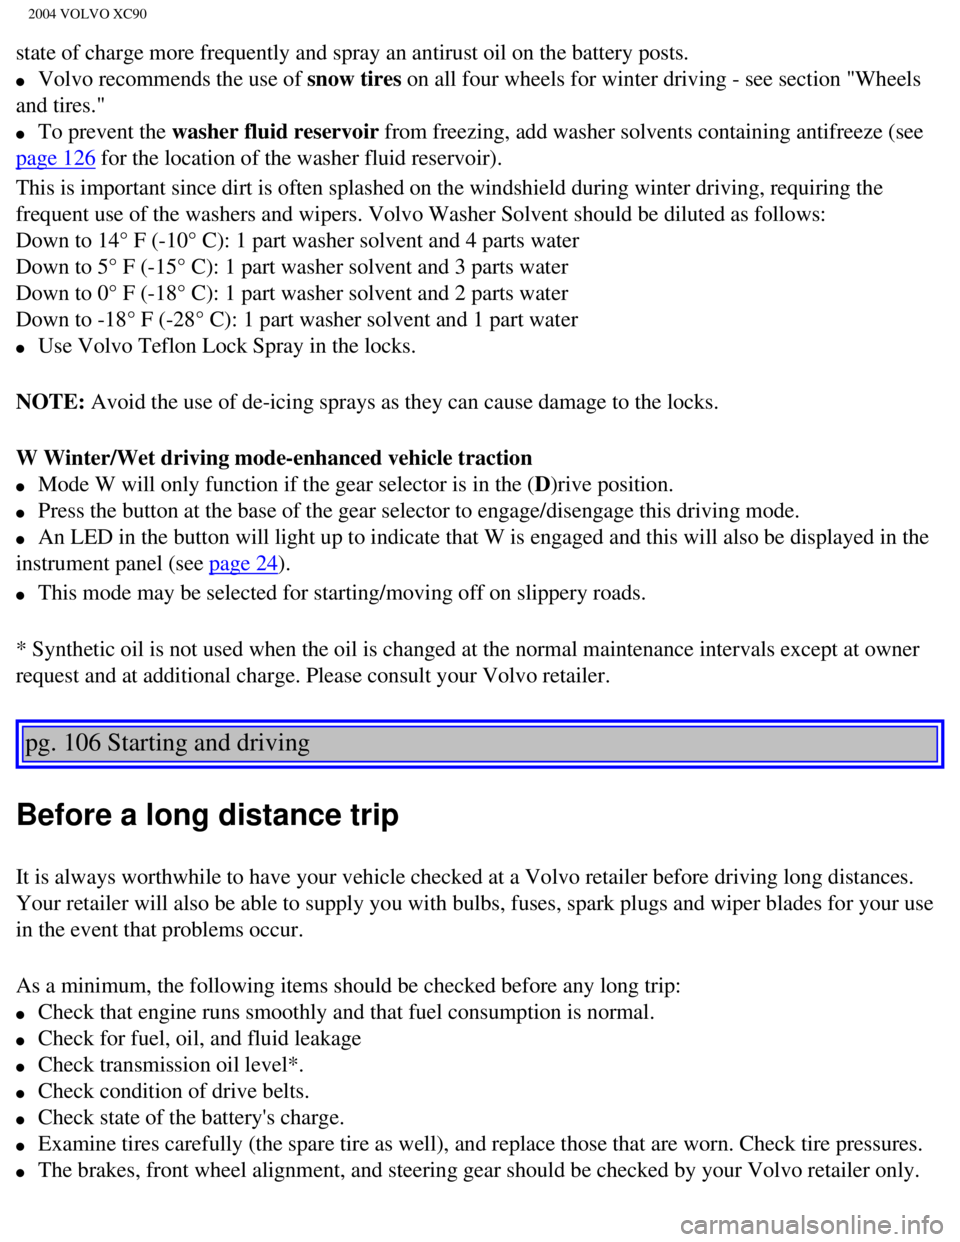
Positions for attaching towing eyelets
Emergency towing
The towing eyelet is located in the tool bag, under the floor of the car\
go area. This eyelet must be
screwed into the positions provided on the right sides of either the fro\
nt or rear bumper (see illustrations).
To attach the towing eyelet:
A Use a coin to pry open the lower edge of the cover (A).
file:///K|/ownersdocs/2004/2004_XC90/04xc90_06b.htm (7 of 17)12/30/200\
6 4:35:23 PM
Page 137 of 245
2004 VOLVO XC90
state of charge more frequently and spray an antirust oil on the battery\
posts.
l Volvo recommends the use of snow tires on all four wheels for winter driving - see section "Wheels
and tires."
l To prevent the washer fluid reservoir from freezing, add washer solvents containing antifreeze (see
page 126 for the location of the washer fluid reservoir).
This is important since dirt is often splashed on the windshield during \
winter driving, requiring the
frequent use of the washers and wipers. Volvo Washer Solvent should be d\
iluted as follows:
Down to 14° F (-10° C): 1 part washer solvent and 4 parts water \
Down to 5° F (-15° C): 1 part washer solvent and 3 parts water
Down to 0° F (-18° C): 1 part washer solvent and 2 parts water
Down to -18° F (-28° C): 1 part washer solvent and 1 part water \
l Use Volvo Teflon Lock Spray in the locks.
NOTE: Avoid the use of de-icing sprays as they can cause damage to the locks.
W Winter/Wet driving mode-enhanced vehicle traction
l Mode W will only function if the gear selector is in the (D)rive position.
l Press the button at the base of the gear selector to engage/disengage th\
is driving mode.
l An LED in the button will light up to indicate that W is engaged and thi\
s will also be displayed in the
instrument panel (see
page 24).
l This mode may be selected for starting/moving off on slippery roads.
* Synthetic oil is not used when the oil is changed at the normal mainte\
nance intervals except at owner
request and at additional charge. Please consult your Volvo retailer.
pg. 106 Starting and driving
Before a long distance trip
It is always worthwhile to have your vehicle checked at a Volvo retailer\
before driving long distances.
Your retailer will also be able to supply you with bulbs, fuses, spark p\
lugs and wiper blades for your use
in the event that problems occur.
As a minimum, the following items should be checked before any long trip\
:
l Check that engine runs smoothly and that fuel consumption is normal.
l Check for fuel, oil, and fluid leakage
l Check transmission oil level*.
l Check condition of drive belts.
l Check state of the battery's charge.
l Examine tires carefully (the spare tire as well), and replace those th\
at are worn. Check tire pressures.
l The brakes, front wheel alignment, and steering gear should be checked b\
y your Volvo retailer only.
file:///K|/ownersdocs/2004/2004_XC90/04xc90_06b.htm (16 of 17)12/30/20\
06 4:35:23 PM
Page 206 of 245

2004 VOLVO XC90
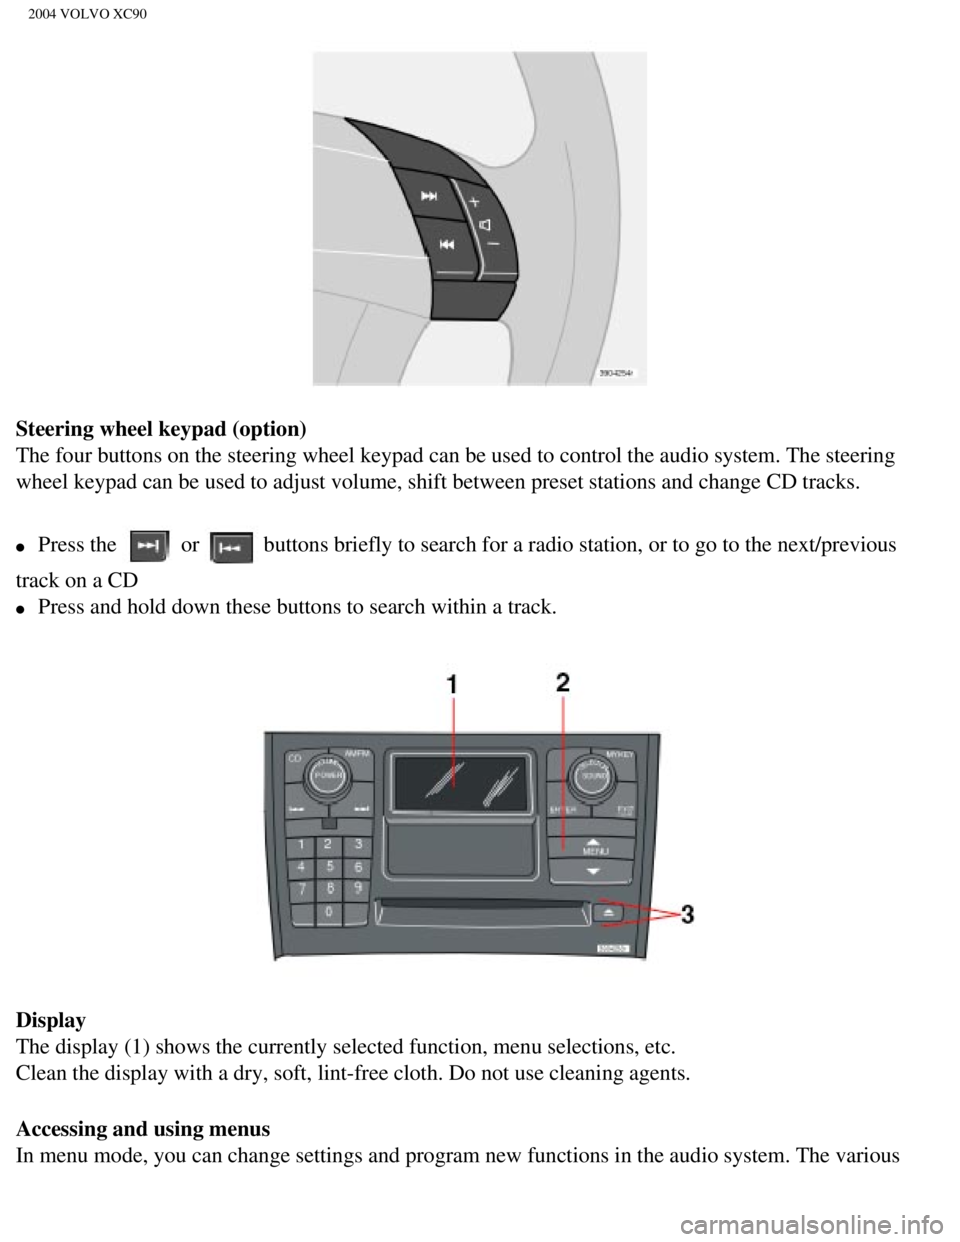
1. On/Off
2. Volume
3. CD player
4. AM/FM - for switching between FM1, FM2 and AM
5. Display
6. ENTER - select in the menu or activate a selection
7. MY KEY - programmable key for your favorite function
8. SELECTOR - select sound source
9. SOUND - make sound settings
10. EXIT/CLEAR - step back in the menu or cancel a selection
11. Menu selections
12. CD eject
13. CD slot, CD changer (option)
14. Storage compartment
15. MY KEY - programmable keys for your favorite functions from the menu\
16. Station preset buttons/CD changer discs (1-6)
17. Infrared (IR) port - for the optional audio/navigation system remo\
te control
18. Seek/change tracks or stations
pg. 161 Audio
Audio system controls
file:///K|/ownersdocs/2004/2004_XC90/04xc90_11a.htm (2 of 17)12/30/200\
6 4:35:31 PM
Page 207 of 245
2004 VOLVO XC90
Steering wheel keypad (option)
The four buttons on the steering wheel keypad can be used to control the\
audio system. The steering
wheel keypad can be used to adjust volume, shift between preset stations\
and change CD tracks.
l Press the or buttons briefly to search for a radio station, or to go to the next/pre\
vious
track on a CD
l Press and hold down these buttons to search within a track.
Display
The display (1) shows the currently selected function, menu selections\
, etc.
Clean the display with a dry, soft, lint-free cloth. Do not use cleaning\
agents.
Accessing and using menus
In menu mode, you can change settings and program new functions in the a\
udio system. The various
file:///K|/ownersdocs/2004/2004_XC90/04xc90_11a.htm (3 of 17)12/30/200\
6 4:35:31 PM
Page 208 of 245
2004 VOLVO XC90
menu alternatives are shown in the display.
Press the menu button (2) to enter menu mode. Use the menus as follows\
:
l Use the menu keys (3) to navigate up or down in the menus. Dots in the\
display indicated that there
are more menu selections from which to choose.
l One long press on EXIT/CLEAR exits menu mode.
l A short press on the EXIT/CLEAR enables you to cancel, undo, or answer n\
o to a menu selection, or
to go back in the menu structure.
l Pressing ENTER confirms a menu selection, or takes you to the next subme\
nu.
pg. 162 Audio
Audio system controls (contd)
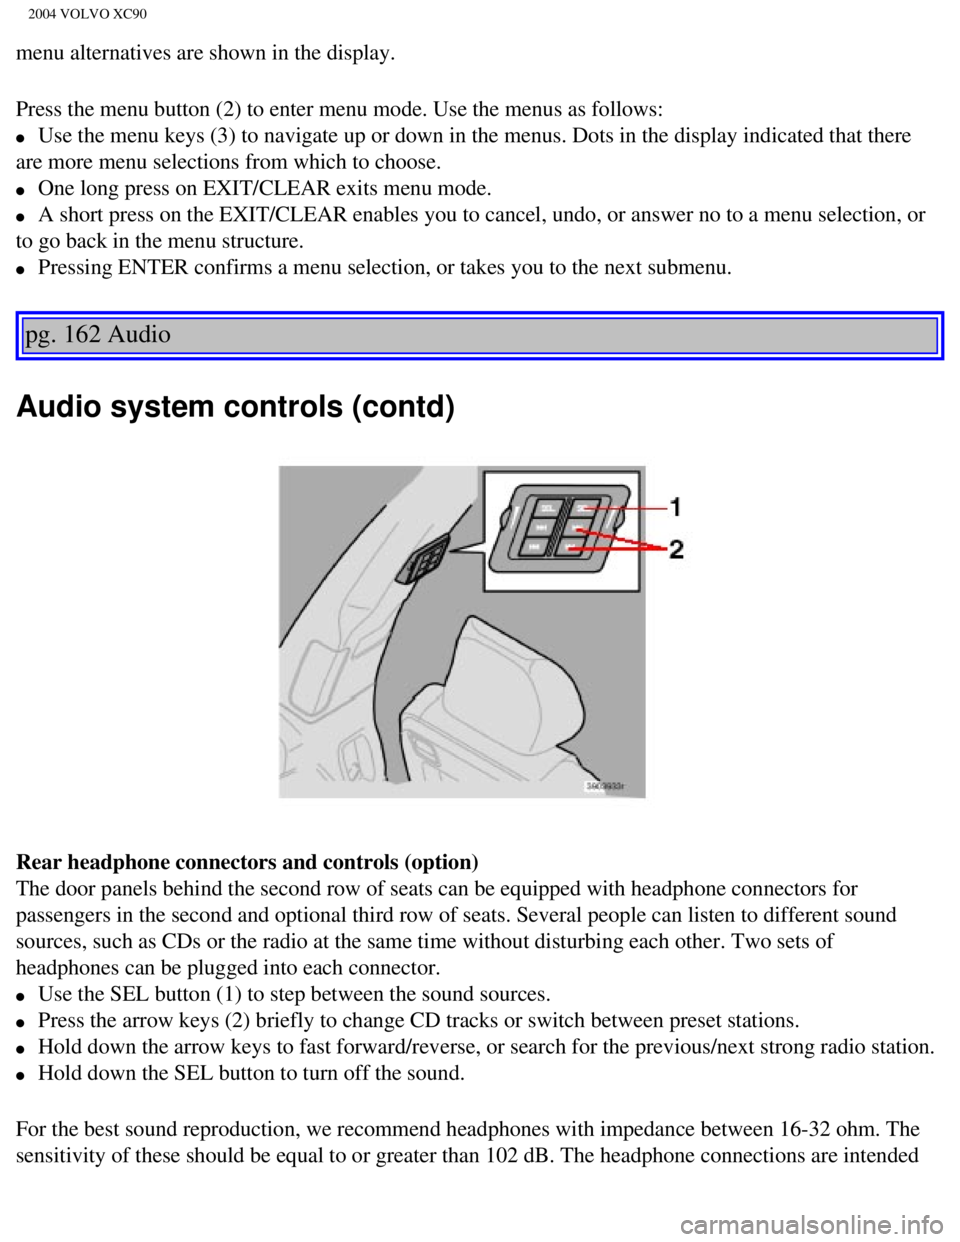
Rear headphone connectors and controls (option)
The door panels behind the second row of seats can be equipped with head\
phone connectors for
passengers in the second and optional third row of seats. Several people\
can listen to different sound
sources, such as CDs or the radio at the same time without disturbing ea\
ch other. Two sets of
headphones can be plugged into each connector.
l Use the SEL button (1) to step between the sound sources.
l Press the arrow keys (2) briefly to change CD tracks or switch between\
preset stations.
l Hold down the arrow keys to fast forward/reverse, or search for the prev\
ious/next strong radio station.
l Hold down the SEL button to turn off the sound.
For the best sound reproduction, we recommend headphones with impedance \
between 16-32 ohm. The
sensitivity of these should be equal to or greater than 102 dB. The head\
phone connections are intended
file:///K|/ownersdocs/2004/2004_XC90/04xc90_11a.htm (4 of 17)12/30/200\
6 4:35:31 PM