2004 VOLVO XC90 sensor
[x] Cancel search: sensorPage 46 of 245

2004 VOLVO XC90
Headlights, parking lights, license plate lights and instrument panel il\
lumination are on if the
ignition key is in position II.
The headlight switch must be in this position before the high beams will\
function (this also applies on
models equipped with the optional Bi-Xenon headlights).
Switch from high to low beams and vice versa by pulling the turn signal \
switch lever on the left side of
steering column toward you.
B - Instrument lighting
Move the thumb wheel up to increase brightness or down to decrease brigh\
tness. There is also an
instrument panel illumination sensor (see illustration on
page 46) which automatically adjusts the level
of illumination. The symbols have maximum illumination in daylight (onl\
y the background lighting can
be adjusted). At night, both the symbol light and background lighting c\
an be adjusted.
C - Unlocking the fuel filler door
Press this button when the vehicle is at a standstill to unlock the fuel\
filler door. Please note that the fuel
filler door will remain unlocked until the vehicle begins to move forwar\
d. An audible click will be heard
when the fuel filler door relocks. See also
page 84.
NOTE: If the fuel filler door does not unlock after the button has been press\
ed, please see
page 31 for
information on manually unlocking this door.
D - Front fog lights
The front fog lights will function only in combination with the low beam\
headlights. The fog lights turn
off when the ignition is switched off.
A light in the switch indicates when the front fog lights are on.
file:///K|/ownersdocs/2004/2004_XC90/04xc90_02a.htm (11 of 16)12/30/20\
06 4:35:14 PM
Page 50 of 245

2004 VOLVO XC90
WARNING!
The Never adjust the steering wheel while
driving.
pg. 33 Instruments and controls
Windshield wipers
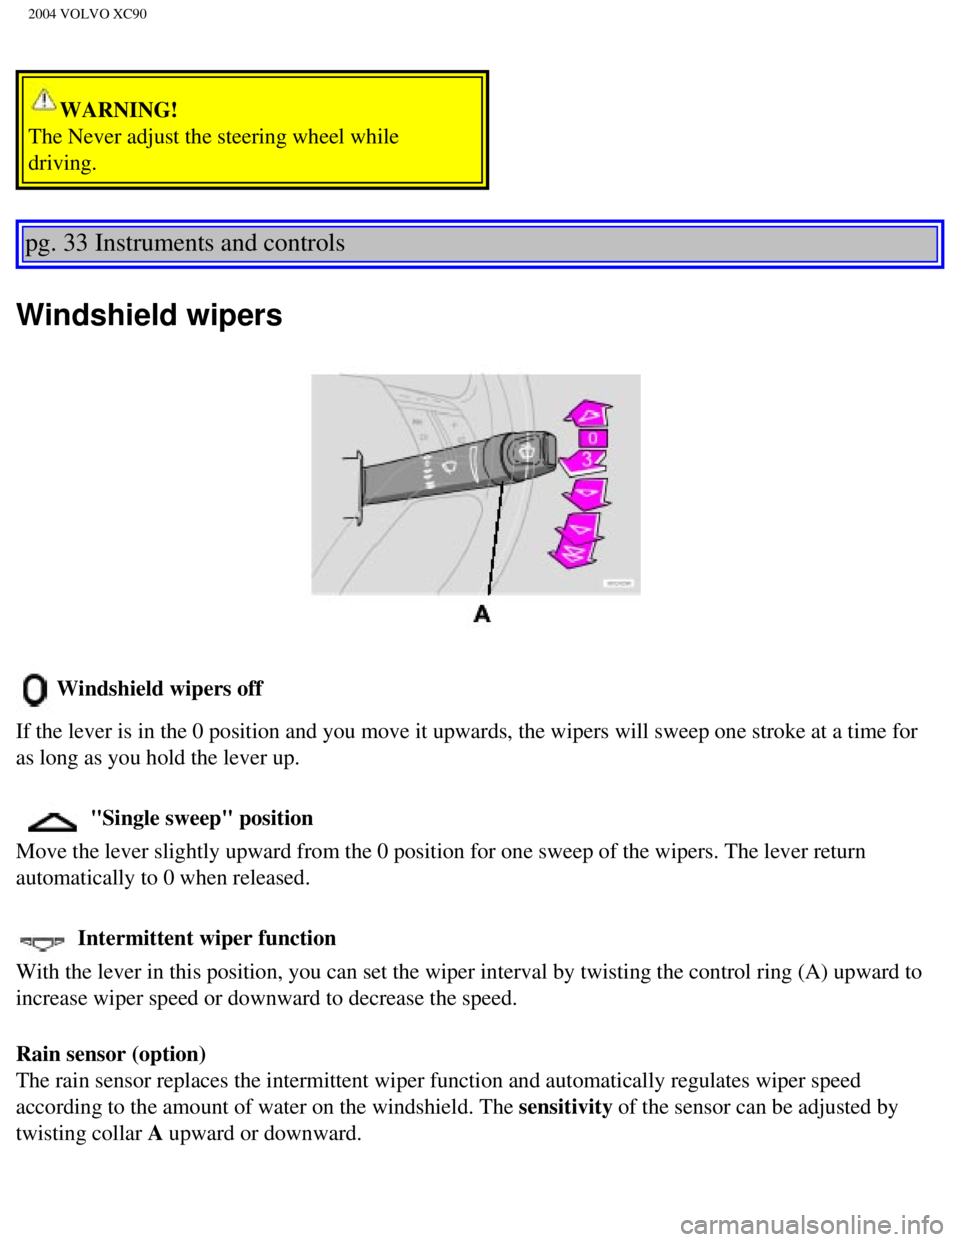
Windshield wipers off
If the lever is in the 0 position and you move it upwards, the wipers wi\
ll sweep one stroke at a time for
as long as you hold the lever up.
"Single sweep" position
Move the lever slightly upward from the 0 position for one sweep of the \
wipers. The lever return
automatically to 0 when released.
Intermittent wiper function
With the lever in this position, you can set the wiper interval by twist\
ing the control ring (A) upward to
increase wiper speed or downward to decrease the speed.
Rain sensor (option)
The rain sensor replaces the intermittent wiper function and automatical\
ly regulates wiper speed
according to the amount of water on the windshield. The sensitivity of the sensor can be adjusted by
twisting collar A upward or downward.
file:///K|/ownersdocs/2004/2004_XC90/04xc90_02a.htm (15 of 16)12/30/20\
06 4:35:14 PM
Page 51 of 245

2004 VOLVO XC90
Activating the rain sensor function:
1. Switch on the ignition.
2. Move the windshield wiper lever to the intermittent position.
The rain sensor is deactivated when the ignition is switched completely \
off.
To reactivate the rain sensor function:
1. Switch on the ignition.
2. Move the windshield wiper lever to position 0 and then back to the in\
termittent position. CAUTION
When washing the vehicle in an automatic car wash, move the windshield w\
iper lever to
position 0 to deactivate the rain sensor. If the rain sensor is left on, the wipers will activate in the
car wash and could be damaged.
Wipers operate at "normal" speed
Wipers operate at "high" speed
3 - Windshield washer/headlight washer (certain models)
Pull the lever toward you and release it. High pressure jets mounted in \
the bumper will spray the
headlights.
Contents | Top of Page
file:///K|/ownersdocs/2004/2004_XC90/04xc90_02a.htm (16 of 16)12/30/20\
06 4:35:14 PM
Page 68 of 245

2004 VOLVO XC90
2 0 0 4
VOLVO XC90
Climate control
pg. 45 Climate control
Climate control system-general information46
Air distribution47
Electronic Climate Control (ECC)48
pg. 46 Climate control
Climate control system-general information
Condensation on the inside of the windows
Keeping the insides of the windows clean will help reduce the amount of \
condensation that forms on the windows. Use a
commercial window cleaning agent to clean the windows.
Ice and snow
Always keep the air intake grille at the base of the windshield free of \
snow.
Cabin air filter
Replace the cabin air filter with a new one at the recommended intervals\
. Please refer to your Warranty and Service
Records Information booklet, or consult your Volvo retailer for these in\
tervals. The filter should be replaced more often
when driving under dirty and dusty conditions. The filter cannot be clea\
ned and therefore should always be replaced with a
new one.
Sensors
The sunlight sensor on the dashboard and passenger compartment temperatu\
re sensor in the ECC control panel should not
be covered in any way as this could cause incorrect information to be se\
nt to the ECC system.
Parking the vehicle in warm weather
If your vehicle has been parked in the sun in warm weather, opening the \
windows and moonroof (option) for several
minutes before driving will help release the warm air from the passenger\
compartment. When the engine is running, close
the windows and moonroof and use the recirculation function for several \
minutes to enable the air conditioning to cool the
compartment as quickly as possible.
Windows and optional moonroof
The ECC system will function best if the windows and optional moonroof a\
re closed. If you drive with the moonroof open,
we recommend that you manually adjust the temperature and blower control\
(the LED in the AUTO switch should be off).
file:///K|/ownersdocs/2004/2004_XC90/04xc90_03.htm (1 of 7)12/30/2006 \
4:35:16 PM
Page 73 of 245

2004 VOLVO XC90
A/C - ON/OFF
Press the switch to turn the air conditioning on or off. The "ON" or "OF\
F" LED will light up to indicate if the system is
switched on or off. Other functions will still be regulated automaticall\
y (if the AUTO switch is on).
l The air conditioning functions only at temperatures above 32° F (0°\
C).
l While the Defroster function is selected, the air conditioning is tempor\
arily activated to dehumidify the air, even if you
have manually switched the air conditioning off. This will only function\
if the blower is not switched off.
Recirculation
Press this switch to engage the recirculation function (air in the pass\
enger compartment recirculates - no fresh air enters the
compartment). The LED in the switch will light up to indicate that the \
function is engaged.
l Use this function if the outside air is contaminated with exhaust gases,\
smoke, etc or to heat/cool the vehicle quickly.
l Recirculation should not be used for more than 15 minutes. If your windows begin to fog or mist, make sure that the
recirculation function is switched off.
l Selecting Defroster automatically switches recirculation off.
l Timer mode activation: (Vehicles equipped with the Interior Air Quality System have no timer m\
ode) Press and hold
the recirculation button for at least 3 seconds to activate a recirculat\
ion timer mode. The amber LED in the recirculation
button will flash 5 times to show that the timer mode is being activated\
. In timer mode, each time the recirculation button is
pressed, the climate control system will recirculate the air in the pass\
enger compartment for 5-12 minutes, depending on the
outside air temperature, and then revert back to fresh air.
l Timer mode deactivation: Press and hold the recirculation button for 3 s\
econds. The amber LED in the recirculation
button will illuminate steadily for 5 seconds to show a return to "norma\
l" mode.
pg. 51 Climate control
l In normal mode, when the recirculation button is pressed, the climate co\
ntrol system will recirculate the air in the
passenger compartment until the recirculation button is pressed again.
l Timer mode memory: If the vehicle is turned off while timer mode is acti\
ve, timer mode will still be active when the
vehicle is restarted.
Interior Air Quality sensor (option)
Some vehicles are equipped with a multifilter and Air Quality sensor. Th\
e filter separates gases and particles, thereby
reducing the amounts of odors and contaminants entering the vehicle. The\
Air Quality sensor detects increased levels of
contaminants in the outside air. When the Air Quality sensor detects con\
taminated outside air, the air intake closes and the
air inside the passenger compartment is recirculated, i.e. no outside ai\
r enters the vehicle. The filter also cleans recirculated
passenger compartment air. When the ECC system is in the AUTO mode, the \
green LED will be on
.
file:///K|/ownersdocs/2004/2004_XC90/04xc90_03.htm (6 of 7)12/30/2006 \
4:35:16 PM
Page 74 of 245

2004 VOLVO XC90
Operation
Press
to operate the Air Quality sensor (normal setting).
Or:
Select one of the following three functions by pressing
1, 2 or 3 times.
1. The AUT LED lights. The Air Quality sensor is now activated.
2. No LED lights. Recirculation is not activated unless needed to cool t\
he passenger compartment in a warm climate.
3. The MAN LED lights. Recirculation is now activated.
Keep in mind the following:
l Make it a rule to have the Air Quality sensor activated at all times.
l Recirculation is limited in cold climates to avoid fogging.
l If window fogging occurs, you should deactivate the Air Quality sensor. \
l If fogging occurs, use the defroster functions for the windshield, side \
windows and rear window. See page 49.
l The filter should be changed at the intervals recommended in the mainten\
ance schedule. However, if the vehicle is used
in a severely contaminated environment, it may be necessary to change th\
e filter more frequently.
pg. 52 Climate control
This page intentionally left blank
Contents | Top of Page
file:///K|/ownersdocs/2004/2004_XC90/04xc90_03.htm (7 of 7)12/30/2006 \
4:35:16 PM
Page 100 of 245

2004 VOLVO XC90
WARNING!
Never use the transmitter to lock the doors from inside the vehicle.
Doing so would ACTIVATE:
- the break-in alarm, which would sound if one of the doors were opened \
- the optional interior motion and inclination alarm sensors.
Doing so would DEACTIVATE:
- the moonroof and interior courtesy light controls.
- the central locking buttons on the front door armrests, although the i\
nterior door handles would still
function to allow occupants to leave the vehicle.
Disabled features would remain disabled until the remote were used again\
to unlock the vehicle.
In addition, locking an occupied vehicle would hinder rapid access to th\
e occupants in an accident or
emergency.
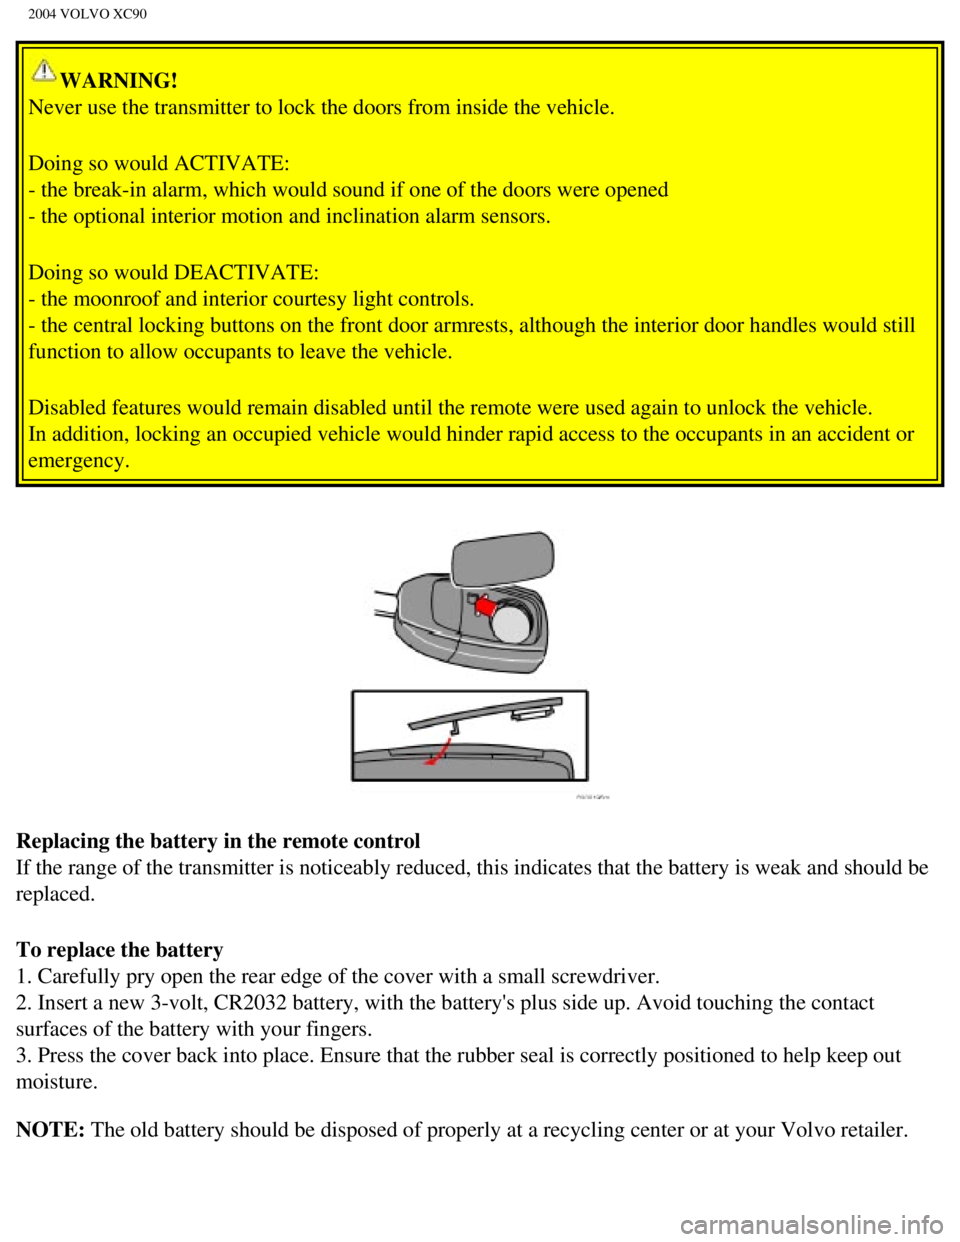
Replacing the battery in the remote control
If the range of the transmitter is noticeably reduced, this indicates th\
at the battery is weak and should be
replaced.
To replace the battery
1. Carefully pry open the rear edge of the cover with a small screwdrive\
r.
2. Insert a new 3-volt, CR2032 battery, with the battery's plus side up.\
Avoid touching the contact
surfaces of the battery with your fingers.
3. Press the cover back into place. Ensure that the rubber seal is corre\
ctly positioned to help keep out
moisture.
NOTE: The old battery should be disposed of properly at a recycling center or\
at your Volvo retailer.
file:///K|/ownersdocs/2004/2004_XC90/04xc90_05.htm (6 of 12)12/30/2006\
4:35:20 PM
Page 104 of 245

2004 VOLVO XC90
l A door is forced open.
l The ignition switch is tampered with.
l If there is movement in the passenger compartment (if the vehicle is eq\
uipped with the optional
movement sensor).
l The vehicle is lifted or towed (if the vehicle is equipped with the opt\
ional inclination sensor).
l The battery is disconnected (while the alarm is armed).
l The siren is disconnected when the alarm is disarmed.
Arming the alarm
Press the LOCK button on the remote control, lock the vehicle using the \
key in the driver's door or press
the central lock button on one of the front doors with the door open. On\
e long flash of the turn signals
will confirm that the alarm is armed.
Disarming the alarm
Press the UNLOCK button on the remote control or unlock the doors with t\
he key.
Turning off (stopping) the alarm
If the alarm is sounding, it can be stopped by pressing the UNLOCK butto\
n on the remote control or by
unlocking the driver's door with the key.
Audible/visual alarm signal
An audible alarm signal is given by a battery powered siren. The alarm c\
ycle lasts for 25 seconds.
The visual alarm signal is given by flashing all turn signals and turnin\
g on the interior lighting for
approximately 5 minutes.
"Panic" button
In an emergency situation, this feature can be used to attract attention\
.
Activate the "panic" button by pressing the red button on the remote con\
trol (see illustration on
page 73)
for at least 3 seconds or by pressing this button twice within 3 seconds\
. The turn signals will flash, the
interior lights will go on and the vehicle's horn will sound.
The function can be turned off by pressing any of the buttons on the rem\
ote control or will stop
automatically after 25 seconds. When a button is pressed, there is a 5 s\
econd delay before the panic
alarm is deactivated.
NOTE: This button will NOT unlock the vehicle.
pg. 79 Locks and Alarms
file:///K|/ownersdocs/2004/2004_XC90/04xc90_05.htm (10 of 12)12/30/200\
6 4:35:20 PM