Page 17 of 483
Key words Booklet
seats . . . . . . . . . . . . . . . . . . . . . . . . . . . . . . . . . . 2.1
-Tether strap to anchorage point on the model 2.1
-Tether strap to anchorage point on the Wagon model 2.1
a chi ld restraint . . . . . . . . . . . . . . . . . . . . . . . . . . 2.1
panel . . . . . . . . . . . . . . . . . . . . . . . . . . . . . . . . . 3.1
- Digital clock . . . . . . . . . . . . . . . . . . . . . . . . . . . . . . . . . . 3.1
- Display , Multifunctioin indicator . . . . . . . . . . . . . . . . .
3.1
- E ngine coolant temperature gauge . . . . . . . . . . . . . . 3.1
-
Fuel gauge . . . . . . . . . . . . . . . . . . . . . . . . . . . . . . . . . . . 3.1
- Odometer . . . . . . . . . . . . . . . . . . . . . . . . . . . . . . . . . . . .
3.1
- Speedometer . . . . . . . . . . . . . . . . . . . . . . . . . . . . . . . . . 3.1
light contro l . . . . . . . . . . . . . . . . . . . . . . . . . . . . . . . 3.1
27
49
49
69
53
69
75
Page 26 of 483
Key words Booklet
Settings
-Clock........................................ 3.1
-Odometer.................................... 3.1
Outside Mirrors . . . . . . . . . . . . . . . . . . . . . . . . . . . . . . . . 3.1
. . 2.1
Stopping engine . . . . . . . . . . . . . . . . . . . . . . . . . . . . . . . . . . 3.1
Stopping the engine . . . . . . . . . . . . . . . . . . . . . . . . . . . . . . 3.1
Page 195 of 483

The power locking system simultaneously Locking with key
locks or unlocks the doors . 1 the key into the lock in the dri-
To lock and unlock the vehicle from the ver's door.
outside, turn the key in the lock of the dri- 2 Turn the key clockwise once.
ver's door.
When you lock the vehicle:
To lock and unlock the vehicle from the inside, press the power locking switch in -doors are (locking knobs
the front doors.
can also lock and unlock the vehicle -the anti-theft alarm system is imme-
using the remote page 27. diately activated.
The anti-theft alarm system switches on -the vehicle in terior lights turn
with the key or remote control. light near the driver's door locking knob
the key into the lock of driver's
door.
2
T urn the key one time only:
Just the driver's door is unlocked (se
lective unlock feature) .
The anti
-theft alarm system is turned off and the interior lights will come on
for about
Turn the key two times:
the vehicle doors are unlocked and
t he anti-theft alarm system is turned off immedia tely.
yo ur power locking sy s tem shoul d not you can open your vehicle manu
ally using the key. The locks themselves are
the key into the lock in the dri
ver 's door.
2
Turn clockwise and hold the key in the
open position .
children-should remain inside the
vehicle. Remember, when you lock the vehicle from the outside the
windows cannot be opened from the inside (in vehicles with power
windows) -see page 37.
For more details see next page.
OPENING AND CLOSING -----------------31
Page 199 of 483
Trunk Rear
P B45-612K
The above the
see page 28
- using the swit
ch on the driver's door pa-
charged, it is to open the rear
AND
the way (counter- For furt her info rmation see
ing the master key into the can turn on the switch
again by turn ing th e key counte rclockwise.
Note
A warn ing
on the This is a reminder to the
trunk/rear The
i s
AND CLOSING----------------35
Page 204 of 483

Power roof*
B45-518K
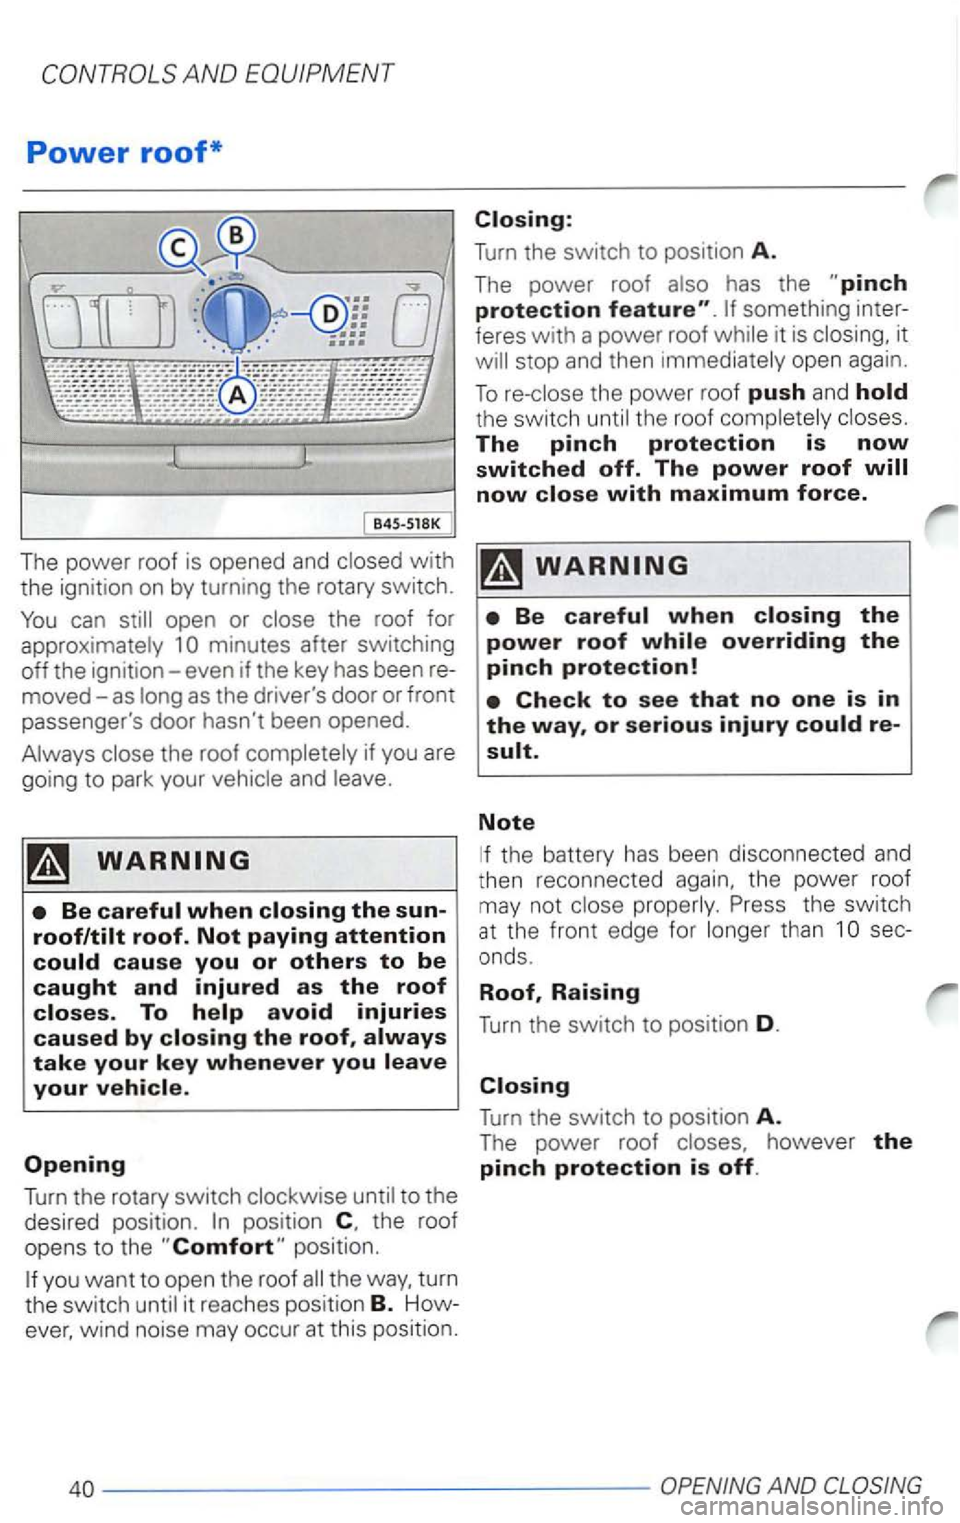
The power roof is opened and closed with the ignition on by turning the rotary switch.
You can still open or close the roof for
approximately 1
minutes after switching
off the ignition-even if the key has been removed-as long as the driver's door or front
passenger's door hasn't been opened.
Always close the roof completely if you are
going to
park your vehicle and leave.
avoid injuries
caused by closing the roof,
Turn the rotary switch clockwise until to the
des ired position.
position.
turn
th e
switc h unti l it reaches position B. However, wind noise may occur at this position.
Closing:
Turn the switch to position A.
The power roof also has the "pinch protection something inter
feres with a power roof while it is closing, it
will stop and then immediately open again.
Tore-close the power roof
push and
th e switch until the roof complete ly closes . The pinch protection is now switched off. The power roof now close with maximum force.
Be careful when closing the
power roof
Check to see that no one is in the
sec
onds .
Roof, Raising
Turn the switch to position D.
Closing
Turn the switch to position A. The power roof closes, however the
pinch protection is off.
40----------------OPENING AND
Page 208 of 483

6 -
A
flap. The switch works also with the ignition
The heat ing elements in the seats can be off.
turned on and regulated with the thumb
8 _
R
ear wheel switch.
To switch off the seat heating, turn the Pull up the switch to unlock the rear lid.
thumbwheel switch to the detent position . T
he switch works also with the ignition off.
A warning light comes
on when the ignition
7 -
with
with EDL is switched on auto
matically when the engine is started.
the warn
ing light comes on.
Differential Lock and .. Anti-Slip Regulat ion chapter
Booklet 3.2.) for further details.
is on and the rear lid is open. Additiona lly a
warning tone will sound and a warning text
is shown in the display of the instrument
cluster. This is to remind you to close the
rear lid. The light should go out when the rear lid is closed properly .
Locking the switch for the rear
is possible to turn off the switch by insert
ing the master key into the lock and turning
i t clockwise.
You can turn on the switch again by turning the key counterclockwise.
44--------------------
Page 339 of 483
6 -
Use this button to tune your radio.
wise to tune upwards or counter-clockwise
to tune downwards .
Automatic tuning (SCAN)
appear in the when
you press this button. The radio
begins to scan upwards to t he next higher
frequency. When the
feature finds a
radio frequency, it
ing the 5 second feature stop th e re.
7 -Station preset buttons
can preset one radio station on eac h of
the six buttons in eac h of the four ban ds FM1 and FM2.
the desired band preset group
(see 2).
Tune to the desired radio station (see 5 or 6).
you
hear
an first
be muted and then return.
radio station
is now preset on this button.
To to the station you just sto red, press
this button
Note
When stations, ton you
the
Page 416 of 483
Wagon model
the rear lid and lift up the floor
vering.
Turn the two locking knobs on the cover
counter-clockwise. then lift up the cover.
Hold th e cover securely in this position.
moving the spare tire. prop the cover under
the floor mat.
Remove th e cover support from it s
moun ting in t he spare tire well and hook the
support into the ope ning prov ided for thi s purpose-see illustration. The tool kit and
spare tire are now accessible.
cure it with the mounting nut.
Turn the mounting nut clockwise until the
tire is securely
in place.
Unhook the luggage compartment peting.
Note
cure the flat tire in place. The second plastic
nut comes with your vehicle .
I