Page 209 of 483

Turn
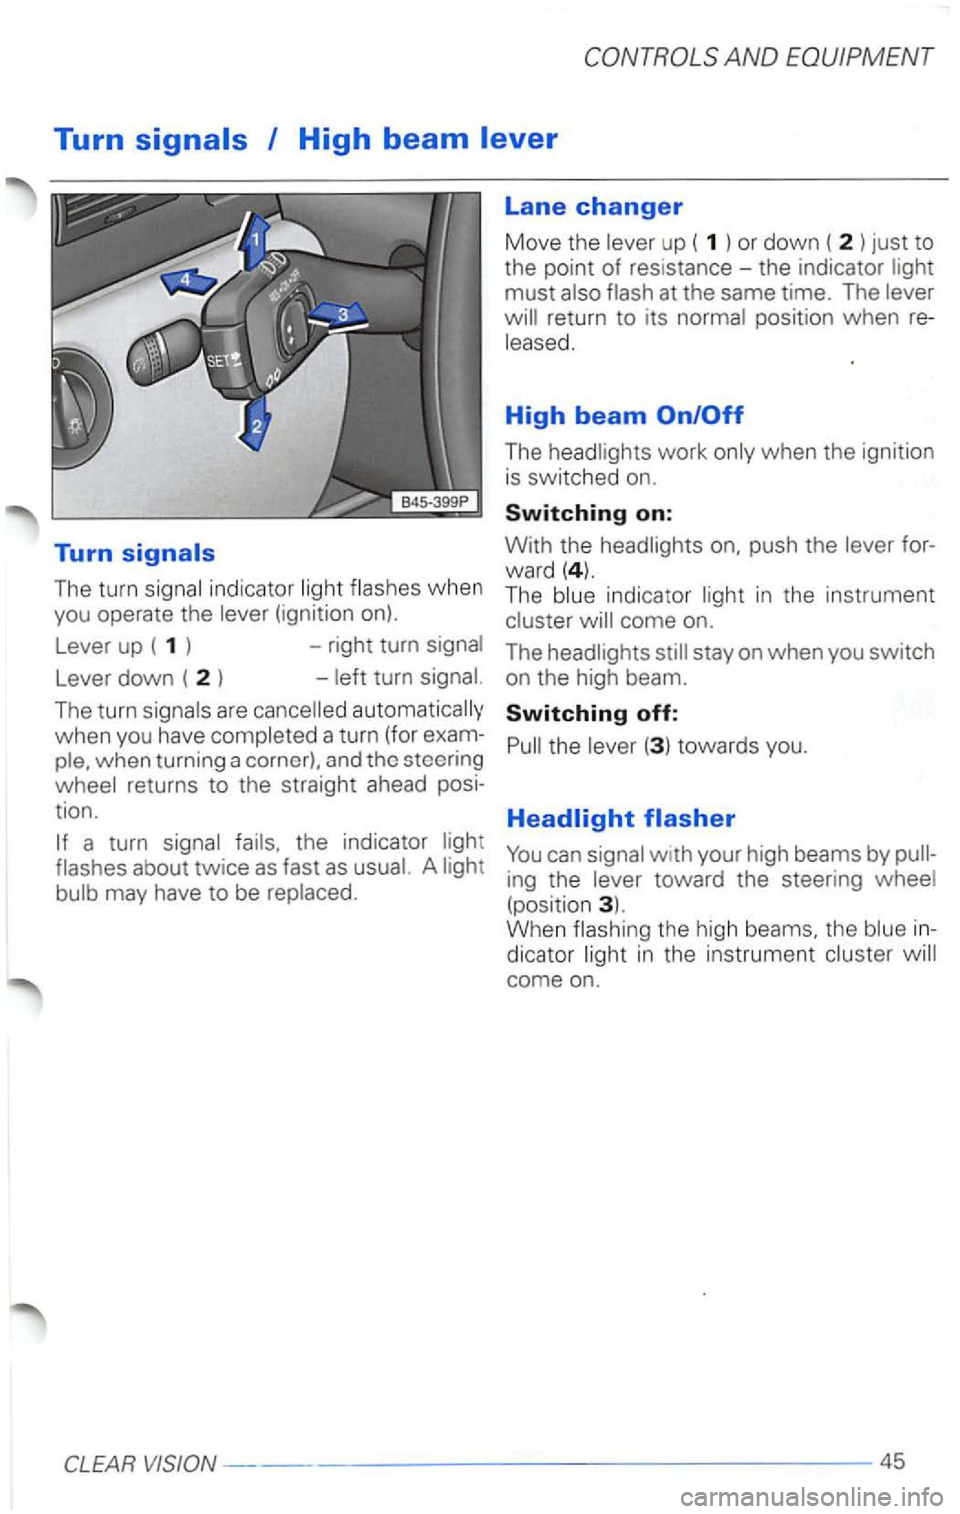
The turn signa l indicator ligh t flashes when you operate the lever (ignition on).
Lever up ( 1 ) -right turn signal
Lever down ( 2 ) - left turn signal.
The
turn signals are cancelled automatically
when you have completed a turn (for exam
ple. when turning a corner). and tho steering
wheel returns to the straight ahead posi
tion.
a turn signal fails. the indicator light
flashes about twice as fast as usual. A light
bulb may have
to be replaced.
Lane changer
Move the lever up ( 1 ) or down ( 2 ) just to
the point
of resistance -the indicator light
must also flash at the same time. The lever
return to its normal position when
The headl ights work only when the ignition
is switched on.
Switching on:
With the headlights push the lever for
ward
( 4). The blue indicator light in the instrument
cluster
stay on when you switch
on the high beam.
Switching off:
Pull the lever (3 ) towards you.
ing the lever toward the steering wheel
(position 3). When flashing the high beams, the blue
come on.
---------------------------------45
Page 221 of 483
Front seats
The correct positioning of the seats is
portant:
so that you can reach
quickly and safely;
-
so that you can drive or ride relaxed
which
pages.
Remember to adjust the seats before
Driver's seat
To avo id co ntact wit h the airbag
to the steering wheel than necessary and ways properly wear the three point safety provided .
We recommend that you adjust th e driver's
seat as
-adjust the seat in fore and aft direction so
t h at
you can easily push the pedals the way while keeping your knee slightly
bent.
- adjust
the seatback so that when you sit
w it h
your back against th e seatback, you
can
grasp the top of the steering
-adjust the steering whe el so that the
inches (25 em.) or more.
AND STORAGE-----------------57
Page 226 of 483
Turn the ignition on; make certain that the
red button
(E) is in th e pus hed-in (down)
position.
Adju s t the driver's seat (see page
Hold the button that you wish to use
02 or 03) down for abo ut 3 (seconds until
you hear the confirmation tone).
Saving the setting for the right side mirror for
Turn the ignition on.
Rotate the outside mirror selector switch
to position R (see page 51).
Thr ee different persons can save their indi-
Adjust the mirror until you can see the
vidual settings, each using one of the three right rear wheel.
memory buttons
Hold down the button that you wish to
use for your settings
Page 371 of 483
matically to the
on
top of the water (hydroplaning). you
The
even when driving in winter
ding snow chains, see
must
of tires/wheels. see
-----------------
Page 387 of 483
Steel wheels
Always include the hub caps and wheel
rims when washing your vehicle to remove
road dirt. salt sprays and bra
ke dust.
after
each washing. read and heed
and the information given
on pages 6 and 22.
Light alloy wheels*
To preserve the decorative appearance of the light alloy wheels, some special care is
necessary. add it ion to road dirt and salt
sprays, brake dust is also corrosive.
Moisture, ice, and road on bra
kes may affect braking efficiency. Test the brakes after
each washing. WAR
and the information given
on pages 6 and 22.
Body cavity sealing
and toxic.
and
Be sure to observe
Do not undercoa
ting or rustproofing on or near the exhaust exhaust pipes,
converter or heat
over
heat and cause a fire.
26 -----------------
Page 417 of 483
AND
Tires
They not
fort and ride. but perform safety tions. This sectio n is intended to provide
you
with important informat ion regard ing
their proper use. care and
Be sure to inspect your tires at (3 for wear
and damage.
Damage to
th at a t ire or has been damaged. it is best to
ve it
it can get worse over time. to tire
your authorized for advice and
Mark tires before removing them.
mount tires on the same side se the rotation direction must stay the
Avoid damaging tires and wheel rims.
Frequently check tires for uneven wear and damage.
Remove embedded
Replace missing valve dust caps.
which are not on New tires be stored standing up.
New tires may have different tread
depths due to the configuratio n
and design
by the tire manu facturers. Whe n
and cannot fer
be
tion for the first miles
lometres). Brake gently. Avoid lowing closely behind other
Page 420 of 483
Tire rotation
tires have
Tires should always remain on same
side of vehicle.
when tires show
may be equipped with
tires which have a specified rotation
in doubt, discuss any
service department.
After rotation adjust tire pressure and torque wheel bolts
ging a
Wheel and tire replacement
and tires approved by the
turer have been matched to your
(for
tire with a tire match ing the others
on your as soon as
Fitting and repairing tires requires expert
We recommend that you have your tires
changed by a authorized VOLKSWAGEN
WAGEN stocks a range of tires and
For safety reasons. tires ced in pairs and not individually. The tires
with the deepest tread
Page 426 of 483
Winter tires with studs should be run on-
winter tires at prolonged high For your own safety, pay
Winter tires must have the same load ca
pacity as original equipment tires. This applies
use chains with fine pitch links protru
ding no more than 1
/2 inch (1 5
mm). inclu
ding tensioner, from tire tread and side
walls. Wheels
must rotate freely in stee
ring positions with chains mounted to pre
vent damage to
axle or brake compo
nents. Drive