Page 294 of 541

Curb weight
The weight of a motor vehicle with
standard equipment including the
maximum capacity of fuel, oil, and
coolant, air conditioner, and addi
tional weight
of optional equip
ment.
Extra load tire
A tire designed to operate at higher
lo
ads and at higher inflation pres
sures than the corresponding stan
dard tire.
Gross Axle Weight Rating
(GAWR)
The load-carryin g capacity of a
single axle system, measured
where the tire contacts the ground.
Gross
The maximum loaded weight of
the vehicle.
Groove
The space between two adjacent
tread rib s.
Load rating (code)
The maximum load that a tir e is
rated to carry for a given inflation
pressure.
You may not find this in
formation on all tires because it is
not required by law.
Maximum load rating
The load rating for a tire at the
maximum permissible inflation
pressure for
that tire.
Maximum loaded vehicle weight
The total of:
Curb weight
Accessory weight
Vehicle capacity weight
Production options weight
Maximum (permissible) inflation
pressure
The maximum cold inflation
pressure
to whic h a tire may be
inflated.
Also ca lled
inflation
Normal occupant weight
Means 150 lbs (68 kilograms) times
the number of occupants seated in
the veh icle
up to the total seating
capacity
of your vehicle.
Occupant distribution
The placement of passengers in a
veh icle.
pounds or less.
Ply
A layer of rubber- coated parallel
cords.
Ply separation
A parting of rubber compound bet-
ween adjacent plies.
296 297
Page 299 of 541
Determining the correct load limit
Please firs t read and note the introductory all ve hicle occupants and lu ggage or other ve hicl e inrormation and heed the pay loa ds. Neve r overload the ve hicle! on page 276.
Do no t over loa d tir es. The rollowi ng example trat es how to dete rm in e the combined we ight or
Load Limit:
1. Locate the statem ent
XXX KG XXX
on your ve hicle's placard (tire inflation pressure la b el)
lb s (5 x =
lb s.)
5. De
termine the combined weight of lu ggage and cargo being
loaded on the ve hicl e. That weight m ay not safely exceed the
ava
ilabl e cargo and lu ggage load capacity calculated in
maintenance
Page 333 of 541

Tire
Introduction
In thi s section you'll fin d information on th e lowing:
Cont ent s o f the tire mobi lity set . . . 337
Prep ara tio ns . . . . . . . . . . . . . . . . . . . . . . . . . . . . . . . 338
minu tes of drivin g . . . . . . . . . . . . . .
tures up to abo ut 3/16 in (4 mm) in diam ete r c an
b e re liabl y se ale d using the tir e mobility The
foreign obje ct (sc rew or fo r example) must
n ot be re m ove d from the tire!
Afte r the sealant is th e tire , driv e for abou t minut es and check tir e pressure ag ain.
Never use th e
tire m obility se t to a tire un less you
-have park ed ve hicl e at a safe s po t,
- are fami liar with the nec ess ary pro ce -dures and safe ty pre cautio ns, and
-have th e correc t tir e mobilit y Otherw ise . ge t exp ert ass is tan ce .
Tir e sealant mu st not be used:
If th e w heel rim is damaged.
i\t out side tempe ratur es below
If th e c ut or punctu re da mag e of th e tir e is
g rea te r than 3/16 in (4 mm) in diameter.
I f you were drivin g wi th very lo w tire press ure
o r flat tir e.
If th e tir e inflation cyli nder h as passe d its ration elate.
More information:
Vehicle key page 34
Braking, s to ppin g and page 188
T ires and page 276
In an em erge ncy pag e
page 328
D o it yoursel f
rious personal injury:
Alway s stop the ve hicle as soon as it is sa fe to
d o so and move the ve hicl e
Always make sur e that th e ground is leve l a n d
firm.
passen gers and espec iall y childr en must stay
Turn on the emerge ncy flas hers and set up an oth er warnin g dev ice about 25 yards (25
m ete rs) behind the ve hicl e to warn approaching
traffic .
the tire mobility set only if yo u are mili ar with the n ecessa ry s tep s. Othenvisc, get
expe rt ass is tance.
yo u can get profe ssional h elp.
Sea lant is harmful and mus t immedi atel y be removed in case of skin contact.
Alway s store th e tire mobilit y se t o u t of reach of children .
Never usc a vehicl e jack, even if th e jack is proved for use with your vehicle.
Always apply the parkin g brake and shift the
t ran smi ssio n Par k (P) (automati c
Page 334 of 541

Improper use of th e tire set can cause a
temporary tire to fail and lead to loss of veh icle
contro l and seriou s personal injuries.
Always remember that a tire filled with ant does not handle as well as an undamaged tire without sealant.
Never drive faster than mph
Neve r use the tire set if the outside temperature is below
Never drive with a tire that has cuts or when they are larger than3/16
in(4mm).
se t only for emergencies yo u can get profe ssional he lp .
to at least 36 psi
(2.5 bar) , do not drive the vehicle. Contact the nearest authorized Volk swagen dealer,
minutes, do not drive the ve hicl e any farth er. Contact the nearest authorize d Volkswagen dealer, rize d Volkswagen Service Facility, or qualified
works hop.
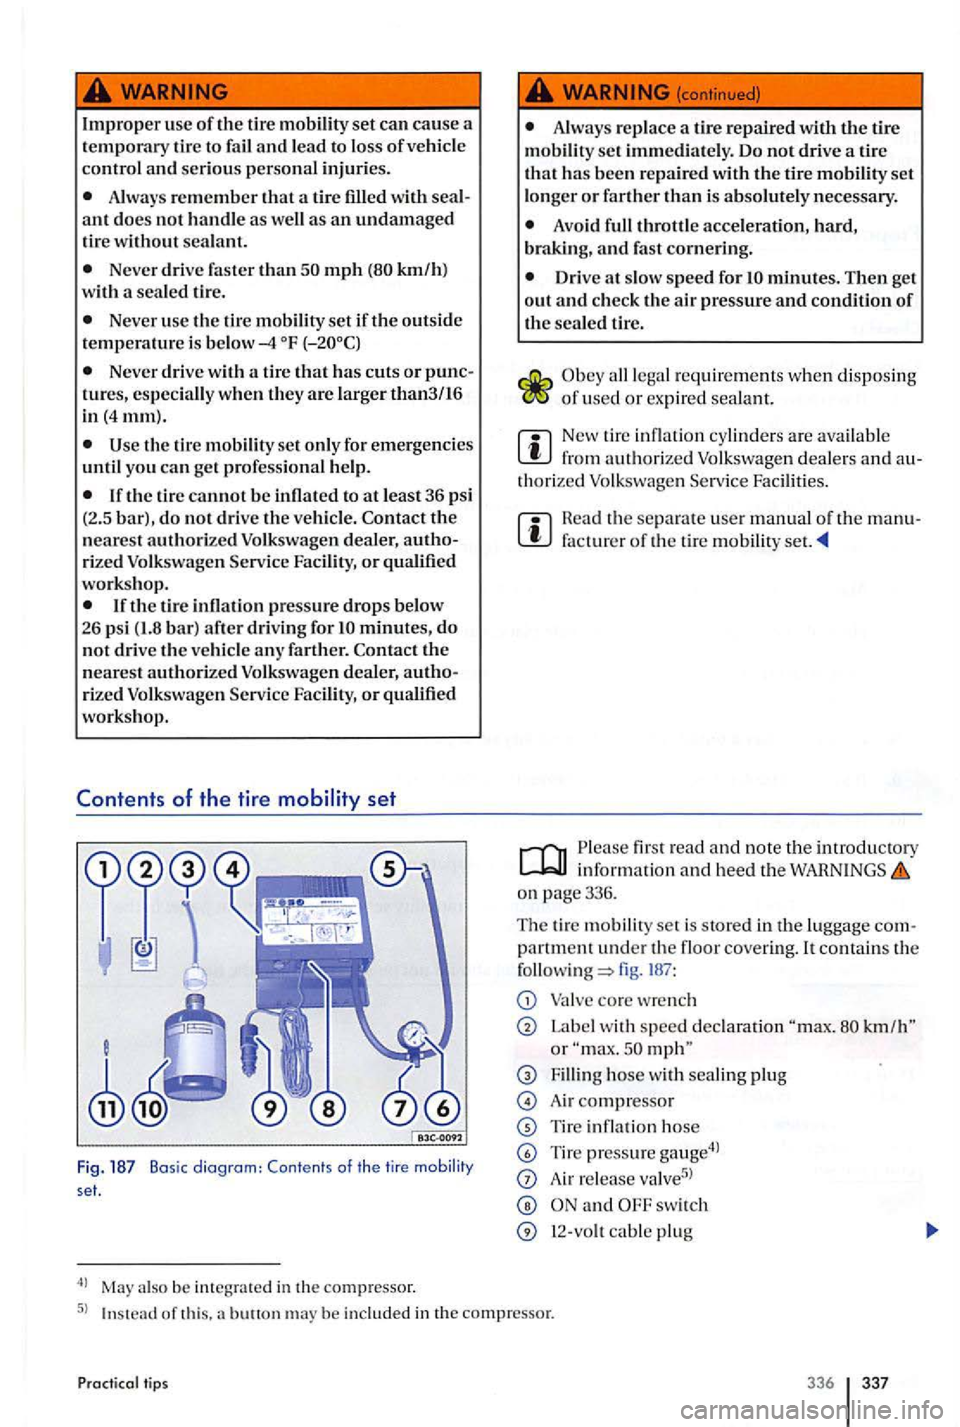
of the tire set
Fig . 187 Basic diagram: Contents of th e tire mobility set.
May a ls o be inte grated in th e c ompr essor.
(continued)
Alwa ys replace a tire
Avoid full throttl e acceleration , hard,
braking, and fas t cornering.
Drive at s low speed for
of u se d or expir ed seala n t.
New tire inflation cylind ers a re avai lable from authorized Volksw age n dealer s a nd thoriz e d Volkswage n
Rea d th e sepa rate use r manual o f the facturer of th e tire mobility
first read and not e the information and hee d the on pag e 336.
Th e tir e mobilit y se t i s s tor ed in th e luggag e
partment under th e floor covering. It contai ns the fig. 18 7 :
Label w ith sp ee d or
Fillin g hose w ith sealing plug
Air com pre ssor
Tire inflation hose
Tire pressure gau ge4l
A ir valve5l
s w itch
In stead of this. a buuonm ay be in cluded in the co mpressor.
tips 336 337
Page 336 of 541

Please first read and note the introdu ctory information and heed the on page 336 .
the valve core from th e tir e valve
u sin g th e valve core page 337 , fig . 187 and place it on a clean surface.
Vigorous ly shake th e tir e inflation cylinder page 337, fig. 187
Tigh tly sc rew the filling page 337, fig. 187 to the tire inflation bo ttl e ( turn
He mov e the sealing plug from th e page 337, fig. 18 7 and slid e th e open end th e way onto the tire va lve.
H old the cylinder with the bottom po inting up and the entire contents of th e tir e inflati on inder int o th e tir e.
Detach the empty tir e inflation cylinder from
th e va lve.
p age337,fig. 187 sc rew the v al ve core back into the tir e valve.
the tire
the tire inflation page 337, fig. 187 o f th e air compressor tightl y to th e tir e va lve .
whether the air release pag e 337, 187 is screwe d on tightly.
page 337, fig. 187 into a soc ket of the page
Switch th e ai r compresso r on using th e page 337, fig. 187
Le t th e air compre ssor run until 2 .5 ) bar is re ach ed
Switch off the air compressor.
an air press ure of29-36 psi 2.5 bar)
cannot b e reac hed, unscrew the tire inflation hose from the tire v alve.
tips
Dr ive about feet m ete rs) backward s o r
f o rward s so that the sealant ca n be distributed sid e th e tire .
th e tire inflat ion hose of th e air pr esso r aga in to the tir e va lve and r epeat th e
th e required tir e pressure still cannot be reached. the tir e is too badly damaged. The t ir e
canno t b e sealed us ing th e tire mobilit y set. Do not
d rive the v ehicle. Get expert
Disconnect th e air compresso r and unscrew the tire infl ation hose from the tir e va lve .
mph km/h).
page340.
The tire inflation hose and ai r compresso r ca n
get hot during inflation.
Protec t hands and skin fro m hot parts.
Do not p lace th e hot tire inflation hose or hot air compressor on flammable material.
Let th e equipment cool off almost plet ely before sto wing it.
bar), th e damage is to o great to be repaired
wi th the tire mobility set. The sealant is not able to seal the tire. Do not drive the ve hicle. Get pert assistance.
Note
Do not let the compressor run for more than 8 minutes to help prevent overheating damage.
Let the compressor cool down for a few minutes
befor e switching it on again. Let it cool down most completely before stowing it in the re p a ir
kit.
338 339