2004 VOLKSWAGEN GOLF PLUS lock
[x] Cancel search: lockPage 315 of 541
Do it yourself
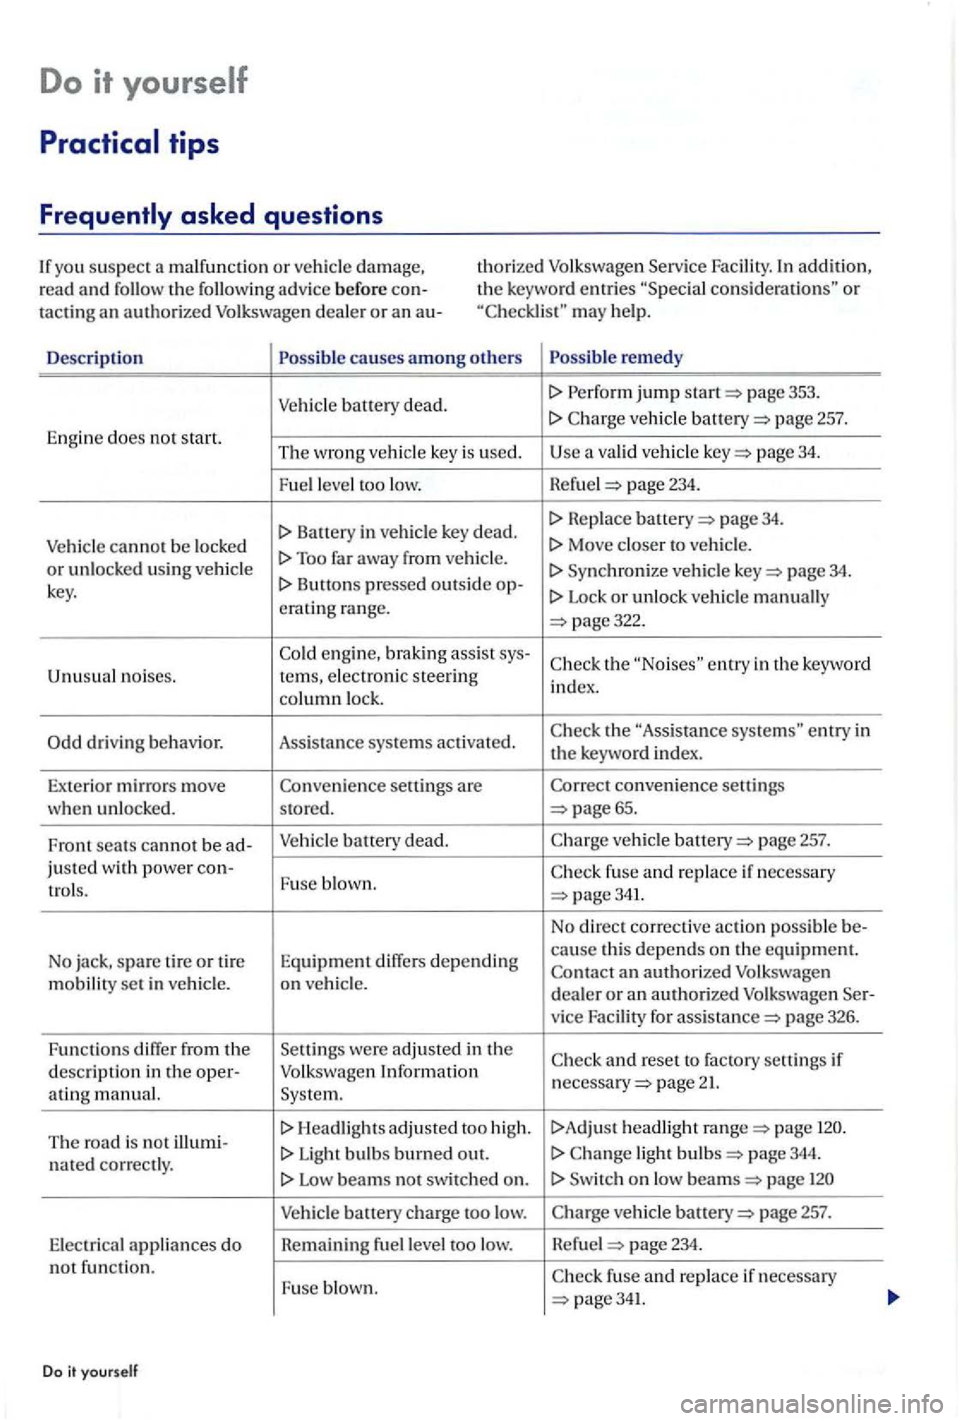
con sid era tions" or may help.
De
scription causes amon g oth ers remed y
Vehicl e ba tt ery dead. jump page 353.
page 257. Engine does no t start. The wrong ve hicle key is used. a valid ve hicl e page 34.
Fuel leve l too low. Hefue l 234.
Batt ery in ve hicl e key dead. page 34.
Vehicle cannot be locke d Too far away from vehicle . Sy nchroni ze veh icle page 34. key. Lock or unlo ck vehicl e manually
crat ing range. page322.
en gine, braking assis t sys-th e entry in the ke yword noises. te rns, e lectro nic steering index.
co lumn lock.
the "Assis tance e ntry in the keywo rd in dex .
Exterior mirro rs move convenience settings
w he n unl ocke d . stored. 65.
F ront seats can not be ad -Vehicle battery dead. veh icle page 257.
jus ted with power con-Fuse b lown.
a n authoriz e d Volkswage n
m obilit y se t in vehicle. on ve h icl e. dealer or an authori zed Volk swagen Ser-
v ice Facility for page 326.
Func tions diff
er from th e Settin gs were adju ste d in th e and reset to fac tory settings if
descript ion in the oper-Volkswagen Information page 2 ating manual. Syste m.
T he road
is not illumi-H ea dlights a djusted too hig h . !>A dju st headlig ht page
n a ted correctly. Light b ulb s burned out. ligh t page 344.
Low beams no t swi tched on . Switch on low page
Vehicle battery ch a rge too low. page 257.
E lect rica l a p plian ces do Remaining fuel le vel too low. Refu el page 234. not functi on.
page341.
Do it yourself
Page 317 of 541
Introduction
In this section yo u'll informati on on th e lowi ng:
Prote cting yourself and the vehicle . . . . . . . . . . .
More information:
B ra king, sto ppin g and page
Em erg ency clos ing and page 322
Ve hicl e tool page326
Chan ging a page
Protecting you rse lf and the vehicle
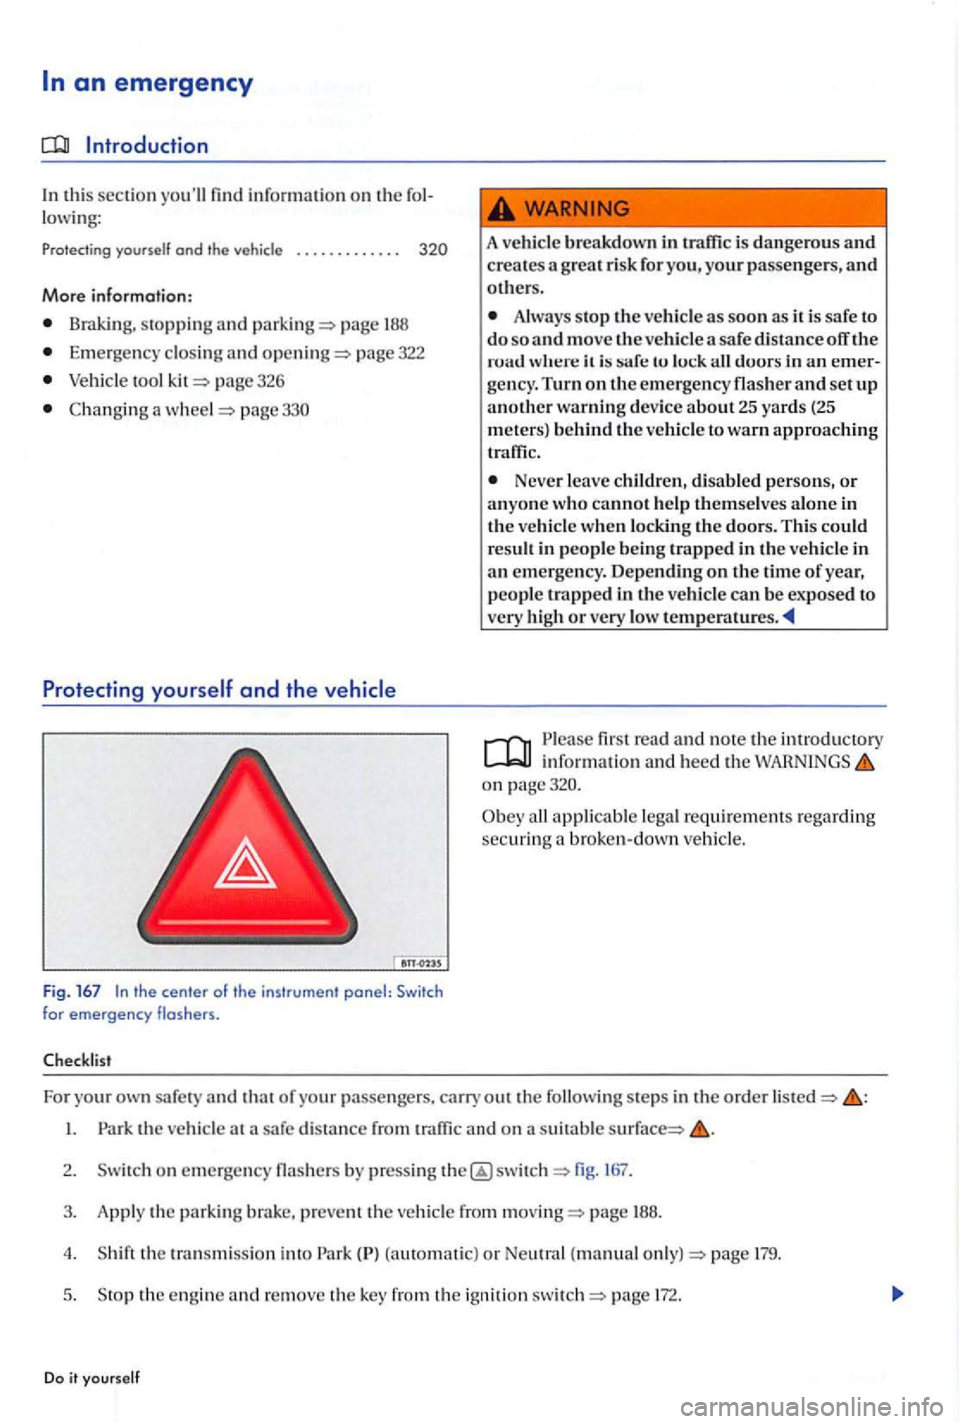
Fig. 167 the center of the instrument panel: for emergency
A vehicle breakdown in
Always stop the vehicle as soon as it is safe to do so and move th e ve hicle a safe distance off the tu all duurs in
Neve r leave children, disable d persons, or anyone who cannot help themselves alone in th e ve hicl e when locking the doors. This could
result in people being trap ped in the vehicle in
a n em erge ncy. Depending on the tim e or year, people trapped in tl1e vehicl e can be exposed to
very high or very low tempe ratures.
fir st rea d and no te th e introdu ctory info rmati on and heed the
on
all appli cabl e leg al require m ent s re garding securin g a broke n- down ve hicl e.
For yo
ur safe ty and th at of your pa sse ngers, carry out th e followin g ste ps in the o rder
on em erge ncy flashers by p ress ing 167.
3. Appl y th e parkin g brake, preve nt the ve hicl e from page 188.
4 . th e tran smi ssio n int o (automati c) or Neutra l (manua l page 179.
5 . Stop th e e ngin e and re move th e key from th e ig niti on page 172.
Do it yourself
Page 319 of 541
Emergency
In thi s sec tion i nfor mation on the lowing:
Manually unlocking and locking the driver door . . 323
the rear a nd th e power su nro of.
Mor e informa tion :
Vehicle key set page 34
lock ing and closin g pa ge 38
page 43
Rear page 45
In an pag e
Neve r leave children, disabl ed p ersons, or anyo n e hicl e. The doors can b e loc ke d
A closed ve hicle can b eco me very ho t o r ve ry
co ld, de pendin g on the seaso n. Partic ularl y in
th e summer, heat build-up in the passe nge r and
lu gg ag e compartment of a park ed vehicl e can
result in tempe ratu res in the v ehicl e th at are much high er th an the outsid e temperatures.
T emperatures can q uickl y reach leve ls th at can
ca use unco nscio usn ess and d eath, particul arl y
t o s mall children.
Care less op en in g o r cl
osin g o f doo rs, the rear hatch, and th e power sunroof is dan gerou s and ca n cause seri ou s personal inju ry.
or cl ose doors , th e rear h atc h , and the
p owe r sunroo f o nl y w hen n o one is in th e w ay.
Note
T o h elp preve
nt ve hicl e dam age, care full y re move
and p ro perl y re -in stall parts w hen performi n g
e m ergency locking or
Page 320 of 541
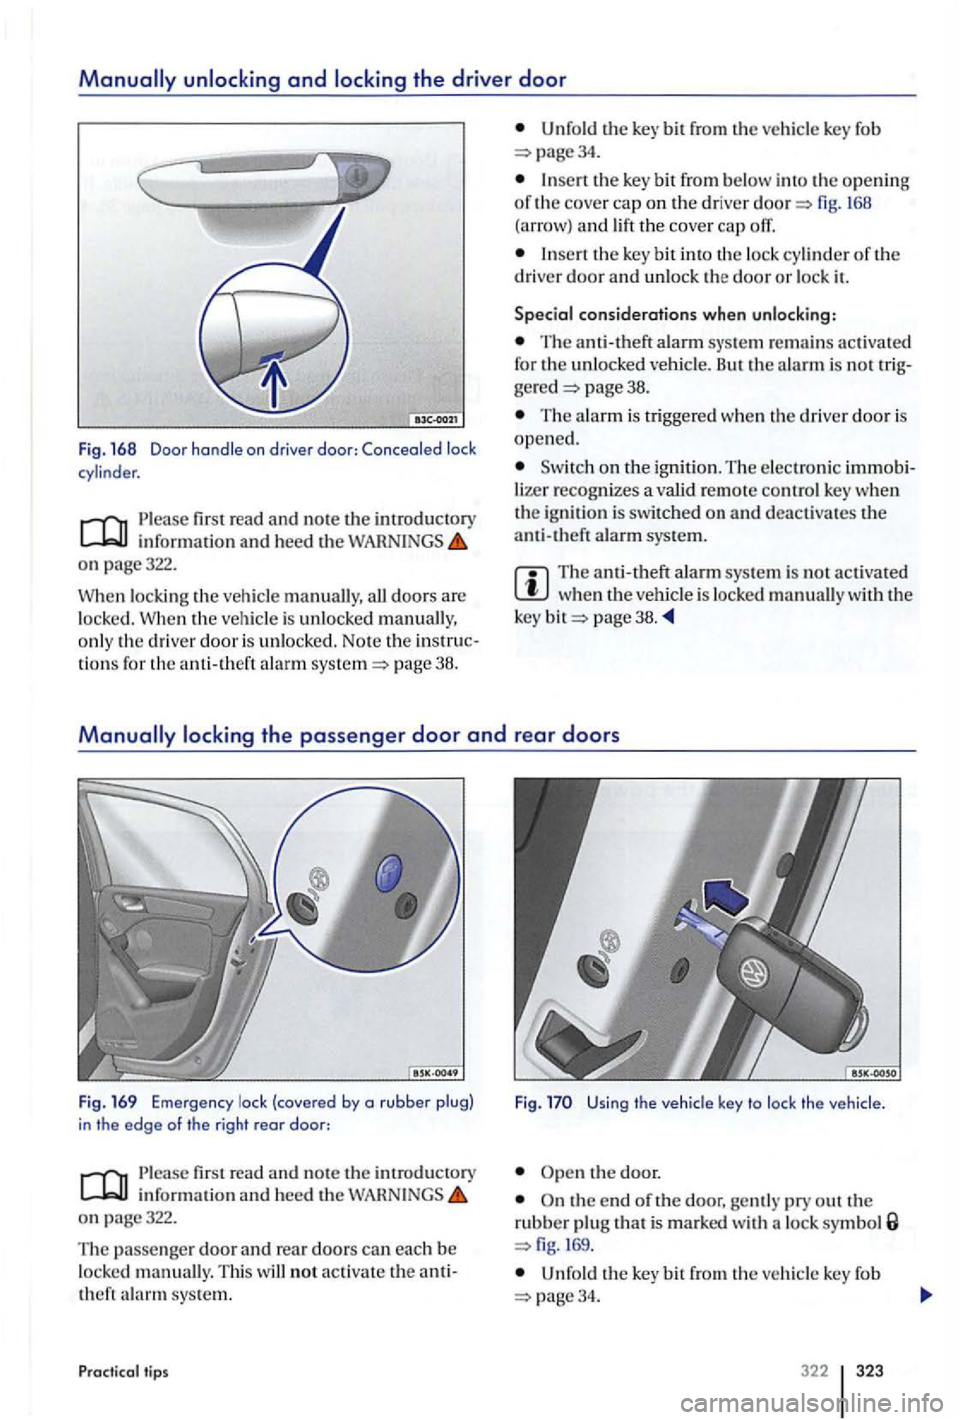
informatio n and heed the WAH N INGS o n page322.
W h
en lock ing the vehicl e all doo rs are
l ocke d. When th e vehicle is unlocke d o n ly th e drive r door is unlo cke d. Note the tions for the anti-th eft ala rm page 38.
Unfo ld the bit from ve hicle key fob page34.
th e key bit from be low into the o pening of the cove r cap on the driver and lift th e cover cap
the ke y bit int o th e lock cy linder of the
driver door and unl ock the door o r lock it.
Special considerations when unlocking:
The anti-theft alarm sys te m activated for the unlo cke d ve hicle. But the alarm is no t page 38.
The alarm is tri gge re d when the drive r door is open e d.
o n the ignition. The e lectron ic lize r recognizes a valid re mot e contro l key w hen
th e ig nit ion is switc hed on and deactivates the anti -theft alarm sys tem.
The anti-theft alarm sys te m is no t activa ted when veh icl e is loc ked manuall y w ith the
k ey page 3 8.
read and note the int roductory information and heed th e WAR N INGS on page322.
T he passe nge r d o
or and rear doors can eac h be loc ked manually. Thi s will not ac tiv ate theft sys te m .
Practic al tip s F
ig. the
vehicle key to lock the vehicle .
Ope n the door.
O n the end of the door, gently pry out th e rubber plug that is m arked with lock symbol 169.
the key bit from the ve hicle key fob 34.
322 323
Page 321 of 541
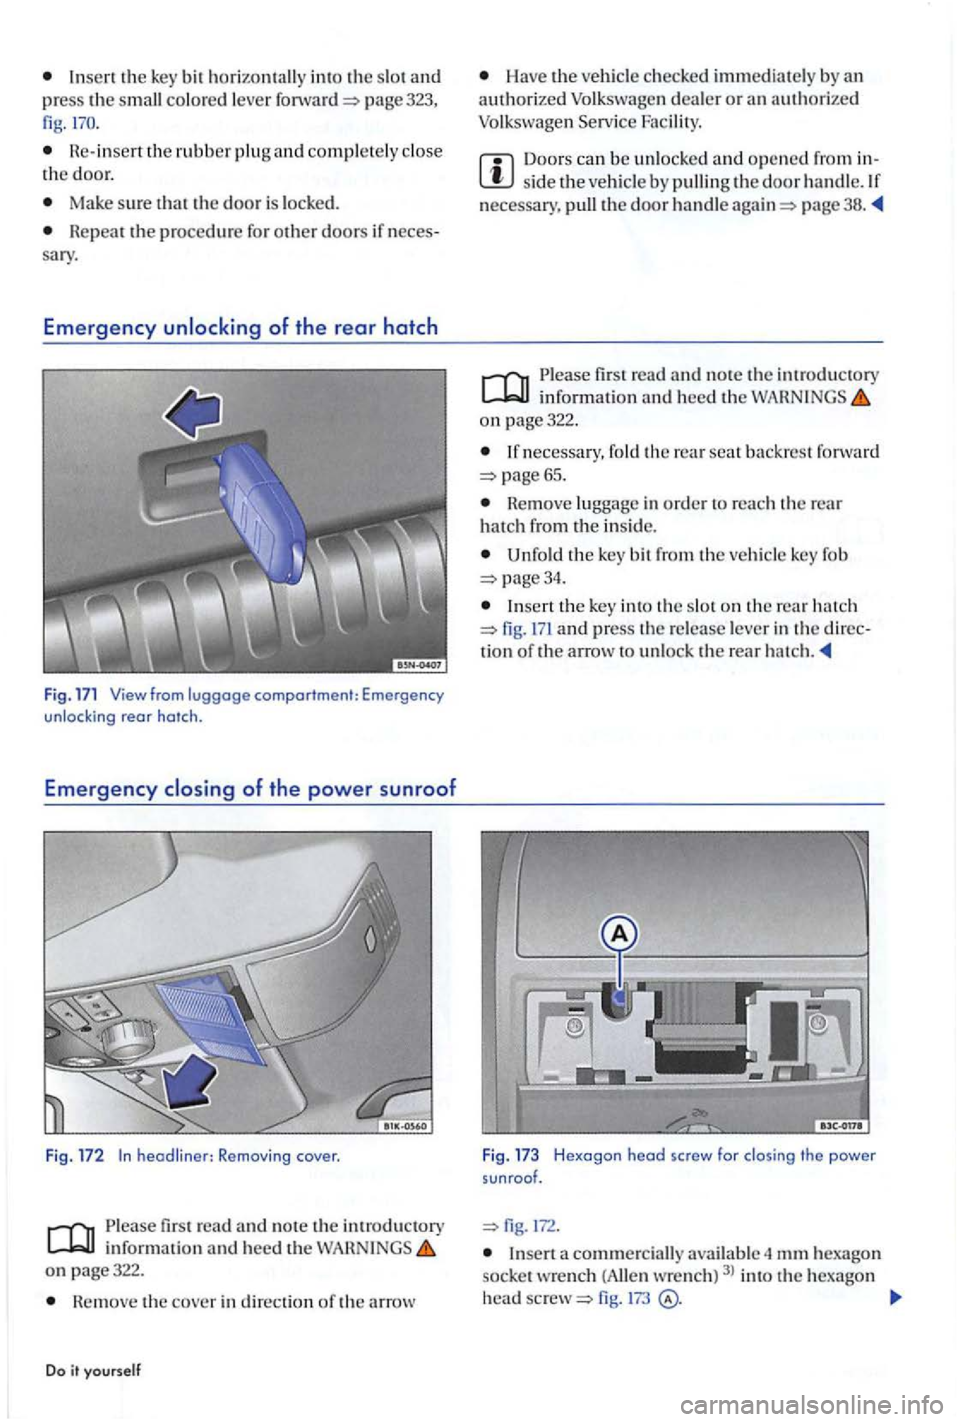
Insert the key bit horizontally int o the slot and press the small colored lever page 323, fig.
Re- insert the rubber plug and completely the door.
Ma ke sure t ha t the door is locke d.
Re peat the procedure fo r othe r doors if sary.
Emergency
Emergency
fir st r ead and note th e introductory inform ation and heed the on page322.
Hemove the cove r in direction of th e a rro w
Do
Have the authorized
Doors can be unlocke d a nd ope ned from sid e t he necessary. pull the door h andl e page 38.
information and heed the on page322.
necessary, fo ld the rear seat back rest fo rwa rd
n emove lugg age in order to re a ch the rear ha tc h from the in sid e.
Unfold the key bit from the key fo b
page34 .
Insert th e ke y int o the slo t o n the rear hatc h and p ress th e re le ase leve r in the d irectio n of the a rro w to unlock the rear h atc h.
Insert a commercially
fig. 173
Page 322 of 541
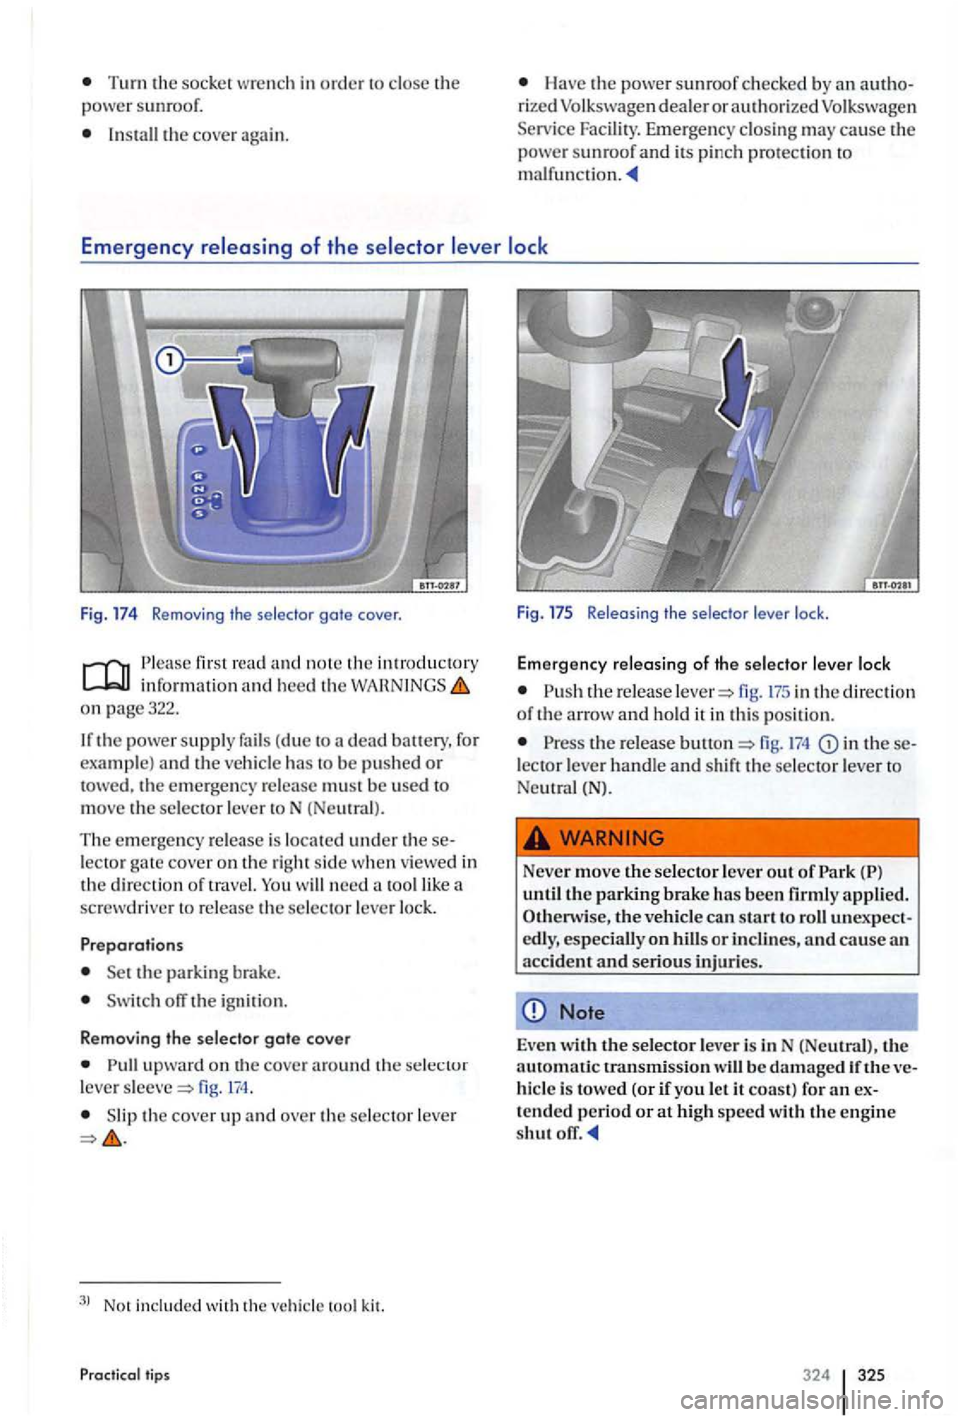
Turn the socke t wre nch in order to close the
power su nroof.
Install the cover again.
Have the power sunroof checked by an authorized Volkswagen dealer o r authorize d Volkswagen
Serv ice Facili ty. Emerg enc y clo sing may ca use the
power sun roo f and its pinc h protec tio n to
Emergency of the
Fig. 17 4 Removing th e selector gate cover .
first read and no te th e in troducto ry info rmation and hee d the Wi\HN INGS on page322.
I f th e
powe r suppl y fails (due to a dead for
exa mple) and the ve hicl e has to be pushed or towed, the emerge ncy re lease must be u se d to
m ove the selec tor leve r toN (Neu tral) .
The e m ergency re le ase is located under these
lector ga te cove r on the rig ht sid e when viewed in
th e dir ection of trav el. You need tool like a
sc rewdriver to re lease the selector leve r lo ck.
Preparations
Se t the parkin g brake.
Switch off the ignition .
Removing the selector gate cover
up wa rd on the cover around th e se lecto r
l eve r fig. 174.
Slip the cover up and ove r th e selector leve r
3l Not included with the vehic le kit.
Practical t ips
F ig. 17 5 Releasing the selector lever lock.
Emergency releasing of the sele ctor lever lock
fig. 17 5 in the directi on of th e arrow and hold it in thi s position.
the re lease fig. in these
l ecto r lever handl e and shift the se lec tor lever to
Ne utral (N).
Neve r move the selector lever out of
unexpect especially on or inclin es, and cause a n
acc ident and seriou s injurie s.
Note
Even witl1 selector lever is in N (Ne utral) , th e
a ut omatic transmission will be damaged ve
hicl e is towe d (or if you let it coast) fo r an ex
t ended p eriod or at high speed with the engine shut
324 325
Page 324 of 541
Cont ents
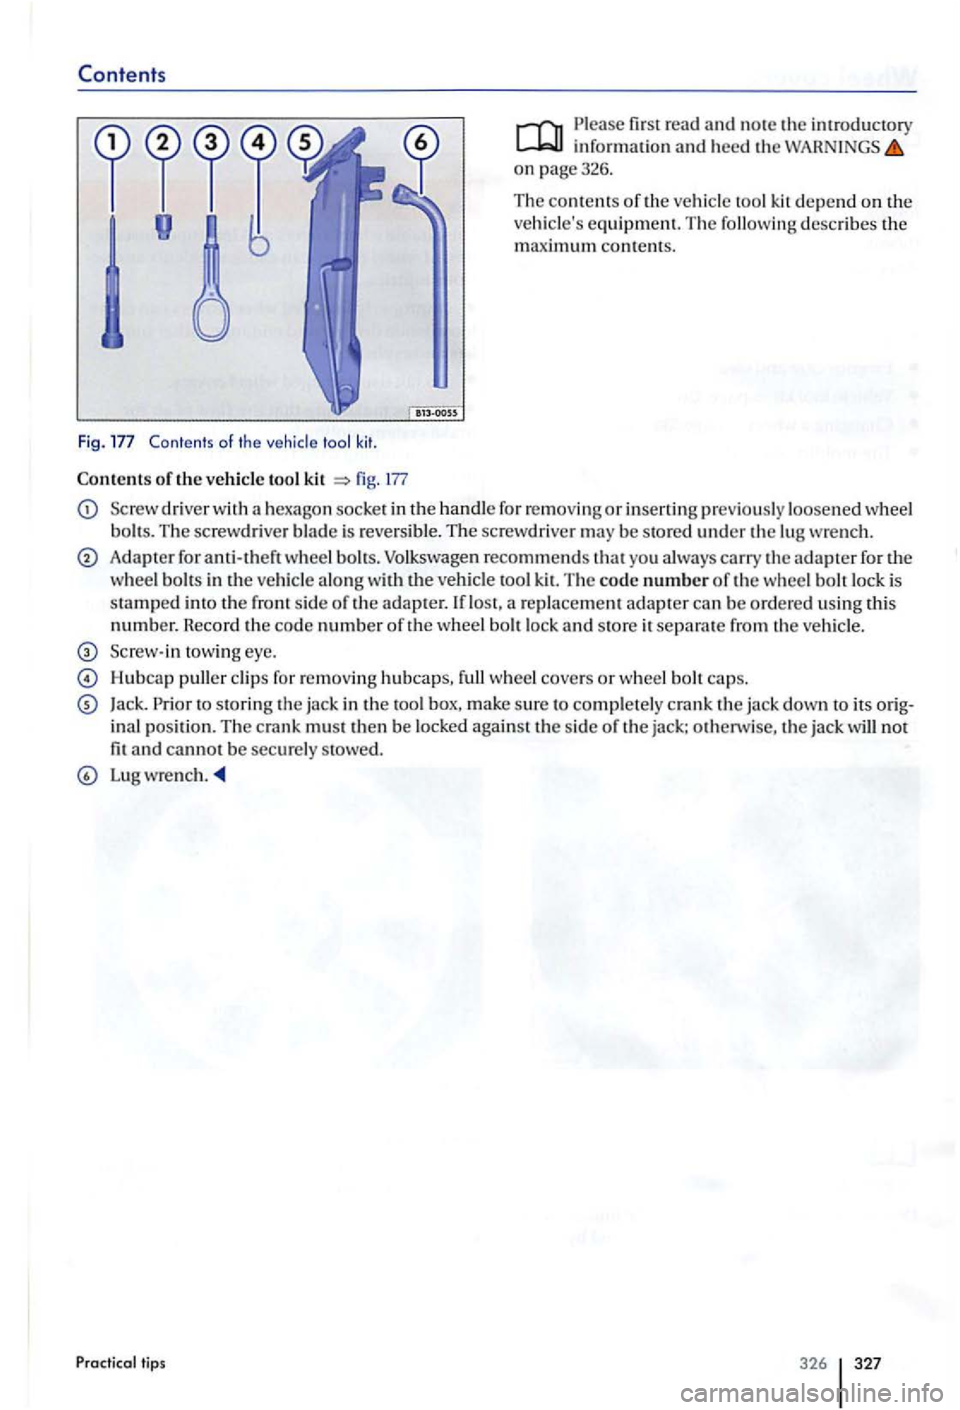
Fig . Contents of th e vehicle tool kit .
Con tents of th e vehicle tool kit fig. 177
Please first read and note the information and heed th e on page326.
T he
contents of th e ve hicl e tool kit d epend on the vehicle's equ ipment. The followin g describe s the maximum conte nt s.
Sc rewdri ver with a hexago n socke t in the handl e fo r r em ov ing or in se rting prev iou sly loosened w heel
bolt s. The screwdrive r blade is revers ible. The screw driver may be stored unde r th e lug wre nch.
Adapter for anti-theft wheel b olts. Volkswagen recom mends that yo u alw ays carry the adapte r fo r th e
w heel b olt s in the ve hicl e along w ith the veh icle tool The code number of the w heel bolt lock is
stamped th e sid e ofthe ad apter.
towing eye.
Hu bca p puller clip s for remov ing hubcaps, full wheel cover s or wheel b o lt caps.
Jack. Prior to stor in g th e jac k in the too l box, make s ure to co mpl ete ly crank the ja ck down to its ina l position. The cra nk mu st then b e locked against the sid e of the jack: oth erwise, the jack will not fit and cannot be sec urel y stowed.
Lug w rench .
Practica l tips
Page 325 of 541
covers
In thi s sect io n you'll find in formation on the low ing:
Hubcap . . . . . . . . . . . . . . . . . . . . . . . . . . . . . . . . . . . 328
Wheel cover . . . . . . . . . . . . . . . . . . . . . . . . . . . . . . . 329
Wheel cops . . . . . . . . . . . . . . . . . . . . . . . . . . . 329
More information:
Exterior care and page 262
Vehicle too l page 326
a page
Tire mobility page 336
Hubcap
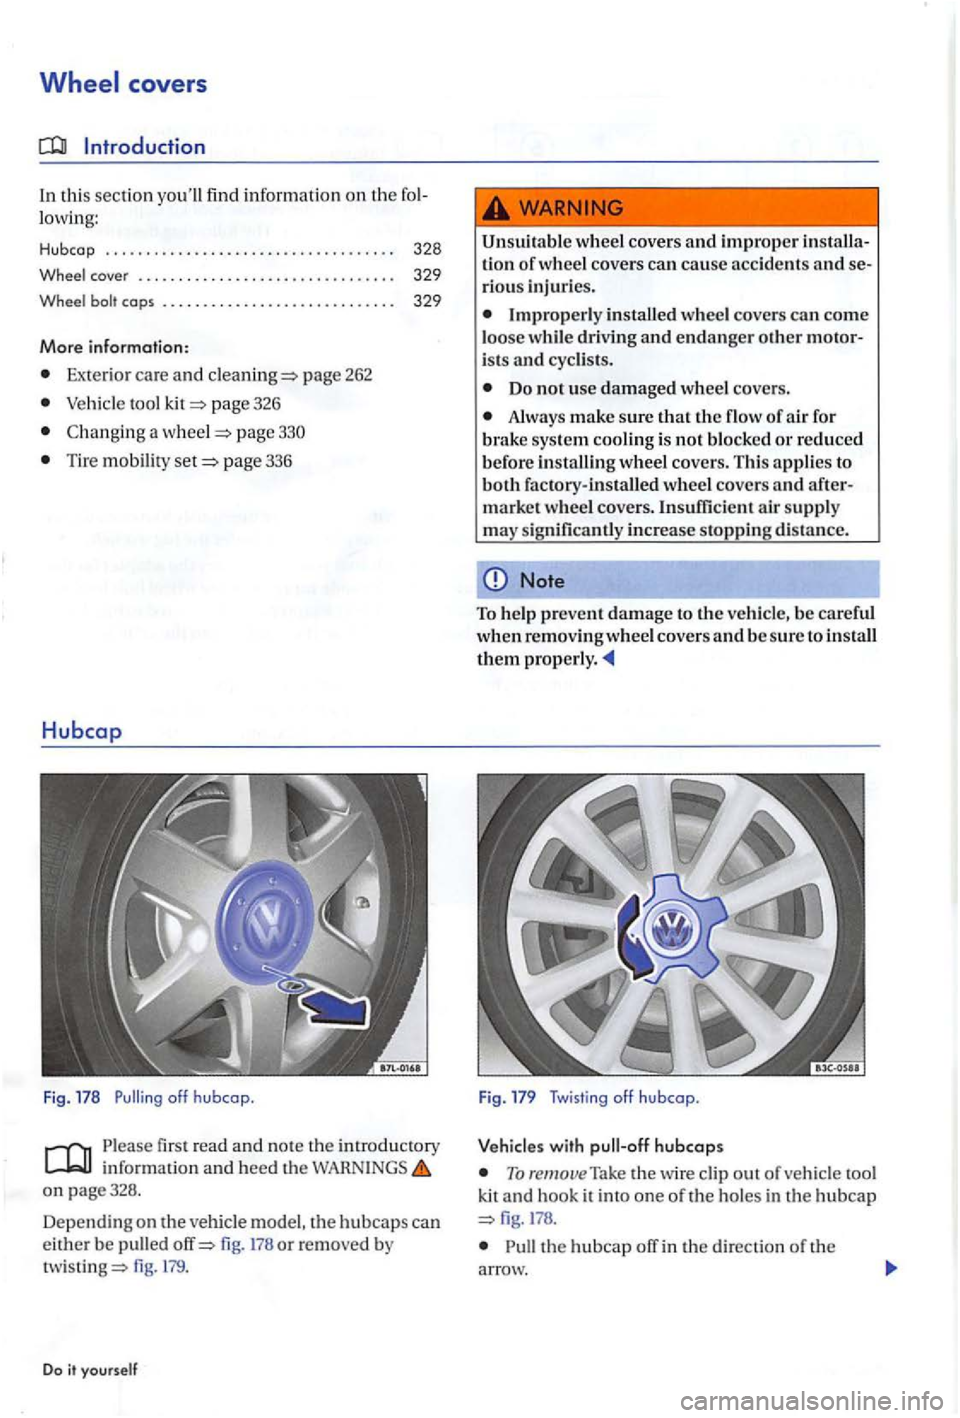
Fig. 178 off hubcap.
Please first read and note th e introductory information and heed the on page328 .
D ependin g on t
he vehicle mode l, th e hubcaps can
e ith er b e pulled fig. 178 or removed by fig. 179.
D o it yourself
Un suitabl e wheel cover s and improp er ti on or w hee l cov ers can cause accid ent s a nd
Improperl y in stall ed w hee l cove rs can come
l o ose w hil e driving and endan ger other
Do no t use d am aged wheel cove rs.
Alw ays m ake s ure that the flow of air for
brak e sys te m cooling is not block ed or r educe d
b e for e in stalling wheel co vers . Thi s appli es to
b o th
factory-in sta ll ed wh eel co vers and mark et w heel c o ve rs . In suffi cient a ir suppl y
m ay sig nifi cantly increa se sto ppin g di sta n ce.
Note
To help prevent damage to th e ve hicle , be ca re ful
wh en r em ov ing wheel co ve rs and b e sure to in stall the m prop erl y.
Fig . 179 Twis ting off h ubcap.
with hubcaps
To remove Take th e wire clip out ve hicl e tool kit and hook it int o one of the ho les in t h e hubca p
Pull the hubcap off in the dir ection of th e
arrow.