Page 222 of 444
with headlight washer system
l1eadlig ht
49, 44 is pulled toward s the ste ering
w heel -while low or high beams turned on. llowever, insect
WARNING
A lways read and heed the ..
Note
To avoid make sure that the headlight washers work properly in winter. Keep the n ozzle in the bumper free of snow and remove any ice with de-icer
lr is important for safe driving you good vision ro rear.
Fig. 46 day-night mirror
5 2 Lights and a view
the mirror in the normal position. th e le ve r the bottom edge of th e mirror must point forward. the lever
Page 223 of 444
Applies to with power outside mirrors
Outside mirrors
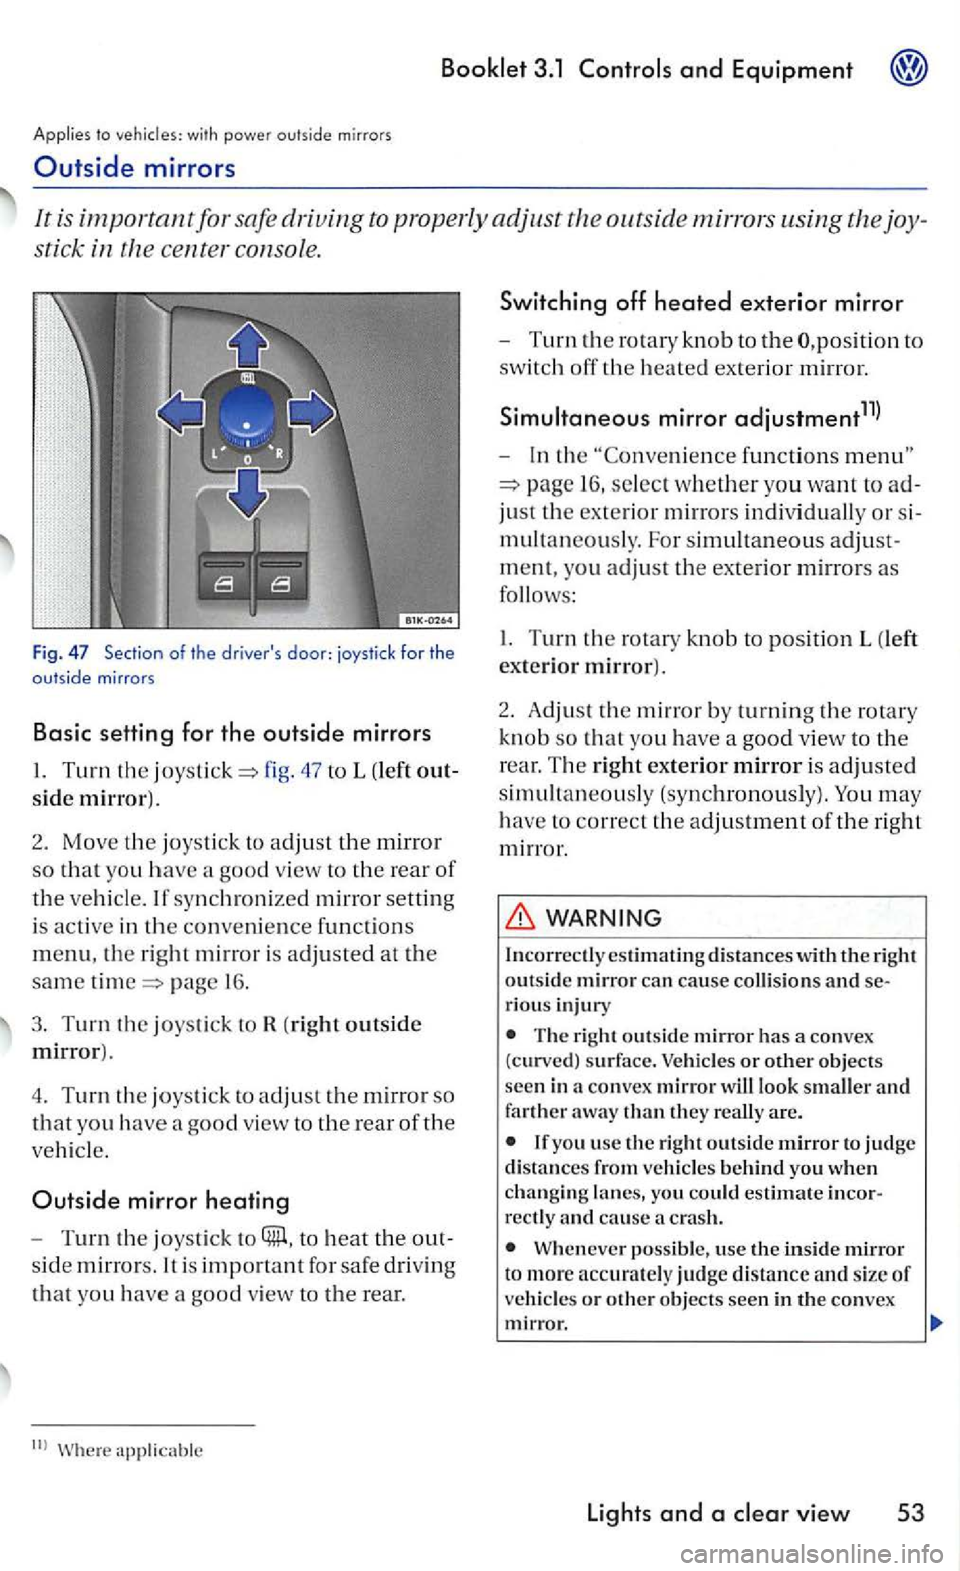
It is important for safe driving to properly adjust outsid e mirrors using the joy
stic k in the ce nter consol e.
Fig . 47 Section of the driver's door: joystick for the outside mirrors
Basic setting for the outside mirrors
47 to L (left out
side mirror).
2. Mov e the joystic k to adjus t th e mirror
so tha t yo u have a good view to th e rear of
the vehicl e. If synch roni zed mirror setting
i s
active in the conve nience fun ctions
menu, the right m irr or is adjusted at the
same page 1 6 .
3. Turn the joystick to R (right outside
mirror).
4. T
urn the joystick to adjust th e mirror so
that yo u have a good view to the rear of the
ve hicl e.
Outside mirror heating
-Turn the joysti ck to to heat the out
s id e
mirrors. It is fo r safe driv in g
that yo u have a goo d view to the rear.
functions
16 , select w hether yo u want to ad
just th e ex terior mirrors indi vidual ly or s i
m ultan
eously. For simultaneo us adjust
m ent, you
adjust th e exterior mirrors as
follows :
I. Turn the rotary kn o b to pos ition L (left
exte rio r mirror).
2 .
Adjust th e m irr or by turning th e rotary
kn ob
so that yo u have a goo d vie w to the
r ear. T
he right exterior mirror is adjusted
simultaneou sly (synchronously). You may
h ave to correct th e adjustment of the right
mirror .
WARNING
Incorrectl y estim ating d is ta n ces with the right outsid e mirror can cause co llision s and serious injury
The right outs id e mirror has a convex
(curved) s urfa ce. Vehicles or other objects
seen in a co nvex mirror will look smaller and farther away than they re all y are.
you usc the right outside m irror to judge distances from vehicle s behind you when changin g lanes, yo u could estimate incorrectly and cause crash.
Wheneve r possible, use the inside mirror t o more accurately judge distance and s ize of ve hicl es or other objects seen in th e convex mirror.
lights and a
Page 224 of 444
and Equipment
(continued)
Make sure th at you do n ot get your fin ger trapped between the mirror and the mirror base when moving the mirrors.
Always make sure you have a good vis ion to the rear.
54 Light s and a
For the sake of environment
The exterior mirror hea ting be sw itch ed
off when it is no needed o th erwise you
wasle
Page 271 of 444
L
Lane c hange function
Language in display 14
L ight s 43
lights interior 47
Lights & Vision
Menu
Locks
Child
safety 33
M
Main menu-Multi-Funct io n
Malfun ction messages
Manual mode C limatronic
Manual tra n sm issio n
Menu compass 19
Menu fo r conven ience fu nctions 16
Menu for Lights & V isio n 17
Menu sound system
Menus
Exam ple of use 15
MFl
mirrors, electrical 53
Sim ultaneous adjustmen t 53
Mirrors lower ed function 17
M
ulti- Fun ction
Multi-fun cti on steering wheel 24
opening an d closing
power windows 39
Indica to r lights 4
button
bumper cove r. spoilers an d
s u spe nsi
on 96
When parking on slopes 95
brake 94
See also brake
p rotection roof 42
Windows
filter
filte r
loc ks lndividualunlocking
roof 41
p rotec tion 42
windows 38
R
Reading lights
back
47
Rear 35
clo sing 37 Indicator light 35
Rear seat folding forwa rd 61
Rear seat.
folding ba ck 61. 62
Hear view mirror 52
Hear window heating 75
Hear window wipe r 51
Rear wiper 49
Remot e control ke y
B u
ttons Repl acing th e battery
ind ex
Page 272 of 444
3.1 and Equipment
Replacing th e battery
Remote contro l
Reverse
Automatic transm issio n 93
Roorload 74
Roor rack 72, 74
Roar rack mounts 72
s
Chil d sarety lock 33
adjustm ent 55, 58
heatin g
Front 59
Securing load 74
Se lector lever lock 89
Se lector lever postions 92
Serv i
ce Interval D is p lay
Service position
menu 18
Speed warnin g 2 1
Starting th e en g in e
the ignition 85
S t
eering 25
S t
eering lock 84
S t
eerin g w heel h eight adju stm ent 25
S t
oppin g the en gin e 86
vis o r 49
S
unroor
Suns hade
power roar 41
Swi tc h lightin g 3
Switc hes Emergency 45
L ig
ht s w it c hes 43
index
outs id e mirrors 53
roar windows 3 8
Switching orr th e engin e
the ig ni tio n
Tie-dow n hooks
Transportin g long items 63
T
runk li d 35
Turn signal and high beam leve r 46
Turn signal s 46 ligh t 46
u
Unpleasant odor 83
w
light Cru ise contro l 96
Doo rs 33
lights 4 Emergency 45
Instrum ent clu ster 4
T u
rn sig n als 46
messages
t ext s in th e di sp la y
parking on slo pes 95
When should re ruel th e tank or the
vehicle?
wiper and w asher sys te m 49
Windshi eld wip ers 49
positio n
52
ti re s warning 14
Page 301 of 444
Booklet 3.2 Tips and Advice
Dampen the windows w ith commer
cially avai lable, alcohol-based g lass
clean er.
Dr y the windows with a clean chamois
or a lint-free cloth.
Removing snow
- Use a s mall brush to remov e snow from
the windows and mirror s.
Removing ice
-Use a de-i cer spra y.
U se a clean cloth to dry th e windows. The
c h amois leather, whic h was use d to wip e paint
surfaces, contains oily res idu e from protective
agents and would smear th e
poss ible use a de- ic in g spray to remove ice. you have to use an ice scraper, push it on ly in one dire ctio n- away from 0.
Use window cleane r or a silico ne remover to re
move rubber, oil, grease silicone depo sits.
Wiper blades should be cleaned regularly.
Clean wiper blades are important so that
y
ou can see.
- Use a so
ft cloth to re mov e dust and dirt
from the windshi eld wiper blades.
- U se window clean
er to clean the w ind
s hi eld wip er blad es. U se a s
ponge or a
cloth to re
move stubborn dirt.
Wax deposits have to be remove d with sp ecial
cleaner. Wax deposits on the windshield could cause the wiper blades to rub. A window clea ner sp ecifica lly for removing wax will stop the b lades
f rom rubbing if added to the windshie ld wash wa te r. Grease removing cleaners will not remove
wax deposits.
WARNING
Poor visi bili ty inc re ases the risk of collisions and oth er ac cid ent s.
Always make sure all win dows are clear of ice , snow , and cond ensation for goo d vis ibility -out the windshie ld, side and rear windows.
Never use warm or h ot water to re move snow and ice from wind ows and mirro rs. This could
ca use th e glass to crack!
The heati ng ele ment s for the rear defogger
a re on t h e in side of the rear window. To preve nt damage, do not put sticke rs over the heatin g e l
ements o n the in side of the rear w indow.
Never move the ice scraper back and forth to
p reve nt dirt from being ground against the gla ss
when you pull the sc raper back towa rds yo u.
Cleaning and protection 25
Page 385 of 444
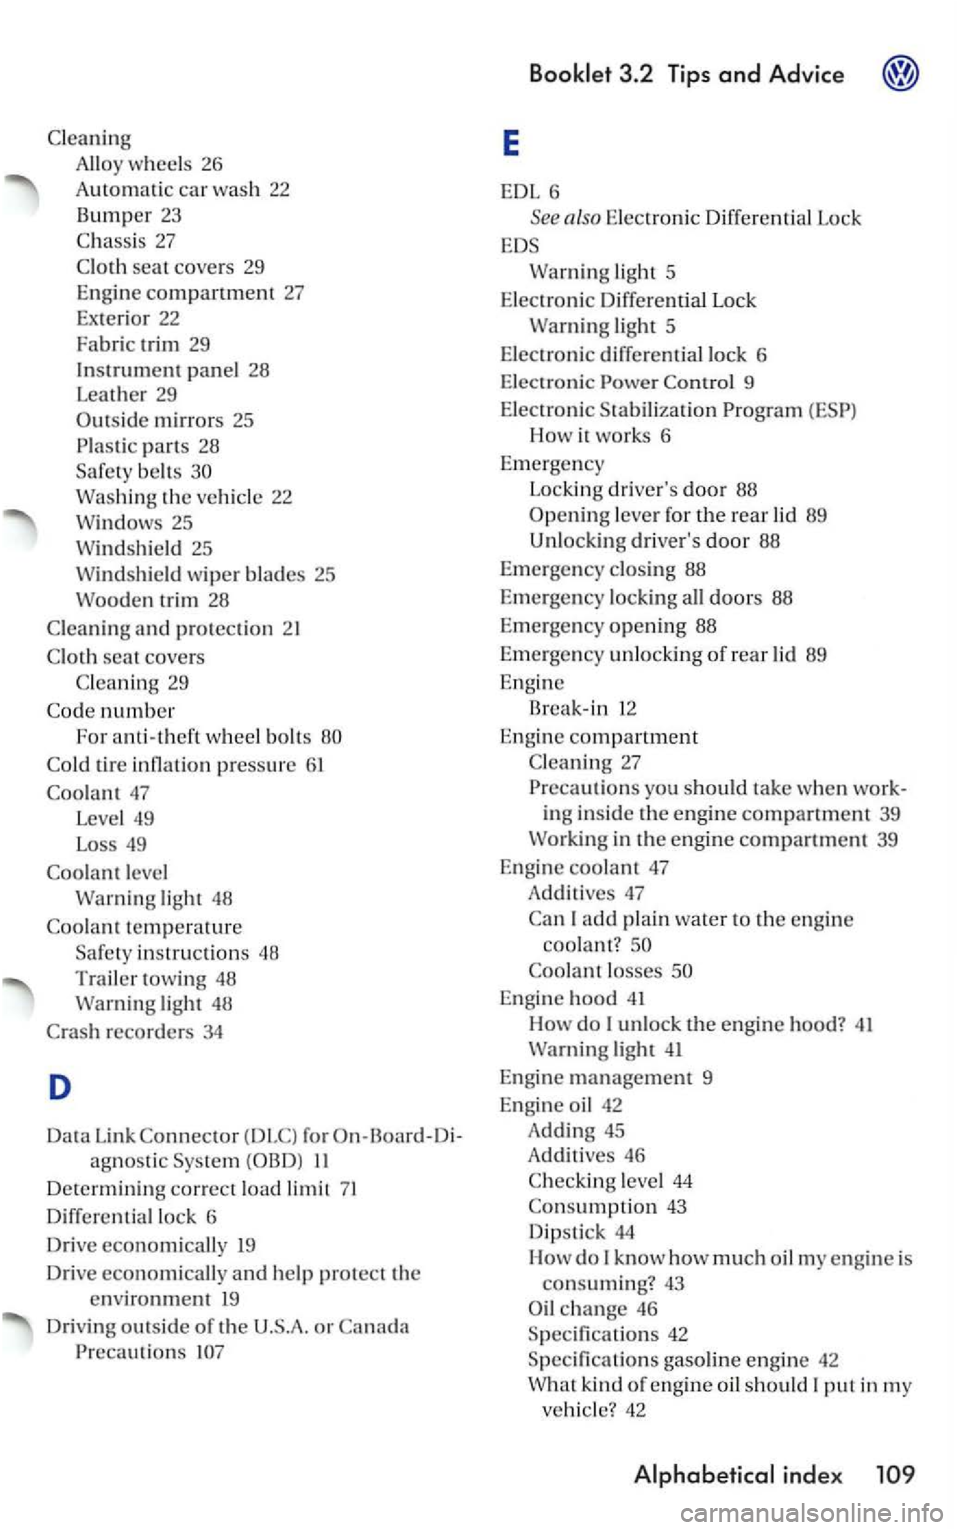
Allo y w heels 26
Auto m
atic car w as h 22
Bumper 23
27
seat cove rs 29
Engine
compartment 27 Exterior 22
Fabric
trim 29
Instrument panel 28
Leat her 29
Outside mirrors 25 part s 28
belt s th e ve hicl e 22
25
tri m 28
and protection 2 1
scat covers
29
numbe r
For anti -
theft wheel bolt s
pressure 6 1
47
L eve l 49
L
oss 49
light 48
temperature
in structions 48
Tr
ailer t o w in g 48 light 48
recorders 34
D
Da ta Link for agnosti c II
D etermin in g correct load limit 71
D ifferentia l lock 6
D rive
econom ically 19
D rive
economi cally and he lp protec t th e environment 19
D
riving o u ts id e of the or Precautions
3 .2 Tips and Advice
light 5
Elec tron ic di
fferential lock 6
Electroni c
Control 9
Electronic
Stabili zat ion
How it work s 6
Em erge ncy
Lockin g drive r's door 88
Opening leve r for the rear lid 89
Unlo ckin g
driver's door 88
Emergen cy clos ing 88
E m erg
ency locking doors 88
E m erge ncy op
ening 88
E m erge ncy
unlocking of rear lid 89
E ngin e
Break-in 12
E ngine
compartment
27
Pr eca utions yo u s ho ul d tak e when working inside th e engine compartment 39
I add pl ain water to the engin e
c o ol
ant?
losses
light 4 1
E n gin e m a
nagem ent 9
E n gin e oil 42
Adding 45 Additi ves 46
leve l 44 43
Dip stick 44
How do I k now how much oil my engine is consuming? 43
c h an ge 46
Specificati on s 42
S pecificat i
ons gasolin e engine 42 kind of engine oil should put in my
ve hicle? 42