2004 VOLKSWAGEN BEETLE page 17
[x] Cancel search: page 17Page 4 of 138

Downloaded from www.Manualslib.com manuals search engine About th is owne r's manual
• ht:-; OwnN's M< nua l is va lid fo r all models a nd
r. t n-of t11 G olf.
• An lpllAb tical
index is included a t th e end of
thi mt nu I.
• A lis t of bbr evintions at th e e nd of the manual
pi, ins the a bbre viations used.
• Dir e tions and positions such as le ft, right , front
n d r
rare norm ally relativ e to the vehicle's direc
ti n f tr v I, unl ss otherwis e indic ated .
• lllu !rations he lp with orientation and should be
r gard d as a general guide.
• This owne r's m anu al was written for left-hand
drive vehicles . In right -h a nd drive vehicles the con
trols m ay sometimes be different to those dis-
pl yed in illustr ations or described in the text
page
10.
•
Any t ec hnical changes made to the vehicle af
t er
publication of this booklet are contained in a
supp leme nt that is included with the vehicle wallet.
All
eq uipment and models are described without
indic~~ing whether the equipment is optional or
spe~1f1c to the model type. This means that your
ve~1cle ma~ not have some of the equipment de
scnbed, or 1t may only be available in certain mar
kets . The scope of equipment fitted in your vehicle
can be found in the sales document t· a 1on and can contact your Volkswagen dealer h' You
information. 5 lp for further
All data in this owner's manual corres d
information available at the time of gofnont to ~he
Because the vehicle is constantly being gd 0 Pnnt.
and further improved, there may be diffe eveloped . ~ne~~ tween your vehicle and the data in this ow , -
. . ners
ma.nut.al. Nohd1
1
s
1
cfrepancy 111 data, illustrations or de
scnp 1ons s a arm the basis for any legal claim. -
Please ensure that the complete vehicle wall t .
I · th
h · I · e IS a ways m e ve 1c e 1f you lend or sell the vehi 1 to someone else. c e
Standard booklets in the vehicle wallet:
• Service schedule
• Owner's manual
Additional booklets in the vehicle
wallet (optional):
• Supplements
• Radio I navigation system
• Provision for mobile telephone
• Other supplements
Page 12 of 138

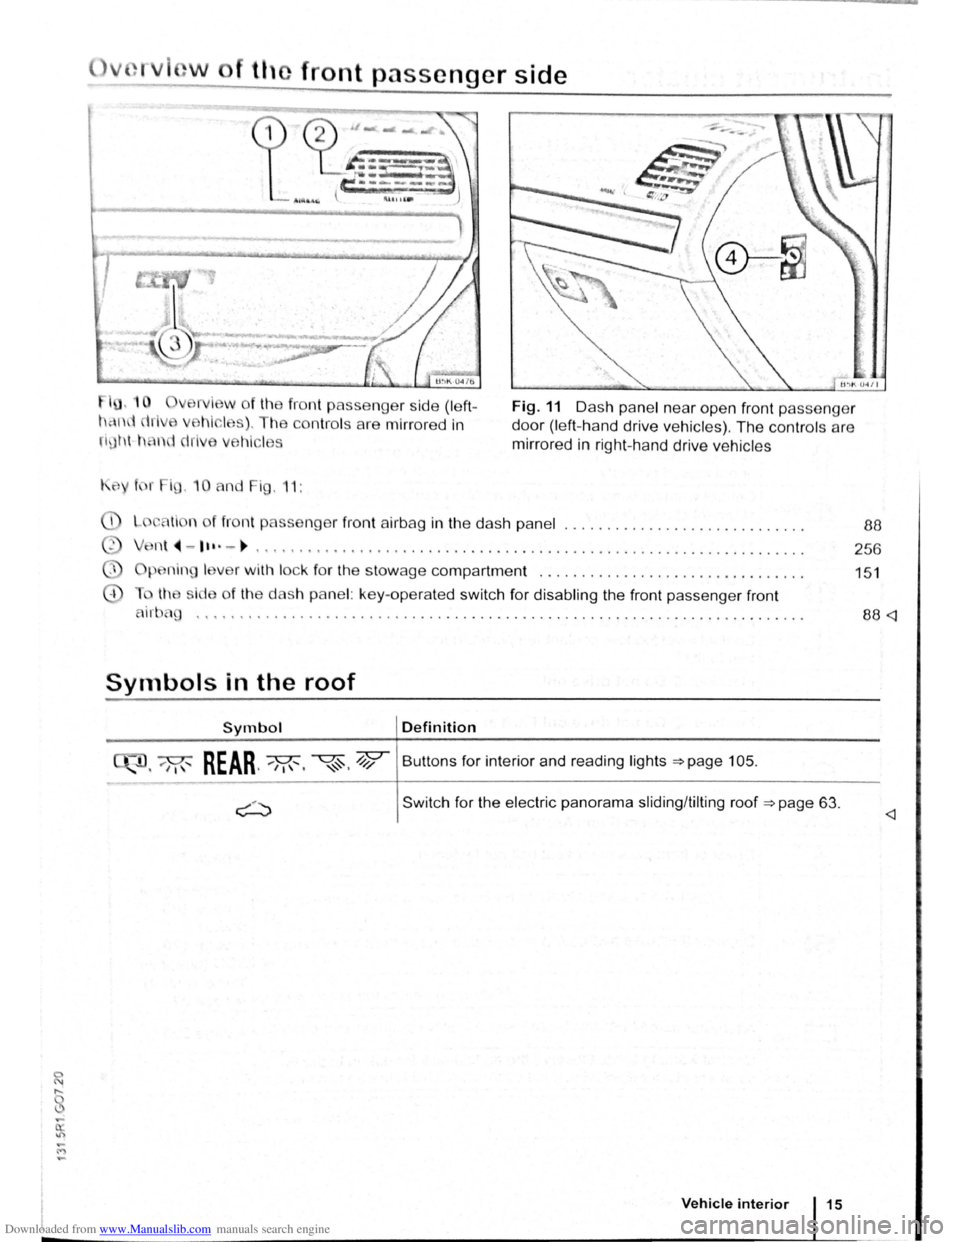
Downloaded from www.Manualslib.com manuals search engine front passenger side
fro nt p asse nger side (left
con tro ls are mirro red in
Fig. 11 D as h pa ne l nea r ope n front passeng er
d o
or (le ft-h a nd driv e ve hi cles ). Th e co ntr ols a re
mirr ore d in rig ht -h a nd driv e ve hi cle s
K f r i , 1 0 nd F ig , 11:
li n f fro nt p sseng er f ront air b ag in the das h p ane l ................ ............ .
n t
~-1 ••·-~ , ......... ..... ............................ ................... .. .
p .n in I v r w ith lock for th e sto w age compartment ............................... .
th i
de of th e das h panel: ke y-ope ra te d swit ch for disabling the front pa sse nger front
88
256
1 5 1
'''.' •••••••••• •••••• 0 •• 0 ••••• •••••••• 0 •••••• 0 0 • • 0 •••• 0 • ••••••••• • 0. 0 • • 88
Symbols in the roof
Symbol Definition
, 'M"' REAR ..... M,, '<~. 4;? Butt ons fo r int erior and reading lights ~page 105.
Swit c h for the electric panorama sliding /tilt ing roof ~page 63.
Vehicle interior 15
Page 13 of 138

Downloaded from www.Manualslib.com manuals search engine m
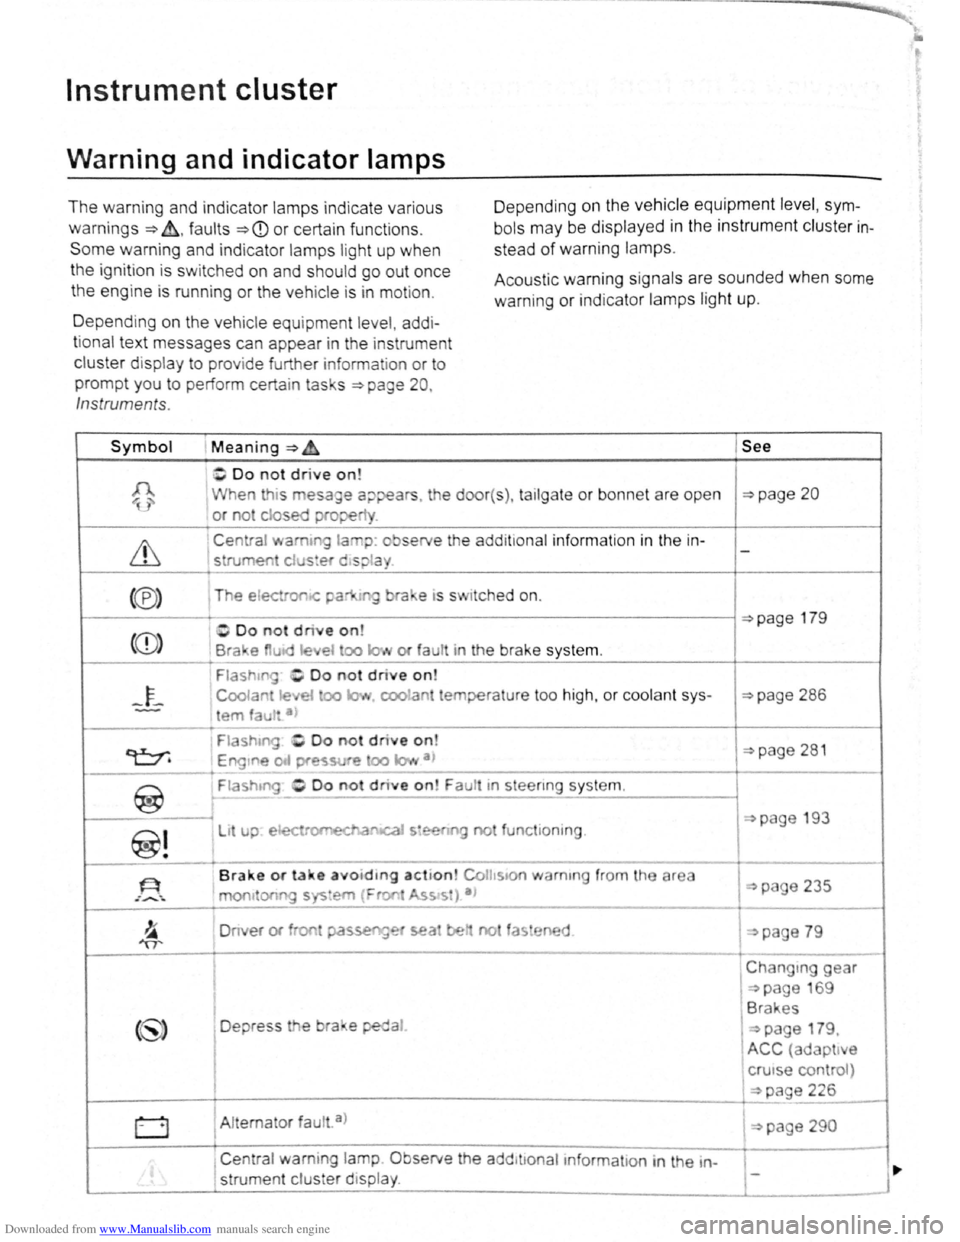
Instrument cluster
Warning and indicator lamps
The warning and indicator lamps ind ica te various
warnings ~~.faults ~CD or certai n funct ions .
Some warning and indicator lamp s light up when
the ignition is s witched on and should go out once
the eng ine is running or the vehicle is in motion. D
epe nding
on the vehicle equipment level , sym
bols may be display ed in the instrument cluster in
stead of warning lamps.
Acoustic warning sig nals are sounded when some
warning
or indicato r lamps light up.
D epending
on the vehic le equ ipment leve l, add i
tional text messages can appear in the instrument
cluster d isplay to prov ide further informat ion or to
prompt you to perform certain tas s ~page 20 ,
Inst rument s.
Symbol Meaning ~ &. See
~Do not drive on!
1 When is esage a;:>pears. the door( s), tailgate or bonnet are open ~page 20
or not cJosed prope
Centra l wamt la p : o serve the add it ional informa tio n in the in -
1 strumeo clus!er d•spla
<®> The e lectron-<: pa ra e •s s itched on.
((D)
1------------
1-------...-
~
Fla shrn Do not drive o n
C oolan Je et oo la.~ cool a tempera ture too high, or coolan t sys
em fau tt a )
Fia shtng -, Oo not d rive on
~page 286
~page 281 Engtne Pfe~svre oo IQI,• a 1
-·---------------------+----------
~
F iashtng tn stee nng sys te m .
~---------~
1----
~!
li up. e ectromEdl.a cal s•ee n g no tun c ioni ng.
On er or f on passe'1g~ sea be no fas ene d
(~) Depress e bra e peda l
page 193
I
Changtng gear
~page 69
1 Brakes
I
~page 179.
ACC (adapt t e
crutse control )
~---------------------------------------------------------~~~pag_e_2_26 ____ ~
0 1 Alt erna tor faul . a )
, Central warning lamp Observe the add tttonaltnformatton in the in
' strume nt clu s er display .
1 ~page 290
Page 14 of 138

Downloaded from www.Manualslib.com manuals search engine Symbol Meaning~~ See
~ Brake pads worn.
Lit up:
ESC fault or switched off for system -related reasons. OR:
the ve hi cle battery has been reconnected .
Flashing :
EScrrcs is taking corrective action. ~page 179
~ TCS switched off manually. OR: ~page 31 TCS and ESC switch ed off manually .
t._.J ABS faulty or not functioning .
~> Electronic parking brake fault. a)
Q± Rear fog light switched on. ~page 105
' , Partial or complete fault in the vehicle lighting (excluding bend light--,\.!),-ingb)) . a) ~page 362
G Lit up or flashing : catalytic converter fault.
'00'
Lit up: glow period for a diesel engine .
Flashing : fault
in engine management system. ~page 332
Fault in engine management system.
-Diesel particulate filter has become saturated with soot. a)
e Lit up or flashing : steering system fault. ~page 193
e!
(l) Tyre pressure too low or tyre monitoring system fault. ~page 253
0 Windscreen washer fluid level too low. a) ~page 117
BJ Fuel tank almost empty. ~page 269
~
Flashing : engine oil system fault.a) ~page 281
Lit up: engine oil level too low. a ) ..............
.,
~
~ Fault in airbag and belt tensioner system.
0"' ... 1'0•. Front passenger front airbag switched off (PASSENGER AIR BAG ~page 88 • r!2 OFF~;).
6
Front passenger front airbag switched on (PASSENGER AIR BAG
I ON@).
~ The tank cap is not closed properly . a ) ~page 269
Lane departure warning system (Lane Assist) switched on, not
ac-~page 2 4 0 /1 tive.
(0! Adaptive cruise control (ACC) currently not available. a) ~page 226
0 Gearbox fault.a) ~page 169
Instrument cluster
=
Page 15 of 138

Downloaded from www.Manualslib.com manuals search engine Symbol Meaning=>~ See
~Q
Turn signal left or right. ~page 105
Hazard warning lights switched on. ~page 336
Q\~ Trailer turn signals ~page 105
Lit up: depress the brake pedal. Changing gear
(~) =>page 169
Flashing : the lock button in the selector lever is not engaged . Brakes
~page 179
Brakes
~page 179 ,
(®) The vehicle is being held by the brake system. Pull-away assist
systems
~page 196
Lit up : the cruise control system
(CCS) is switched on. ~page 218
(')
Lit up: the adaptive cruise control (ACC) is act ive . ~page 226
Lit up: the speed limiter is switched on, active.
Flashing : the set speed
of the speed limiter has been exceeded . ~page 222
/l
Lane departure warning system (lane Assist) is switched on and ac-~page 240 tive.
=D Main beam is sw itched on or the headlight flasher is be ing operated . ~page 105
~~ ACC is active . No vehicle has been detected ahead.
When displayed in white : ACC active . Vehicle detected ahead. ~page 226
T-i When displayed in grey: ACC not active. System switched on, does
not regulate :
0 Main beam assist switched on. ~page 105
SAFE Immobilizer active . ~page 163
,.,-c Service reminder I serv ice due . ~page 24
@
A mobile telepho ne is connected via Bluetooth to the factory-fitted ~ Booklet Pro vi-provision for mobile telephone .
Mobile telephone battery charge level. Only for factory-fitted provi-
sion for mobile
lil telephone sion for mobile telephone .
*
Black ice warning . The outside temperature is below +4 °C (+39 °F) . ~page 20
(A)
The start/stop system is available . The engine is switched off auto-
matically .
~
The start/stop system is not available . ~page 196
OR: the engine has been started automatically .
a) Displayed in colour on an instrument cluster with colour display .
b) A separate display appears in the instrument cluster if there is a bend lighting fault.
Page 16 of 138

Downloaded from www.Manualslib.com manuals search engine Instruments
CClJ Introduction
This chapter contains information on the following
subjects :
I nst
rument overview . . . . . . . . . . . . . . . . . . . . . 20
D isplays . . . . . . . . . . . . . . . . . . . . . . . . . . . . . . . 21
S ervice interval disp lay . . . . . . . . . . . . . . .
. . . . 24
Additional information and warnings:
• W arning and indicato r la mps ::;. page 16
• V olkswage n inf orm ation system :::;. page 26
• lnfota inment s ys tem ~page 31
Instrument overview
Fig. 12 Instrument clus ter in the das h pane l
• Se lec ted gear displa y (for veh icles w ith an au
tomatic gearbox) ::;.page 169
• Informat ion on service intervals ~Booklet Serv
ice schedule
·A WARNING
Accidents and injuries can occur if the driver
is d is tracted .
• Never press the buttons on the instrument
cluster while the vehicle is in motion.
D escriptions
of the instr uments ~Fig. 12:
G) Rev. counter (runn ing engine speed in revo lutio n s x 1, 00 0 per minute).
The start of the red zone on th e d ia l ind icates th e max im um e ng ine sp eed that may be used in each
gear when the eng ine
is warm and after it has been run in proper ly . You should change up a gear or
move the selector lever to
0 (or lift your foot off th e a ccele ra tor ) be fore the need le reaches the red
zone
~CD.
0 Coolant temperature display ~page 28 6.
G) Displays ~page 21.
@ Reset , set and display button ~page 21.
® Speedometer
® Fuel gauge ~page 269.
Overv iew
of the vehicle
Page 17 of 138

Downloaded from www.Manualslib.com manuals search engine 0 ~ ,..._ 0 (.9
CD
• When the engine is cold, avoid high engine
speeds, driving at full throttle and overloading
the engine.
Displays
• The needle on the rev counter should only
briefly tip into the red area. Damage to the en
gine may otherwise be incurred.
&"" Changing up a gear early wi~l help to save
W fuel a nd minimise engine no1se.
Fig. 13 A: bonnet open , B : tailgate open, C: front left door open, D: right rear door open (only in four-door
vehicles)
r-('n First read and observe the introductory
L-W.I information and safety warnings A on
page 20.
Depending on the vehicle equipment level, a varie
ty of information can be displayed in the instrument
cluster =>Fig. 12 @:
• Open doors, bonnet and tailgate =>Fig. 13
• Warning and information messages
• Mileage displays
• Time
• Radio and navigation information =>Booklet Ra
dio
or =>Booklet Navigation system
• Telephone information =>Booklet Provision for
mobile telephone
• Outside temperature
• Compass display
• Selector lever positions
• Gear-change indicator (manual gearbox)
• Driving data display (multifunction display
(MFD)) and menus for various settings
=>page 26
• Service interval dis play =>page 24
• Speed warning function =>page 26
• Speed warning for winter tyres
• Start/stop system status display =>page 196
• Status display for active cylinder management
(ACr®) =>page 190
• Traffic signs detected by the traffic sign recogni
tion system =>page 243
• Engine code
• Vehicle battery charge level (SOC)
Open doors, bonnet and tailgate
The instrument cluster display indicates if any
doors, or the bonnet or tailgate, are open once the
vehicle has been unlocked, and while the vehicle is
in motion .
In some cases, an acoustic warning is
also sounded . Different instrument cluster designs
will have different displays.
Instrument cluster
Page 18 of 138

Downloaded from www.Manualslib.com manuals search engine Legend for Fig . 13 See
A I D o not drive on!
Bonne t ope n or not prope rly closed. ~page 277
B 0 Do not drive on! ~page 57 Tailgate open or no t closed prope rly .
C Do not drive on! C ,D Ve hicle door ope n or n ot pr ope rly clos ed. ~page 55
Warn ing and information messages
The sy~tem runs a che ck o n ce rtain components
and function s in the vehicle whe n the ignition is
sw itched on or w hil e the ve hi cle is in motion . Mal
fun tions ar e indic ated by r ed and yellow warning
s ymbol s 1
) wi th te t message s in the instrument
c l
1ster d is pla y ~page 16. An acoustic warning is
a ls o so unded i n certa in ca se s. Di fferent instrument
clu ster design s
will h av e diffe rent dis plays .
Type of mes
sage
Symbol col
our
opened manually.
To do so, choose Vehicle
status or Vehicle in the selection menu
~page 26.
Priori ty 1 warn
in g re port The
symbol flashes or lights up -sometimes together with an acoustic
warning signal.
Red i> Do not drive on! Danger! ~A
Check function and resolve problem. Seek expert assistance if neces
sary.
The symbol flashes or lights up -sometimes together with an acoustic
warning signal.
Prio rity 2 warn
ing report Yellow If there is a fault, or if service fluids are running low, your vehicle could
be damaged or break down
~CD.
Check the fault as soon as possible . Seek expert assistance if neces
sary.
Information
message Information about various procedures within the vehicle .
a) Displa yed in colour on an i nstrumen t cluster wit h co lour d isplay .
Mileage displays
The odometer re gi sters the total distance travelled
by the car.
T he
trip recorde r(trip) shows the distance travel
led since the trip reco rder was last reset. The final
d ig it show s dis tan ces
of 100 m.
• Press button ::::>Fig . 12 0 briefly to reset the
tri p record
er to 0 .
Time
• To se t th e t ime , press and hold button
~Fig. 12 0 while the doors are closed until the
word Time appears in the display .
• Releas e the button . The time is shown in the
d is p l
ay and the hour setting is marked .
1
) D isp layed in col our on an instrum ent clu ste r with col our di sp la y.
O ve rview of the ve hicle
• Then press the button repeatedly until the re
quired hour is displayed . Press and hold the button
to scroll through quickly.
• Once you have set the hour, wait until the mi
nutes display is marked .
• Then press the button repeatedly until the re
quired minute is displayed. Press and hold the but
ton to scroll through quickly.
• Release the button to finish setting the clock.
You can also set the time in the infotainment sys
tem using the@) button and the ~ and
[T tme and date] function buttons ~page 31. ..,.