Page 102 of 348
’04 Tacoma U (L/O 0309)
94
2004 TACOMA from Sep. ’03 Prod. (OM35814U)
CAUTION
�When returning the seatback to its
original position, make sure the
seatback is securely locked by
pushing forward and rearward on
the top of the seatback.
�Make sure the top strap is securely
latched, and check that the child
restraint system is secure by push-
ing and pulling it in different direc-
tions. Follow all the installation in-
structions provided by its manufac-
turer.
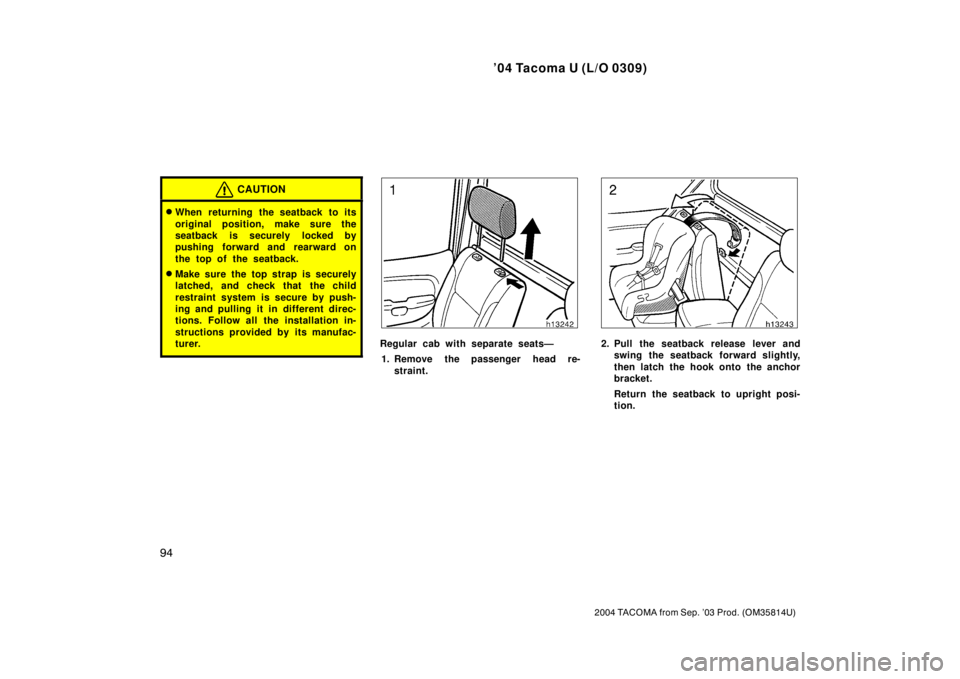
Regular cab with separate seats—1. Remove the passenger head re- straint.2. Pull the seatback release lever andswing the seatback forward slightly,
then latch the hook onto the anchor
bracket.
Return the seatback to upright posi-
tion.
Page 103 of 348
’04 Tacoma U (L/O 0309)
95
2004 TACOMA from Sep. ’03 Prod. (OM35814U)
3. Fix the child restraint system withthe seat belt and tighten the top
strap.
Replace the passenger head re-
straint.
For instructions on installing the child re-
straint system, see “Child restraint” in this
Section.
CAUTION
�When returning the seatback to its
original position, make sure the
seatback is securely locked by
pushing forward and rearward on
the top of the seatback.
�Make sure the top strap is securely
latched, and check that the child
restraint system is secure by push-
ing and pulling it in different direc-
tions. Follow all the installation in-
structions provided by its manufac-
turer.
Double cab with rear seats— 1. Remove the head restraint (outside position only).
Page 104 of 348
’04 Tacoma U (L/O 0309)
96
2004 TACOMA from Sep. ’03 Prod. (OM35814U)
2. Pull the seatback release lever andswing the seatback forward slightly,
then latch the hook onto the anchor
bracket.
Return the seatback to upright posi-
tion.3. Fix the child restraint system withthe seat belt and tighten the top
strap.
Replace the head restraint (outside
position only).
For instructions on installing the child re-
straint system, see “Child restraint” in this
Section.
CAUTION
�When returning the seatback to its
original position, make sure the
seatback is securely locked by
pushing forward and rearward on
the top of the seatback. Failure to
do so will prevent the seat belt
from operating properly.
�Make sure the top strap is securely
latched, and check that the child
restraint system is secure by push-
ing and pulling it in different direc-
tions. Follow all the installation in-
structions provided by its manufac-
turer.
Page 106 of 348
’04 Tacoma U (L/O 0309)
98
2004 TACOMA from Sep. ’03 Prod. (OM35814U)
Symbol mark
TO USE THE ANCHOR BRACKET:
Front outside position—1. Remove the passenger head re- straint.
Lightly push down on the top sur-
face of the anchor bracket cover
with the symbol mark shown in the
illustration, then pull it forward to
remove.2. Fix the child restraint system withthe seat belt.
Latch the hook onto the anchor
bracket on the back panel and tight-
en the top strap.
For instructions on installing the child re-
straint system, see “Child restraint” in this
Section.
CAUTION
Make sure the top strap is securely
latched, and check that the child re-
straint system is secure by pushing
and pulling it in different directions.
Follow all the installation instructions
provided by its manufacturer.
Page 107 of 348
’04 Tacoma U (L/O 0309)
99
2004 TACOMA from Sep. ’03 Prod. (OM35814U)
3. Replace the head restraint.
Store the removed cover in a safe place
such as the glove box.
Be sure to replace the cover when the
anchor bracket is not in use.Front center position—
Fix the child restraint system with the
seat belt.
Latch the hook onto the rear lower an-
chor bracket and tighten the top strap.
For instructions on installing the child re-
straint system, see “Child restraint” in this
Section.
CAUTION
Make sure the top strap is securely
latched, and check that the child re-
straint system is secure by pushing
and pulling it in different directions.
Follow all the installation instructions
provided by its manufacturer.
Page 109 of 348
’04 Tacoma U (L/O 0309)
101
2004 TACOMA from Sep. ’03 Prod. (OM35814U)
CAUTION
Make sure the top strap is securely
latched, and check that the child re-
straint system is secure by pushing
and pulling it in different directions.
Follow all the installation instructions
provided by its manufacturer.
Separate seats
Split bench seats
Non�split bench seat
Lower anchorages for the child restraint
systems complying with the FMVSS225
or CMVSS210.2 specifications are
installed in the right passenger ’s seat-
ing position.
Child restraint systems complying with the
FMVSS225 or CMVSS210.2 specification
can be fixed to these anchorages. In this
case, it is not necessary to fix the child
restraint system with a seat belt on the
vehicle.
—Installation with child
restraint lower anchorages
(regular cab and xtra�cab models)
Page 111 of 348
 ’04 Tacoma U (L/O 0309)
103
2004 TACOMA from Sep. ’03 Prod. (OM35814U)
For the installation details, refer to the
instruction manual equipped with each
product.
CAUTION
�When using the lower ancho")
’04 Tacoma U (L/O 0309)
103
2004 TACOMA from Sep. ’03 Prod. (OM35814U)
For the installation details, refer to the
instruction manual equipped with each
product.
CAUTION
�When using the lower anchorages
for the child restraint system, be
sure that there are no irregular ob-
jects around the anchorages or that
the seat belt is not caught.
�Push and pull the child restraint
system in different directions to be
sure it is secure. Follow all the
installation instructions provided by
its manufacturer.
�After securing the child restraint
system, never slide or recline the
seat.
�Vehicles with passenger airbag
manual on�off switch—
Child restraint system should never
be installed on the front passenger
seat with the passenger airbag
manual on�off switch in the “ON”
position, because the force of the
deploying airbag could cause death
or serious injury to the child in for-
ward seating position.
Lower anchorages for the child restraint
systems complying with the FMVSS225
or CMVSS210.2 specifications are
installed in the outside positions of the
rear seat.
Child restraint systems complying with the
FMVSS225 or CMVSS210.2 specification
can be fixed with these anchorages. In
this case, it is not necessary to fix the
child restraint system with a seat belt on
the vehicle.
Canada only
Ty p e A
—Installation with child
restraint lower anchorages
(double cab models)
Page 112 of 348
 ’04 Tacoma U (L/O 0309)
104
2004 TACOMA from Sep. ’03 Prod. (OM35814U)
Canada only
Ty p e B
For owners in Canada
The symbol on a child restraint system
indicates the presence of a lower connec-
t")
’04 Tacoma U (L/O 0309)
104
2004 TACOMA from Sep. ’03 Prod. (OM35814U)
Canada only
Ty p e B
For owners in Canada
The symbol on a child restraint system
indicates the presence of a lower connec-
tor system.
CHILD RESTRAINT SYSTEM
INSTALLATION
Ty p e A — 1. Widen the clearance between the seat cushion and seatback a little
and confirm the position of the low-
er anchorages near the tag on the
seatback.
2. Latch the hooks of lower straps onto the anchorages and tighten the lower
straps.
Ty p e B — 1. Widen the clearance between the seat cushion and seatback a little
and confirm the position of the low-
er anchorages near the tag on the
seatback.
2. Latch the buckles onto the anchor- ages.
If your child restraint system has a top
strap, it should be anchored. (For the
installation of the top strap, see “—Using
a top strap” in this Section.) For the installation details, refer to the
instruction manual equipped with each
product.
CAUTION
�When using the lower anchorages
for the child restraint system, be
sure that there are no irregular ob-
jects around the anchorages or that
the seat belt is not caught.
�Push and pull the child restraint
system in different directions to be
sure it is secure. Follow all the
installation instructions provided by
its manufacturer.
�After securing the child restraint
system, never recline the seat.
�Do not install a child restraint sys-
tem on the rear seat if it interferes
with the lock mechanism of the
front seats. Otherwise, the child or
front seat occupant(s) may be killed
or seriously injured in case of sud-
den braking or a collision.
 ’04 Tacoma U (L/O 0309)
95
2004 TACOMA from Sep. ’03 Prod. (OM35814U)
3. Fix the child restraint system withthe seat belt and tighten the top
strap.
Replace the passenger head re-
straint.
For ins")
 ’04 Tacoma U (L/O 0309)
96
2004 TACOMA from Sep. ’03 Prod. (OM35814U)
2. Pull the seatback release lever andswing the seatback forward slightly,
then latch the hook onto the anchor
bracket.
Return")
 ’04 Tacoma U (L/O 0309)
98
2004 TACOMA from Sep. ’03 Prod. (OM35814U)
Symbol mark
TO USE THE ANCHOR BRACKET:
Front outside position—1. Remove the passenger head re- straint.
Lightly push down on")
 ’04 Tacoma U (L/O 0309)
99
2004 TACOMA from Sep. ’03 Prod. (OM35814U)
3. Replace the head restraint.
Store the removed cover in a safe place
such as the glove box.
Be sure to replace the cover wh")
 ’04 Tacoma U (L/O 0309)
101
2004 TACOMA from Sep. ’03 Prod. (OM35814U)
CAUTION
Make sure the top strap is securely
latched, and check that the child re-
straint system is secure by pushing
and pul")