Page 62 of 333

62
When the seat belt pretensioners are acti-
vated, an operating noise may be heard
and a small amount of non−toxic gas may
be released. This does not indicate that
a fire is occurring. This gas is normally
harmless.
Once the seat belt pretensioners have
been activated, the seat belt retractors
remain locked.
CAUTION
Do not modify, remove, strike or open
the seat belt pretensioner assemblies,
airbag sensor or surrounding area or
wiring. Failure to follow these instruc-
tions may prevent the seat belt pre-
tensioners from activating correctly,
cause sudden operation of the system
or disable the system, which could
result in death or serious injury. Con-
sult your Toyota dealer about any re-
pair and modification.
NOTICE
Do not perform any of the following
changes without consulting your
Toyota dealer. Such changes can in-
terfere with proper operation of the
seat belt pretensioners in some
cases.
� Installation of electronic devices
such as a mobile two�way radio,
cassette tape player or compact
disc player
� Repairs on or near the front seat
belt retractor assemblies
� Modification of the suspension sys-
tem
� Modification of the front end struc-
ture
� Attachment of a grille guard (bull
bar, kangaroo bar, etc.), snowplow,
winches or any other equipment to
the front end
� Repairs made on or near the front
fenders, front end structure or con-
sole
22p010a
This indicator comes on when the “IG�
ON” mode is enabled. It goes off after
about 6 seconds. This means the seat
belt pretensioners are operating proper-
ly.
The warning light system monitors the air-
bag sensor assembly, front airbag sen-
sors, side and curtain shield airbag sen-
sors, curtain shield airbag sensors,
driver ’s seat position sensor, driver ’s seat
belt buckle switch, front passenger ’s seat
belt buckle switch, seat belt pretensioner
assemblies, warning light, interconnecting
wiring and power sources. (For details,
see “Service reminder indicators and
warning buzzers” on page 117.)
Page 69 of 333

69
NOTICE
Do not perform any of the following
changes without consulting your
Toyota dealer. Such changes can in-
terfere with proper operation of the
SRS front airbag system in some
cases.
�Installation of electronic devices
such as a mobile two�way radio,
cassette tape player or compact
disc player
� Modification of the suspension sys-
tem
� Modification of the front end struc-
ture
� Attachment of a grille guard (bull
bar, kangaroo bar, etc.), snowplow,
winches or any other equipment to
the front end
� Repairs made on or near the front
fenders, front end structure, con-
sole, steering column, steering
wheel or dashboard near the front
passenger airbag
22p010a
This indicator comes on when the “IG�
ON” mode is enabled. It goes off after
about 6 seconds. This means the SRS
front airbags are operating properly.
The warning light system monitors the air-
bag sensor assembly, front airbag sen-
sors, side and curtain shield airbag sen-
sors, curtain shield airbag sensors,
driver ’s seat position sensor, driver ’s seat
belt buckle switch, front passenger ’s seat
belt buckle switch, seat belt pretensioner
assemblies, warning light, interconnecting
wiring and power sources. (For details,
see “Service reminder indicators and
warning buzzers” on page 117.) If any of the following conditions occurs,
this indicates a malfunction of the airbags
or seat belt pretensioners. Contact your
Toyota dealer as soon as possible.
�When the “IG
−ON” mode is enabled,
the light does not come on or remains
on for more than 6 seconds.
�The light comes on while driving.
Page 76 of 333

76
�Do not disassemble or repair the
front and rear pillars and roof side
rails containing the curtain shield
airbags. Such changes may disable
the system or cause the curtain
shield airbags to inflate accidental-
ly, resulting in death or serious in-
jury.
Failure to follow these instructions
can result in death or serious injury.
Consult your Toyota dealer about any
repair and modification.NOTICE
Do not perform any of the following
changes without consulting your
Toyota dealer. Such changes can
interfere with proper operation of the
SRS side airbag and curtain shield
airbag system in some cases.
� Installation of electronic devices
such as a mobile two�way radio,
cassette tape player or compact
disc player
� Modification of the suspension sys-
tem
� Modification of the side structure of
the passenger compartment
� Repairs made on or near the con-
sole or front seat
22p010a
This indicator comes on when the “IG�
ON” mode is enabled. It goes off after
about 6 seconds. This means the SRS
side airbags and curtain shield airbags
are operating properly.
The warning light system monitors the air-
bag sensor assembly, front airbag sen-
sors, side and curtain shield airbag sen-
sors, curtain shield airbag sensors,
driver ’s seat position sensor, driver ’s seat
belt buckle switch, front passenger ’s seat
belt buckle switch, seat belt pretensioner
assemblies, warning light, interconnecting
wiring and power sources. (For details,
see “Service reminder indicators and
warning buzzers” on page 117.)
Page 155 of 333
155
OPERATION OF INSTRUMENTS AND
CONTROLS
Car audio system
Reference156
. . . . . . . . . . . . . . . . . . . . . . . . . . . . . . . . . . . . .\
. . . . . . . . . . . .
Using your audio systemm 158
. . . . . . . . . . . . . . . . . . . . . . . . . . . . . . . . . .
Radio operation 163
. . . . . . . . . . . . . . . . . . . . . . . . . . . . . . . . . . . . \
. . . . . . . .
Cassette tape player operation 166
. . . . . . . . . . . . . . . . . . . . . . . . . . . . . . .
Compact disc player operation 169
. . . . . . . . . . . . . . . . . . . . . . . . . . . . . . .
Audio remote controls 174
. . . . . . . . . . . . . . . . . . . . . . . . . . . . . . . . . . . . \
. . .
Car audio system operating hints 175
. . . . . . . . . . . . . . . . . . . . . . . . . . . . .
SECTION 2– 8
Page 159 of 333
159
VOLUME CONTROL
To adjust the volume, push and turn the
“VOL”.Ty p e 1
Ty p e 2
Push the “AM”, “FM”, “TAPE” “DISC”
or “TAPE·DISC” button to turn on that
mode. The selected mode turns on di-
rectly.
Push these buttons if you want to switch
from one mode to another.
If the tape or disc is not set, the cassette
player or compact disc player does not
turn on.
You can turn off the cassette player by
ejecting the cassette tape. If the audio
system was previously off, then the entire
audio system will be turned off when you
eject the cassette tape. If another function
was previously playing, it will come on
again.
Page 160 of 333
160
26p136a
Radio
26p137a
Casette tape
26p138a
Compact disc (Type 1)
26p149b
Compact disc (Type 2)
The switches for radio, cassette tape
and compact disc player operation are
displayed on the liquid crystal display.
Touch them lightly and directly on the
screen.
The selected switch is highlighted in
green.
Page 162 of 333

162
YOUR RADIO ANTENNA
To remove an antenna on the roof, care-
fully turn it counterclockwise.
NOTICE
To prevent damage to the antenna,
make sure to remove it before driving
your Toyota through an automatic car
wash.
YOUR CASSETTE PLAYER
When you insert a cassette, the exposed
tape should be to the right.
NOTICE
Do not oil any part of the player and
do not insert anything other than cas-
sette tapes into the slot, or the tape
player may be damaged.
YOUR COMPACT DISC PLAYER
When you insert a disc, gently push it in
with the label side up. (The player will
automatically eject a disc if the label side
is down.)
The discs set in the player are played
continuously, starting with disc number 1.
The disc number of the disc currently be-
ing played, the track number and the time
from the beginning of the program appear
on the display.
Type 2 only:
When play of one disc ends, the first
track of the following disc starts. When
play of the final disc ends, play of the
first disc starts again.
The player will skip any empty disc num-
ber.
Page 163 of 333
163
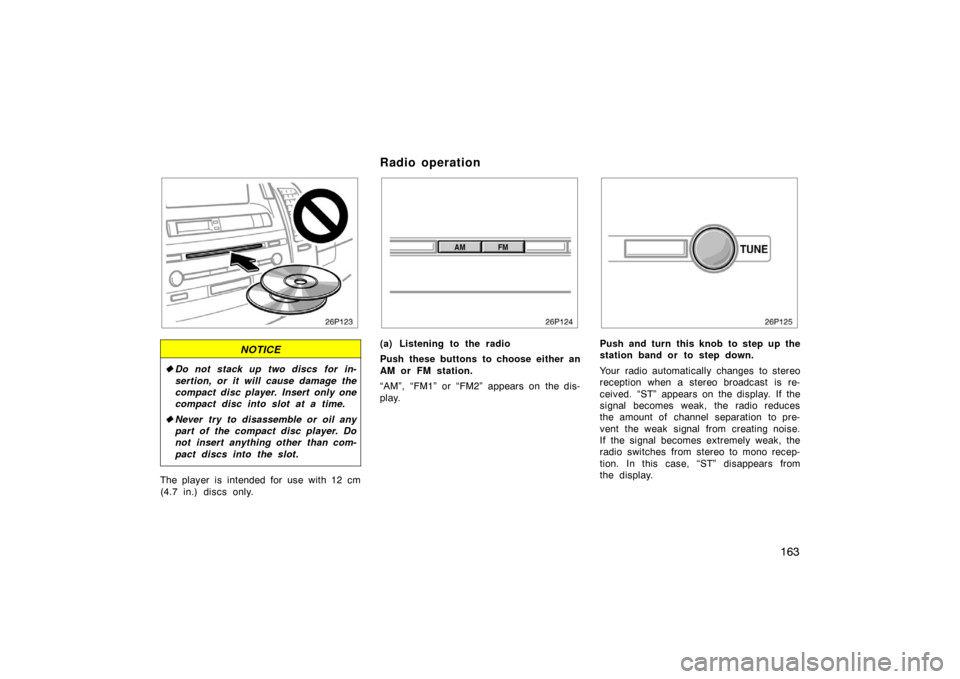
NOTICE
�Do not stack up two discs for in-
sertion, or it will cause damage the
compact disc player. Insert only one
compact disc into slot at a time.
� Never try to disassemble or oil any
part of the compact disc player. Do
not insert anything other than com-
pact discs into the slot.
The player is intended for use with 12 cm
(4.7 in.) discs only.
(a) Listening to the radio
Push these buttons to choose either an
AM or FM station.
“AM”, “FM1” or “FM2” appears on the dis-
play.Push and turn this knob to step up the
station band or to step down.
Your radio automatically changes to stereo
reception when a stereo broadcast is re-
ceived. “ST” appears on the display. If the
signal becomes weak, the radio reduces
the amount of channel separation to pre-
vent the weak signal from creating noise.
If the signal becomes extremely weak, the
radio switches from stereo to mono recep-
tion. In this case, “ST” disappears from
the display.
Radio operation


26p149b
Compact disc (Type 2)
The switches for radio, cassette tape
and compact disc player operation are
displayed on the liquid")