Page 101 of 138
91
5. Touch the switch corresponding to the
desired category. Then touch the
“OK”switch.
Delete previous point
You can delete your previous destination.
1. Push the
“MENU” button.
2. Touch the “Setup” switch. Then
touch
switch twice to display page 3 of
the “Setup” screen.
3. Touch the “Delete” switch of “Pre-
vious Point”.
Page 109 of 138
99
(b) Edit dealer
You can edit the dealer name, staff, loca-
tion and phone number.
1. Touch the
“Set Dealer” switch on
the “Maintenance” screen. The “Edit
Dealer” screen appears.
2. To edit, touch the corresponding
switch.
�To edit “Dealer” or “Contact”
To input the name, touch the alphabet, nu-
meral and/or umlaut keys. You can input
up to 24 letters.
After inputting, touch the
“OK” switch at the
bottom right of the screen. The previous
screen will be displayed.
Page 115 of 138
105
(b) Adding a memo
To add a memo, touch the corresponding
date.
The “Memo” screen appears on the dis-
play. Touch the
“Add Memo” switch.
(See page 102 for inputting a memo.)
You can add the memo up to 100.
(c) Deleting a memo
Touch the corresponding date. Touch the
corresponding memo switch, and then
touch the
“Delete” switch on the screen.
A message appears on the display. To de-
lete, touch the
“Yes” switch. To cancel
the deletion, touch the
“No” switch.
(d) Editing a memo
To edit the memo, touch the correspond-
ing date, and then touch the memo you
wish to edit.
Page 117 of 138
107
To display the memos listed in a desired
period, touch the
“Period” switch.
Touch the number keys.
After setting the period, touch the
“OK”switch. The “Memo list” screen will be dis-
played.
You can set a period from January 1, 2003,
through December 31, 2022, for searching.
To delete and/or edit the memo, touch the
desired memo switch.
To delete all memos, touch the
“Delete
All”
switch. A message appears on the
display. To delete, touch the “Yes”
switch. To cancel the deletion, touch the“No” switch.
To edit: Touch the corresponding “Memo”
or “Location” switch. (See page 105 for
details.)
To delete: Touch the
“Delete” switch.
(See page 105 for details.)
Page 118 of 138

108
Hands�free system
Hands�free system allows you to call or
receive without your hands off the steer-
ing wheel by connecting your cellular
phone.
This system supports the Bluetooth. Blue-
tooth is a data wireless system by which you
can call without your cellular phone connect-
ing with a cable or placing on a cradle.
If your cellular phone does not support the
Bluetooth, this system can not be functioned.
CAUTION
While you are driving, do not use a cellu-
lar phone or connect the Bluetooth
phone.
NOTICE
Do not leave your cellular phone in the
car. The temperature indoor may be
high and damage the phone.
INFORMATION
In the following conditions, the system
may not be functioned.
�The cellular phone is turned OFF.
�The current position is outside the
communication area.
�The cellular phone is not connected.
�The cellular phone has a low battery.
FCC ID: BAB134000�268
IC ID: 2024B�134268
MADE IN JAPAN
This device complies with Part 15 of the
FCC Rules and RSS−210. Operation is
subject to the following two conditions: (1)
This device may not cause harmful interfer-
ence, and (2) This device must accept any
interference received, including interfer-
ence that may cause undesired operation.
CAUTION
Changes or modifications not expressly
approved by the party responsible for
compliance could void the user’s au-
thority to operate the equipment.
By pushing the telephone button above,
you can receive a call or hang up without
your hands off the steering wheel.
unl303a
You can use the microphone above when
talking on the phone.
Page 119 of 138

109 The receiving voice outputs from the driver’s
speaker. When the incoming calls or receiv-
ing voice outputs, the audio from the Audio
system or voice guidance from the Navigation
system will be muted.
INFORMATION
�Talk alternately with the remote party
on the phone. If you talk at the same
time, the voice may not reach each
other. (It is not a malfunction.)
�Keep the volume of receiving voice
down. Otherwise, echo is coming up.
When you talk on the phone, speak
clearly towards the microphone.
�In the following situation, your voice
may not reach the remote party.
�Driving on unpaved road. (Making
a traffic noise.)
�Driving at the high speed.
�The window is open.
�Turning the air�conditioning vents
towards the microphone.
�The sound of the air�conditioning
fan is loud.
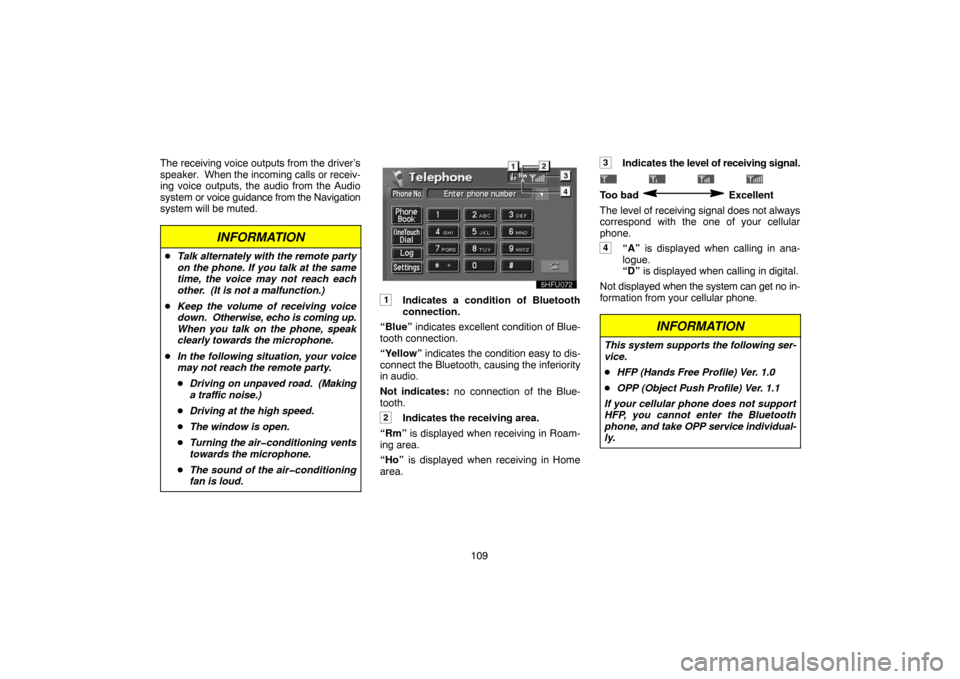
1Indicates a condition of Bluetooth
connection.
“Blue” indicates excellent condition of Blue-
tooth connection.
“Yellow” indicates the condition easy to dis-
connect the Bluetooth, causing the inferiority
in audio.
Not indicates: no connection of the Blue-
tooth.
2Indicates the receiving area.
“Rm” is displayed when receiving in Roam-
ing area.
“Ho” is displayed when receiving in Home
area.
3Indicates the level of receiving signal.
Too bad Excellent
The level of receiving signal does not always
correspond with the one of your cellular
phone.
4“A” is displayed when calling in ana-
logue.
“D” is displayed when calling in digital.
Not displayed when the system can get no in-
formation from your cellular phone.
INFORMATION
This system supports the following ser-
vice.
�HFP (Hands Free Profile) Ver. 1.0
�OPP (Object Push Profile) Ver. 1.1
If your cellular phone does not support
HFP, you cannot enter the Bluetooth
phone, and take OPP service individual-
ly.
Page 135 of 138

125
Speech command system
The speech command system allows you
to operate the navigation system without
your hands off the steering wheel.
UNL301
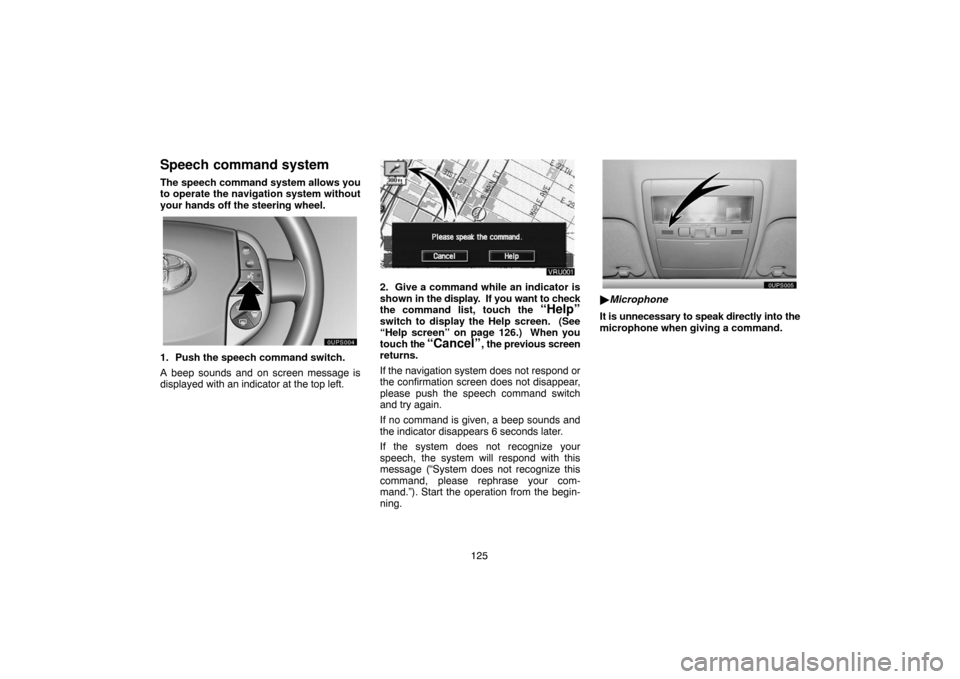
1. Push the speech command switch.
A beep sounds and on screen message is
displayed with an indicator at the top left.
2. Give a command while an indicator is
shown in the display. If you want to check
the command list, touch the
“Help”
switch to display the Help screen. (See
“Help screen” on page 126.) When you
touch the
“Cancel”, the previous screen
returns.
If the navigation system does not respond or
the confirmation screen does not disappear,
please push the speech command switch
and try again.
If no command is given, a beep sounds and
the indicator disappears 6 seconds later.
If the system does not recognize your
speech, the system will respond with this
message (“System does not recognize this
command, please rephrase your com-
mand.”). Start the operation from the begin-
ning.
UNL303
�Microphone
It is unnecessary to speak directly into the
microphone when giving a command.