Page 191 of 330
’04Camry_U (L/O 0307)
183
2004 CAMRY from Jul. ’03 Prod. (OM33616U)
Zone number
After calibration, leaving the system for
several seconds returns it to the compass
mode.
CAUTION
Do not adjust the display while the
vehicle is moving. Be sure to adjust
the display only when the vehicle is
stopped.
Hawaii: 5
Samoa: 5
Guam: 8
Saipan: 8
Page 192 of 330

’04Camry_U (L/O 0307)
184
2004 CAMRY from Jul. ’03 Prod. (OM33616U)
CALIBRATING THE COMPASS (circling
calibration)
Sometimes the direction display on the
compass may not change after a turn. To
rectify this, stop the vehicle and push and
hold the “COMP” switch until “C” appears
on the display.
If “C” appears on the display because of
a drastic change in the magnetic field,
perform circling calibration.Drive the vehicle in a circle at 8 km/h (5
mph) or less. If there is not enough space
to drive in a circle, drive around the
block.
After driving 1 to 3 circles in the above
method, calibration is completed when the
direction is shown on the display.
If calibration cannot be performed because
of the magnetized vehicle etc., take your
vehicle to Toyota dealer.Perform circling calibration just after
you have purchased your Toyota. And
then always perform circling calibration
after the battery has been removed, re-
placed or disconnected.
�Do not perform circling calibration of
the compass in a place where the
earth’s magnetic field is subject to in-
terference by artificial magnetic fields
(underground parking, under a steel
tower, between buildings, roof parking,
near a crossing, near a large vehicle,
etc.).
�During calibration, do not operate elec-
tric systems (moon roof, power win-
dows, etc.) as they may interfere with
the calibration.
Page 193 of 330

’04Camry_U (L/O 0307)
185
2004 CAMRY from Jul. ’03 Prod. (OM33616U)
CAUTION
�When doing the circling calibration,
be sure to secure a wide space,
and watch out for people and ve-
hicles in the neighborhood. Do not
violate any local traffic rules while
performing circling calibration.
�Do not adjust the display while the
vehicle is moving. Be sure to adjust
the display only when the vehicle is
stopped.
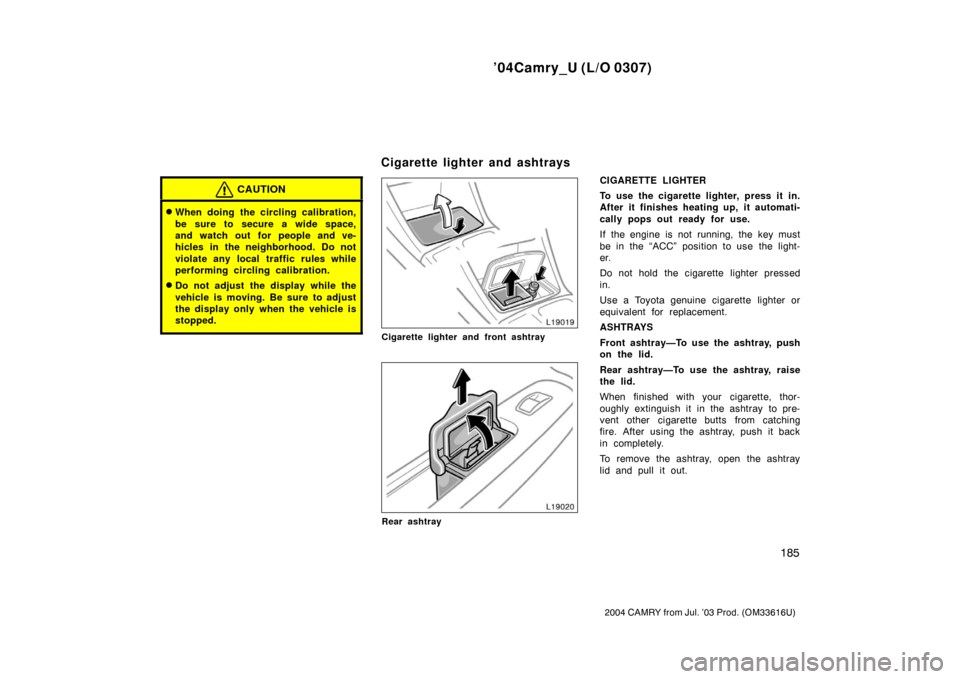
Cigarette lighter and front ashtray
Rear ashtray
CIGARETTE LIGHTER
To use the cigarette lighter, press it in.
After it finishes heating up, it automati-
cally pops out ready for use.
If the engine is not running, the key must
be in the “ACC” position to use the light-
er.
Do not hold the cigarette lighter pressed
in.
Use a Toyota genuine cigarette lighter or
equivalent for replacement.
ASHTRAYS
Front ashtray—To use the ashtray, push
on the lid.
Rear ashtray—To use the ashtray, raise
the lid.
When finished with your cigarette, thor-
oughly extinguish it in the ashtray to pre-
vent other cigarette butts from catching
fire. After using the ashtray, push it back
in completely.
To remove the ashtray, open the ashtray
lid and pull it out.
Cigarette lighter and ashtrays
Page 292 of 330

’04Camry_U (L/O 0307)
284
2004 CAMRY from Jul. ’03 Prod. (OM33616U)
Oil identification marks
Either or both API registered marks are
added to some oil containers to help
you select the oil you should use.
The API Service Symbol is located any-
where on the outside of the container.
The top portion of the label shows the oil
quality by API (American Petroleum Insti-
tute) designations such as SL. The center
portion of the label shows the SAE viscos-
ity grade such as SAE 5W−30. “Energy −
Conserving” shown in the lower portion,
indicates that the oil has fuel −saving ca-
pabilities.
The ILSAC (International Lubricant Stan-
dardization and Approval Committee) Certi-
fication Mark is displayed on the front of
the container.
To ensure excellent lubrication perfor-
mance for your engine, “Toyota Genuine
Motor Oil” is available, which has been
specifically tested and approved for all
Toyota engines.
Please contact your Toyota dealer for fur-
ther details about “Toyota Genuine Motor
Oil”. Look at the see�through coolant reser-
voir when the engine is cold. The cool-
ant level is satisfactory if it is between
the “F” and “L” lines on the reservoir.
If the level is low, add the coolant. (For
the coolant type, see “Coolant type
selection” described below.)
The coolant level in the reservoir will vary
with engine temperature. However, if the
level is on or below the “L” line, add
coolant. Bring the level up to the “F” line.
If the coolant level drops within a short
time after replenishing, there may be a
leak in the system. Visually check the
radiator, hoses, engine coolant filler cap,
radiator cap and drain cock and water
pump.
If you can find no leak, have your Toyota
dealer test the cap pressure and check
for leaks in the cooling system.
CAUTION
To prevent burning yourself, do not
remove the radiator cap when the en-
gine is hot.
Checking the engine coolant
level
Page 322 of 330

’04Camry_U (L/O 0307)
314
2004 CAMRY from Jul. ’03 Prod. (OM33616U)
21. ETCS 10 A: Multiport fuel injection
system/s equential multiport fuel injec-
tion system
22. HAZ 15 A: Emergency flashers
23. ECU�B 10 A: Multiplex communication
system (power door lock system, secu-
rity system, auto −door locking system,
automatic light control system, head-
light delay off system, tail light auto
cut system, illuminated entry system,
daytime running light system, wireless
remote control system), air conditioning
system
24. DOME 7.5 A: Ignition switch light, inte-
rior light, personal lights, trunk light,
vanity lights, garage door opener,
clock, outside temperature gauge, mul-
ti −information display
25. CIG 15 A: Cigarette lighter
26. ECU�ACC 5 A: Power rear view mir-
rors, clock, multi −information display
27. RAD NO.2 10 A: Car audio system,
navigation system
28. POWER POINT 15 A: Power outlets
29. RAD NO.1 20 A: Car audio system,
navigation system 30. GAUGE1 10 A:
Gauges and meters,
clock, outside temperature gauge, mul-
ti −information display, shift lock system,
seat belt reminder lights
31. ECU�IG 10 A: SRS airbag system,
power windows, anti −lock brake system
32. WIPER 25 A: Windshield wipers
33. HTR 10 A: Air conditioning systems
34. MIR HTR 10 A: Outside rear view mir-
ror heaters
35. AM1 5 A: Starting system
36. FOG 15 A: Front fog lights
37. SUN�SHADE 15 A: No circuit
38. GAUGE2 10 A: Auto anti−glare inside
rear view mirror, compass, electric
moon roof, back −up lights, automatic
transmission indicator lights, automatic
light control system, cruise control sys-
tem
39. PANEL 10 A: Glove box light, clock,
outside temperature gauge, multi −infor-
mation display, instrument cluster
lights, instrument panel lights, over-
drive− off indicator light
40. TAIL 10 A: Tail lights, parking lights,
license plate lights 41. PWR NO.4 20 A:
Rear passenger’s
power window (left side)
42. PWR NO.2 20 A: Front passenger ’s
door lock system, front passenger ’s
power window
43. OBD 7.5 A: On−board diagnosis sys-
tem
44. SEAT HTR 20 A: Seat heaters
45.
WASHER 15 A: Windshield washer
46. FAN RLY 10 A: Electric cooling fans
47. STOP 15 A: Stop lights, high mounted
stoplight, anti −lock brake system,
cruise control system
48. FUEL OPEN 5 A: No circuit
49. DOOR NO.2 25 A: Multiplex commu-
nication system (power door lock sys-
tem, auto −door locking system, wire-
less remote control system)
50. AMP 25 A: No circuit
51. PWR NO.3 20 A: Rear passenger’s
power window (right side)