Page 65 of 339

57
2004 AVALON from Aug. ’04 Prod. (OM41412U)
�If the seat belt extender has been
connected to the driver ’s seat belt
buckle without wearing the seat belt
when using the")
’04 AVALON U (L/O 0408)
57
2004 AVALON from Aug. ’04 Prod. (OM41412U)
�If the seat belt extender has been
connected to the driver ’s seat belt
buckle without wearing the seat belt
when using the extender in the
driver ’s seat, the SRS driver ’s air-
bag system will judge that the driv-
er wears the seat belt even if not
wearing it. In this case, the driver ’s
airbag may not activate correctly,
causing death or serious injury in
the event of collision. Be sure to
wear the seat belt with the seat belt
extender.
�Be sure to wear the seat belt with-
out the seat belt extender if you
can fasten the seat belt without the
extender.
�Do not use the seat belt extender
when installing a child restraint
system on the front or rear passen-
ger seat. If installing a child re-
straint system with the seat belt
extender connected to the seat belt,
the seat belt will not securely hold
the child restraint system, which
could cause death or serious injury
to the child or other passengers in
the event of collision.
To connect the extender to the seat
belt, insert the tab into the seat belt
buckle so that the “PRESS” signs on
the buckle release buttons of the ex-
tender and the seat belt are both facing
outward as shown.
You will hear a click when the tab locks
into the buckle.
When releasing the seat belt, press on
the buckle release button on the extender,
not on the seat belt. This helps prevent
damage to the vehicle interior and extend-
er itself.
When not in use, remove the extender
and store in the vehicle for future use.
Page 98 of 339
’04 AVALON U (L/O 0408)
90
2004 AVALON from Aug. ’04 Prod. (OM41412U)
4. Replace the head restraint.
Store any removed covers in a safe place
such as the glove box.
Be sure to replace all covers when the
anchor bracket is not in use.Lower anchorages for the child restraint
systems complying with the FMVSS225
or CMVSS210.2 specifications are
installed in the rear seat.
The anchorages are installed in the clear-
ance between the seat cushion and seat-
back of both outside rear seats.
Child restraint systems complying with the
FMVSS213 or CMVSS213 specification
can be fixed to these anchorages. In this
case, it is not necessary to fix the child
restraint system with a seat belt on the
vehicle.
Canada only
Type A (anchor position indicated by
buttons)
—Installation with child
restraint lower anchorages
Page 99 of 339
’04 AVALON U (L/O 0408)
91
2004 AVALON from Aug. ’04 Prod. (OM41412U)
Canada only
Type A (anchor position indicated by
tags)Canada only
Type B (anchor position indicated by
buttons)Canada only
Type B (anchor position indicated by
tags)
Page 100 of 339

92
2004 AVALON from Aug. ’04 Prod. (OM41412U)
For owners in Canada
The symbol on a child restraint system
indicates the presence of a lower connec-
tor system.
CHILD RESTRA")
’04 AVALON U (L/O 0408)
92
2004 AVALON from Aug. ’04 Prod. (OM41412U)
For owners in Canada
The symbol on a child restraint system
indicates the presence of a lower connec-
tor system.
CHILD RESTRAINT SYSTEM
INSTALLATION
Ty p e A —1. Widen the clearance between the seat cushion and seatback a little
and confirm the position of the low-
er anchorages near the buttons or
tags on the seatback.
2. Latch the hooks of lower straps onto the anchorages and tighten the lower
straps.
Ty p e B — 1. Widen the clearance between the seat cushion and seatback a little
and confirm the position of the low-
er anchorages near the buttons or
tags on the seatback.
2. Latch the buckles onto the anchor- ages.
If your child restraint system has a top
strap, it should be anchored. (For the
installation of the top strap, see “—Using
a top strap” in this Section.) For installation details, refer to the instruc-
tion manual equipped with each product.
CAUTION
�When using the lower anchorages
for the child restraint system, be
sure that there are no irregular ob-
jects around the anchorages and
that the seat belt is not caught.
�Push and pull the child restraint
system in different directions to
make sure it is secure. Follow all
the installation instructions pro-
vided by its manufacturer.
�Do not install a child restraint sys-
tem on the rear seat if it interferes
with the lock mechanism of the
front seats. Otherwise, the child or
front seat occupant(s) may be killed
or seriously injured in case of sud-
den braking or a collision.
Page 156 of 339
’04 AVALON U (L/O 0408)
148
2004 AVALON from Aug. ’04 Prod. (OM41412U)
Details of specific buttons, controls, and
features are described in the alphabetical
list that follows.
—Controls and features
�Ty p e 1
Preset buttons
Page 157 of 339

149
2004 AVALON from Aug. ’04 Prod. (OM41412U)
Preset buttons
These buttons are used to preset and
tune in radio stations.
To preset a station to a button: Tune in
the desi")
’04 AVALON U (L/O 0408)
149
2004 AVALON from Aug. ’04 Prod. (OM41412U)
Preset buttons
These buttons are used to preset and
tune in radio stations.
To preset a station to a button: Tune in
the desired station. (See “TUNE” or
“SEEK” button.) Push and hold down the
button until you hear a beep—this will set
the station to the button. The button num-
ber will appear on the display.
To tune in to a preset station: Push the
button for the station you want. The but-
ton number and station frequency will ap-
pear on the display.
These systems can store one AM and two
FM stations for each button. (The display
will show “AM”, “FM1” or “FM2” when you
push “AM” “FM”.)
(Eject button)
Push the cassette tape eject button to
eject a cassette. Push the compact disc
eject button to eject a compact disc.
After you turn the ignition to “LOCK”, you
will be able to eject a cassette or disc,
but you will not be able to reinsert it.
(Reverse/Fast forward button)
Cassette Player
Push the fast forward button to fast for-
ward a cassette tape. “
” will appear
on the display. Push the reverse button to
rewind a tape. “
” will appear on the
display.
To stop the tape while it is fast forward-
ing, push the fast forward button or
“TAPE”; to stop the tape while it is re-
winding, push the reverse button or
“TAPE”.
If a tape side rewinds completely, the cas-
sette player will stop and then play that
same side. If a tape fast forwards com-
pletely, the cassette player will play the
other side of the tape, using the auto�re-
verse feature.
Compact Disc Player
If you want to fast forward or reverse
through a compact disc track, push and
hold in the fast forward or reverse button.
When you release the button, the compact
disc player will resume playing. AM
Push “AM” to turn on the radio and select
the AM band. “AM” will appear on the
display.
If the audio system is off, you can turn
on the radio by pushing “AM”. Also, push
“AM” to switch from cassette or compact
disc operation to radio operation.
AUDIO CTRL / MODE (Audio control
and mode adjustment)
Manual tone adjustment function—
This knob is used to adjust the tone
manually.
For low�pitch tone adjustment, push
“AUDIO CTRL / MODE” repeatedly until
“BASS” appears on the display. Then turn
the knob to suit your preference.
The display will show the range from
“BASS �5” to “BASS 5”.
For middle�pitch tone adjustment, push
“AUDIO CTRL / MODE” repeatedly until
“MID” appears on the display. Then turn
the knob to suit your preference.
The display will show the range from “MID
�5” to “MID 5”.
Page 163 of 339
’04 AVALON U (L/O 0408)
155
2004 AVALON from Aug. ’04 Prod. (OM41412U)
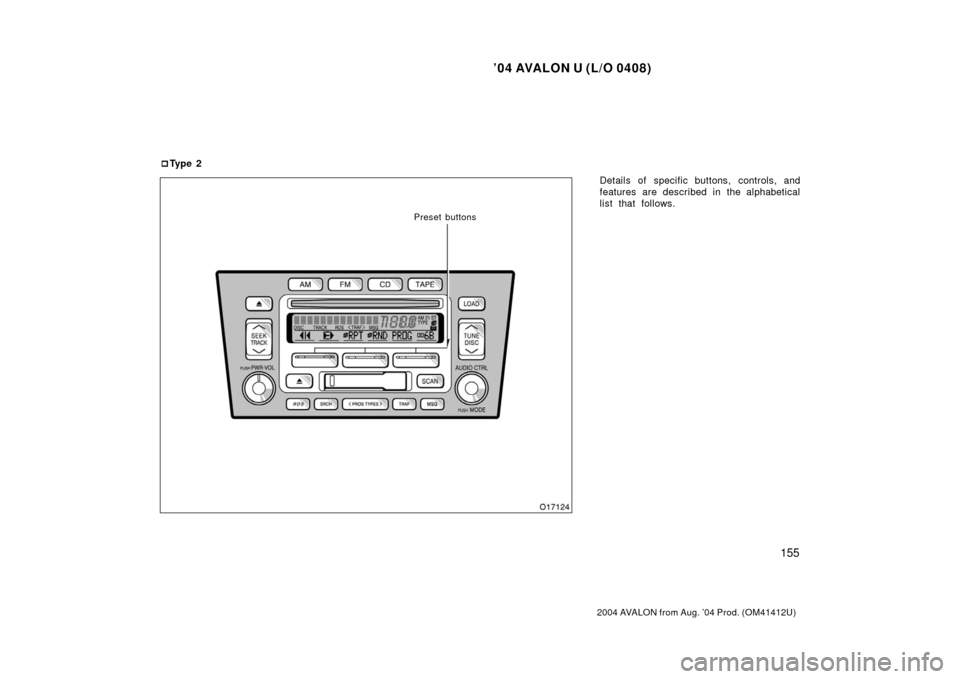
Details of specific buttons, controls, and
features are described in the alphabetical
list that follows.
�
Ty p e 2
Preset buttons
Page 164 of 339

156
2004 AVALON from Aug. ’04 Prod. (OM41412U)
Preset buttons
These buttons are used to preset and
tune in radio stations. These preset but-
tons are programmable only when")
’04 AVALON U (L/O 0408)
156
2004 AVALON from Aug. ’04 Prod. (OM41412U)
Preset buttons
These buttons are used to preset and
tune in radio stations. These preset but-
tons are programmable only when RDS is
not selected.
To preset a station to a button: Tune in
the desired station. (See “TUNE” or
“SEEK” button.) Push and hold down the
button until you hear a beep—this will set
the station to the button. The preset but-
ton number will appear on the display.
To tune in to a preset station: Push the
button for the station you want. The pre-
set button number and station frequency
will appear on the display.
This radio can store one AM and two FM
stations for each button. (The display will
show “AM”, “FM1” or “FM2” when you
push “AM” “FM”.)
(Eject button)
Cassette tape
This button is used to eject a cassette.
While the ignition is in “LOCK”, you can
eject a cassette but you cannot reinsert
it. Compact disc
This button is used to eject one or all
compact discs. To eject the current com-
pact disc, push and release the compact
disc eject button. To eject all specific
discs, push either side of the “DISC” but-
ton until the number of the disc you want
to eject is displayed. Push and release
the eject button. To eject all discs, press
and hold the eject button until you hear
a beep. The last compact disc played be-
fore pushing the button will be ejected
first. If the ejected disc is not removed for
a long time, the eject function will be
cancelled.
While the ignition is in “LOCK”, you can
eject one or all discs but you cannot rein-
sert them.
(Reverse/Fast�forward button)
Cassette Player
Push the fast�forward button to fast�for-
ward a cassette tape. “
” will appear
on the display. Push the reverse button to
rewind a tape. “
” will appear on the
display.
To stop the tape while it is fast�forward-
ing, push the fast�forward button or
“TAPE”; to stop the tape while it is re-
winding, push the reverse button or
“TAPE”.
If a tape rewinds completely, the cassette
player will stop and then play that same
side. If a tape fast�forwards completely,
the cassette will play the other side of the
tape using the auto�reverse feature.
Compact Disc Player
If you want to fast�forward or reverse a
compact disc track, push and hold the
fast�forward or reverse button. When you
release the button, the compact disc play-
er will resume playing.

90
2004 AVALON from Aug. ’04 Prod. (OM41412U)
4. Replace the head restraint.
Store any removed covers in a safe place
such as the glove box.
Be sure to replace all covers")

91
2004 AVALON from Aug. ’04 Prod. (OM41412U)
Canada only
Type A (anchor position indicated by
tags)Canada only
Type B (anchor position indicated by
buttons)Canada only
Typ")

148
2004 AVALON from Aug. ’04 Prod. (OM41412U)
Details of specific buttons, controls, and
features are described in the alphabetical
list that follows.
—Controls and feat")