Page 8 of 122

AVALON_Navi_U (L/O 0408)
viii
2004 AVALON Navigation from Aug. ’04 Prod. (OM41413U)
Controller and buttons
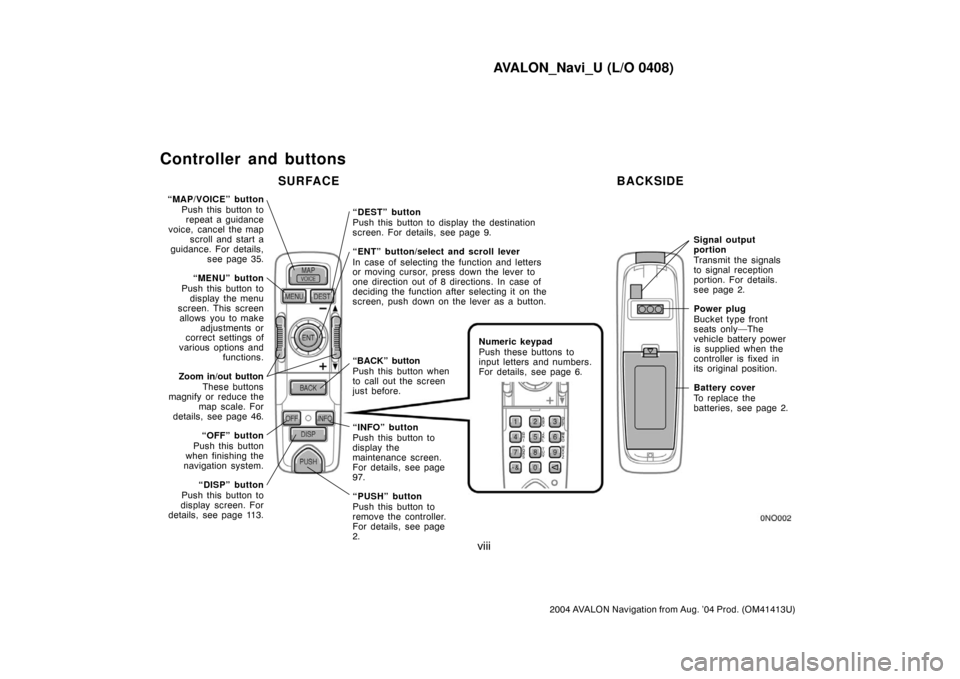
“MAP/VOICE” button
Push this button to
repeat a guidance
voice, cancel the map
scroll and start a
guidance. For details,
see page 35.
“MENU” button
Push this button to
display the menu
screen. This screen
allows you to make
adjustments or
correct settings of
various options and
functions.
Zoom in/out button
These buttons
magnify or reduce the
map scale. For
details, see page 46.
“OFF” button
Push this button
when finishing the
navigation system.
“DISP” button
Push this button to
display screen. For
details, see page 113.“DEST” button
Push this button to display the destination
screen. For details, see page 9.
“ENT” button/select and scroll lever
In case of selecting the function and letters
or moving cursor, press down the lever to
one direction out of 8 directions. In case of
deciding the function after selecting it on the
screen, push down on the lever as a button.
Numeric keypad
Push these buttons to
input letters and numbers.
For details, see page 6.
“INFO” button
Push this button to
display the
maintenance screen.
For details, see page
97.
“PUSH” button
Push this button to
remove the controller.
For details, see page
2.
Signal output
portion
Transmit the signals
to signal reception
portion. For details.
see page 2.
Power plug
Bucket type front
seats only—The
vehicle battery power
is supplied when the
controller is fixed in
its original position.
Battery cover
To replace the
batteries, see page 2.
SURFACE BACKSIDE
“BACK” button
Push this button when
to call out the screen
just before.
Page 10 of 122
AVALON_Navi_U (L/O 0408)
2
2004 AVALON Navigation from Aug. ’04 Prod. (OM41413U)
1NO103
With bucket type front seat
1NO093
With bench type front seat
Your navigation system can be operated
by the navigation controller when the
ignition switch is in the “ACC” or “ON”
position.
With bucket type front seat—The controller
is located beside the automatic transmis-
sion selector lever.
With bench type front seat—The controller
is located on the front armrest.
To turn on the system—Push the
“MAP/VOICE”, “MENU”, “DEST”
or “INFO” button.
To turn off the system—Push the
“OFF” button.
NOTICE
To prevent the battery from being dis-
charged, do not leave the navigation
system on longer than necessary
when the engine is not running.
1NO101
paste
Your navigation system
Page 12 of 122
AVALON_Navi_U (L/O 0408)
4
2004 AVALON Navigation from Aug. ’04 Prod. (OM41413U)
REPLACING CONTROLLER BATTERY
For replacement of the batteries, use 2
AAA batteries.
WIth bucket type front seat only—While
the controller is fixed in its original posi-
tion, the power source is supplied from
the vehicle. As long as you use the con-
troller in this position, the controller can
be used without batteries.
NOTICE
�When replacing the batteries, use
new batteries of the same manufac-
turer.
�Dispose of used batteries according
to the local laws.
Replace the batteries by the following pro-
cedures:
1NO097
1. Remove the cover of the controller as
shown.
1NO098
2. Put in new batteries as shown. Install
the cover.
After replacing battery, check that the con-
troller operates properly. If the controller
still does not operate properly, contact
your Toyota dealer.
Page 13 of 122

AVALON_Navi_U (L/O 0408)
5
2004 AVALON Navigation from Aug. ’04 Prod. (OM41413U)
NOTICE
�Make sure the positive side and
negative side of the battery should
be faced correctly.
�Do not replace the battery with wet
hands. Water may cause unexpected
rust.
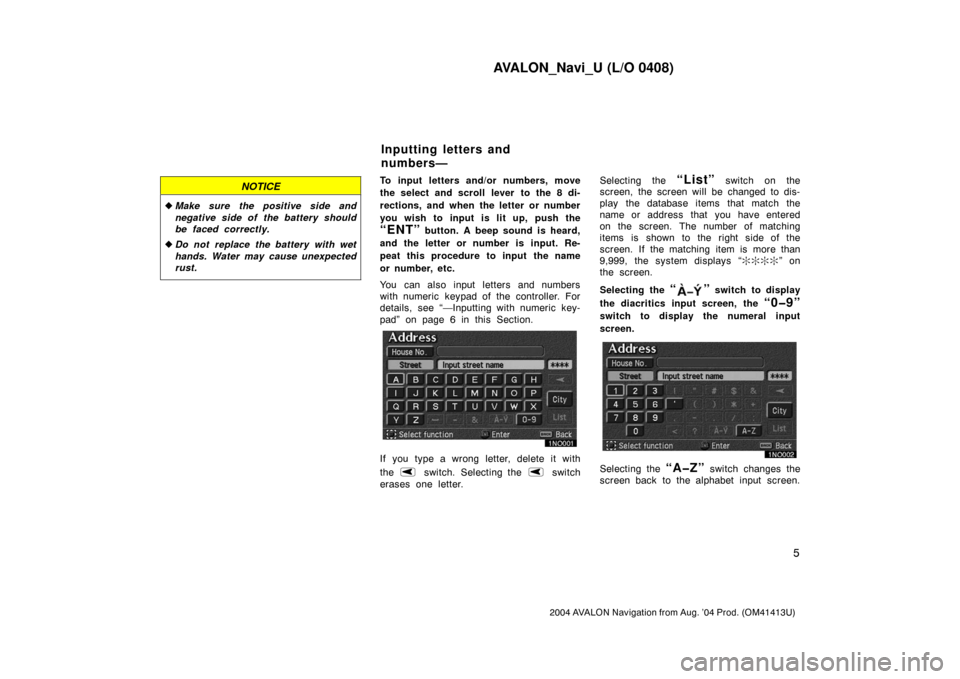
To input letters and/or numbers, move
the select and scroll lever to the 8 di-
rections, and when the letter or number
you wish to input is lit up, push the
“ENT” button. A beep sound is heard,
and the letter or number is input. Re-
peat this procedure to input the name
or number, etc.
You can also input letters and numbers
with numeric keypad of the controller. For
details, see “—Inputting with numeric key-
pad” on page 6 in this Section.
If you type a wrong letter, delete it with
the
switch. Selecting the switch
erases one letter.Selecting the
“List” switch on the
screen, the screen will be changed to dis-
play the database items that match the
name or address that you have entered
on the screen. The number of matching
items is shown to the right side of the
screen. If the matching item is more than
9,999, the system displays “����” on
the screen.
Selecting the
“” switch to display
the diacritics input screen, the
“0�9”
switch to display the numeral input
screen.
Selecting the “A�Z” switch changes the
screen back to the alphabet input screen.
Inputting letters and
numbers—
Page 43 of 122

AVALON_Navi_U (L/O 0408)
35
2004 AVALON Navigation from Aug. ’04 Prod. (OM41413U)
Map screen
The map screen has 2 modes.
Single mode
Dual mode
The current vehicle position mark ap-
pears in the center of the map screen.
You can return to this map screen
showing your current position at any
time from any screen by pushing the
“MAP/VOICE” button on the naviga-
tion controller.
During driving, the current vehicle position
mark is fixed in the center of the screen
and the map moves.
If you move the map, the current vehicle
position mark continues to track your cur-
rent location.
INFORMATION
When you use the map scroll feature,
the current vehicle position mark may
disappear from the screen. Move the
map again with map scroll or push
the
“MAP/VOICE” button to return
to the current vehicle position map
location display.
The current position is automatically
set as your vehicle receives signals
from the GPS (Global Positioning Sys-
tem). If your current position is not
correct, it is automatically corrected af-
ter your vehicle receives signals from
the GPS.
INFORMATION
After battery disconnection, or on a
new vehicle, the current position may
not be correct. As soon as the sys-
tem receives signals from the GPS,
the correct current position is dis-
played.
If you must correct the current position
manually, follow the steps on page 78.
Current position display
Page 106 of 122

AVALON_Navi_U (L/O 0408)
98
2004 AVALON Navigation from Aug. ’04 Prod. (OM41413U)
After you input that information, select the
“OK” switch. The screen then returns to
the “Maintenance” screen. The icon’s color
will change to green after the date or driv-
ing distance is inputted. The icon’s color
will change to orange when your Toyota
needs to be serviced. The following
switches appear on the screen.
“Delete all”: Cancel all conditions which
have been inputted.
“Reset all”: Reset all items which satisfy
either condition.
Select the
“Off” switch at the top of the
“Maintenance” screen, and the information
screen will no longer be displayed.
INFORMATION
�For scheduled maintenance informa-
tion, please refer to the “Owner ’s
Manual Supplement” or “Scheduled
Maintenance”.
�Depending on your driving or the
road conditions, the system may
have a time�lag between the data
which has been inputted and the ac-
tual date and driving distance.
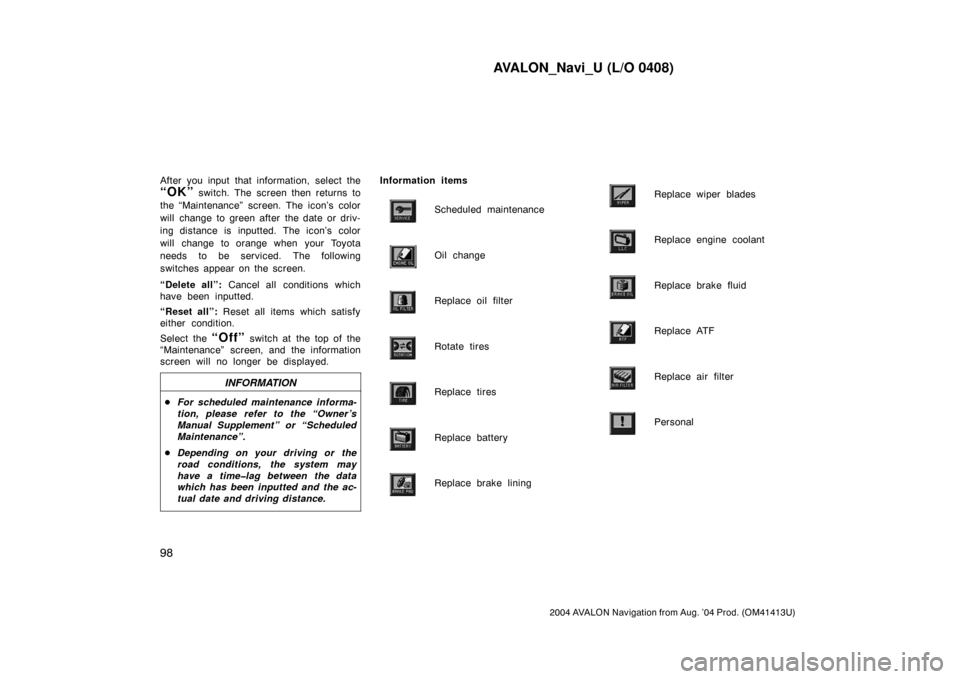
Information items
Scheduled maintenance
Oil change
Replace oil filter
Rotate tires
Replace tires
Replace battery
Replace brake lining
Replace wiper blades
Replace engine coolant
Replace brake fluid
Replace ATF
Replace air filter
Personal