2004 SUBARU IMPREZA WRX maintenance schedule
[x] Cancel search: maintenance schedulePage 405 of 491
11 - 2 0
Maintenance and service
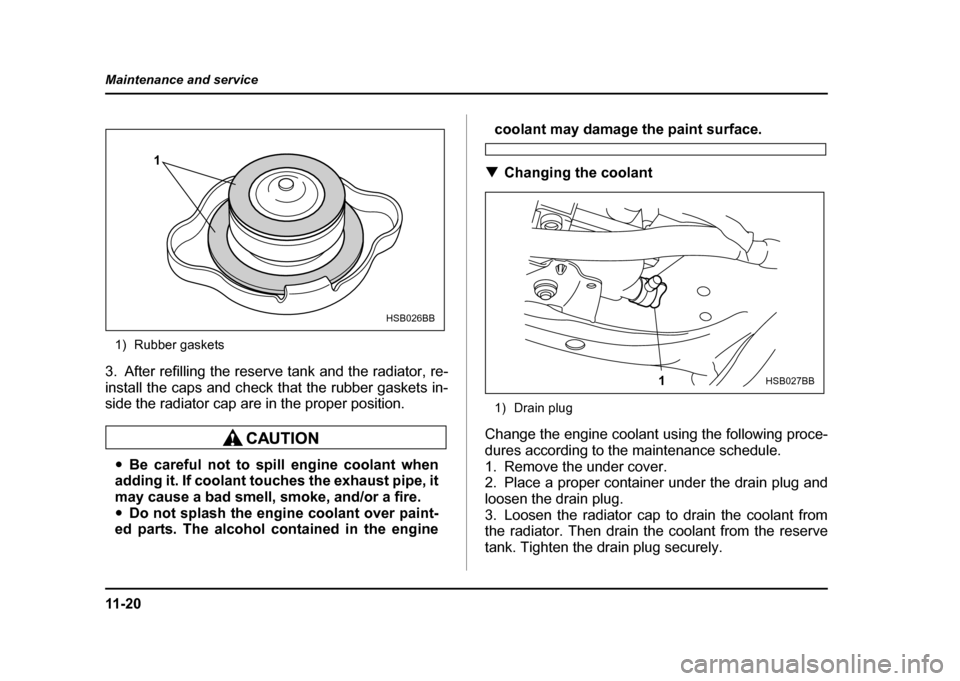
1) Rubber gaskets
3. After refilling the reserve tank and the radiator, re-
install the caps and check that the rubber gaskets in-
side the radiator cap are in the proper position.
" Be careful not to spill engine coolant when
adding it. If coolant touches the exhaust pipe, it
may cause a bad smell, smoke, and/or a fire." Do not splash the engine coolant over paint-
ed parts. The alcohol contained in the engine
coolant may damage the paint surface.
! Changing the coolant
1) Drain plug
Change the engine coolant using the following proce-
dures according to the maintenance schedule.
1. Remove the under cover.
2. Place a proper container under the drain plug and
loosen the drain plug.
3. Loosen the radiator cap to drain the coolant from
the radiator. Then drain the coolant from the reserve
tank. Tighten the drain plug securely.
1
HSB026BB
1HSB027BB
Page 408 of 491
11 -2 3
Maintenance and service
– CONTINUED –
7. Put the radiator cap back on and tighten firmly. At
this time, make sure that the rubber gasket in the radi-
ator cap is correctly in place.
8. Start and run the engine for more than five minutes
at 2,000 to 3,000 rpm.
9. Stop the engine and wait until the coolant cools
down (122 to 140 °F [50 to 60 °C]). If there is any loss
of coolant, add coolant to the radiator’s filler neck and
to the reserve tank’s “FULL” level.
10.Put the radiator cap and reservoir cap back on and
tighten firmly.Air cleaner element
The air cleaner element functions as a filter screen.
When the element is perforated or removed, engine
wear will be excessive and engine life shortened.
The air cleaner element is a viscous type. It is unnec-
essary to clean or wash the element.
Do not operate the engine with the air cleaner
element removed. The air cleaner element not
only filters intake air but also stops flames if the
engine backfires. If the air cleaner element is
not installed when the engine backfires, you
could be burned.
! Replacing the air cleaner element
! Non-turbo models
Replace the air cleaner element according to the
maintenance schedule in the “Warranty and Mainte-
nance Booklet”. Under extremely dusty conditions, re-
place it more frequently. It is recommended that you
always use genuine SUBARU parts.
Page 411 of 491
11 - 2 6
Maintenance and service
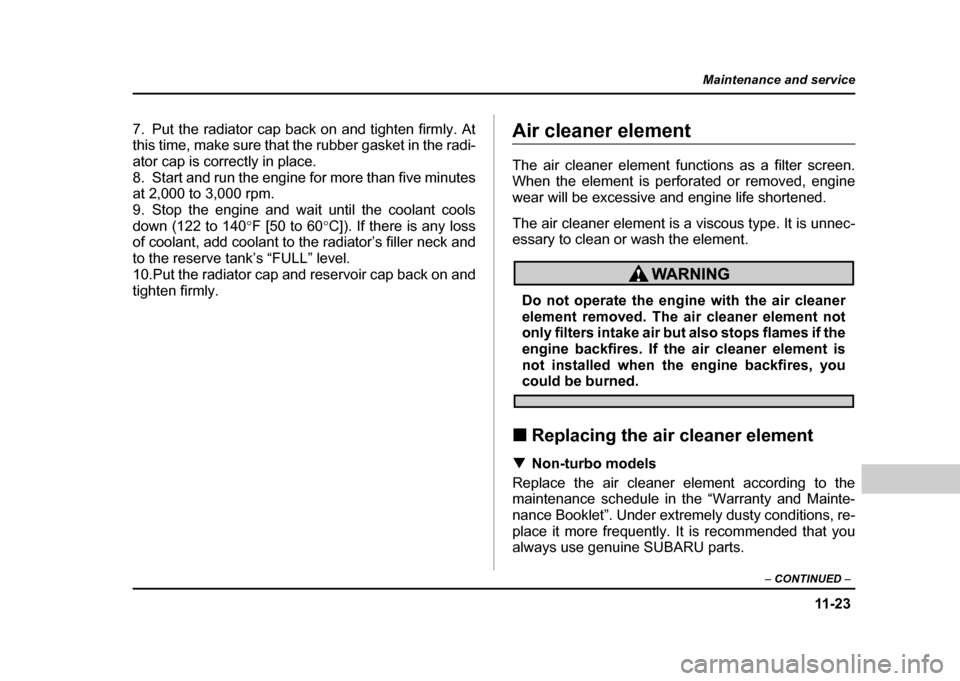
4. To install the air cleaner case cover, insert the two
projections on the air cleaner case cover into the slits
on the air cleaner case and then snap the two clamps
on the air cleaner case cover.
Spark plugs
It may be difficult to replace the spark plugs. It is rec-
ommended that you have the spark plugs replaced byyour SUBARU dealer.
The spark plugs should be replaced according to the
maintenance schedule in the “Warranty and Mainte-
nance Booklet”.
"
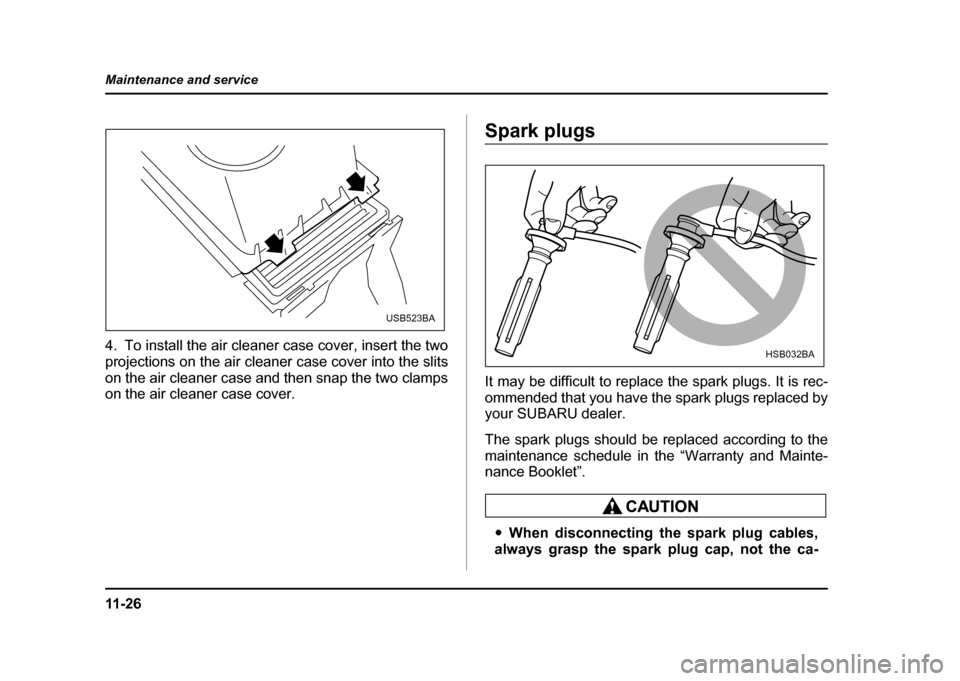
When disconnecting the spark plug cables,
always grasp the spark plug cap, not the ca-
USB523BA
HSB032BA
Page 425 of 491
11 - 4 0
Maintenance and service
Brake booster
If the brake booster does not operate as described be-
low, have it checked by your SUBARU dealer.
1. With the engine off, depress the brake pedal sever-
al times, applying the same pedal force each time. The
distance the pedal travels should not vary.
2. With the brake pedal depressed, start the engine.
The pedal should move slightly down to the floor.
3. With the brake pedal depressed, stop the engine
and keep the pedal depressed for 30 seconds. The
pedal height should not change.
4. Start the engine again and run for about one minute
then turn it off. Depress the brake pedal several times
to check the brake booster. Brake booster operates
properly if the pedal stroke decreases with each de- pression.Brake pedal
Check the brake pedal free play and reserve distance
according to the maintenance schedule in the “War-
ranty and Maintenance Booklet”. !
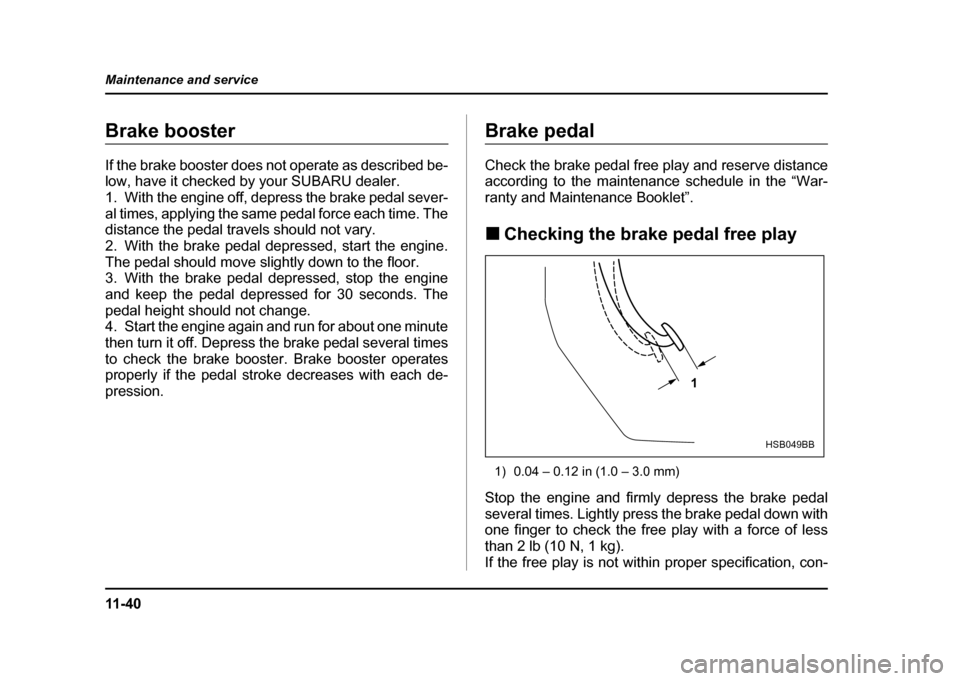
Checking the brake pedal free play
1) 0.04 – 0.12 in (1.0 – 3.0 mm)
Stop the engine and firmly depress the brake pedal
several times. Lightly press the brake pedal down with
one finger to check the free play with a force of less
than 2 lb (10 N, 1 kg).
If the free play is not within proper specification, con-
1
HSB049BB
Page 426 of 491
11 -4 1
Maintenance and service
– CONTINUED –
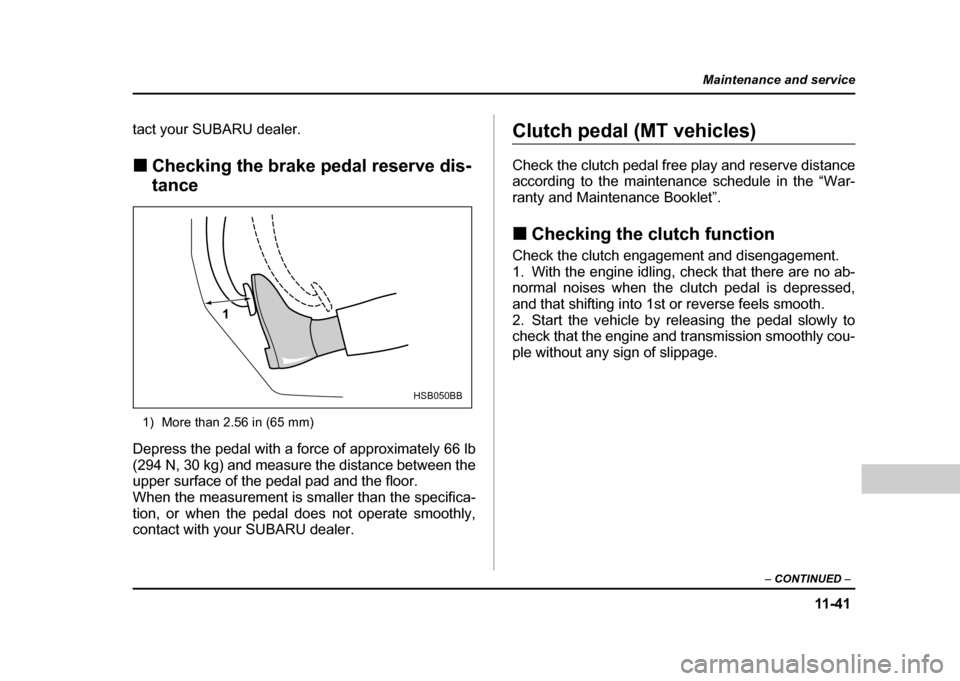
tact your SUBARU dealer. !Checking the brake pedal reserve dis- tance
1) More than 2.56 in (65 mm)
Depress the pedal with a force of approximately 66 lb
(294 N, 30 kg) and measure the distance between the
upper surface of the pedal pad and the floor.
When the measurement is smaller than the specifica-
tion, or when the pedal does not operate smoothly,
contact with your SUBARU dealer.Clutch pedal (MT vehicles)
Check the clutch pedal free play and reserve distance
according to the maintenance schedule in the “War-
ranty and Maintenance Booklet”. ! Checking the clutch function
Check the clutch engagement and disengagement.
1. With the engine idling, check that there are no ab-
normal noises when the clutch pedal is depressed,
and that shifting into 1st or reverse feels smooth.
2. Start the vehicle by releasing the pedal slowly to
check that the engine and transmission smoothly cou-
ple without any sign of slippage.
1
HSB050BB
Page 429 of 491
11 - 4 4
Maintenance and service
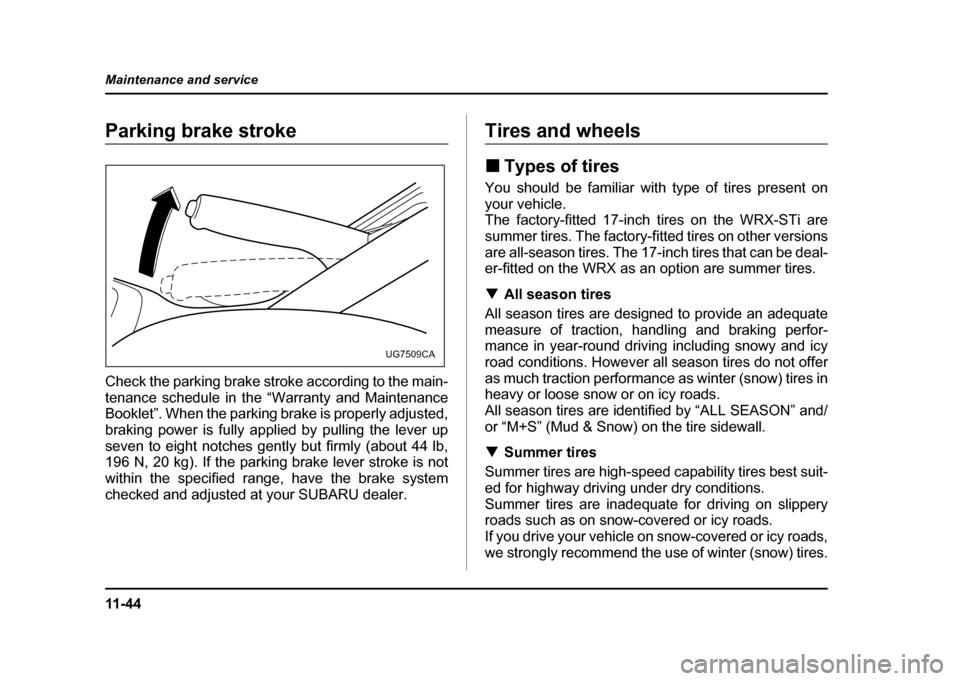
Parking brake stroke
Check the parking brake stroke according to the main-
tenance schedule in the “Warranty and Maintenance
Booklet”. When the parking brake is properly adjusted,
braking power is fully applied by pulling the lever up
seven to eight notches gently but firmly (about 44 lb,
196 N, 20 kg). If the parking brake lever stroke is not
within the specified range, have the brake system
checked and adjusted at your SUBARU dealer.Tires and wheels !
Types of tires
You should be familiar with type of tires present on your vehicle.
The factory-fitted 17-inch tires on the WRX-STi are
summer tires. The factory-fitted tires on other versions
are all-season tires. The 17-inch tires that can be deal-
er-fitted on the WRX as an option are summer tires. ! All season tires
All season tires are designed to provide an adequate
measure of traction, handling and braking perfor-
mance in year-round driving including snowy and icy
road conditions. However all season tires do not offer
as much traction performance as winter (snow) tires in
heavy or loose snow or on icy roads.
All season tires are identified by “ALL SEASON” and/
or “M+S” (Mud & Snow) on the tire sidewall. ! Summer tires
Summer tires are high-speed capability tires best suit-
ed for highway driving under dry conditions.
Summer tires are inadequate for driving on slippery
roads such as on snow-covered or icy roads.
If you drive your vehicle on snow-covered or icy roads,
we strongly recommend the use of winter (snow) tires.
UG7509CA
Page 485 of 491

14-6
Index
Keys
.................................................................................. 2-2
L
Leather seat materials ............................................... 10-6
Light control switch ..................................................... 3-29
Limited slip differential (LSD) .................................7-27
Loading your vehicle .................................................. 8-17
LSD (Limited slip differential) .................................7-27
M
Main fuse ........................................................................ 11-63
Maintenance Precautions .............................................................. 11-3
Schedule ................................................................... 11-3
Seatbelt ..................................................................... 1-27
Tools ........................................................................... 9-24
Manual climate control system ..............................4-4
Manual transmission 5 speed ..................................................................... 7-15
6 speed ..................................................................... 7-12
Manual transmission oil ............................................ 11-28
Map light ................................................................ 6-3, 11-77
Maximum load limits .................................................. 8-29
Meters and gauges .............................................. 3-7, 3-15
Mirrors .............................................................................. 3-44
Moonroof .............................................................. 2-31, 9-23N
New vehicle break-in driving –
the first 1,000 miles (1,600 km) ........................8-2
O
Odometer/Trip meter .......................................... 3-8, 3-15
Off road driving .............................................................. 8-8
Oil pressure warning light .........................................3-21
Oil filter .............................................................................. 11-12
Oil level
Engine ......................................................................... 11-11
Manual transmission ............................................. 11-28
Rear differential ...................................................... 11-34
Outside mirrors .............................................................. 3-47
Overheating engine ..................................................... 9-16
P
Parking Brake ........................................................................... 7-34
Brake stroke ............................................................. 11-44
Light switch ............................................................... 3-34
Tips .............................................................................. 7-35
Power
Door locking switches .......................................... 2-5
Steering ...................................................................... 7-28
Steering fluid ............................................................ 11-36