2004 SUBARU IMPREZA seats
[x] Cancel search: seatsPage 58 of 491
1-31
Seat, seatbelt and SRS airbags
– CONTINUED –
Child restraint systems
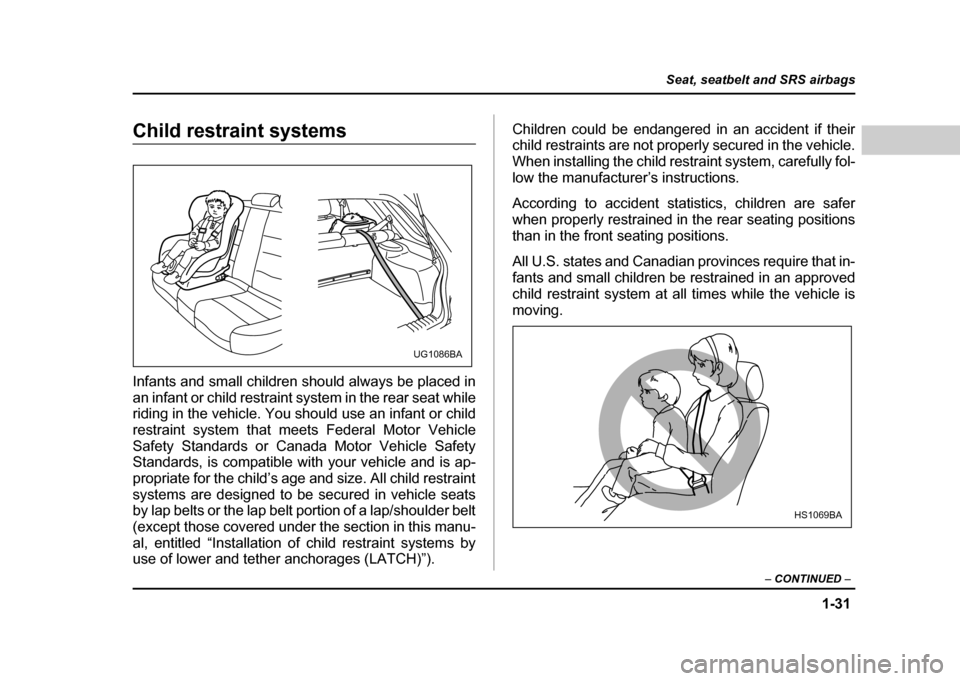
Infants and small children should always be placed in
an infant or child restraint system in the rear seat while
riding in the vehicle. You should use an infant or child
restraint system that meets Federal Motor Vehicle
Safety Standards or Canada Motor Vehicle Safety
Standards, is compatible with your vehicle and is ap-
propriate for the child’s age and size. All child restraint
systems are designed to be secured in vehicle seats
by lap belts or the lap belt portion of a lap/shoulder belt
(except those covered under the section in this manu-
al, entitled “Installation of child restraint systems by
use of lower and tether anchorages (LATCH)”). Children could be endangered in an accident if their
child restraints are not properly secured in the vehicle.
When installing the child restraint system, carefully fol-
low the manufacturer’s instructions.
According to accident statistics, children are safer
when properly restrained in the rear seating positions
than in the front seating positions.
All U.S. states and Canadian provinces require that in-
fants and small children be restrained in an approved
child restraint system at all times while the vehicle ismoving.
UG1086BA
HS1069BA
Page 60 of 491
1-33
Seat, seatbelt and SRS airbags
– CONTINUED –
!Where to place a child restraint system
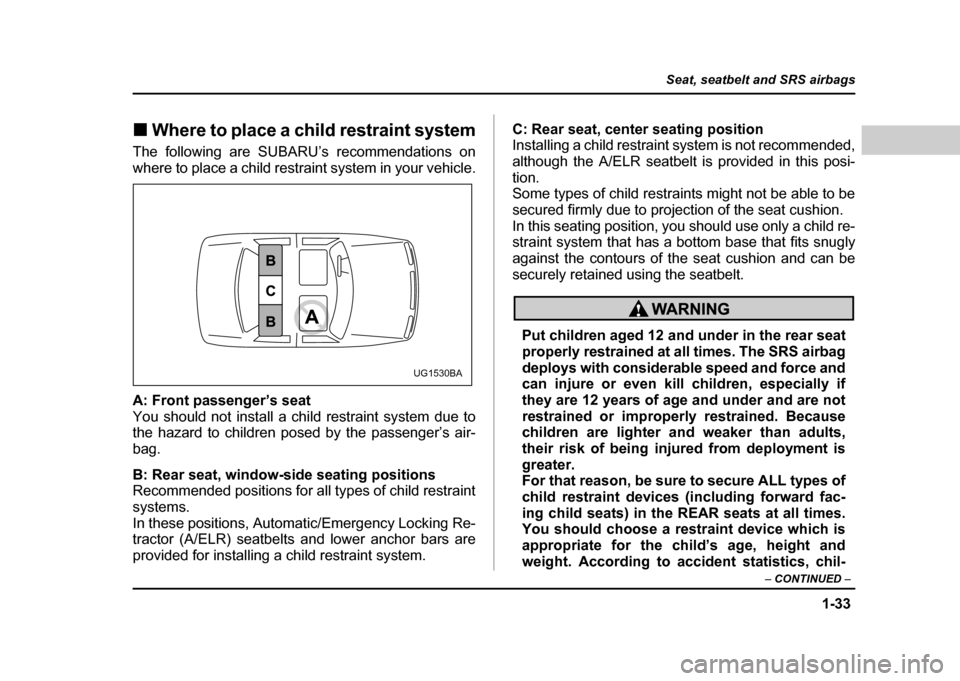
The following are SUBARU’s recommendations on
where to place a child restraint system in your vehicle.
A: Front passenger’s seat
You should not install a child restraint system due to
the hazard to children posed by the passenger’s air-
bag.
B: Rear seat, window-side seating positions
Recommended positions for all types of child restraint systems.
In these positions, Automatic/Emergency Locking Re-
tractor (A/ELR) seatbelts and lower anchor bars are
provided for installing a child restraint system. C: Rear seat, center seating position
Installing a child restraint system is not recommended,
although the A/ELR seatbelt is provided in this posi-
tion.
Some types of child restraints might not be able to be
secured firmly due to projection of the seat cushion.
In this seating position, you should use only a child re-
straint system that has a bottom base that fits snugly
against the contours of the seat cushion and can be
securely retained using the seatbelt.
Put children aged 12 and under in the rear seat
properly restrained at all times. The SRS airbag
deploys with considerable speed and force and
can injure or even kill children, especially if
they are 12 years of age and under and are not
restrained or improperly restrained. Because
children are lighter and weaker than adults,
their risk of being injured from deployment is
greater.
For that reason, be sure to secure ALL types of
child restraint devices (including forward fac-
ing child seats) in the REAR seats at all times.
You should choose a restraint device which is
appropriate for the child’s age, height and
weight. According to accident statistics, chil-
UG1530BA
Page 80 of 491
1-53
Seat, seatbelt and SRS airbags
– CONTINUED –
injury such as abrasions and bruises to the
face or arms because of the SRS airbag deploy-
ment force."The SRS airbags deploy with considerable
speed and force. Occupants who are out of
proper position when the SRS airbag deploys
could suffer very serious injuries. Because the
SRS airbag needs enough space for deploy-
ment, the driver should always sit upright and
well back in the seat as far from the steering
wheel as practical while still maintaining full ve-
hicle control and the front passenger should
move the seat as far back as possible and sit
upright and well back in the seat. " Do not place any objects over or near the
SRS airbag cover or between you and the SRS
airbag. If the SRS airbag deploys, those objects
could interfere with its proper operation and
could be propelled inside the car and cause in-
jury.
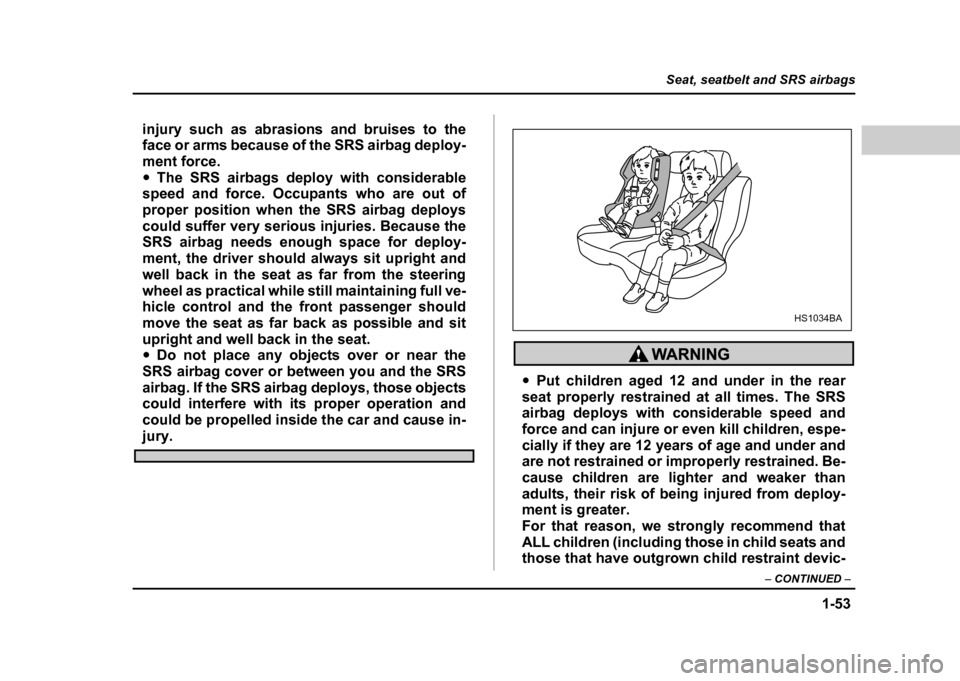
" Put children aged 12 and under in the rear
seat properly restrained at all times. The SRS
airbag deploys with considerable speed and
force and can injure or even kill children, espe-
cially if they are 12 years of age and under and
are not restrained or improperly restrained. Be-
cause children are lighter and weaker than
adults, their risk of being injured from deploy-
ment is greater.
For that reason, we strongly recommend that
ALL children (including those in child seats and
those that have outgrown child restraint devic-
HS1034BA
Page 81 of 491
1-54
Seat, seatbelt and SRS airbags
es) sit in the REAR seat properly restrained at
all times in a child restraint device or in a seat-
belt, whichever is appropriate for the child’s
age, height and weight.
Secure ALL types of child restraint devices (in-
cluding forward facing child seats) in the REAR
seats at all times.
According to accident statistics, children are
safer when properly restrained in the rear seat-
ing positions than in the front seating posi-
tions.
For instructions and precautions concerning
the child restraint system, see the “Child re-
straint systems” section in this chapter. "
NEVER INSTALL A REARWARD FACING
CHILD SEAT IN THE FRONT SEAT. DOING SO RISKS SERIOUS INJURY OR DEATH TO THE
CHILD BY PLACING THE CHILD’S HEAD TOO
CLOSE TO THE SRS AIRBAG." Never allow a child to stand up, or to kneel on
the front passenger’s seat, or never hold a child
on your lap or in your arms. The SRS airbag de-
ploys with considerable force and can injure or
even kill the child.
" When the SRS airbag deploys, some smoke
will be released. This smoke could cause
breathing problems for people with a history of
asthma or other breathing trouble. If you or
your passengers have breathing problems after
SRS airbag deploys, get fresh air promptly." A deploying SRS airbag releases hot gas. Oc-
cupants could get burnt if they come into direct
contact with the hot gas.
NOTE
When you sell your vehicle, we urge you to explain
to the buyer that it is equipped with SRS airbags
by alerting him to the applicable section in this
owner’s manual.
Page 101 of 491
1-74
Seat, seatbelt and SRS airbags
"
Under the center console
" Inside each front fender
" Steering wheel and column and nearby areas
" Top of the dashboard on front passenger’s
side and nearby areas " Each front seat and nearby area (only for ve-
hicles with SRS side airbags)
" Inside each center pillar
In the event that the SRS airbag is deployed, re-
placement of the system should be performed
only by an authorized SUBARU dealer. When the
components of the SRS airbag system are re-
placed, use only genuine SUBARU parts.
To ensure their long-term reliability, the SRS airbags
must be inspected by a SUBARU dealer ten years af-
ter the date of manufacture, which is shown on the cer-
tification plate attached to the driver’s door jamb.
NOTE
In the following cases, contact your SUBARU deal-
er as soon as possible. " The front part of the vehicle was involved in an
accident in which the SRS frontal airbags did not
deploy. " The pad section of the steering wheel or front passenger’s frontal airbag cover is scratched,
cracked, or otherwise damaged.
In addition, if your vehicle is equipped with SRS
side airbags, contact your SUBARU dealer as
soon as possible in the following cases. "
Either center pillar or a nearby area of the vehi-
cle was involved in an accident in which the SRS
side airbag did not deploy. " The fabric or leather of either front seatback is
cut, frayed, or otherwise damaged. ! Precautions against vehicle modifica- tion
"To avoid accidental activation of the system
or rendering the system inoperative, which may
result in serious injury, no modifications
should be made to any components or wiring of
the SRS airbag system.
This includes following modifications: "Installation of custom steering wheels
" Attachment of additional trim materials to
the dashboard " Installation of custom seats (for vehicles
Page 186 of 491
3-49
Instruments and controls
– CONTINUED –
frosting or defogging is desired when you restart your
vehicle, you have to push the switch to turn it on again.
NOTE
While the outside mirror defogger is operating, the
rear window defogger also operates.
To prevent the battery from being discharged,
do not operate the defogger continuously for
any longer than necessary.
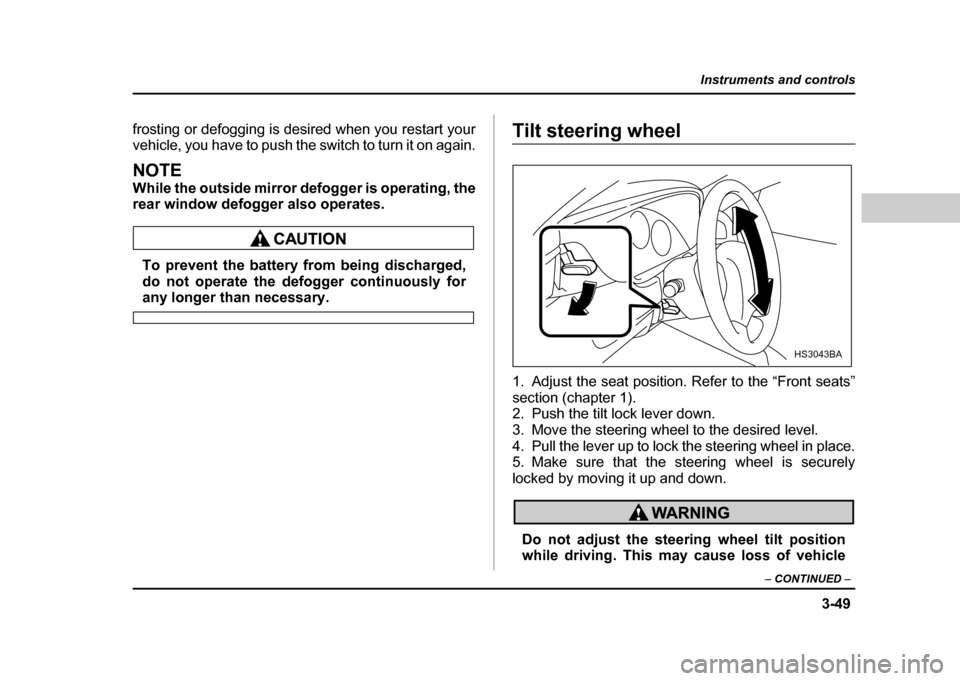
Tilt steering wheel
1. Adjust the seat position. Refer to the “Front seats”
section (chapter 1).
2. Push the tilt lock lever down.
3. Move the steering wheel to the desired level.
4. Pull the lever up to lock the steering wheel in place.
5. Make sure that the steering wheel is securely
locked by moving it up and down.
Do not adjust the steering wheel tilt position
while driving. This may cause loss of vehicle
HS3043BA
Page 383 of 491

10-6
Appearance care
Cleaning the interior
Use a vacuum cleaner to get rid of the dust and dirt.
Wipe the vinyl areas with a clean, damp cloth. !
Seat fabric
Remove loose dirt, dust or debris with a vacuum
cleaner. If the dirt is caked on the fabric or hard to re-
move with a vacuum cleaner, use a soft blush then
vacuum it.
Wipe the fabric surface with a tightly wrung cloth and
dry the seat fabric thoroughly. If the fabric is still dirty,
wipe using a solution of mild soap and lukewarm water
then dry thoroughly.
If the stain does not come out, try a commercially-
available fabric cleaner. Use the cleaner on a hidden
place and make sure it does not affect the fabric ad-
versely. Use the cleaner according to its instructions. ! Leather seat materials
The leather used by SUBARU is a high quality natural
product which will retain its distinctive appearance and
feel for many years with proper care.
Allowing dust or road dirt to build up on the surface can
cause the material to become brittle and to wear pre- maturely. Regular cleaning with a soft, moist, natural
fiber cloth should be performed monthly, taking care
not to soak the leather or allow water to penetrate the
stitched seams.
A mild detergent suitable for cleaning woolen fabrics
may be used to remove difficult dirt spots, rubbing with
a soft, dry cloth afterwards to restore the luster. If your
SUBARU is to be parked for a long time in bright sun-
light, it is recommended that the seats and headrests
be covered, or the windows shaded, to prevent fading
or shrinkage.
Minor surface blemishes or bald patches may be treat-
ed with a commercial leather spray lacquer. You willdiscover that each leather seat section will develop
soft folds or wrinkles, which is characteristic of genu-
ine leather. !
Synthetic leather upholstery
The synthetic leather material used on the SUBARU
may be cleaned using mild soap or detergent and wa-
ter, after first vacuuming or brushing away loose dirt.
Allow the soap to soak in for a few minutes and wipe
off with a clean, damp cloth. Commercial foam-type
cleaners suitable for synthetic leather materials may
be used when necessary.
Page 484 of 491

14-5
Index
Seatbelt pretensioners
.......................................1-27
Seats ........................................................................... 1-2
Turn signal light and parking light ...................11-70
Front-wheel drive warning light ..............................3-25
Fuel .................................................................................... 7-2
Economy hints ........................................................ 8-2
Filler lid and cap ..................................................... 7-4
Gauge .................................................................. 3-9, 3-16
Requirements .......................................................... 7-2
Fuses ................................................................................ 11-60
Fuses and circuits ....................................................... 12-6
G
GAWR (Gross Axle Weight Rating) .....................8-20
Glove box ........................................................................ 6-6
GVWR (Gross Vehicle Weight Rating ) .............8-20
H
Hazard warning flasher ............................................. 3-6
Headlight beam leveler ............................................. 3-33
Headlight indicator light ............................................3-27
Headlights ......................................................... 3-29, 11-66
Headrest adjustment (Wagon) ..............................1-11
Head restraint adjustment (Front) .......................1-5
Heater operation .......................................................... 4-6
High beam indicator light ..........................................3-26
High mount stop light ................................................. 11-78Horn
.. .. ... .. ... ... .. ... .. ... ... .. ... ... .. ... .. ... ... .. ... ... .. ... .. ... ... .. ... ... .. .. 3-5 0
Hose and connections ............................................... 11-19
I
Ignition switch ............................................................... 3-3
Illuminated entry ........................................................... 2-8
Illumination brightness control ...............................3-32
Indicator light High beam ................................................................ 3-26
Selector lever position ......................................... 3-26
Turn signal ............................................................... 3-26
Inside mirror ................................................................... 3-44
Intercooler water spray ............................................. 11-53
Warning light ........................................................... 3-25
Switch ........................................................................ 3-43
Internal trunk lid release handle ............................2-26
J
Jack and jack handle ................................................. 9-24
Jump starting ................................................................. 9-14
KKey Interlock release .................................................... 3-5
Number ...................................................................... 2-3
Reminder chime ..................................................... 3-4