2004 PONTIAC GRAND PRIX turn signal bulb
[x] Cancel search: turn signal bulbPage 118 of 432

Flash-To-Pass Feature
This feature allows you to use the high-beam headlamps
to signal the driver in front of you that you want to pass.
Pull and hold the exterior lamps control lever toward
you to use this feature. When you do, the following
will occur:
·If the headlamps are either off, in low-beam
or in Daytime Running Lamps (DRL) mode,
the high-beam headlamps will turn on. They'll stay
on as long as you hold the lever there. Release
the lever to turn them off.
·If the headlamps are in high-beam mode, they will
switch to low beam. To return to high-beam, push
the lever away from you.
If your vehicle is equipped with Head-Up Display (HUD),
an arrow will appear on the display to indicate that
the high beams are on.
Turn and Lane-Change Signals
To signal a turn, move the lever all the way up or down.
The lever returns automatically when the turn is
complete.
An arrow on the instrument
panel cluster will ¯ash in
the direction of the
turn or lane change.
If your vehicle is equipped with the Head-Up-Display
(HUD), the turn signals will appear in the HUD area
when making turns or lane changes. See
Head-Up
Display (HUD) on page 3-19for more information.
Raise or lower the lever until the arrow starts to ¯ash
to signal a lane change. Hold it there until the lane
change is complete. The lever returns to its original
position when it is released.
Arrows that ¯ash rapidly when signaling for a turn or
lane change may be caused by a burned-out signal bulb.
Other driver's won't see the signal.
Replace burned-out bulbs to help avoid possible
accidents. Check the fuse and for burned-out bulbs if
the arrow fails to work when signaling a turn. See
Fuses
and Circuit Breakers on page 5-99for more information.
3-14
Page 183 of 432

REDUCED ENGINE POWER
This symbol appears with
the REDUCED ENGINE
POWER warning message.
This warning message appears when the vehicle's
engine power is reduced. This happens when driving
conditions, such as climbing a steep hill, make the
transaxle overwork in a gear that may cause damage to
the vehicle's engine or transaxle. Reduced engine
power can affect the vehicle's ability to accelerate.
This warning message will display only when the ignition
is in RUN. Press the set/reset button to acknowledge
this warning message and to clear it from the screen.
This message will continue to display if it has not been
acknowledged when the engine is turned off. It will
also re-display for three seconds if the message has
been acknowledged, but the condition still exists
when the engine is turned off.
The message will re-appear when the engine is turned
on and the condition still exists.
RIGHT FRONT TURN LAMP OUT
This warning message will appear when the vehicle's
right front turn signal needs to be replaced. See
Front Turn Signal, Parking and Fog Lamps on page 5-62for bulb replacement procedures.
This warning message will display only while the ignition
is in RUN. Press the set/reset button to acknowledge
this warning message. and to clear it from the screen.
This message will continue to display if it has not
been acknowledged when the engine is turned off. It will
also re-display for three seconds if the message has
been acknowledged, but the condition still exists when
the engine is turned off.
The message will re-appear when the engine is turned
on and the condition still exists.
3-79
Page 184 of 432

RIGHT REAR TURN LAMP OUT
This warning message will appear when the
vehicle's right rear turn signal needs to be replaced.
See
Taillamps, Turn Signal, and Stoplamps on
page 5-64for bulb replacement procedures.
This warning message will display only while the ignition
is in RUN. Press the set/reset button to acknowledge
this warning message and to clear it from the screen.
This message will continue to display if it has not been
acknowledged when the engine is turned off. It will
also re-display for three seconds if the message has
been acknowledged, but the condition still exists
when the engine is turned off.
The message will re-appear when the engine is turned
on and the condition still exists.
SERVICE ABS SYSTEM
This symbol appears
with the SERVICE ABS
SYSTEM warning
message.
If the vehicle has the Anti-Lock Brake System (ABS),
this warning message will appear when the vehicle's
brakes are not functioning properly. Have the brake
system serviced by your dealer as soon as possible.
This warning message will display only while the ignition
is in RUN. Press the set/reset button to acknowledge
this warning message and to clear it from the screen.
This message will continue to display if it has not been
acknowledged when the engine is turned off. It will
also re-display for three seconds if the message has
been acknowledged, but the condition still exists
when the engine is turned off.
The message will re-appear when the engine is turned
on and the condition still exists.
3-80
Page 186 of 432

SERVICE PARK LAMPS
This warning message will display if one of the vehicle's
parking lamps needs to be replaced. SeeFront Turn
Signal, Parking and Fog Lamps on page 5-62for
bulb replacement procedures.
This warning message will display only while the ignition
is in RUN. Press the set/reset button to acknowledge
this warning message and to clear it from the screen.
This message will continue to display if it has not been
acknowledged when the engine is turned off. It will
also re-display for three seconds if the message has
been acknowledged, but the condition still exists
when the engine is turned off.
The message will re-appear when the engine is turned
on and the condition still exists.
SERVICE TRACTION SYSTEM
This symbol will appear
with the SERVICE
TRACTION SYSTEM
warning message.
If the vehicle has the traction control system, this
warning message appears when the system is not
functioning properly. See
Traction Control System (TCS)
on page 4-10for more information. Have the traction
control system serviced by your dealer as soon as
possible.
This warning message will display only while the ignition
is in RUN. Press the set/reset button to acknowledge
this warning message and to clear it from the screen.
This message will continue to display if it has not been
acknowledged when the engine is turned off. It will
also re-display for three seconds if the message has
been acknowledged, but the condition still exists
when the engine is turned off.
The message will re-appear when the engine is turned
on and the condition still exists.
3-82
Page 278 of 432

Making Turns
Notice:Making very sharp turns while trailering
could cause the trailer to come in contact with
the vehicle. Your vehicle could be damaged.
Avoid making very sharp turns while trailering.
When you're turning with a trailer, make wider turns than
normal. Do this so your trailer won't strike soft shoulders,
curbs, road signs, trees or other objects. Avoid jerky or
sudden maneuvers. Signal well in advance.
Turn Signals When Towing a Trailer
When you tow a trailer, your vehicle may need a
different turn signal ¯asher and/or extra wiring.
Check with your dealer. The arrows on your instrument
panel will ¯ash whenever you signal a turn or lane
change. Properly hooked up, the trailer lamps will also
¯ash, telling other drivers you're about to turn,
change lanes or stop.
When towing a trailer, the arrows on your instrument
panel will ¯ash for turns even if the bulbs on the trailer
are burned out. Thus, you may think drivers behind
you are seeing your signal when they are not. It's
important to check occasionally to be sure the trailer
bulbs are still working.Your vehicle has bulb warning lights. When you plug
a trailer lighting system into your vehicle's lighting
system, its bulb warning lights may not let you know if
one of your lamps goes out. So, when you have a trailer
lighting system plugged in, be sure to check your
vehicle and trailer lamps from time to time to be sure
they're all working. Once you disconnect the trailer
lamps, the bulb warning lights again can tell you if one
of your vehicle lamps is out.
Driving On Grades
Reduce speed and shift to a lower gear before you start
down a long or steep downgrade. If you don't shift
down, you might have to use your brakes so much that
they would get hot and no longer work well.
On a long uphill grade, shift down and reduce your
speed to around 45 mph (70 km/h) to reduce the
possibility of engine and transaxle overheating.
If you have overdrive, you may have to drive in
THIRD (3) instead of AUTOMATIC OVERDRIVE (D).
4-42
Page 281 of 432

Service............................................................5-3
Doing Your Own Service Work.........................5-3
Adding Equipment to the Outside
of Your Vehicle...........................................5-4
Fuel................................................................5-4
Gasoline Octane............................................5-4
Gasoline Speci®cations....................................5-5
California Fuel...............................................5-5
Additives.......................................................5-6
Fuels in Foreign Countries...............................5-7
Filling Your Tank............................................5-7
Filling a Portable Fuel Container.....................5-10
Checking Things Under the Hood....................5-10
Hood Release..............................................5-11
Engine Compartment Overview.......................5-12
Engine Oil...................................................5-16
Supercharger Oil..........................................5-21
Engine Air Cleaner/Filter................................5-22
Automatic Transaxle Fluid..............................5-24
Engine Coolant.............................................5-26
Radiator Pressure Cap..................................5-29
Engine Overheating.......................................5-29
Cooling System............................................5-32
Power Steering Fluid.....................................5-42
Windshield Washer Fluid................................5-43Brakes........................................................5-45
Battery........................................................5-48
Jump Starting...............................................5-49
Headlamp Aiming...........................................5-56
Bulb Replacement..........................................5-59
Halogen Bulbs..............................................5-59
Headlamps and Sidemarker Lamps.................5-60
Front Turn Signal, Parking and
Fog Lamps...............................................5-62
Center High-Mounted Stoplamp (CHMSL).........5-64
Taillamps, Turn Signal, and Stoplamps............5-64
Back-Up Lamps............................................5-65
Replacement Bulbs.......................................5-66
Windshield Wiper Blade Replacement..............5-67
Tires..............................................................5-68
In¯ation -- Tire Pressure................................5-69
Tire Pressure Monitor System.........................5-70
Tire Inspection and Rotation...........................5-71
When It Is Time for New Tires.......................5-72
Buying New Tires.........................................5-73
Uniform Tire Quality Grading..........................5-74
Wheel Alignment and Tire Balance..................5-75
Wheel Replacement......................................5-75
Tire Chains..................................................5-77
Section 5 Service and Appearance Care
5-1
Page 342 of 432

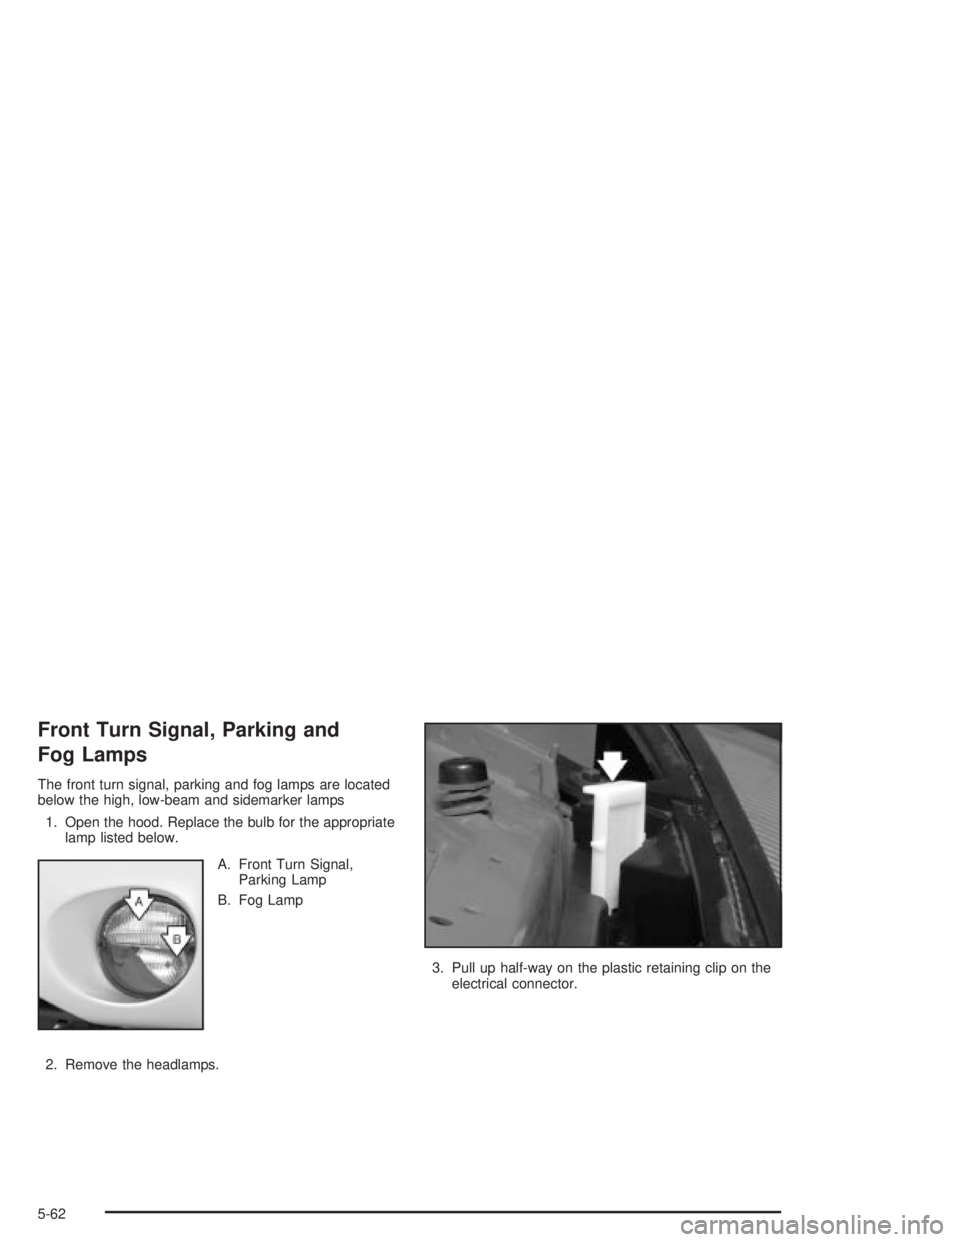
Front Turn Signal, Parking and
Fog Lamps
The front turn signal, parking and fog lamps are located
below the high, low-beam and sidemarker lamps
1. Open the hood. Replace the bulb for the appropriate
lamp listed below.
A. Front Turn Signal,
Parking Lamp
B. Fog Lamp
2. Remove the headlamps.3. Pull up half-way on the plastic retaining clip on the
electrical connector.
5-62
Page 343 of 432

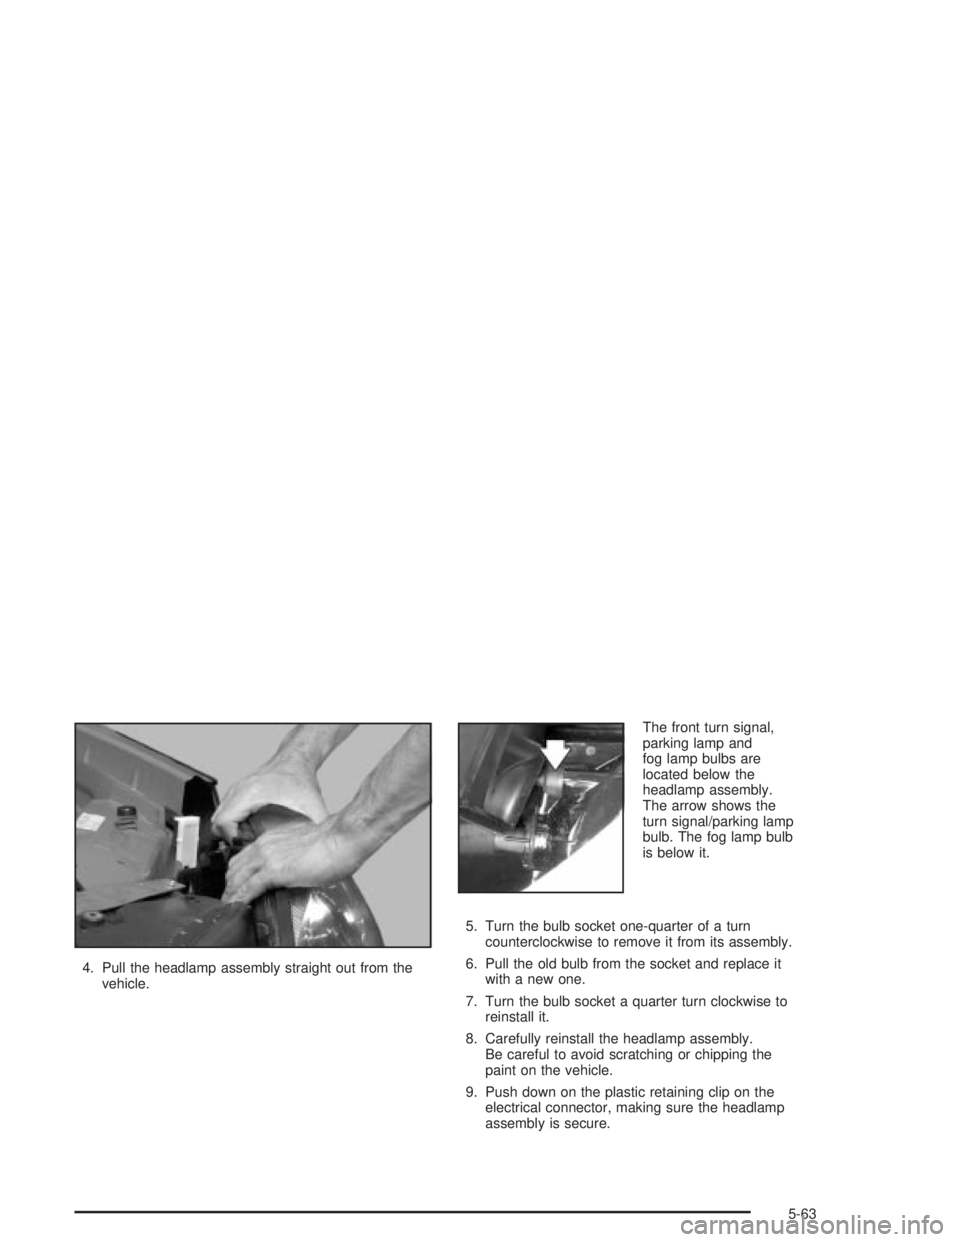
4. Pull the headlamp assembly straight out from the
vehicle.The front turn signal,
parking lamp and
fog lamp bulbs are
located below the
headlamp assembly.
The arrow shows the
turn signal/parking lamp
bulb. The fog lamp bulb
is below it.
5. Turn the bulb socket one-quarter of a turn
counterclockwise to remove it from its assembly.
6. Pull the old bulb from the socket and replace it
with a new one.
7. Turn the bulb socket a quarter turn clockwise to
reinstall it.
8. Carefully reinstall the headlamp assembly.
Be careful to avoid scratching or chipping the
paint on the vehicle.
9. Push down on the plastic retaining clip on the
electrical connector, making sure the headlamp
assembly is secure.
5-63