2004 PONTIAC GRAND PRIX radio
[x] Cancel search: radioPage 233 of 432

Audio Steering Wheel Controls
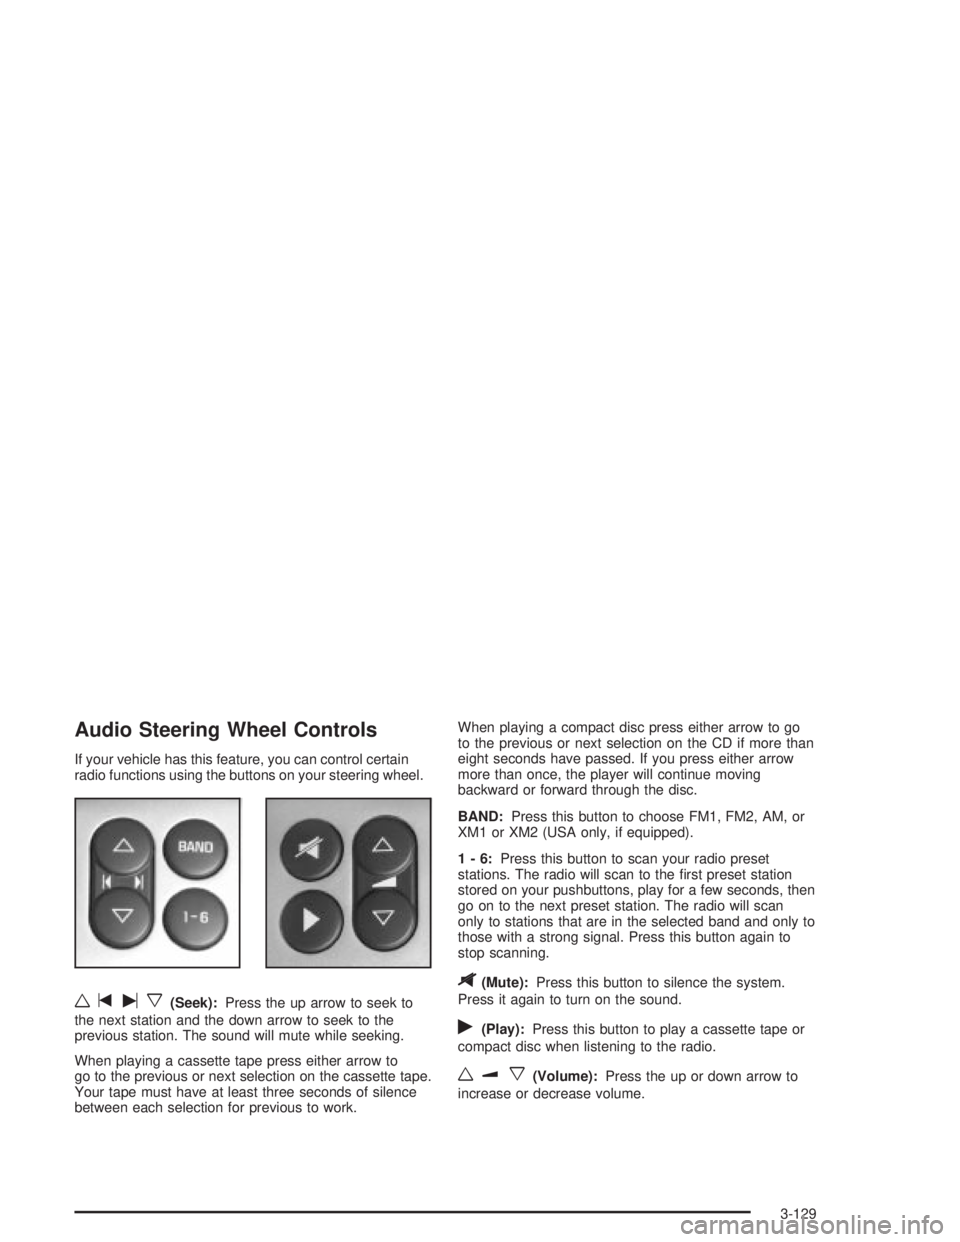
If your vehicle has this feature, you can control certain
radio functions using the buttons on your steering wheel.
wtux(Seek):Press the up arrow to seek to
the next station and the down arrow to seek to the
previous station. The sound will mute while seeking.
When playing a cassette tape press either arrow to
go to the previous or next selection on the cassette tape.
Your tape must have at least three seconds of silence
between each selection for previous to work.When playing a compact disc press either arrow to go
to the previous or next selection on the CD if more than
eight seconds have passed. If you press either arrow
more than once, the player will continue moving
backward or forward through the disc.
BAND:Press this button to choose FM1, FM2, AM, or
XM1 or XM2 (USA only, if equipped).
1-6:Press this button to scan your radio preset
stations. The radio will scan to the ®rst preset station
stored on your pushbuttons, play for a few seconds, then
go on to the next preset station. The radio will scan
only to stations that are in the selected band and only to
those with a strong signal. Press this button again to
stop scanning.
$(Mute):Press this button to silence the system.
Press it again to turn on the sound.
r(Play):Press this button to play a cassette tape or
compact disc when listening to the radio.
wux(Volume):Press the up or down arrow to
increase or decrease volume.
3-129
Page 234 of 432

Understanding Radio Reception
AM
The range for most AM stations is greater than for FM,
especially at night. The longer range, however, can
cause stations to interfere with each other. AM can pick
up noise from things like storms and power lines.
Try reducing the treble to reduce this noise if you ever
get it.
FM Stereo
FM stereo will give you the best sound, but FM signals
will reach only about 10 to 40 miles (16 to 65 km).
Tall buildings or hills can interfere with FM signals,
causing the sound to come and go.
XMŸ Satellite Radio Service (USA Only)
XMŸ Satellite Radio gives you digital radio reception
from coast to coast. Just as with FM, tall buildings
or hills can interfere with satellite radio signals, causing
the sound to come and go. Your radio may display
ªNO SIGNALº to indicate interference.
Care of Your Cassette Tape Player
A tape player that is not cleaned regularly can cause
reduced sound quality, ruined cassettes, or a damaged
mechanism. Cassette tapes should be stored in their
cases away from contaminants, direct sunlight, and
extreme heat. If they are not, they may not operate
properly or may cause failure of the tape player.
Your tape player should be cleaned regularly after every
50 hours of use. Your radio will display CLEAN
PLAYER to indicate that you have used your tape
player for 50 hours without resetting the tape clean
timer. If this message appears on the display, your
cassette tape player needs to be cleaned. It will still play
tapes, but you should clean it as soon as possible to
prevent damage to your tapes and player. If you notice
a reduction in sound quality, try a known good
cassette to see if the tape or the tape player is at fault.
If this other cassette has no improvement in sound
quality, clean the tape player.
For best results, use a scrubbing action, non-abrasive
cleaning cassette with pads which scrub the tape
head as the hubs of the cleaner cassette turn. The
recommended cleaning cassette is available through
your dealership.
3-130
Page 235 of 432

The broken tape detection feature of your cassette tape
player may identify the cleaning cassette as a damaged
tape, in error. To prevent the cleaning cassette from
being ejected, use the following steps:
1. Turn the ignition on.
2. Turn the radio off.
3. Press and hold the CD TAPE button for ®ve
seconds. READY will appear on the display for
®ve seconds.
4. Insert the scrubbing action cleaning cassette.
5. Eject the cleaning cassette after the manufacturer's
recommended cleaning time.
After the cleaning cassette is ejected, the broken tape
detection feature will be active again.
You may also choose a non-scrubbing action, wet-type
cleaner which uses a cassette with a fabric belt to
clean the tape head. This type of cleaning cassette will
not eject on its own. A non-scrubbing action cleaner
may not clean as thoroughly as the scrubbing type
cleaner. The use of a non-scrubbing action, dry-type
cleaning cassette is not recommended.After you clean the player, press and hold the eject
button for ®ve seconds to reset the CLEAN PLAYER
indicator. The radio will display CLEANED to show the
indicator was reset.
Cassettes are subject to wear and the sound quality
may degrade over time. Always make sure the cassette
tape is in good condition before you have your tape
player serviced.
Care of Your CDs
Handle discs carefully. Store them in their original cases
or other protective cases and away from direct sunlight
and dust. If the surface of a disc is soiled, dampen
a clean, soft cloth in a mild, neutral detergent solution
and clean it, wiping from the center to the edge.
Be sure never to touch the side without writing when
handling discs. Pick up discs by grasping the outer
edges or the edge of the hole and the outer edge.
Care of Your CD Player
The use of CD lens cleaner discs is not advised, due to
the risk of contaminating the lens of the CD optics
with lubricants internal to the CD mechanism.
3-131
Page 236 of 432

Backglass Antenna
The AM-FM antenna is integrated with the rear window
defogger, located in the rear window. Be sure that the
inside surface of the rear window is not scratched and
that the lines on the glass are not damaged. If the inside
surface is damaged, it could interfere with radio
reception. Also, for proper radio reception, the antenna
connector at the top-center of the rear window needs to
be properly attached to the post on the glass.
Notice:Do not try to clear frost or other material
from the inside of the rear window with a razor blade
or anything else that is sharp. This may damage
the rear defogger grid and affect your radio's ability
to pick up stations clearly. The repairs wouldn't
be covered by your warranty.
Notice:Do not apply aftermarket glass tinting
with metallic ®lm. The metallic ®lm in some tinting
materials will interfere with or distort the incoming
radio reception. Any damage caused to your
backglass antenna due to metallic tinting materials
will not be covered by your warranty.
Because this antenna is built into your rear window,
there is a reduced risk of damage caused by car washes
and vandals.If you choose to add a cellular telephone to your
vehicle, and the antenna needs to be attached to the
glass, be sure that you do not damage the grid lines for
the AM-FM antenna. There is enough space between
the lines to attach a cellular telephone antenna
without interfering with radio reception
Do not apply aftermarket glass tinting to the back glass.
The metallic ®lm in some tinting materials will interfere
with or distort the incoming radio reception. Care must be
taken when cleaning the rear window because it breaks
in the resistive material heating element and will
adversely affect radio and defogger performance.
See your dealer for details.
XMŸ Satellite Radio Antenna
System (United States Only)
Your XMŸ Satellite Radio antenna is located on the
roof of your vehicle. Keep this antenna clear of
snow and ice build up for clear radio reception.
The performance of your XM system may be affected
if your sunroof is open.
3-132
Page 330 of 432

Notice:If you leave your radio on, it could be badly
damaged. The repairs wouldn't be covered by
your warranty.
3. Turn off the ignition on both vehicles. Unplug
unnecessary accessories plugged into the cigarette
lighter or in the accessory power outlet. Turn off
the radio and all lamps that aren't needed. This will
avoid sparks and help save both batteries. And it
could save your radio!
4. Open the hoods and locate the batteries. Find the
positive (+) and negative (-) terminal locations on
each vehicle. You will not need to access your
battery for jump starting. Your vehicle has a remote
positive (+) jump starting terminal for that purpose
located under the underhood fuse block. The
underhood fuse block is located in the engine
compartment on the passenger's side of the vehicle,
near the diagonal cross brace. See
Engine
Compartment Overview on page 5-12for more
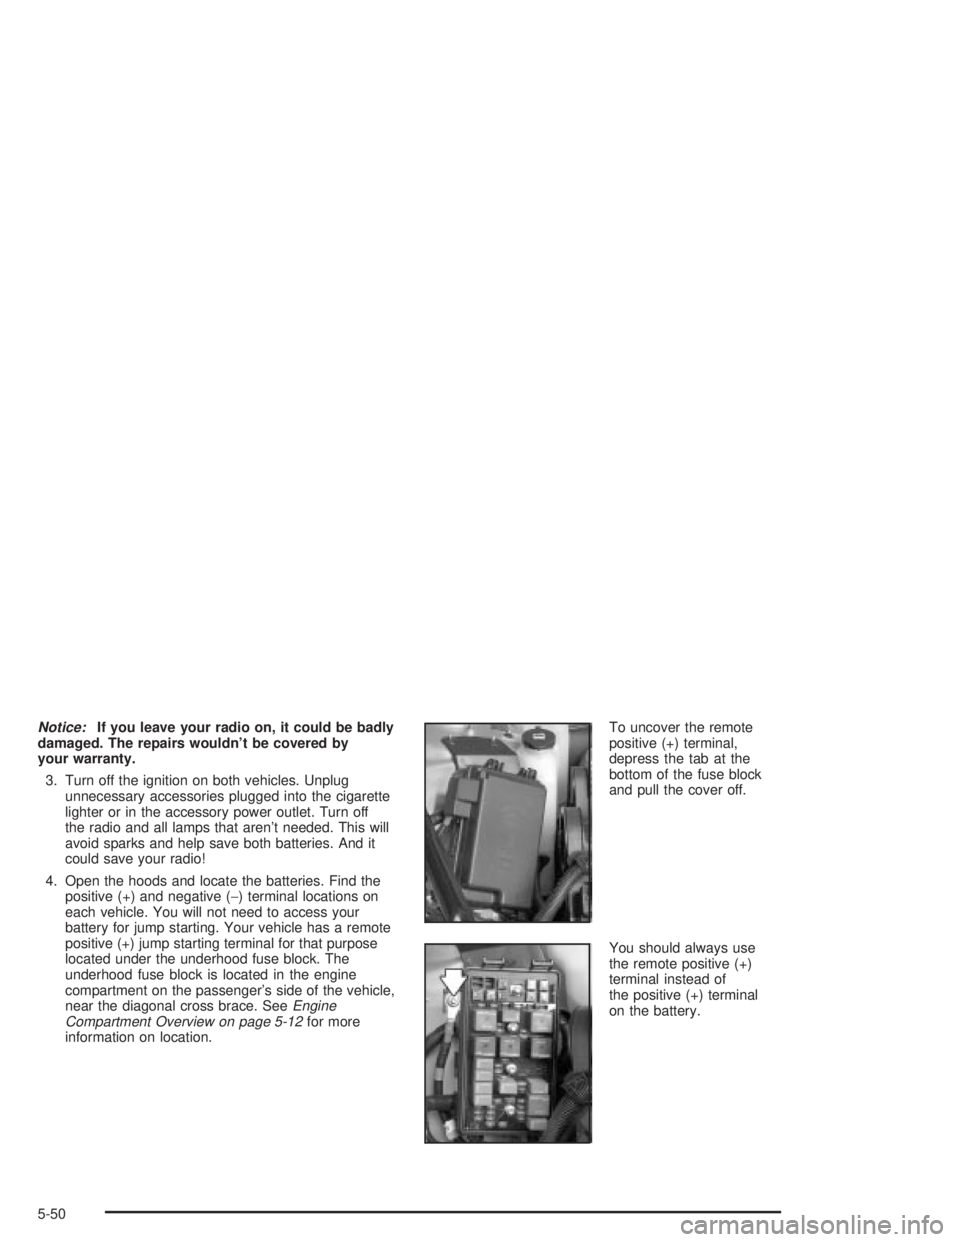
information on location.To uncover the remote
positive (+) terminal,
depress the tab at the
bottom of the fuse block
and pull the cover off.
You should always use
the remote positive (+)
terminal instead of
the positive (+) terminal
on the battery.
5-50
Page 381 of 432

Circuit
Breakers Usage
RR DEFOG Rear Window Defogger
DR LK/TRUNK Door Lock/Trunk
ONSTAR/ALDL Onstar
ž/Diagnostic Link
CANNISTER Fuel Tank Solenoid Cannister
PK LAMPS Parking Lamps
RADIO/AMP Radio Ampli®er
RFA/MODRemote Funtion Activator
(Remote Keyless Entry)
DISPLAYS Instrument Panel Dispays/HUD/DIC
INT LIGHT Interior Lamps
HVAC Climate Controls
Circuit
Breakers Usage
CHMSL/BKUPCenter High Mounted Stop
Lamp/Back-Up Lamps
PWR WDO Power Windows
SPRING COIL
2Steering Wheel Control Switches
PWR SEAT Power Seat
TURN/HAZTurn Signals/Hazard Warning
Lamps
PWR MIRS Power Mirrors
HTD SEAT Heated Seat
To reinstall the end panel, position the lower section
with the edge, on the side opening and press the sides
of the panel until it snaps into place.
5-101
Page 417 of 432

A
A/C OFF FOR ENGINE PROTECTION..............3-65
Accessory Power Outlets.................................3-23
Adding Washer Fluid.......................................5-44
Additional Program Information........................... 7-9
Additives, Fuel................................................. 5-6
Add-On Electrical Equipment............................5-99
Adjusting the Speakers
(Balance/Fade)........................3-92, 3-103, 3-117
Air Bag
Readiness Light..........................................3-34
Air Bag Systems.............................................1-48
How Does an Air Bag Restrain?....................1-54
Servicing Your Air Bag-Equipped Vehicle.........1-56
What Makes an Air Bag In¯ate?....................1-53
What Will You See After an
Air Bag In¯ates?......................................1-54
When Should an Air Bag In¯ate?...................1-53
Where Are the Air Bags?..............................1-50
Air Cleaner/Filter, Engine.................................5-22
Air Conditioning..............................................3-27
AJAR............................................................3-66
AM .............................................................3-130
Antenna, Backglass.......................................3-132
Antenna, XMŸ Satellite Radio
Antenna System........................................3-132
Anti-lock Brake System (ABS)............................ 4-7
Anti-Lock Brake, System Warning Light..............3-37Appearance Care............................................5-90
Care of Safety Belts....................................5-93
Chemical Paint Spotting...............................5-96
Cleaning the Inside of Your Vehicle................5-90
Cleaning the Outside of Your Vehicle..............5-93
Finish Damage............................................5-95
GM Vehicle Care/Appearance Materials..........5-96
Sheet Metal Damage...................................5-95
Underbody Maintenance...............................5-96
Weatherstrips..............................................5-93
Arming Con®rmation........................................2-15
Arming with the Power Lock Switch...................2-14
Arming with the Remote Keyless
Entry Transmitter.........................................2-15
Ashtray.........................................................3-24
Assist Handles...............................................2-38
Audio System(s).............................................3-88
Audio Steering Wheel Controls....................3-129
Backglass Antenna.....................................3-132
Care of Your Cassette Tape Player...............3-130
Care of Your CD Player..............................3-131
Care of Your CDs......................................3-131
Radio with Cassette and CD.......................3-100
Radio with CD............................................3-89
Radio with Six-Disc CD..............................3-114
Setting the Time..........................................3-88
Theft-Deterrent Feature...............................3-128
Understanding Radio Reception...................3-130
XMŸ Satellite Radio Antenna System...........3-132
1
Page 426 of 432

OnStaržSystem.............................................2-35
OnStaržVirtual Advisor....................................2-36
Other Warning Devices...................................... 3-5
Outlet Adjustment............................................3-29
Outside
Convex Mirror.............................................2-34
Power Mirrors.............................................2-34
Overhead Console Reading Lamps....................3-18
Overhead Console..........................................2-36
Overheated Engine Protection Operating Mode.....5-30
Overseas ± Customer Assistance........................ 7-5
Owners, Canadian............................................... ii
Owner's Information........................................7-11
P
PARK LAMPS ON..........................................3-78
Park (P)
Shifting Into................................................2-28
Shifting Out of............................................2-30
Parking
Brake........................................................2-27
Over Things That Burn.................................2-30
Parking Brake and Automatic Transaxle
Park (P) Mechanism Check...........................6-13
PARKING BRAKE ON.....................................3-78
Parking on Hills..............................................4-43Part A - Scheduled Maintenance Services............ 6-4
Part B - Owner Checks and Services................6-10
Part C - Periodic Maintenance Inspections..........6-14
Part D - Recommended Fluids and Lubricants....6-16
Part E - Maintenance Record...........................6-17
Passing.................................................4-16, 4-41
PASS-Key
žIII ................................................2-15
PASS-KeyžIII Operation..................................2-16
Performance Shifting with TAP-ShiftŸ................2-25
Plan Ahead When Possible................................ 7-7
Playing a Cassette Tape................................3-109
Playing a Compact Disc...............3-98, 3-111, 3-123
Playing a Speci®c Loaded
Compact Disc............................................3-124
Playing the Radio........................3-90, 3-101, 3-115
Power
Accessory Outlets........................................3-23
Door Locks.................................................. 2-8
Electrical System.........................................5-99
Lumbar Controls........................................... 1-5
Seat............................................................ 1-4
Steering Fluid.............................................5-42
Windows....................................................2-13
Power Steering...............................................4-14
Pretensioners, Safety Belt................................1-28
Programmable Automatic Door Locks.................. 2-9
10