Page 67 of 432

The key can be used for
the ignition, as well as the
driver's door lock and
storage compartments.
When a new key is delivered, it will come with a bar
coded tag attached to the key ring. Keep the bar coded
tag that came with the original keys. Give this tag to
your dealer if you need a new key made.
Your vehicle has the PASS-Key
žIII vehicle theft
system. The key has a transponder in the key head that
matches a decoder in the vehicle's instrument panel.
If a replacement key or an additional key is needed,
it must be purchased from your dealer. The key will have
PK3 stamped on it.Any new PASS-Key
žIII key must be programmed
before it will start your vehicle. SeePASS-KeyžIII
on page 2-15for more information on programming
your new key.
In an emergency, contact Pontiac Roadside Assistance.
See
Roadside Assistance Program on page 7-6for
more information.
Notice:Your vehicle has a number of features
that can help prevent theft. You can have a lot of
trouble getting into your vehicle if you ever lock
your keys inside. You may even have to damage
your vehicle to get in. So be sure you have
spare keys.
If your vehicle is equipped with the OnStar
žsystem with
an active subscription and you lock your keys inside the
vehicle, OnStar
žmay be able to send a command to
unlock your vehicle. SeeOnStaržSystem on page 2-35for more information.
2-3
Page 74 of 432

Trunk
{CAUTION:
It can be dangerous to drive with the trunk lid
open because carbon monoxide (CO) gas can
come into your vehicle. You can't see or smell
CO. It can cause unconsciousness and even
death. If you must drive with the trunk lid
open or if electrical wiring or other cable
connections must pass through the seal
between the body and the trunk lid:
·Make sure all other windows are shut.
·Turn the fan on your heating or cooling
system to its highest speed and select the
control setting that will force outside air
into your vehicle. See ªClimate Control
Systemº in the Index.
·If you have air outlets on or under the
instrument panel, open them all the way.
See ªEngine Exhaustº in the Index.
Trunk Lock
To unlock the trunk from the outside, insert the key into
the lock on the trunk and turn it clockwise. You can
also press the open trunk symbol on the remote keyless
entry transmitter. See
Remote Keyless Entry System
Operation on page 2-5for more information.
The ignition must be off, or, the transaxle must be in
PARK (P), in order for the trunk to open.
Remote Trunk Release
This feature is used to unlock the trunk from inside the
vehicle using the power door lock switch.
Press and hold the
power door lock switch
to the left for one and
one-half seconds to
unlock the trunk.
The transaxle must be in PARK (P) to activate the
trunk release.
2-10
Page 78 of 432

Theft-Deterrent Systems
Vehicle theft is big business, especially in some cities.
Although your vehicle has a number of theft-deterrent
features, we know that nothing we put on it can make it
impossible to steal.
Content Theft-Deterrent
Your vehicle has a theft-deterrent alarm system.
A red light located on top
of the instrument panel,
toward the center of the
vehicle and near the
windshield, will ¯ash slowly
when the system is armed.
While armed, the doors will not unlock with the power
door lock switch. The remote alarm will sound if
someone tampers with the trunk lock, enters the vehiclewithout using the remote keyless entry transmitter or
key to unlock the doors, or turns the ignition on without
the proper key. The horn will sound and the headlamps
will ¯ash for up to two minutes. The system will also
cut off the fuel supply, preventing the vehicle from
being driven.
Arming with the Power Lock Switch
The vehicle's content theft-deterrent alarm system
can be activated when the key is removed from
the ignition and either power door lock switch is used to
lock the doors, when any door is open. This system
can be activated through the Driver's Information Center
(DIC). See personal programming under
DIC Controls
and Displays on page 3-45.
When programmed, the red light will ¯ash rapidly on top
of the instrument panel indicating the system is ready to
activate. When the doors are locked using the power door
lock switch, the red light will stop ¯ashing indicating that
the system is arming. After all the doors are closed and
locked, the red light will begin ¯ashing at a very slow rate,
indicating the system is armed.
2-14
Page 82 of 432

Starting and Operating
Your Vehicle
New Vehicle Break-In
Notice:Your vehicle doesn't need an elaborate
ªbreak-in.º But it will perform better in the long run
if you follow these guidelines:
·Don't drive at any one speed Ð fast or
slow Ð for the ®rst 500 miles (805 km).
Don't make full-throttle starts.
·Avoid making hard stops for the ®rst 200 miles
(322 km) or so. During this time your new
brake linings aren't yet broken in. Hard stops
with new linings can mean premature wear and
earlier replacement. Follow this breaking-in
guideline every time you get new brake linings.
·Don't tow a trailer during break-in. See ªTowing
a Trailerº in the Index for more information.
Ignition Positions
There are four different positions in the ignition switch
which is located on the instrument panel, to the right
of the steering column. Insert the key in the ignition and
turn it to the right for each position.
Insert the key in the
ignition and turn it to the
right for each position.
9(OFF):This position locks the ignition, steering
wheel and transaxle. It's a theft-deterrent feature.
It's also the only position from which the key can be
removed.
2-18
Page 90 of 432

While in the MANUAL (M)
mode, push either paddle
once to up-shift to the
next gear. Pull either
paddle once to down-shift
to the next gear.
To fully use the system, select MANUAL (M) while
stopped, with the engine running. The vehicle will begin
moving in ®rst gear upon acceleration. (In icy or slippery
conditions, you may start out in second gear, rather than
®rst gear, for better vehicle control.)
Then you will be prompted
to up-shift by the indicator
light on the instrument
panel or by the up-shift
symbol on Head-Up Display
(HUD), if equipped, using a
TAP-Shift Ÿ paddle.Throughout acceleration you will be prompted in this
way to up-shift as needed. If you do not up-shift when
prompted, vehicle speed will be limited to protect
the engine.
Press the accelerator quickly while driving in the highest
gear to make the transaxle automatically down-shift.
The transaxle will also automatically down-shift as the
vehicle decelerates and comes to a stop.
A chime will sound if you push or pull a paddle requesting
a transaxle gear change when the vehicle cannot
respond. The system will not allow either an up-shift or a
down-shift if the vehicle speed is too fast or too slow, nor
will it allow a start from third or higher gear.
You may also select MANUAL (M) while the vehicle is
already moving. The current transaxle position will
continue to be displayed on the DIC and HUD,
if equipped. The transaxle up-shifts and down-shifts can
be done using the TAP-Shift Ÿ paddles as described
previously.
2-26
Page 91 of 432

Parking Brake
The parking brake is
located to the left of the
brake pedal near the
driver's door. To set the
parking brake, hold
the regular brake pedal
down with your right foot.
Push down on the
parking brake pedal,
with your left foot.
To release the parking brake, hold the regular brake
pedal down with your right foot and push the parking
brake pedal with your left foot. When you lift your
left foot, the parking brake pedal will follow it to the
released position.A warning chime will sound if the parking brake is set,
the ignition is on and the shift lever is not in PARK (P)
or NEUTRAL (N).
The brake light will also come on the instrument panel
when the parking brake is set. It will stay on if your
parking brake doesn't release fully.
The BRAKE ON message will also appear in the Driver
Information Center (DIC) when the parking brake is set.
Notice:Driving with the parking brake on can cause
your rear brakes to overheat. You may have to
replace them, and you could also damage other
parts of your vehicle.
If you are towing a trailer and parking on a hill, see
Towing a Trailer on page 4-37. That section shows
what to do ®rst to keep the trailer from moving.
2-27
Page 105 of 432

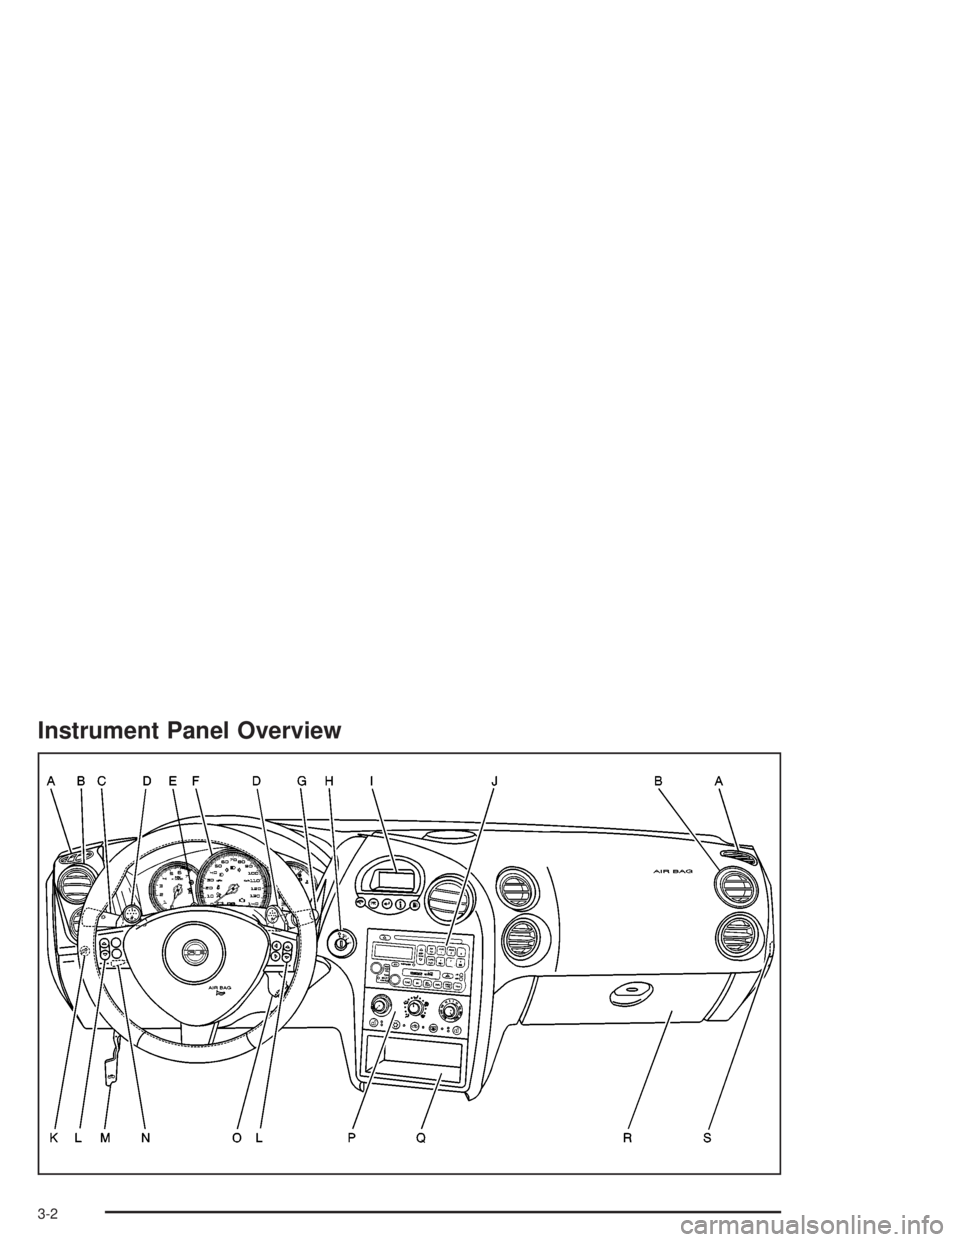
Instrument Panel Overview...............................3-2
Hazard Warning Flashers................................3-4
Other Warning Devices...................................3-5
Horn.............................................................3-5
Tilt Wheel.....................................................3-5
Windshield Washer Lever................................3-6
Cruise Control Lever.......................................3-8
Exterior Lamps.............................................3-12
Interior Lamps..............................................3-16
Head-Up Display (HUD).................................3-19
Accessory Power Outlets...............................3-23
Ashtrays and Cigarette Lighter........................3-24
Climate Controls............................................3-25
Climate Control System.................................3-25
Outlet Adjustment.........................................3-29
Warning Lights, Gages and Indicators.............3-31
Instrument Panel Cluster................................3-32
Speedometer and Odometer...........................3-33
Tachometer.................................................3-33
Safety Belt Reminder Light.............................3-34
Air Bag Readiness Light................................3-34
Up-Shift Light...............................................3-35
Brake System Warning Light..........................3-36
Anti-Lock Brake System Warning Light.............3-37
Traction Control System (TCS)
Warning Light...........................................3-38Enhanced Traction System Warning Light.........3-38
Engine Coolant Temperature Warning Light......3-39
Engine Coolant Temperature Gage..................3-39
Malfunction Indicator Lamp.............................3-40
Oil Pressure Light.........................................3-43
Fog Lamp Light............................................3-44
High-Beam On Light......................................3-44
Fuel Gage...................................................3-44
Driver Information Center (DIC).......................3-45
DIC Controls and Displays.............................3-45
DIC Warnings and Messages.........................3-65
Audio System(s).............................................3-88
Setting the Time...........................................3-88
Radio with CD..............................................3-89
Radio with Cassette and CD.........................3-100
Radio with Six-Disc CD................................3-114
Theft-Deterrent Feature................................3-128
Audio Steering Wheel Controls......................3-129
Understanding Radio Reception....................3-130
Care of Your Cassette Tape Player...............3-130
Care of Your CDs.......................................3-131
Care of Your CD Player...............................3-131
Backglass Antenna......................................3-132
XMŸ Satellite Radio Antenna System
(United States Only).................................3-132
Section 3 Instrument Panel
3-1
Page 106 of 432
Instrument Panel Overview
3-2