Page 377 of 446
Fuses and Circuit Breakers
The wiring circuits in your vehicle are protected from
short circuits by a combination of fuses and circuit
breakers. This greatly reduces the chance of damage
caused by electrical problems.
Look at the silver-colored band inside the fuse. If the
band is broken or melted, replace the fuse. Be sure you
replace a bad fuse with a new one of the identical
size and rating.
The MaxiFuses are located in two fuse blocks, one in
the engine compartment and the other under the
rear seat. If a MaxiFuse should blow, have your vehicle
serviced by your dealer immediately.
Removing Fuses
You will �nd a fuse puller attached in both of the fuse
blocks. Snap the wide end of the fuse puller on to
the fuse at the side indentations, then hold the puller
and pull the fuse out.
Engine Compartment Fuse Block
The engine compartment
fuse block is located in the
front of the engine
compartment on the
passenger’s side of the
vehicle. SeeEngine
Compartment Overview on
page 5-14for more
information on location. Lift
the cover to gain access.
Fuse 22 or 23 can be moved to the outer position to
enable the accessory power outlet or cigarette lighter
when the ignition is not on. See your dealer for
additional assistance, if needed.
5-101
Page 379 of 446
Relays Usage
27 Headlamp High Beam
28 Headlamp Low Beam
29 Fog Lamps
30 Daytime Running Lamps
31 Horn
32 Air Conditioning Clutch
33 HVAC Solenoid
34 Accessory
35 Not Used
36 Starter 1
37 Cooling Fan 1
38 Ignition 1
39 Cooling Fan Series/Parallel
40 Cooling Fan 2Circuit
BreakersUsage
41 Starter
Fuses Usage
42 Not Used
43 Not Used
44 Antilock Brake System
45 Not Used
46 Cooling Fan 1
47 Cooling Fan 2
48 Spare
49 Spare
50 Spare
51 Spare
52 Spare
53 Fuse Puller
5-103
Page 381 of 446
1. Buckle the center passenger position safety belt,
then route the safety belts through the proper slots
in the seat cushion. Do not let the safety belts
get twisted.
2. Slide the rear of the cushion up and under the
seatback so the rear locating guides hook into
the wire loops on the back frame.3. With the seat cushion lowered, push rearward and
then press down on the seat cushion until the
spring locks on both ends engage.
4. Check to make sure the safety belts are properly
routed and that no portion of any safety belt is
trapped under the seat. Also make sure the seat
cushion is secured.
Rear Underseat Fuse Block
The rear fuse block is
located below the rear seat
on the driver’s side of the
vehicle. The rear seat
cushion must be removed
to access the fuse block.
SeeRemoving the Rear
Seat Cushion on
page 5-104.
5-105
Page 383 of 446
Fuses Usage
27 Interior Lamps
28 Not Used
29 Ignition Switch
30 Instrument Panel
31 Heated Seat Right Front
32 Not Used
33 Heating, Ventilation, Air Conditioning
34 Ignition 3 Rear
35 Antilock Brake System
36 Turn Signal/Hazard
37 HVAC Battery
38 Dash Integration ModuleRelays Usage
39 Fuel Pump
40 Parking Lamps
41 Ignition 1
42 Rear Fog Lamps
43 Not Used
44 Park Brake
45 Reverse Lamps
46 Retained Accessory Power
48 Not Used
49 Ignition 3
51 Interior Lamps
52 Trunk Release
53 Front Courtesy Lamps
54 Not Used
55 Electronic Level Control Compressor
5-107
Page 408 of 446
At Least Twice a Year
Restraint System Check
Make sure the safety belt reminder light and all your
belts, buckles, latch plates, retractors and anchorages
are working properly. Look for any other loose or
damaged safety belt system parts. If you see anything
that might keep a safety belt system from doing its
job, have it repaired. Have any torn or frayed safety belts
replaced.
Also look for any opened or broken air bag coverings,
and have them repaired or replaced. (The air bag
system does not need regular maintenance.)
Wiper Blade Check
Inspect wiper blades for wear or cracking. Replace
blade inserts that appear worn or damaged or that
streak or miss areas of the windshield. Also see
“Windshield Wiper and Wiper Blades” underCleaning
the Outside of Your Vehicle on page 5-94.
Weatherstrip Lubrication
Silicone grease on weatherstrips will make them last
longer, seal better, and not stick or squeak. Apply
silicone grease with a clean cloth. During very cold,
damp weather more frequent application may be
required. SeePart D: Recommended Fluids and
Lubricants on page 6-25.
Automatic Transaxle Check
Check the transaxle �uid level; add if needed. See
Automatic Transaxle Fluid on page 5-23. A �uid loss
may indicate a problem. Check the system and repair if
needed.
At Least Once a Year
Key Lock Cylinders Service
Lubricate the key lock cylinders with the lubricant
speci�ed in Part D.
Body Lubrication Service
Lubricate all hinges and latches, including those for the
hood, rear compartment, glove box door, console
door and any folding seat hardware. Part D tells you
what to use. More frequent lubrication may be required
when exposed to a corrosive environment.
6-20
Page 409 of 446
Starter Switch Check
{CAUTION:
When you are doing this inspection, the
vehicle could move suddenly. If the vehicle
moves, you or others could be injured.
1. Before you start, be sure you have enough room
around the vehicle.
2. Firmly apply both the parking brake and the regular
brake. SeeParking Brake on page 2-32if
necessary.
Do not use the accelerator pedal, and be ready to
turn off the engine immediately if it starts.
3. Try to start the engine in each gear. The starter
should work only in PARK (P) or NEUTRAL (N).
If the starter works in any other position, your
vehicle needs service.
Automatic Transaxle Shift Lock Control
System Check
{CAUTION:
When you are doing this inspection, the
vehicle could move suddenly. If the vehicle
moves, you or others could be injured.
1. Before you start, be sure you have enough room
around the vehicle. It should be parked on a level
surface.
2. Firmly apply the parking brake. SeeParking Brake
on page 2-32if necessary.
Be ready to apply the regular brake immediately if
the vehicle begins to move.
3. With the engine off, turn the key to the ON position,
but do not start the engine. Without applying the
regular brake, try to move the shift lever out
of PARK (P) with normal effort. If the shift lever
moves out of PARK (P), your vehicle needs service.
6-21
Page 410 of 446
Ignition Transaxle Lock Check
While parked, and with the parking brake set, try to turn
the ignition key to OFF in each shift lever position.
The key should turn to OFF only when the shift lever
is in PARK (P).
The key should come out only in OFF.
Parking Brake and Automatic Transaxle
Park (P) Mechanism Check
{CAUTION:
When you are doing this check, your vehicle
could begin to move. You or others could be
injured and property could be damaged. Make
sure there is room in front of your vehicle in
case it begins to roll. Be ready to apply the
regular brake at once should the vehicle begin
to move.Park on a fairly steep hill, with the vehicle facing
downhill. Keeping your foot on the regular brake, set the
parking brake.
To check the parking brake’s holding ability: With
the engine running and transaxle in NEUTRAL (N),
slowly remove foot pressure from the regular
brake pedal. Do this until the vehicle is held by the
parking brake only.
To check the PARK (P) mechanism’s holding ability:
With the engine running, shift to PARK (P). Then
release the parking brake followed by the regular
brake.
Underbody Flushing Service
At least every spring, use plain water to �ush any
corrosive materials from the underbody. Take care to
clean thoroughly any areas where mud and other debris
can collect.
6-22
Page 413 of 446
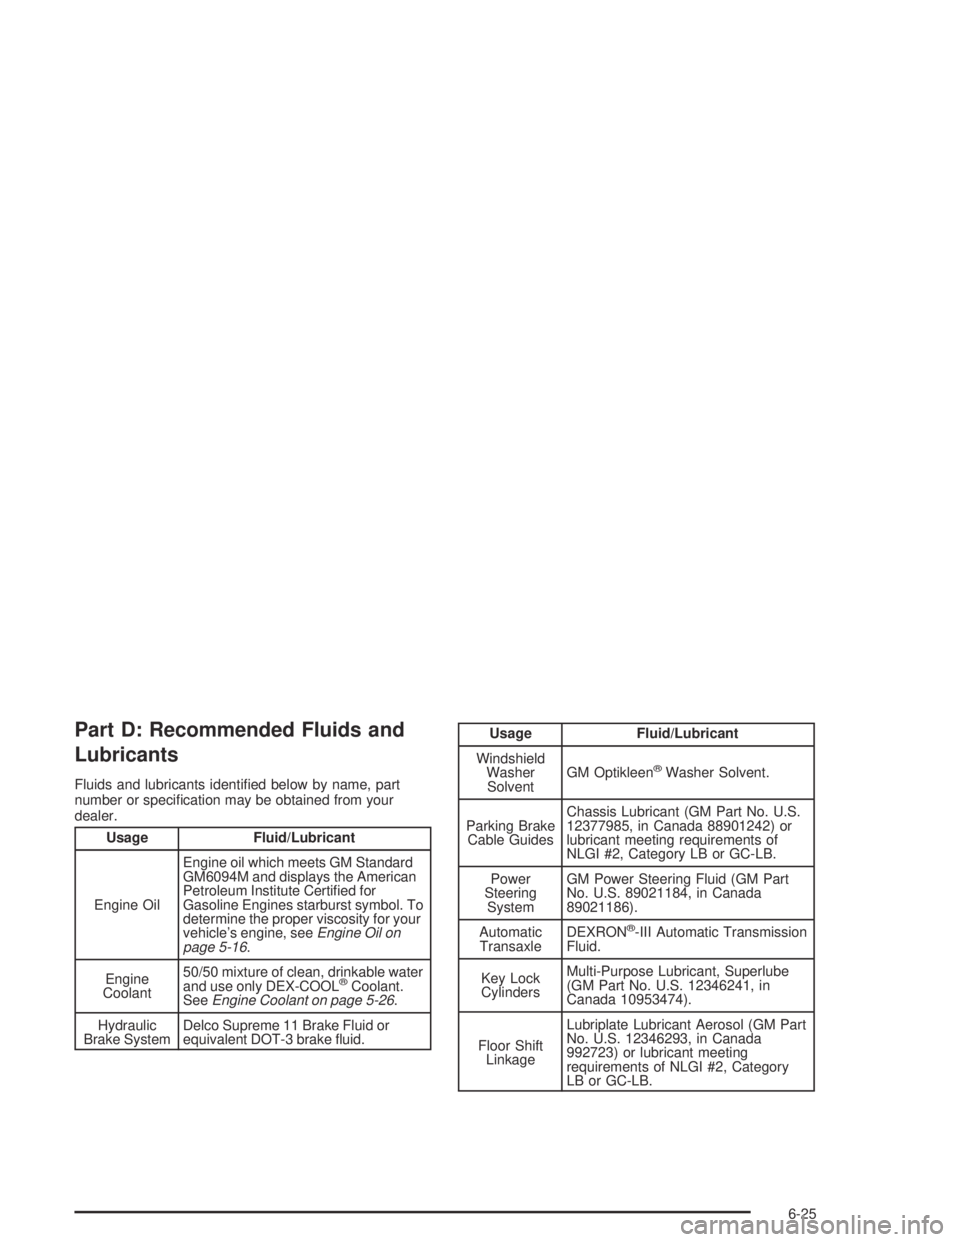
Part D: Recommended Fluids and
Lubricants
Fluids and lubricants identi�ed below by name, part
number or speci�cation may be obtained from your
dealer.
Usage Fluid/Lubricant
Engine OilEngine oil which meets GM Standard
GM6094M and displays the American
Petroleum Institute Certi�ed for
Gasoline Engines starburst symbol. To
determine the proper viscosity for your
vehicle’s engine, seeEngine Oil on
page 5-16.
Engine
Coolant50/50 mixture of clean, drinkable water
and use only DEX-COOL
®Coolant.
SeeEngine Coolant on page 5-26.
Hydraulic
Brake SystemDelco Supreme 11 Brake Fluid or
equivalent DOT-3 brake �uid.
Usage Fluid/Lubricant
Windshield
Washer
SolventGM Optikleen
®Washer Solvent.
Parking Brake
Cable GuidesChassis Lubricant (GM Part No. U.S.
12377985, in Canada 88901242) or
lubricant meeting requirements of
NLGI #2, Category LB or GC-LB.
Power
Steering
SystemGM Power Steering Fluid (GM Part
No. U.S. 89021184, in Canada
89021186).
Automatic
TransaxleDEXRON
®-III Automatic Transmission
Fluid.
Key Lock
CylindersMulti-Purpose Lubricant, Superlube
(GM Part No. U.S. 12346241, in
Canada 10953474).
Floor Shift
LinkageLubriplate Lubricant Aerosol (GM Part
No. U.S. 12346293, in Canada
992723) or lubricant meeting
requirements of NLGI #2, Category
LB or GC-LB.
6-25