2004 NISSAN XTERRA air condition
[x] Cancel search: air conditionPage 192 of 296
cWhenever working on or near a battery,
always wear suitable eye protectors (for
example, goggles or industrial safety
spectacles) and remove rings, metal
bands, or any other jewelry. Do not lean
over the battery when jump starting.
cDo not attempt to jump start a frozen
battery. It could explode and cause se-
rious injury.
cYour vehicle has an automatic engine
cooling fan. It could come on at any
time. Keep hands and other objects
away from it.
WARNING
Always follow the instructions below.
Failure to do so could result in damage to
the charging system and cause personal
injury.
1. If the booster battery is in another vehicle,
position the two vehicles to bring their bat-
teries near each other.
Do not allow the two vehicles to touch.2. Apply the parking brake. Move the shift lever
to N (Neutral) (manual transmission) or to P
(Park) (automatic transmission) . Switch off
all unnecessary electrical systems (lights,
heater, air conditioner, etc.) .
3. Remove vent caps on the battery (if so
equipped) . Cover the battery with an old
cloth to reduce explosion hazard.
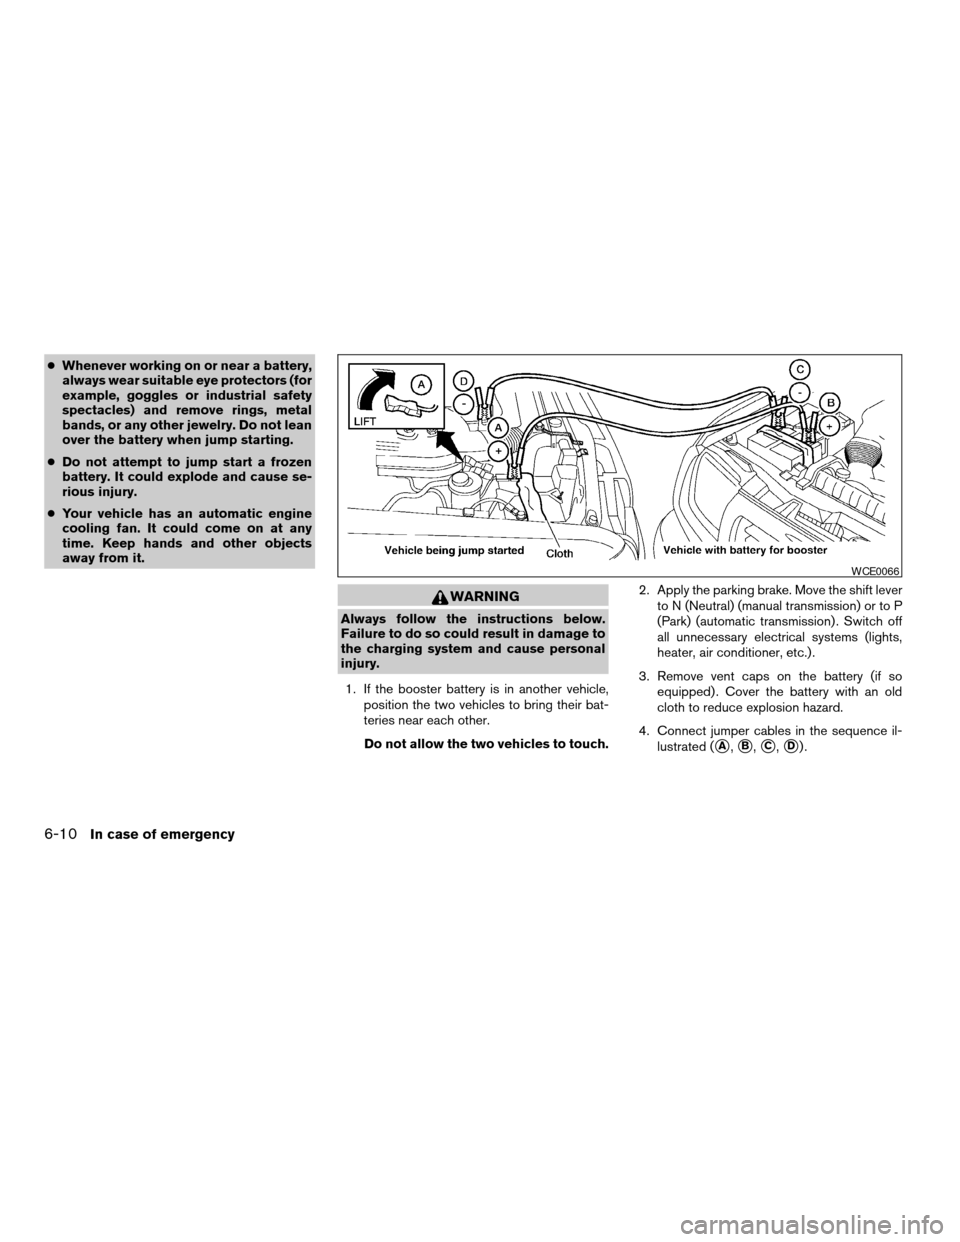
4. Connect jumper cables in the sequence il-
lustrated (
sA,sB,sC,sD).
WCE0066
6-10In case of emergency
ZREVIEW COPY:Ð2004 Xterra(xtr)
Owners Manual(owners)ÐUSA English(nna)
10/23/03Ðdebbie
X
Page 193 of 296
CAUTION
cAlways connect positive (1) to positive
(1) and negative (2) to body ground (for
example, strut mounting bolt, engine
lift bracket, etc.) — not to the battery.
cMake sure the jumper cables do not
touch moving parts in the engine com-
partment and that the cable clamps do
not contact any other metal.
5. Start the engine of the booster vehicle and
let it run for a few minutes.
6. Keep the engine speed of the booster ve-
hicle at about 2,000 rpm, and start the en-
gine of the vehicle being jump started.
CAUTION
Do not keep the starter motor engaged for
more than 10 seconds. If the engine does
not start right away, turn the key off and
wait 3 to 4 seconds before trying again.
7. After starting the engine, carefully discon-
nect the negative cable and then the positive
cable.
8. Replace the vent caps (if so equipped) . Be
sure to dispose of the cloth used to cover
the vent holes as it may be contaminated
with corrosive acid.
WARNING
cAutomatic transmission models cannot
be push-started or tow-started. This
may cause transmission or other ve-
hicle damage.
cThree-way catalyst equipped models
should not be started by pushing. The
three-way catalyst may be damaged.
cNever try to start the vehicle by towing
it. When the engine starts, the forward
surge could cause the vehicle to collide
with the tow vehicle.If your vehicle is overheating (indicated by an
extremely high temperature gauge reading) , or if
you feel a lack of engine power, detect abnormal
noise, etc. take the following steps.
WARNING
cDo not continue to drive if your vehicle
overheats. Doing so could cause engine
damage or a vehicle fire.
cTo avoid the danger of being scalded,
never remove the radiator cap while the
engine is still hot. When the radiator
cap is removed, pressurized hot water
will spurt out, possibly causing serious
injury.
cDo not open the hood if steam is com-
ing out.
1. Move the vehicle safely off the road, apply
the parking brake and move the shift lever to
N (Neutral) (manual transmission) or to P
(Park) (automatic transmission) .
Do not stop the engine.
2. Turn off the air conditioner (if so equipped) .
Open all the windows, move the heater or air
conditioner temperature control to maximum
hot and fan control to high speed.
PUSH STARTING IF YOUR VEHICLE OVERHEATS
In case of emergency6-11
ZREVIEW COPY:Ð2004 Xterra(xtr)
Owners Manual(owners)ÐUSA English(nna)
10/23/03Ðdebbie
X
Page 205 of 296

8 Maintenance and do-it-yourself
Maintenance requirements..........................8-2
General maintenance..............................8-2
Explanation of general maintenance items.........8-2
Maintenance precautions...........................8-5
Engine compartment check locations................8-6
Engine cooling system.............................8-9
Checking engine coolant level...................8-9
Changing engine coolant.......................8-10
Engine oil........................................8-10
Checking engine oil level.......................8-10
Changing engine oil...........................8-11
Changing engine oil filter.......................8-13
Automatic transmission fluid.......................8-14
Temperature conditions for checking.............8-14
Power steering fluid...............................8-15
Brake and clutch fluid.............................8-16
Brake fluid....................................8-16
Clutch fluid...................................8-17
Window washer fluid.............................8-17
Window washer fluid reservoir..................8-17
Battery..........................................8-18
Jump starting.................................8-19
Drive belts.......................................8-20Spark plugs......................................8-21
Replacing spark plugs.........................8-21
Air cleaner.......................................8-23
In-cabin Microfilter (if so equipped)..............8-23
Windshield wiper blades..........................8-26
Cleaning.....................................8-26
Replacing....................................8-26
Parking brake and brake pedal.....................8-29
Checking parking brake........................8-29
Checking brake pedal..........................8-29
Brake booster.................................8-30
Fuses...........................................8-31
Passenger compartment.......................8-31
Keyfob battery replacement........................8-32
Lights...........................................8-33
Headlights....................................8-33
Fog lights (if so equipped)......................8-34
Exterior and interior lights.......................8-36
Wheels and tires.................................8-40
Tire pressure..................................8-40
Tire labeling...................................8-43
Types of tires..................................8-46
Tire chains....................................8-46
Changing wheels and tires.....................8-47
ZREVIEW COPY:Ð2004 Xterra(xtr)
Owners Manual(owners)ÐUSA English(nna)
10/23/03Ðdebbie
X
Page 206 of 296

Your new NISSAN has been designed to have
minimum maintenance requirements with longer
service intervals to save you both time and
money. However, some day-to-day and regular
maintenance is essential to maintain your NIS-
SAN’s good mechanical condition, as well as its
emission and engine performance.
It is the owner’s responsibility to make sure that
the scheduled maintenance, as well as general
maintenance, is performed.
As the vehicle owner, you are the only one who
can ensure that your vehicle receives proper
maintenance. You are a vital link in the mainte-
nance chain.
Scheduled maintenance
For your convenience, both required and optional
scheduled maintenance items are described and
listed in your “NISSAN Service and Maintenance
Guide.” You must refer to that guide to ensure
that necessary maintenance is performed on your
NISSAN at regular intervals.
General maintenance
General maintenance includes those items which
should be checked during normal day-to-day op-
eration. They are essential for proper vehicle op-
eration. It is your responsibility to perform these
maintenance procedures regularly as prescribed.Performing general maintenance checks requires
minimal mechanical skill and only a few general
automotive tools.
These checks or inspections can be done by you,
a qualified technician, or, if you prefer, a NISSAN
dealer.
Where to go for service
If maintenance service is required or your vehicle
appears to malfunction, have the systems
checked and corrected by a NISSAN dealer.
NISSAN technicians are well-trained specialists
who are kept up-to-date with the latest service
information through technical bulletins, service
tips, and in-dealership training programs. They
are completely qualified to work on NISSAN ve-
hiclesbeforethey work on your vehicle, rather
than after they have worked on it.
You can be confident that a NISSAN dealer’s
service department performs the best job to meet
the maintenance requirements on your vehicle —
in a reliable and economic way.During the normal day-to-day operation of the
vehicle, general maintenance should be per-
formed regularly as prescribed in this section. If
you detect any unusual sounds, vibrations or
smells, be sure to check for the cause or have a
NISSAN dealer do it promptly. In addition, you
should notify a NISSAN dealer if you think that
repairs are required.
When performing any checks or maintenance
work, closely observe the “Maintenance precau-
tions” later in this section.
EXPLANATION OF GENERAL
MAINTENANCE ITEMS
Additional information on the following
items with “*” is found later in this section.
Outside the vehicle
The maintenance items listed here should be
performed from time to time, unless otherwise
specified.
Doors, engine hood and tailgateCheck that
the doors, engine hood and tailgate operate
properly. Also ensure that all latches lock se-
curely. Lubricate hinges, latches, latch pins, roll-
ers and links as necessary. Make sure that the
secondary latch keeps the hood from opening
when the primary latch is released.
MAINTENANCE REQUIREMENTS GENERAL MAINTENANCE
8-2Maintenance and do-it-yourself
ZREVIEW COPY:Ð2004 Xterra(xtr)
Owners Manual(owners)ÐUSA English(nna)
10/23/03Ðdebbie
X
Page 208 of 296

Warning lights and chimesMake sure all
warning lights and chimes are operating properly.
Windshield wiper and washer*Check that
the wipers and washer operate properly and that
the wipers do not streak.
Windshield defrosterCheck that the air
comes out of the defroster outlets properly and in
sufficient quantity when operating the heater or
air conditioner.
Under the hood and vehicle
The maintenance items listed here should be
checked periodically (for example, each time you
check the engine oil or refuel) .
Automatic transmission fluid level*Check
the level after putting the selector lever in P with
the engine idling at operating temperature.
Battery*Check the fluid level in each cell. It
should be between the MAX and MIN lines. Ve-
hicles operated in high temperatures or under
severe conditions require frequent checks of the
battery fluid level.
Brake and clutch fluid levels*Make sure that
the brake and clutch fluid level is between the
MIN and MAX lines on the reservoir.
Engine coolant level*Check the coolant level
when the engine is cold.Engine drive belts*Make sure the drive belts
are not frayed, worn, cracked or oily.
Engine oil level*Check the level after parking
the vehicle on a level surface with the engine off.
Wait more than 10 minutes for the oil to drain
back into the oil pan.
Exhaust systemMake sure there are no loose
supports, cracks or holes. If the sound of the
exhaust seems unusual or there is a smell of
exhaust fumes, immediately have the exhaust
system inspected by a NISSAN dealer. See the
carbon monoxide warning in the “Starting and
driving” section of this manual.
Fluid leaksCheck under the vehicle for fuel, oil,
water or other fluid leaks after the vehicle has
been parked for a while. Water dripping from the
air conditioner after use is normal. If you should
notice any leaks or if gasoline fumes are evident,
check for the cause and have it corrected imme-
diately.
Power steering fluid level* and linesCheck
the level when the fluid is cold, with the engine
off. Check the lines for proper attachment, leaks,
cracks, etc.
Radiator and hosesCheck the front of the
radiator and clean off any dirt, insects, leaves,etc., that may have accumulated. Make sure the
hoses have no cracks, deformation, rot or loose
connections.
UnderbodyThe underbody is frequently ex-
posed to corrosive substances such as those
used on icy roads or to control dust. It is very
important to remove these substances from the
underbody, otherwise rust may form on the floor
pan, frame, fuel lines and exhaust system. At the
end of winter, the underbody should be thor-
oughly flushed with plain water, in those areas
where mud and dirt may have accumulated. See
the “Appearance and care” section of this
manual.
Windshield washer fluid*Check that there is
adequate fluid in the reservoir.
8-4Maintenance and do-it-yourself
ZREVIEW COPY:Ð2004 Xterra(xtr)
Owners Manual(owners)ÐUSA English(nna)
10/23/03Ðdebbie
X
Page 224 of 296
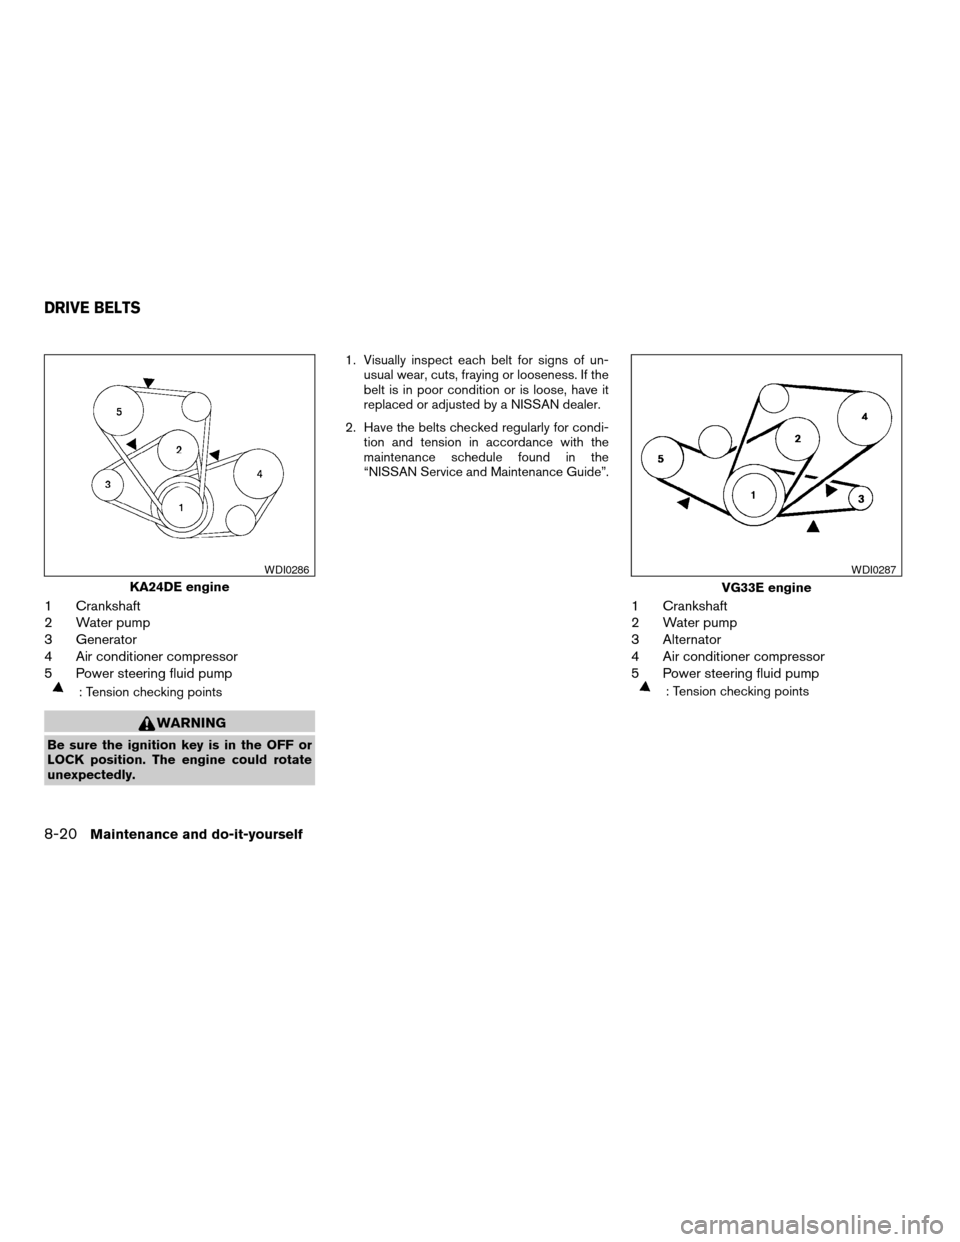
1 Crankshaft
2 Water pump
3 Generator
4 Air conditioner compressor
5 Power steering fluid pump
: Tension checking points
WARNING
Be sure the ignition key is in the OFF or
LOCK position. The engine could rotate
unexpectedly.1. Visually inspect each belt for signs of un-
usual wear, cuts, fraying or looseness. If the
belt is in poor condition or is loose, have it
replaced or adjusted by a NISSAN dealer.
2. Have the belts checked regularly for condi-
tion and tension in accordance with the
maintenance schedule found in the
“NISSAN Service and Maintenance Guide”.
1 Crankshaft
2 Water pump
3 Alternator
4 Air conditioner compressor
5 Power steering fluid pump
: Tension checking points
KA24DE engine
WDI0286
VG33E engine
WDI0287
DRIVE BELTS
8-20Maintenance and do-it-yourself
ZREVIEW COPY:Ð2004 Xterra(xtr)
Owners Manual(owners)ÐUSA English(nna)
10/23/03Ðdebbie
X
Page 225 of 296
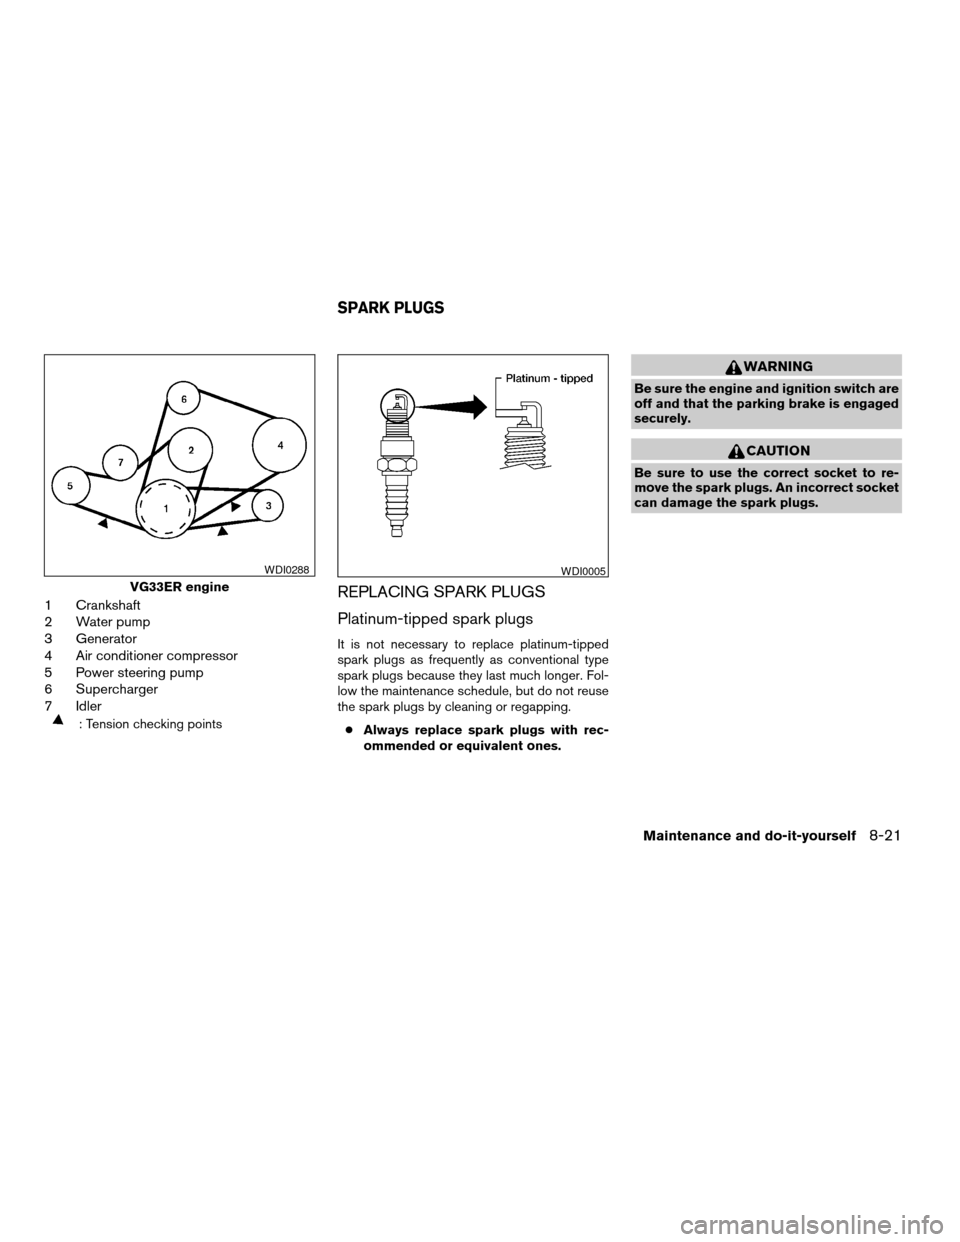
1 Crankshaft
2 Water pump
3 Generator
4 Air conditioner compressor
5 Power steering pump
6 Supercharger
7 Idler
: Tension checking points
REPLACING SPARK PLUGS
Platinum-tipped spark plugs
It is not necessary to replace platinum-tipped
spark plugs as frequently as conventional type
spark plugs because they last much longer. Fol-
low the maintenance schedule, but do not reuse
the spark plugs by cleaning or regapping.
cAlways replace spark plugs with rec-
ommended or equivalent ones.
WARNING
Be sure the engine and ignition switch are
off and that the parking brake is engaged
securely.
CAUTION
Be sure to use the correct socket to re-
move the spark plugs. An incorrect socket
can damage the spark plugs.
VG33ER engine
WDI0288WDI0005
SPARK PLUGS
Maintenance and do-it-yourself8-21
ZREVIEW COPY:Ð2004 Xterra(xtr)
Owners Manual(owners)ÐUSA English(nna)
10/23/03Ðdebbie
X
Page 244 of 296
If you have a flat tire, see the “In case of
emergency” section of this manual.
TIRE PRESSURE
Tire inflation pressure
Check the tire pressures (including the spare)
often and always prior to long distance trips. The
recommended tire pressure specifications are
shown on the Tire and Loading Information label
(this label is also known as the tire placard) under
the9Recommended Cold Tire Inflation Pressure9
heading. The Tire and Loading Information label
is affixed to the driver side center pillar. Tire
pressures should be checked regularly because:
cMost tires naturally lose air over time.
cTires can lose air suddenly when driven over
potholes or other objects or if the vehicle
strikes a curb while parking.
The tire pressures should be checked when the
tires are cold. The tires are considered COLD
after the vehicle has been parked for 3 or more
hours, or driven less than 1 mile (1.6 km) at
moderate speeds.
Incorrect tire pressure, including under in-
flation, may adversely affect tire life and
vehicle handling.
WARNING
cImproperly inflated tires can fail sud-
denly and cause an accident.
cThe vehicle weight capacity is indicated
on the Tire and Loading Information
label. Do not load your vehicle beyond
this capacity. Overloading your vehicle
may result in reduced tire life, unsafe
operating conditions due to premature
tire failure, or unfavorable handling
characteristics and could also lead to a
serious accident. Loading beyond the
specified capacity may also result in
failure of other vehicle components.
cBefore taking a long trip, or whenever
you heavily load your vehicle, use a tire
pressure gauge to ensure that the tire
pressures are at the specified level.
cDo not drive your vehicle over 85 MPH
(137 km/h) unless it is equipped with
high speed rated tires. Driving faster
than 85 MPH (137 km/h) may result in
tire failure, loss of control and possible
injury.cFor additional information regarding
tires, refer to “Important Tire Safety In-
formation” (US) or “Tire Safety Informa-
tion” (Canada) in the Warranty Informa-
tion Booklet.
WHEELS AND TIRES
8-40Maintenance and do-it-yourself
ZREVIEW COPY:Ð2004 Xterra(xtr)
Owners Manual(owners)ÐUSA English(nna)
11/06/03Ðcathy
X