2004 NISSAN XTERRA fuel
[x] Cancel search: fuelPage 168 of 296
OFF: For driving up and down long
slopes where engine braking is nec-
essary push the Overdrive switch
once. The O/D OFF indicator light
in the instrument panel comes on at
this time.
When cruising at a low speed or climbing a
gentle slope, you may feel uncomfortable shift
shocks as the transmission shifts into and out of
Overdrive repeatedly. In this case, depress the
Overdrive switch to turn the Overdrive off. The
O/D OFF indicator light in the instrument panel
comes on at this time.
When driving conditions change, depress the
Overdrive switch to turn the Overdrive on.
Remember not to drive at high speeds for ex-
tended periods of time with the Overdrive off.
This reduces fuel economy.
MANUAL TRANSMISSION
WARNING
cDo not downshift abruptly on slippery
roads. This may cause a loss of control.
cDo not over-rev the engine when shift-
ing to a lower gear. This may cause a
loss of control or engine damage.
CAUTION
cDo not rest your foot on the clutch pedal
while driving. This may cause clutch
damage.
cFully depress the clutch pedal before
shifting to help prevent transmission
damage.
cStop your vehicle completely before
shifting into R (Reverse) .
cWhen the vehicle is stopped with the
engine running (for example, at a stop
light) , shift to N (Neutral) and release
the clutch pedal with the foot brake
applied.
Shifting
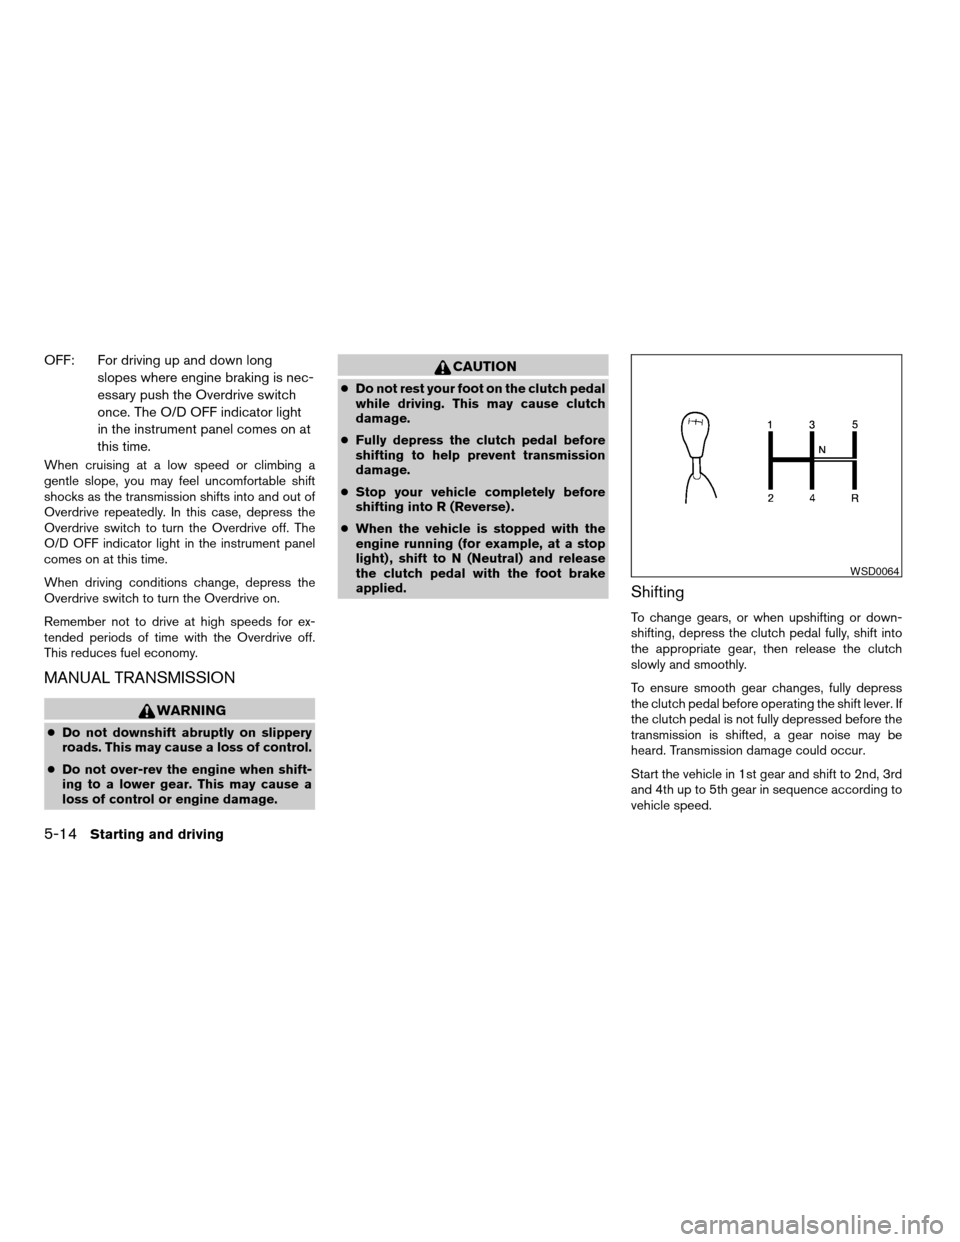
To change gears, or when upshifting or down-
shifting, depress the clutch pedal fully, shift into
the appropriate gear, then release the clutch
slowly and smoothly.
To ensure smooth gear changes, fully depress
the clutch pedal before operating the shift lever. If
the clutch pedal is not fully depressed before the
transmission is shifted, a gear noise may be
heard. Transmission damage could occur.
Start the vehicle in 1st gear and shift to 2nd, 3rd
and 4th up to 5th gear in sequence according to
vehicle speed.
WSD0064
5-14Starting and driving
ZREVIEW COPY:Ð2004 Xterra(xtr)
Owners Manual(owners)ÐUSA English(nna)
10/23/03Ðdebbie
X
Page 169 of 296

You cannot shift directly from 5th gear into R
(Reverse) . First shift into N (Neutral) , then into R
(Reverse) .
If it is difficult to move the shift lever into R
(Reverse) or 1 (First) , shift into N (Neutral) , then
release the clutch pedal. Depress the clutch
pedal again and shift into R (Reverse) or 1 (First) .
If your vehicle is equipped with 4-wheel drive, see
“ Transfer case shifting procedures” later in this
section.
Suggested upshift speeds
The following are suggested vehicle speeds for
shifting into a higher gear. These suggestions
relate to fuel economy and vehicle performance.
Actual upshift speeds will vary according to road
conditions, the weather and individual driving
habits.
cTwo-wheel drive models and four-wheel
drive models (2H and 4H position):
GEAR CHANGE MPH (km/h)
1st to 2nd 15 (24)
2nd to 3rd 25 (40)
3rd to 4th 40 (64)
4th to 5th 45 (72)
c4–wheel drive model (4L position):
GEAR CHANGE MPH (km/h)
1st to 2nd 8 (13)
2nd to 3rd 12 (19)
3rd to 4th 20 (32)
4th to 5th 22 (35)
Suggested maximum speed in each
gear
Downshift to a lower gear if the engine is not
running smoothly, or if you need to accelerate.
Do not exceed the maximum suggested speed
(shown below) in any gear. For level road driving,
use the highest gear suggested for that speed.
Always observe posted speed limits, and drive
according to the road conditions, which will en-
sure safe operation. Do not over-rev the engine
when shifting to a lower gear as it may cause
engine damage or loss of vehicle control.
Allowable maximum speed in each gear:
2–wheel drive models
GEAR CHANGE MPH (km/h)
1st 30 (48)
2nd 55 (88)
3rd 80 (129)
4th —
5th —
4–wheel drive models
2H/4H position
GEAR CHANGE MPH (km/h)
1st 25 (40)
2nd 43 (69)
3rd 68 (109)
4th —
5th —
4L position
GEAR CHANGE MPH (km/h)
1st 12 (19)
2nd 22 (35)
3rd 30 (48)
4th —
5th —
Starting and driving5-15
ZREVIEW COPY:Ð2004 Xterra(xtr)
Owners Manual(owners)ÐUSA English(nna)
10/23/03Ðdebbie
X
Page 172 of 296
cPush and hold the RES/ACCEL switch.
When the vehicle attains the speed you de-
sire, release the switch.
cPush and release the RES/ACCEL switch.
Each time you do this, the set speed in-
creases by about 1 MPH (1.6 km/h) .
To reset at a slower cruising speed,use one
of the following three methods.
cLightly tap the brake pedal. When the ve-
hicle attains the desired speed, push the
COAST/SET switch and release it.
cPush and hold the COAST/SET switch. Re-
lease the switch when the vehicle slows to
the desired speed.
cPush and release the COAST/SET switch.
Each time you do this, the set speed de-
creases by about 1 MPH (1.6 km/h) .
To resume the preset speed,push and re-
lease the RES/ACCEL switch. The vehicle re-
turns to the last set cruising speed when the
vehicle speed is over 25 MPH (40 km/h) .CAUTION
During the first 1,200 miles (2,000 km) ,
follow these recommendations to obtain
maximum engine performance and en-
sure the future reliability and economy of
your new vehicle. Failure to follow these
recommendations may result in short-
ened engine life and reduced engine
performance.
cAvoid driving for long periods at constant
speed, either fast or slow, and do not run the
engine over 4,000 rpm.
cDo not accelerate at full throttle in any gear.
cAvoid quick starts.
cAvoid hard braking as much as possible.
cDo not tow a trailer for the first 500 miles
(800 km) . Your engine, axle or other parts
could be damaged.cAccelerate slowly and smoothly. Maintain
cruising speeds with a constant accelerator
position.
cDrive at moderate speeds on the highway.
Driving at high speed lowers fuel economy.
c
Avoid unnecessary stopping and braking.
Maintain a safe distance behind other vehicles.
cUse a proper gear range which suits road
conditions. On level roads, shift into high
gear as soon as possible.
cAvoid unnecessary engine idling.
cKeep your engine tuned up.
cFollow the recommended periodic mainte-
nance schedule.
cKeep the tires inflated to the correct pres-
sure. Low tire pressure increases tire wear
and lowers fuel economy.
cKeep the front wheels in correct alignment.
Improper alignment increases tire wear and
lowers fuel economy.
c
Air conditioner operation lowers fuel economy.
Use the air conditioner only when necessary.
cWhen cruising at highway speeds, it is more
economical to use the air conditioner and
leave the windows closed to reduce drag.
c
Use 4H or 4L position only when
necessary. Four-wheel drive operation low-
ers fuel economy.
BREAK-IN SCHEDULE INCREASING FUEL ECONOMY
5-18Starting and driving
ZREVIEW COPY:Ð2004 Xterra(xtr)
Owners Manual(owners)ÐUSA English(nna)
10/23/03Ðdebbie
X
Page 173 of 296
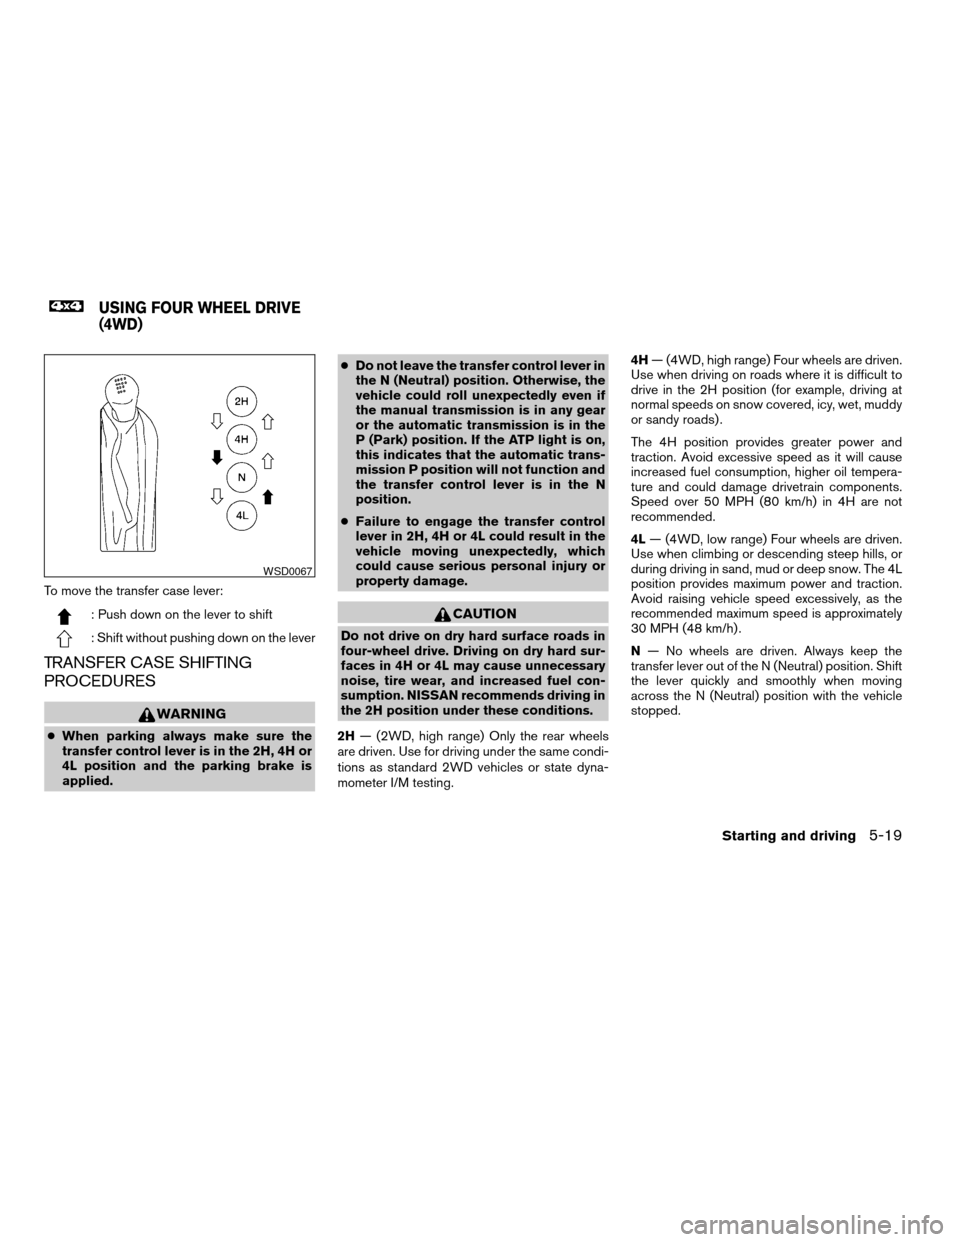
To move the transfer case lever:
: Push down on the lever to shift
: Shift without pushing down on the lever
TRANSFER CASE SHIFTING
PROCEDURES
WARNING
cWhen parking always make sure the
transfer control lever is in the 2H, 4H or
4L position and the parking brake is
applied.cDo not leave the transfer control lever in
the N (Neutral) position. Otherwise, the
vehicle could roll unexpectedly even if
the manual transmission is in any gear
or the automatic transmission is in the
P (Park) position. If the ATP light is on,
this indicates that the automatic trans-
mission P position will not function and
the transfer control lever is in the N
position.
cFailure to engage the transfer control
lever in 2H, 4H or 4L could result in the
vehicle moving unexpectedly, which
could cause serious personal injury or
property damage.
CAUTION
Do not drive on dry hard surface roads in
four-wheel drive. Driving on dry hard sur-
faces in 4H or 4L may cause unnecessary
noise, tire wear, and increased fuel con-
sumption. NISSAN recommends driving in
the 2H position under these conditions.
2H— (2WD, high range) Only the rear wheels
are driven. Use for driving under the same condi-
tions as standard 2WD vehicles or state dyna-
mometer I/M testing.4H— (4WD, high range) Four wheels are driven.
Use when driving on roads where it is difficult to
drive in the 2H position (for example, driving at
normal speeds on snow covered, icy, wet, muddy
or sandy roads) .
The 4H position provides greater power and
traction. Avoid excessive speed as it will cause
increased fuel consumption, higher oil tempera-
ture and could damage drivetrain components.
Speed over 50 MPH (80 km/h) in 4H are not
recommended.
4L— (4WD, low range) Four wheels are driven.
Use when climbing or descending steep hills, or
during driving in sand, mud or deep snow. The 4L
position provides maximum power and traction.
Avoid raising vehicle speed excessively, as the
recommended maximum speed is approximately
30 MPH (48 km/h) .
N— No wheels are driven. Always keep the
transfer lever out of the N (Neutral) position. Shift
the lever quickly and smoothly when moving
across the N (Neutral) position with the vehicle
stopped.
WSD0067
USING FOUR WHEEL DRIVE
(4WD)
Starting and driving5-19
ZREVIEW COPY:Ð2004 Xterra(xtr)
Owners Manual(owners)ÐUSA English(nna)
10/23/03Ðdebbie
X
Page 175 of 296

TO SHIFT
TRANSFER CASESHIFT PROCEDURE FOR AUTO-LOCK FREE RUNNING HUBS
From 2H to 4H Move the transfer case shift lever to 4H at speeds below 25 MPH (40 km/h) . It is not necessary to depress the clutch pedal. Perform this operation when
driving straight, not while cornering.
From 4H to 2H1. Move the transfer case shift lever to 2H. This can be done at any speed, and it is not necessary to depress the clutch pedal. Perform this operation when
driving straight, not while cornering.
2. Disengage the AUTO-LOCK hubs following the procedure outlined below.
NOTE: The 4WD indicator light may not turn off immediately under certain driving conditions, such as when the vehicle is driven uphill.
This is normal and it will shut off as the vehicle is driven further.
AUTO-LOCK HUB DISENGAGEMENT (FREE MODE)
The AUTO-LOCK hubs will not disengage until the vehicle is completely stopped and is then moved in a straight line, approximately 7-10 ft (2-3 m) , in the
opposite direction of travel. For example:
If you were driving the vehicle forward, stop and move the vehicle 7-10 ft (2-3 m) backward.
If you were driving the vehicle in reverse, stop and move the vehicle 7-10 ft (2-3 m) forward.
It is not necessary to immediately return the AUTO-LOCK hubs to FREE MODE when shifting from 4H to 2H. The vehicle may be operated under normal
2H conditions with the AUTO-LOCK hubs engaged. However, disengaging the AUTO-LOCK hubs will allow for better fuel economy, quieter ride and less
component wear. Leaving the hubs locked while driving in 2H may be desirable so that you can easily shift to 4H at speeds greater than 25 MPH (40 km/
h) .
From 4H to 4L or 4L to
4H1. Stop the vehicle.
Keep the engine running.
2. Depress the clutch pedal, or place the transmission selector lever in the N (Neutral) position.
3. Depress the transfer case shift lever and move it to the 4L or 4H position. Change gears quickly and smoothly.
From 2H to 4L1. Stop the vehicle.
Keep the engine running.
2. Depress the clutch pedal, or place the transmission selector lever in the N (Neutral) position.
3. Depress the transfer case shift lever and move it to the 4L position. Change gears quickly and smoothly.
From 4L to 2H1. Stop the vehicle.
Keep the engine running.
2. Depress the clutch pedal, or place the transmission selector lever in the N (Neutral) position.
3. Depress the transfer case shift lever and move it to the 2H position. Change gears quickly and smoothly.
4. Disengage the AUTO-LOCK hubs following the procedure outlined above.
Starting and driving5-21
ZREVIEW COPY:Ð2004 Xterra(xtr)
Owners Manual(owners)ÐUSA English(nna)
10/23/03Ðdebbie
X
Page 203 of 296
MOST COMMON FACTORS
CONTRIBUTING TO VEHICLE
CORROSION
1. The accumulation of moisture-retaining dirt
and debris in body panel sections, cavities,
and other areas.
2. Damage to paint and other protective coat-
ings caused by gravel and stone chips or
minor traffic accidents.
ENVIRONMENTAL FACTORS
INFLUENCE THE RATE OF
CORROSION
Moisture
Accumulation of sand, dirt and water on the ve-
hicle body underside can accelerate corrosion.
Wet floor coverings will not dry completely inside
the vehicle, and should be removed for drying to
avoid floor panel corrosion.
Relative humidity
Corrosion will be accelerated:
cin areas of high relative humidity.
cin areas where the temperatures stay above
freezing.
cwhere atmospheric pollution exists.cwhere road salt is used.
Temperature
High temperatures accelerate the rate of corro-
sion to those parts which are not well ventilated.
Air pollution
Industrial pollution, the presence of salt in the air
in coastal areas, or heavy road salt use acceler-
ates the corrosion process. Road salt also accel-
erates the disintegration of paint surfaces.
TO PROTECT YOUR VEHICLE
FROM CORROSION
cWash and wax your vehicle often to keep the
vehicle clean.
cAlways check for minor damage to the paint
and repair it as soon as possible.
cKeep drain holes at the bottom of the doors
and tailgate open to avoid water accumula-
tion.
cCheck the underbody for accumulation of
sand, dirt or salt. If present, wash with water
as soon as possible.
CAUTION
cNEVER remove dirt, sand or other de-
bris from the passenger compartment
by washing it out with a hose. Remove
dirt with a vacuum cleaner or broom.
cNever allow water or other liquids to
come in contact with electronic compo-
nents inside the vehicle as this may
damage them.
Chemicals used for road surface de-icing are
extremely corrosive. They accelerate corrosion
and deterioration of underbody components
such as the exhaust system, fuel and brake lines,
brake cables, floor pan and fenders.
In winter, the underbody must be cleaned
periodically.
For additional protection against rust and corro-
sion, which may be required in some areas, con-
sult a NISSAN dealer.
CORROSION PROTECTION
Appearance and care7-5
ZREVIEW COPY:Ð2004 Xterra(xtr)
Owners Manual(owners)ÐUSA English(nna)
10/23/03Ðdebbie
X
Page 208 of 296

Warning lights and chimesMake sure all
warning lights and chimes are operating properly.
Windshield wiper and washer*Check that
the wipers and washer operate properly and that
the wipers do not streak.
Windshield defrosterCheck that the air
comes out of the defroster outlets properly and in
sufficient quantity when operating the heater or
air conditioner.
Under the hood and vehicle
The maintenance items listed here should be
checked periodically (for example, each time you
check the engine oil or refuel) .
Automatic transmission fluid level*Check
the level after putting the selector lever in P with
the engine idling at operating temperature.
Battery*Check the fluid level in each cell. It
should be between the MAX and MIN lines. Ve-
hicles operated in high temperatures or under
severe conditions require frequent checks of the
battery fluid level.
Brake and clutch fluid levels*Make sure that
the brake and clutch fluid level is between the
MIN and MAX lines on the reservoir.
Engine coolant level*Check the coolant level
when the engine is cold.Engine drive belts*Make sure the drive belts
are not frayed, worn, cracked or oily.
Engine oil level*Check the level after parking
the vehicle on a level surface with the engine off.
Wait more than 10 minutes for the oil to drain
back into the oil pan.
Exhaust systemMake sure there are no loose
supports, cracks or holes. If the sound of the
exhaust seems unusual or there is a smell of
exhaust fumes, immediately have the exhaust
system inspected by a NISSAN dealer. See the
carbon monoxide warning in the “Starting and
driving” section of this manual.
Fluid leaksCheck under the vehicle for fuel, oil,
water or other fluid leaks after the vehicle has
been parked for a while. Water dripping from the
air conditioner after use is normal. If you should
notice any leaks or if gasoline fumes are evident,
check for the cause and have it corrected imme-
diately.
Power steering fluid level* and linesCheck
the level when the fluid is cold, with the engine
off. Check the lines for proper attachment, leaks,
cracks, etc.
Radiator and hosesCheck the front of the
radiator and clean off any dirt, insects, leaves,etc., that may have accumulated. Make sure the
hoses have no cracks, deformation, rot or loose
connections.
UnderbodyThe underbody is frequently ex-
posed to corrosive substances such as those
used on icy roads or to control dust. It is very
important to remove these substances from the
underbody, otherwise rust may form on the floor
pan, frame, fuel lines and exhaust system. At the
end of winter, the underbody should be thor-
oughly flushed with plain water, in those areas
where mud and dirt may have accumulated. See
the “Appearance and care” section of this
manual.
Windshield washer fluid*Check that there is
adequate fluid in the reservoir.
8-4Maintenance and do-it-yourself
ZREVIEW COPY:Ð2004 Xterra(xtr)
Owners Manual(owners)ÐUSA English(nna)
10/23/03Ðdebbie
X
Page 209 of 296
When performing any inspection or maintenance
work on your vehicle, always take care to prevent
serious accidental injury to yourself or damage to
the vehicle. The following are general precau-
tions which should be closely observed.
WARNING
cPark the vehicle on a level surface, ap-
ply the parking brake securely and
block the wheels to prevent the vehicle
from moving. For manual transmission
models, move the shift lever to N (Neu-
tral) . For automatic transmission mod-
els, move the selector lever to P (Park) .
cBe sure the ignition key is in the OFF or
LOCK position when performing any
parts replacement or repairs.
cNever leave the engine or automatic
transmission related component har-
nesses disconnected while the ignition
switch is in the ON position.
cNever connect or disconnect the battery
or any transistorized component while
the ignition switch is in the ON position.
cIf you must work with the engine run-
ning, keep your hands, clothing, hair
and tools away from moving fans, belts
and any other moving parts.cIt is advisable to secure or remove any
loose clothing and remove any jewelry,
such as rings, watches, etc. before
working on your vehicle.
cAlways wear eye protection whenever
you work on your vehicle.
cIf you must run the engine in an en-
closed space such as a garage, be sure
there is proper ventilation for exhaust
gases to escape.
cNever get under the vehicle while it is
supported only by a jack. If it is neces-
sary to work under the vehicle, support
it with safety stands.
cKeep smoking materials, flame and
sparks away from the fuel tank and
battery.
cOn gasoline engine models with the
multiport fuel injection (MFI) system,
the fuel filter or fuel lines should be
serviced by a NISSAN dealer because
the fuel lines are under high pressure
even when the engine is off.
CAUTION
cDo not work under the hood while the
engine is hot. Turn the engine off and
wait until it cools down.
cAvoid contact with used engine oil and
coolant. Improperly disposed engine
oil, engine coolant and/or other vehicle
fluids can damage the environment. Al-
ways conform to local regulations for
disposal of vehicle fluid.
This “Maintenance and do-it-yourself” section
gives instructions regarding only those items
which are relatively easy for an owner to perform.
A genuine NISSAN service manual is also avail-
able. See “Owner’s Manual/Service Manual or-
der information” in the “Technical and consumer
information” section of this manual.
You should be aware that incomplete or improper
servicing may result in operating difficulties or
excessive emissions, and could affect warranty
coverage.If in doubt about any servicing,
have it done by a NISSAN dealer.
MAINTENANCE PRECAUTIONS
Maintenance and do-it-yourself8-5
ZREVIEW COPY:Ð2004 Xterra(xtr)
Owners Manual(owners)ÐUSA English(nna)
10/23/03Ðdebbie
X