2004 NISSAN XTERRA clutch
[x] Cancel search: clutchPage 175 of 296

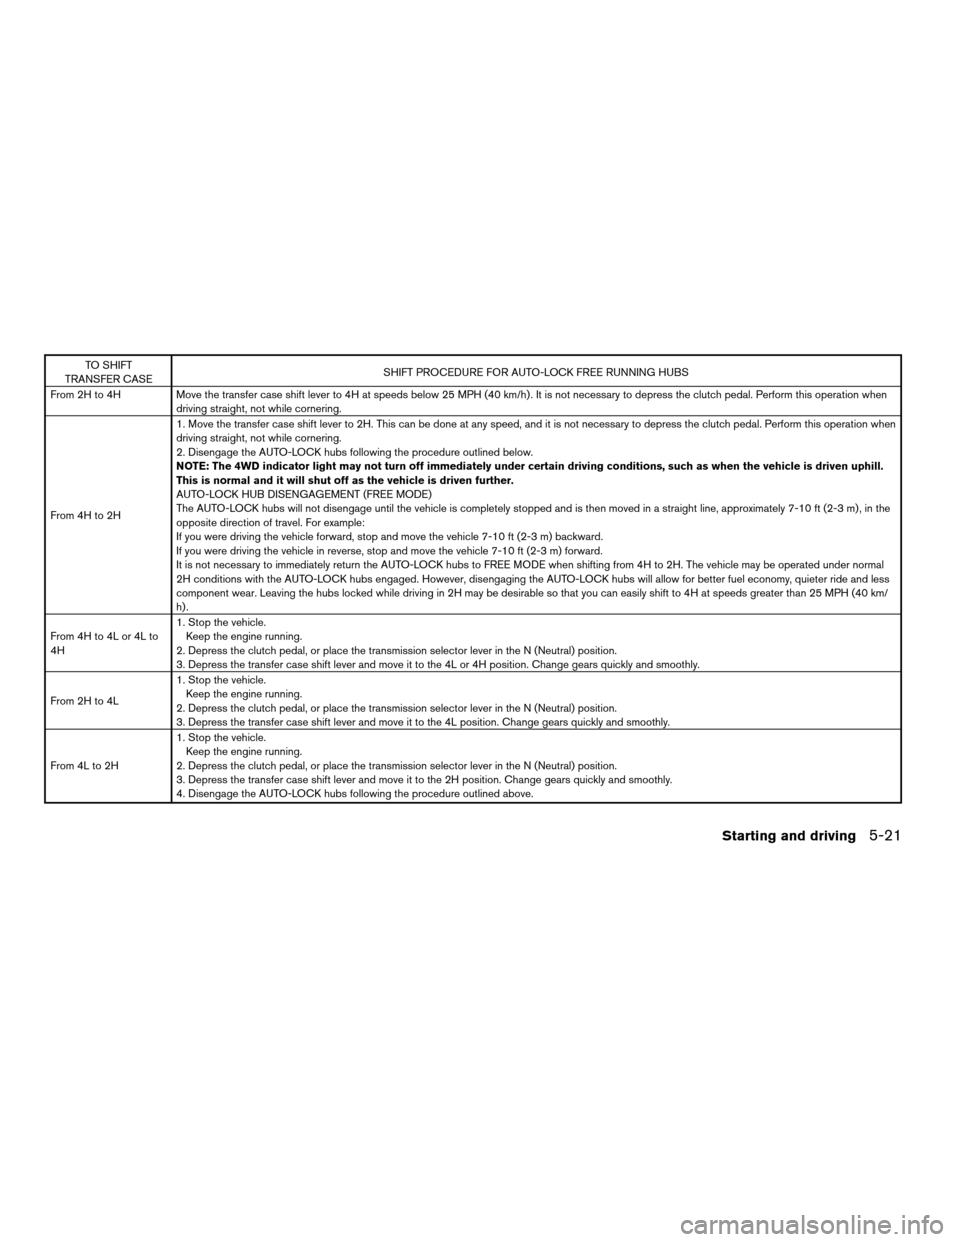
TO SHIFT
TRANSFER CASESHIFT PROCEDURE FOR AUTO-LOCK FREE RUNNING HUBS
From 2H to 4H Move the transfer case shift lever to 4H at speeds below 25 MPH (40 km/h) . It is not necessary to depress the clutch pedal. Perform this operation when
driving straight, not while cornering.
From 4H to 2H1. Move the transfer case shift lever to 2H. This can be done at any speed, and it is not necessary to depress the clutch pedal. Perform this operation when
driving straight, not while cornering.
2. Disengage the AUTO-LOCK hubs following the procedure outlined below.
NOTE: The 4WD indicator light may not turn off immediately under certain driving conditions, such as when the vehicle is driven uphill.
This is normal and it will shut off as the vehicle is driven further.
AUTO-LOCK HUB DISENGAGEMENT (FREE MODE)
The AUTO-LOCK hubs will not disengage until the vehicle is completely stopped and is then moved in a straight line, approximately 7-10 ft (2-3 m) , in the
opposite direction of travel. For example:
If you were driving the vehicle forward, stop and move the vehicle 7-10 ft (2-3 m) backward.
If you were driving the vehicle in reverse, stop and move the vehicle 7-10 ft (2-3 m) forward.
It is not necessary to immediately return the AUTO-LOCK hubs to FREE MODE when shifting from 4H to 2H. The vehicle may be operated under normal
2H conditions with the AUTO-LOCK hubs engaged. However, disengaging the AUTO-LOCK hubs will allow for better fuel economy, quieter ride and less
component wear. Leaving the hubs locked while driving in 2H may be desirable so that you can easily shift to 4H at speeds greater than 25 MPH (40 km/
h) .
From 4H to 4L or 4L to
4H1. Stop the vehicle.
Keep the engine running.
2. Depress the clutch pedal, or place the transmission selector lever in the N (Neutral) position.
3. Depress the transfer case shift lever and move it to the 4L or 4H position. Change gears quickly and smoothly.
From 2H to 4L1. Stop the vehicle.
Keep the engine running.
2. Depress the clutch pedal, or place the transmission selector lever in the N (Neutral) position.
3. Depress the transfer case shift lever and move it to the 4L position. Change gears quickly and smoothly.
From 4L to 2H1. Stop the vehicle.
Keep the engine running.
2. Depress the clutch pedal, or place the transmission selector lever in the N (Neutral) position.
3. Depress the transfer case shift lever and move it to the 2H position. Change gears quickly and smoothly.
4. Disengage the AUTO-LOCK hubs following the procedure outlined above.
Starting and driving5-21
ZREVIEW COPY:Ð2004 Xterra(xtr)
Owners Manual(owners)ÐUSA English(nna)
10/23/03Ðdebbie
X
Page 205 of 296

8 Maintenance and do-it-yourself
Maintenance requirements..........................8-2
General maintenance..............................8-2
Explanation of general maintenance items.........8-2
Maintenance precautions...........................8-5
Engine compartment check locations................8-6
Engine cooling system.............................8-9
Checking engine coolant level...................8-9
Changing engine coolant.......................8-10
Engine oil........................................8-10
Checking engine oil level.......................8-10
Changing engine oil...........................8-11
Changing engine oil filter.......................8-13
Automatic transmission fluid.......................8-14
Temperature conditions for checking.............8-14
Power steering fluid...............................8-15
Brake and clutch fluid.............................8-16
Brake fluid....................................8-16
Clutch fluid...................................8-17
Window washer fluid.............................8-17
Window washer fluid reservoir..................8-17
Battery..........................................8-18
Jump starting.................................8-19
Drive belts.......................................8-20Spark plugs......................................8-21
Replacing spark plugs.........................8-21
Air cleaner.......................................8-23
In-cabin Microfilter (if so equipped)..............8-23
Windshield wiper blades..........................8-26
Cleaning.....................................8-26
Replacing....................................8-26
Parking brake and brake pedal.....................8-29
Checking parking brake........................8-29
Checking brake pedal..........................8-29
Brake booster.................................8-30
Fuses...........................................8-31
Passenger compartment.......................8-31
Keyfob battery replacement........................8-32
Lights...........................................8-33
Headlights....................................8-33
Fog lights (if so equipped)......................8-34
Exterior and interior lights.......................8-36
Wheels and tires.................................8-40
Tire pressure..................................8-40
Tire labeling...................................8-43
Types of tires..................................8-46
Tire chains....................................8-46
Changing wheels and tires.....................8-47
ZREVIEW COPY:Ð2004 Xterra(xtr)
Owners Manual(owners)ÐUSA English(nna)
10/23/03Ðdebbie
X
Page 207 of 296

When driving in areas using road salt or other
corrosive materials, check lubrication frequently.
Lights*Clean the headlights on a regular basis.
Make sure that the headlights, stop lights, tail
lights, turn signal lights, and other lights are all
operating properly and installed securely. Also
check headlight aim.
Road wheel nuts*When checking the tires,
make sure no wheel nuts are missing, and check
for any loose wheel nuts. Tighten if necessary.
Tire rotation*Tires should be rotated every
7,500 miles (12,000 km) .
Tires*Check the pressure with a gauge often
and always prior to long distance trips. If neces-
sary, adjust the pressure in all tires, including the
spare, to the pressure specified. Check carefully
for damage, cuts or excessive wear.
Wheel alignment and balanceIf the vehicle
should pull to either side while driving on a
straight and level road, or if you detect uneven or
abnormal tire wear, there may be a need for wheel
alignment. If the steering wheel or seat vibrates at
normal highway speeds, wheel balancing may be
needed.
cFor additional information regarding tires,
refer to “Important Tire Safety Information”
(US) or “Tire Safety Information” (Canada) in
the Warranty Information Booklet .WindshieldClean the windshield on a regular
basis. Check the windshield at least every six
months for cracks or other damage. Have a dam-
aged windshield repaired by a qualified repair
facility.
Windshield wiper blades*Check for cracks or
wear if they do not wipe properly.
Inside the vehicle
The maintenance items listed here should be
checked on a regular basis, such as when per-
forming periodic maintenance, cleaning the ve-
hicle, etc.
Additional information on the following
items with an “*” is found later in this sec-
tion.
Accelerator pedalCheck the pedal for smooth
operation and make sure the pedal does not bind
or require uneven effort. Keep the floor mat away
from the pedal.
Automatic transmission P (Park) position
mechanismCheck that the lock release button
on the shift selector lever operates properly and
smoothly. On a fairly steep hill check that your
vehicle is held securely with the selector lever in
the P (Park) position without applying any brakes.
Brake pedal and booster*Check the pedal for
smooth operation and make sure it has the properdistance under it when depressed fully. Check
the brake booster function. Be certain to keep the
floor mat away from the pedal.
BrakesCheck that the brakes do not pull the
vehicle to one side when applied.
Clutch pedal*Make sure the pedal operates
smoothly and check that it has the proper free
travel.
Parking brake*Check that the pedal has the
proper travel and confirm that your vehicle is held
securely on a fairly steep hill with only the parking
brake applied.
SeatsCheck seat position controls such as seat
adjusters, seatback recliner, etc. to ensure they
operate smoothly and all latches lock securely in
every position. Check that the head restraints
move up and down smoothly and the locks (if so
equipped) hold securely in all latched positions.
Seat beltsCheck that all parts of the seat belt
system (for example, buckles, anchors, adjusters
and retractors) operate properly and smoothly,
and are installed securely. Check the belt web-
bing for cuts, fraying, wear or damage.
Steering wheelCheck for changes in the steer-
ing system, such as excessive freeplay, hard
steering or strange noises.
Maintenance and do-it-yourself8-3
ZREVIEW COPY:Ð2004 Xterra(xtr)
Owners Manual(owners)ÐUSA English(nna)
10/23/03Ðdebbie
X
Page 208 of 296

Warning lights and chimesMake sure all
warning lights and chimes are operating properly.
Windshield wiper and washer*Check that
the wipers and washer operate properly and that
the wipers do not streak.
Windshield defrosterCheck that the air
comes out of the defroster outlets properly and in
sufficient quantity when operating the heater or
air conditioner.
Under the hood and vehicle
The maintenance items listed here should be
checked periodically (for example, each time you
check the engine oil or refuel) .
Automatic transmission fluid level*Check
the level after putting the selector lever in P with
the engine idling at operating temperature.
Battery*Check the fluid level in each cell. It
should be between the MAX and MIN lines. Ve-
hicles operated in high temperatures or under
severe conditions require frequent checks of the
battery fluid level.
Brake and clutch fluid levels*Make sure that
the brake and clutch fluid level is between the
MIN and MAX lines on the reservoir.
Engine coolant level*Check the coolant level
when the engine is cold.Engine drive belts*Make sure the drive belts
are not frayed, worn, cracked or oily.
Engine oil level*Check the level after parking
the vehicle on a level surface with the engine off.
Wait more than 10 minutes for the oil to drain
back into the oil pan.
Exhaust systemMake sure there are no loose
supports, cracks or holes. If the sound of the
exhaust seems unusual or there is a smell of
exhaust fumes, immediately have the exhaust
system inspected by a NISSAN dealer. See the
carbon monoxide warning in the “Starting and
driving” section of this manual.
Fluid leaksCheck under the vehicle for fuel, oil,
water or other fluid leaks after the vehicle has
been parked for a while. Water dripping from the
air conditioner after use is normal. If you should
notice any leaks or if gasoline fumes are evident,
check for the cause and have it corrected imme-
diately.
Power steering fluid level* and linesCheck
the level when the fluid is cold, with the engine
off. Check the lines for proper attachment, leaks,
cracks, etc.
Radiator and hosesCheck the front of the
radiator and clean off any dirt, insects, leaves,etc., that may have accumulated. Make sure the
hoses have no cracks, deformation, rot or loose
connections.
UnderbodyThe underbody is frequently ex-
posed to corrosive substances such as those
used on icy roads or to control dust. It is very
important to remove these substances from the
underbody, otherwise rust may form on the floor
pan, frame, fuel lines and exhaust system. At the
end of winter, the underbody should be thor-
oughly flushed with plain water, in those areas
where mud and dirt may have accumulated. See
the “Appearance and care” section of this
manual.
Windshield washer fluid*Check that there is
adequate fluid in the reservoir.
8-4Maintenance and do-it-yourself
ZREVIEW COPY:Ð2004 Xterra(xtr)
Owners Manual(owners)ÐUSA English(nna)
10/23/03Ðdebbie
X
Page 210 of 296

KA24DE engine
1. Power steering fluid reservoir
2. Automatic transmission fluid dipstick
(A/T model)
3. Air cleaner
4. Engine oil filler cap
5. Engine oil dipstick
6. Brake fluid reservoir
7. Clutch fluid reservoir (M/T model)
8. Windshield washer fluid reservoir
9. Radiator cap
10. Engine coolant reservoir
11. Battery
WDI0087
ENGINE COMPARTMENT CHECK
LOCATIONS
8-6Maintenance and do-it-yourself
ZREVIEW COPY:Ð2004 Xterra(xtr)
Owners Manual(owners)ÐUSA English(nna)
10/23/03Ðdebbie
X
Page 211 of 296

VG33E engine
1. Fuse/fusible link holder
2. Power steering fluid reservoir
3. Automatic transmission fluid dipstick
(A/T model)
4. Brake fluid reservoir
5. Clutch fluid reservoir (M/T model)
6. Air cleaner
7. Windshield washer fluid reservoir
8. Engine oil dipstick
9. Radiator cap
10. Engine oil filler cap
11. Engine coolant reservoir
12. Battery
WDI0269
Maintenance and do-it-yourself8-7
ZREVIEW COPY:Ð2004 Xterra(xtr)
Owners Manual(owners)ÐUSA English(nna)
10/23/03Ðdebbie
X
Page 220 of 296

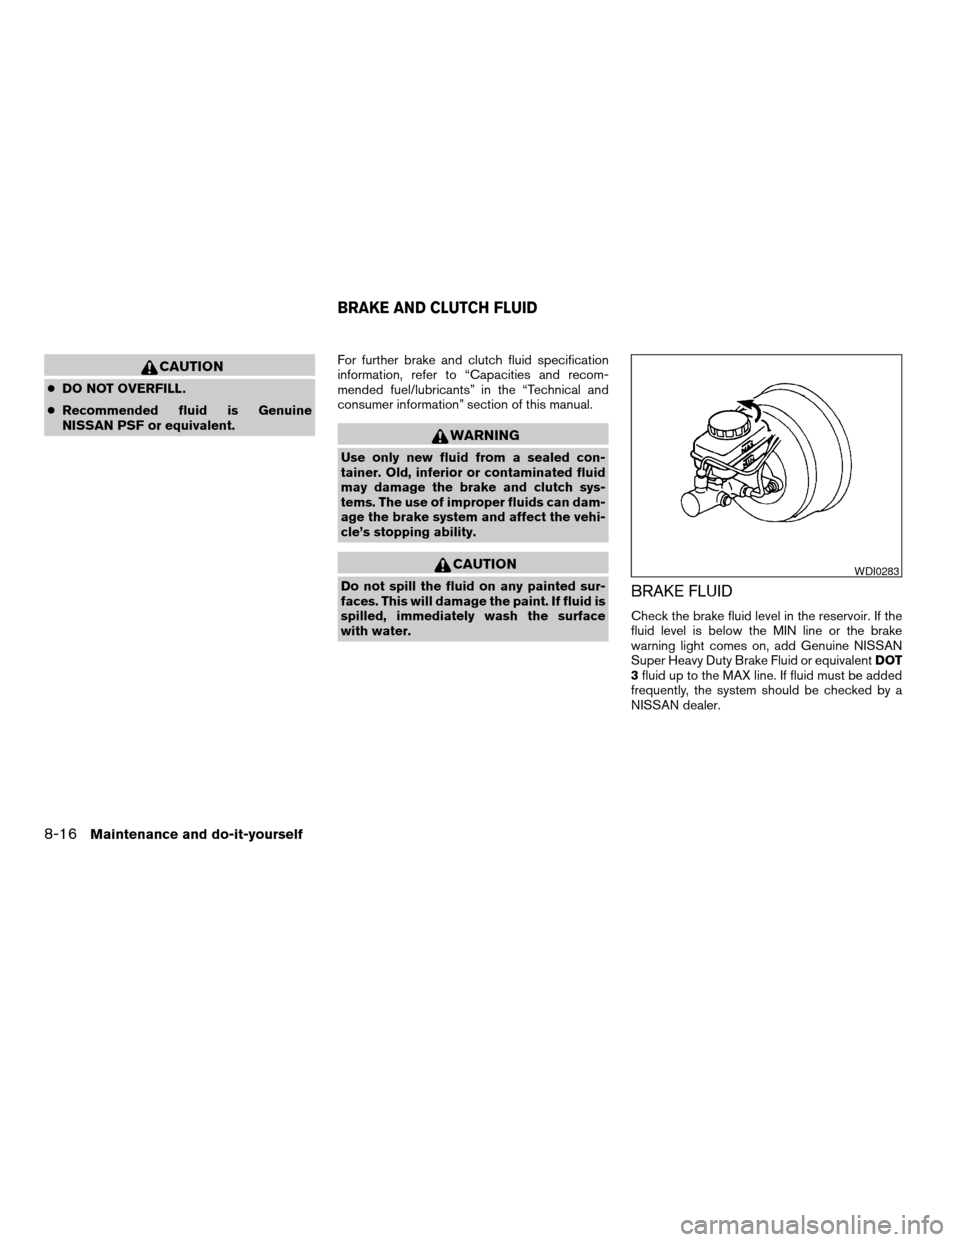
CAUTION
cDO NOT OVERFILL.
cRecommended fluid is Genuine
NISSAN PSF or equivalent.For further brake and clutch fluid specification
information, refer to “Capacities and recom-
mended fuel/lubricants” in the “Technical and
consumer information” section of this manual.
WARNING
Use only new fluid from a sealed con-
tainer. Old, inferior or contaminated fluid
may damage the brake and clutch sys-
tems. The use of improper fluids can dam-
age the brake system and affect the vehi-
cle’s stopping ability.
CAUTION
Do not spill the fluid on any painted sur-
faces. This will damage the paint. If fluid is
spilled, immediately wash the surface
with water.BRAKE FLUID
Check the brake fluid level in the reservoir. If the
fluid level is below the MIN line or the brake
warning light comes on, add Genuine NISSAN
Super Heavy Duty Brake Fluid or equivalentDOT
3fluid up to the MAX line. If fluid must be added
frequently, the system should be checked by a
NISSAN dealer.
WDI0283
BRAKE AND CLUTCH FLUID
8-16Maintenance and do-it-yourself
ZREVIEW COPY:Ð2004 Xterra(xtr)
Owners Manual(owners)ÐUSA English(nna)
10/23/03Ðdebbie
X
Page 221 of 296

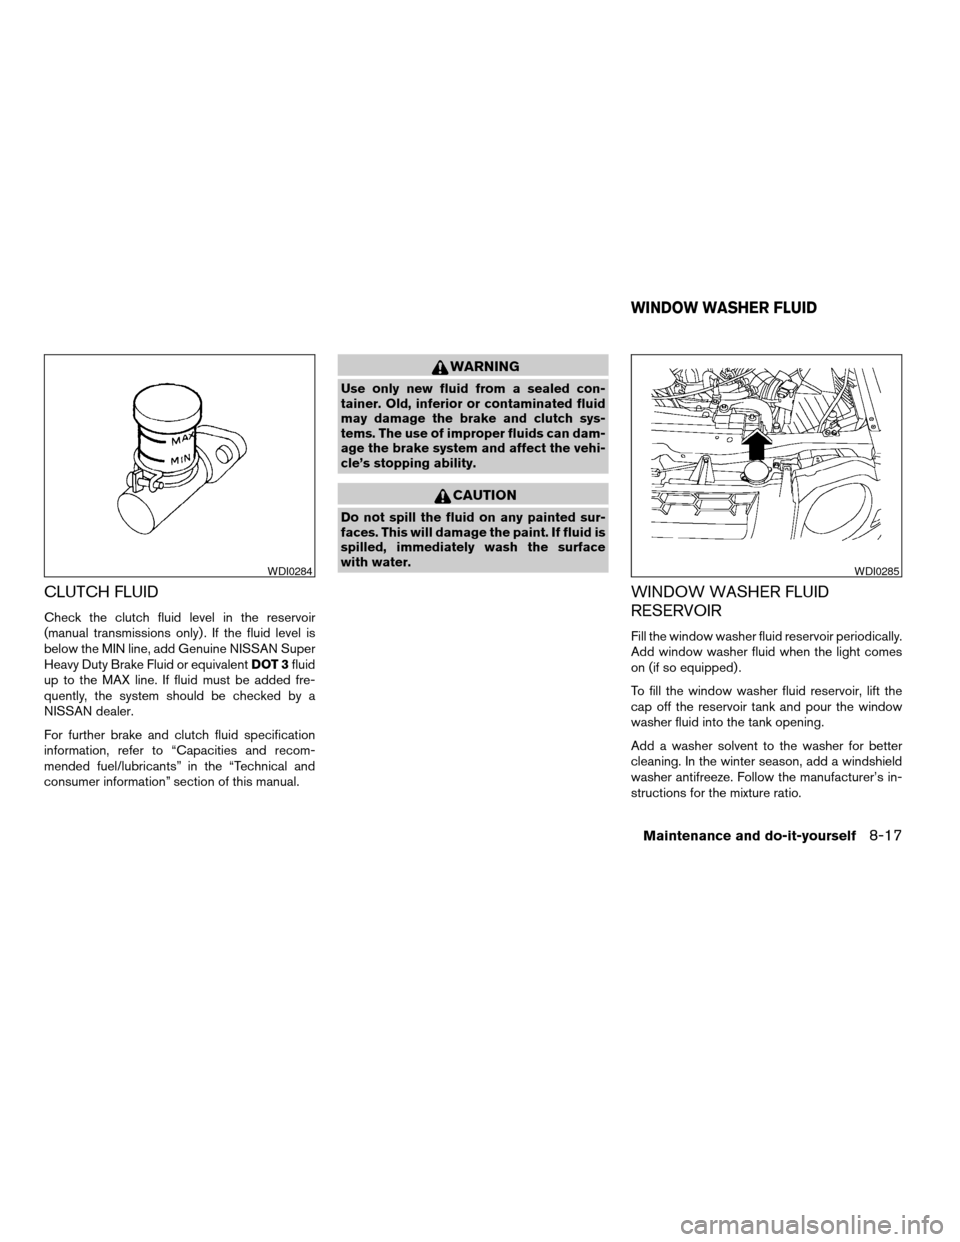
CLUTCH FLUID
Check the clutch fluid level in the reservoir
(manual transmissions only) . If the fluid level is
below the MIN line, add Genuine NISSAN Super
Heavy Duty Brake Fluid or equivalentDOT 3fluid
up to the MAX line. If fluid must be added fre-
quently, the system should be checked by a
NISSAN dealer.
For further brake and clutch fluid specification
information, refer to “Capacities and recom-
mended fuel/lubricants” in the “Technical and
consumer information” section of this manual.
WARNING
Use only new fluid from a sealed con-
tainer. Old, inferior or contaminated fluid
may damage the brake and clutch sys-
tems. The use of improper fluids can dam-
age the brake system and affect the vehi-
cle’s stopping ability.
CAUTION
Do not spill the fluid on any painted sur-
faces. This will damage the paint. If fluid is
spilled, immediately wash the surface
with water.
WINDOW WASHER FLUID
RESERVOIR
Fill the window washer fluid reservoir periodically.
Add window washer fluid when the light comes
on (if so equipped) .
To fill the window washer fluid reservoir, lift the
cap off the reservoir tank and pour the window
washer fluid into the tank opening.
Add a washer solvent to the washer for better
cleaning. In the winter season, add a windshield
washer antifreeze. Follow the manufacturer’s in-
structions for the mixture ratio.
WDI0284WDI0285
WINDOW WASHER FLUID
Maintenance and do-it-yourself8-17
ZREVIEW COPY:Ð2004 Xterra(xtr)
Owners Manual(owners)ÐUSA English(nna)
10/23/03Ðdebbie
X