2004 NISSAN SENTRA washer fluid
[x] Cancel search: washer fluidPage 13 of 248

QG18DE engine
1. Engine oil filler cap (P. 8-11)
2. Spark plug caps/ignition coils (P. 8-22)
3. Brake fluid reservoir (P. 8-18)
4. Clutch fluid reservoir (M/T model)
(P. 8-18)
5. Air cleaner (P. 8-23)
6. Battery (P. 8-19)
7. Fuse/Fusible link box (P. 8-30)
8. Radiator cap (P. 8-8)
9. Engine oil dipstick (P. 8-11)
10. Windshield washer fluid reservoir
(P. 8-19)
11. Engine coolant reservoir (P. 8-8)
12. Power steering fluid reservoir (P. 8-17)
WDI0024
ENGINE COMPARTMENT LOCATIONS
Illustrated table of contents0-7
ZREVIEW COPY:Ð2004 Sentra(b15)
Owners Manual(owners)ÐUSA English(nna)
03/18/04Ðtbrooks
X
Page 14 of 248

QR25DE engine
1. Engine oil filler cap (P. 8-11)
2. Spark plug caps (P. 8-22)
3. Brake fluid reservoir (P. 8-18)
4. Clutch fluid reservoir (M/T model)
(P. 8-18)
5. Air cleaner (P. 8-23)
6. Battery (P. 8-19)
7. Fuel/Fusible link box (P. 8-30)
8. Radiator cap (P. 8-8)
9. Engine oil dipstick (P. 8-11)
10. Windshield washer fluid reservoir
(P. 8-19)
11. Engine coolant reservoir (P. 8-8)
12. Power steering fluid reservoir (P. 8-17)
See the page number indicated in paren-
theses for operating details.
LDI0108
0-8Illustrated table of contents
ZREVIEW COPY:Ð2004 Sentra(b15)
Owners Manual(owners)ÐUSA English(nna)
03/18/04Ðtbrooks
X
Page 15 of 248
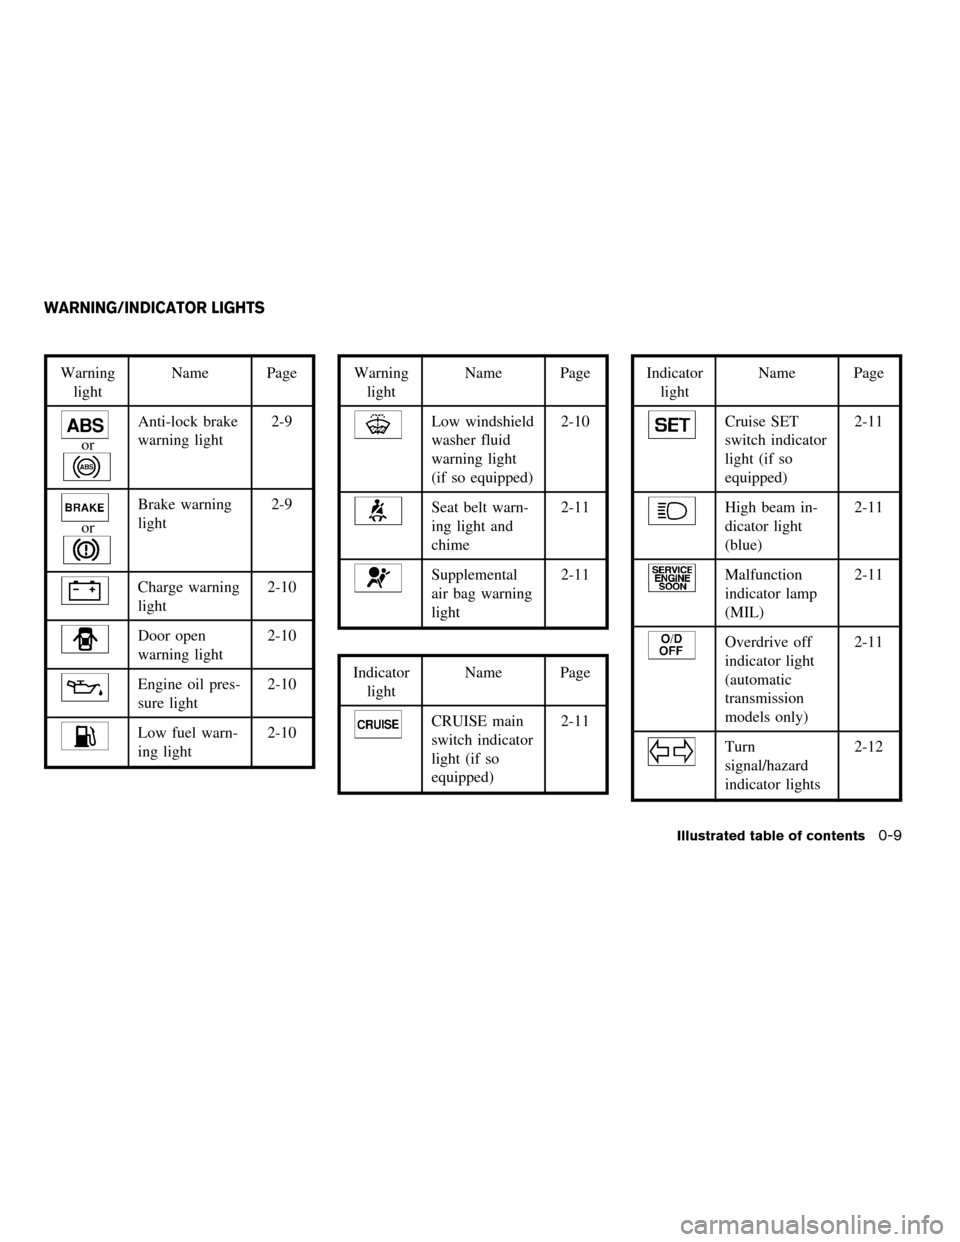
Warning
lightName Page
or
Anti-lock brake
warning light2-9
or
Brake warning
light2-9
Charge warning
light2-10
Door open
warning light2-10
Engine oil pres-
sure light2-10
Low fuel warn-
ing light2-10
Warning
lightName Page
Low windshield
washer fluid
warning light
(if so equipped)2-10
Seat belt warn-
ing light and
chime2-11
Supplemental
air bag warning
light2-11
Indicator
lightName Page
CRUISE main
switch indicator
light (if so
equipped)2-11
Indicator
lightName Page
Cruise SET
switch indicator
light (if so
equipped)2-11
High beam in-
dicator light
(blue)2-11
Malfunction
indicator lamp
(MIL)2-11
Overdrive off
indicator light
(automatic
transmission
models only)2-11
Turn
signal/hazard
indicator lights2-12
WARNING/INDICATOR LIGHTS
Illustrated table of contents0-9
ZREVIEW COPY:Ð2004 Sentra(b15)
Owners Manual(owners)ÐUSA English(nna)
03/18/04Ðtbrooks
X
Page 63 of 248

orAnti-lock brake warning light
(if so equipped)Low fuel warning lightCruise SET switch indicator light (if so
equipped)
orBrake warning lightLow windshield washer fluid warning light (if so
equipped)High beam indicator light (Blue)
Charge warning lightSeat belt warning light and chimeMalfunction indicator lamp (MIL)
Door open warning lightSupplemental air bag warning lightOverdrive off indicator light (automatic trans-
mission models only)
Engine oil pressure warning lightCRUISE main switch indicator light (if so
equipped)Turn signal/hazard indicator lights
CHECKING BULBS
With all doors closed, apply the parking brake
and turn the ignition key to the ON position
without starting the engine. The following lights
will come on:
,,or,,,
The following lights come on briefly and then go
off:
or
If any light fails to come on, it may indicate
a burned-out bulb or an open circuit in the
electrical system. Have the system repaired
promptly.
WARNING LIGHTS
orAnti-lock brake
warning light (if so
equipped)
If the light comes on while the engine is running,
it may indicate the anti-lock brake system is not
functioning properly. Have the system checked
by a NISSAN dealer.
Turn off the engine, and start it again by
slowly turning the ignition key (quickly do-
ing so may cause the ABS light to stay on
when there is nothing wrong) . If the light
stays on, have the system checked by a
NISSAN dealer.If an abnormality occurs in the system, the anti-
lock function ceases, but the regular braking
system continues to operate.
If the light comes on while you are driving,
contact a NISSAN dealer for repair.orBrake warning light
This light functions for both the parking brake and
the foot brake systems.
When the ignition key is in the ON position, the
light comes on when the parking brake is applied,
and also warns of a low brake fluid level. If the
light comes on while the engine is running with
WARNING/INDICATOR LIGHTS AND
AUDIBLE REMINDERS
Instruments and controls2-9
ZREVIEW COPY:Ð2004 Sentra(b15)
Owners Manual(owners)ÐUSA English(nna)
03/18/04Ðtbrooks
X
Page 64 of 248
the parking brake not applied, stop the vehicle
and perform the following:
1. Check the brake fluid level. Add brake fluid
as necessary. See “Brake fluid” in the “Main-
tenance and do-it-yourself” section of this
manual.
2. If the brake fluid level is correct, have the
brake system checked by a NISSAN dealer.
WARNING
cYour vehicle is equipped with an auto-
matic engine cooling fan. It may come
on at any time without warning, even if
the ignition key is in the OFF position
and the engine is not running. To avoid
injury, always disconnect the negative
battery cable before working near the
fan.
cPressing the brake pedal with the en-
gine stopped and/or a low brake fluid
level may increase your stopping dis-
tance and braking will require greater
pedal effort as well as pedal travel.
cIf the brake fluid level is below the
MINIMUM or MIN mark on the brake
fluid reservoir, do not drive until the
brake system has been checked at a
NISSAN dealer.
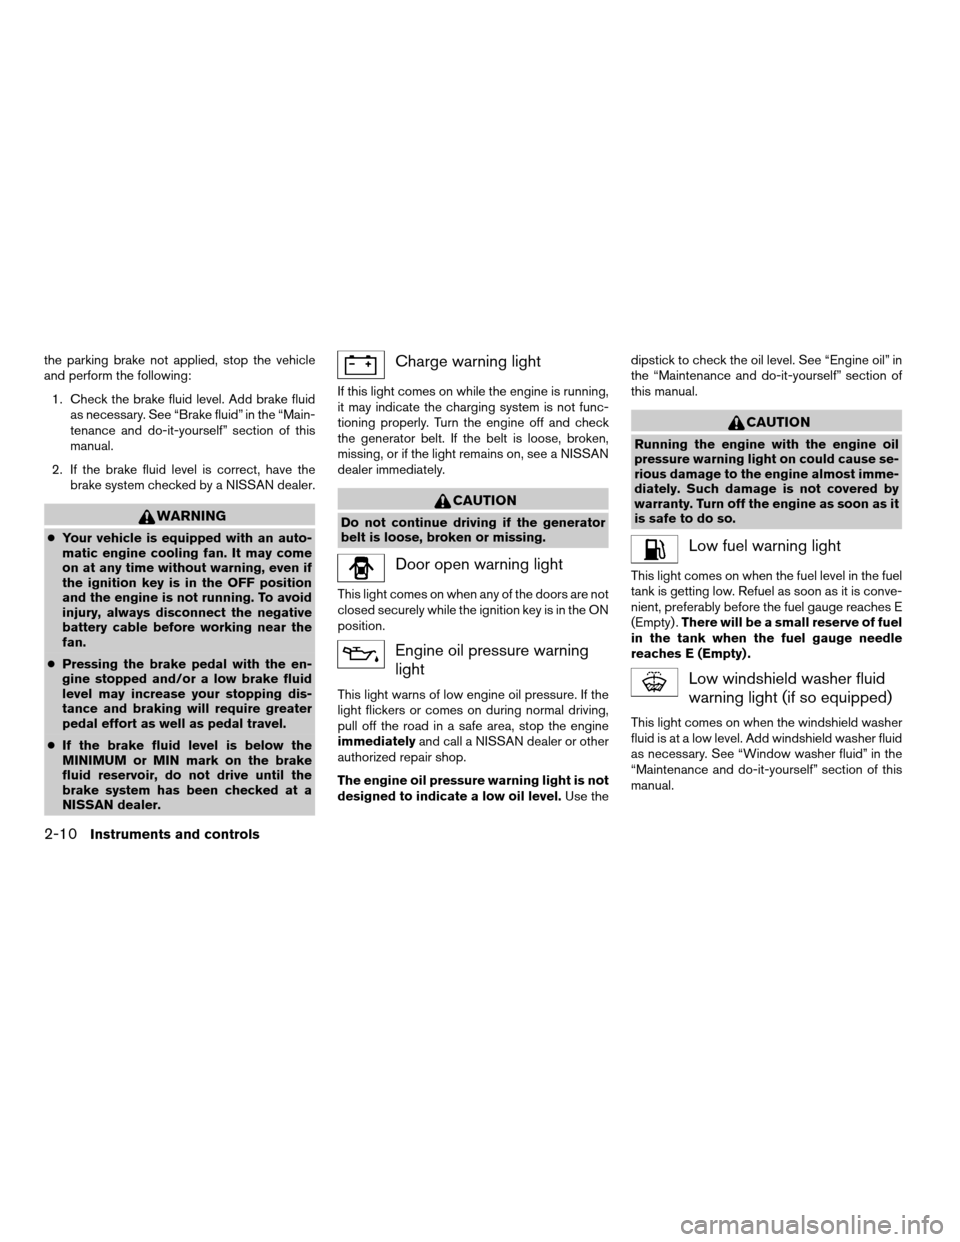
Charge warning light
If this light comes on while the engine is running,
it may indicate the charging system is not func-
tioning properly. Turn the engine off and check
the generator belt. If the belt is loose, broken,
missing, or if the light remains on, see a NISSAN
dealer immediately.
CAUTION
Do not continue driving if the generator
belt is loose, broken or missing.
Door open warning light
This light comes on when any of the doors are not
closed securely while the ignition key is in the ON
position.
Engine oil pressure warning
light
This light warns of low engine oil pressure. If the
light flickers or comes on during normal driving,
pull off the road in a safe area, stop the engine
immediatelyand call a NISSAN dealer or other
authorized repair shop.
The engine oil pressure warning light is not
designed to indicate a low oil level.Use thedipstick to check the oil level. See “Engine oil” in
the “Maintenance and do-it-yourself” section of
this manual.
CAUTION
Running the engine with the engine oil
pressure warning light on could cause se-
rious damage to the engine almost imme-
diately. Such damage is not covered by
warranty. Turn off the engine as soon as it
is safe to do so.
Low fuel warning light
This light comes on when the fuel level in the fuel
tank is getting low. Refuel as soon as it is conve-
nient, preferably before the fuel gauge reaches E
(Empty) .There will be a small reserve of fuel
in the tank when the fuel gauge needle
reaches E (Empty) .
Low windshield washer fluid
warning light (if so equipped)
This light comes on when the windshield washer
fluid is at a low level. Add windshield washer fluid
as necessary. See “Window washer fluid” in the
“Maintenance and do-it-yourself” section of this
manual.
2-10Instruments and controls
ZREVIEW COPY:Ð2004 Sentra(b15)
Owners Manual(owners)ÐUSA English(nna)
03/18/04Ðtbrooks
X
Page 71 of 248
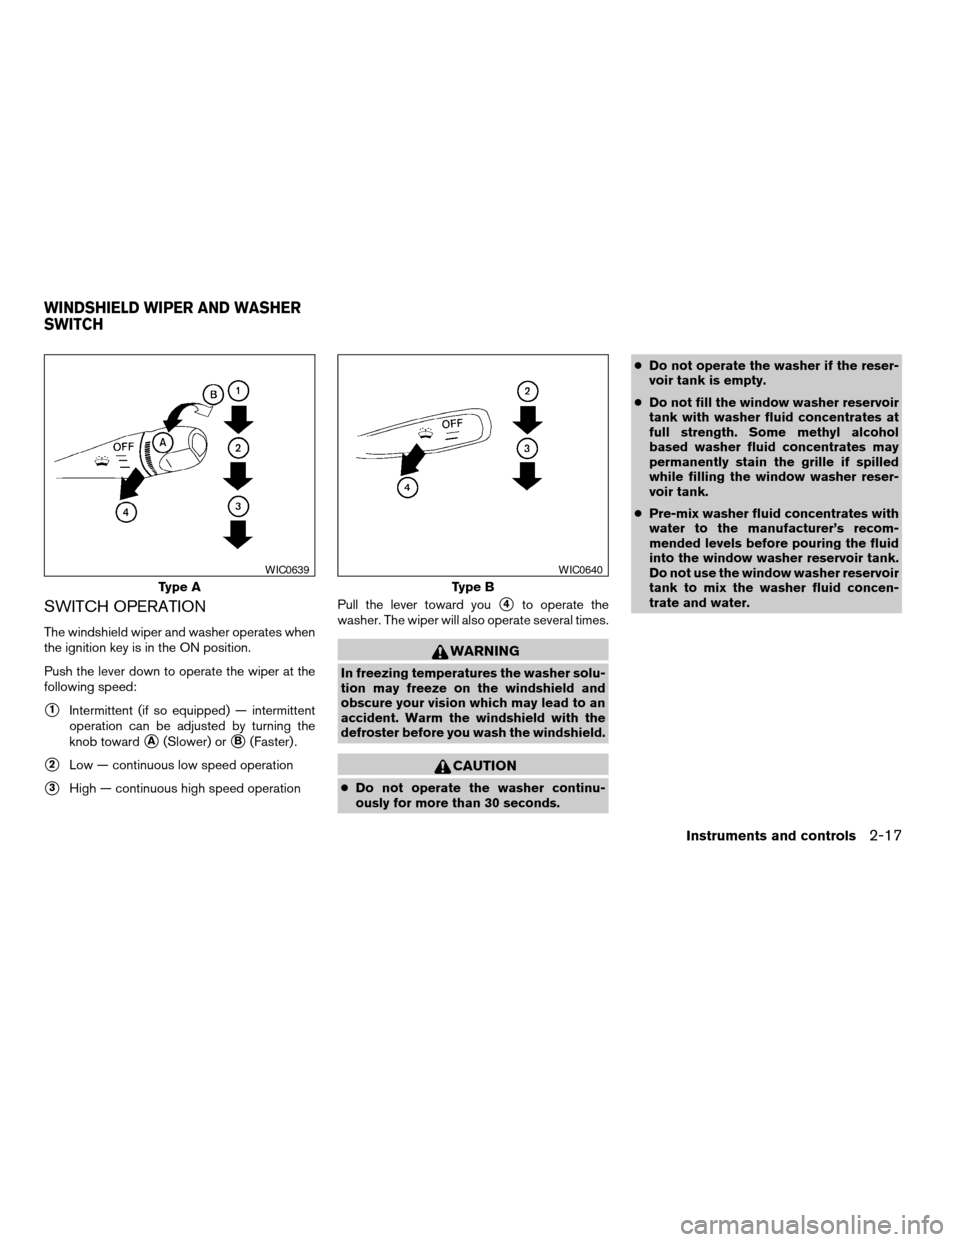
SWITCH OPERATION
The windshield wiper and washer operates when
the ignition key is in the ON position.
Push the lever down to operate the wiper at the
following speed:
s1Intermittent (if so equipped) — intermittent
operation can be adjusted by turning the
knob toward
sA(Slower) orsB(Faster) .
s2Low — continuous low speed operation
s3High — continuous high speed operationPull the lever toward you
s4to operate the
washer. The wiper will also operate several times.
WARNING
In freezing temperatures the washer solu-
tion may freeze on the windshield and
obscure your vision which may lead to an
accident. Warm the windshield with the
defroster before you wash the windshield.
CAUTION
cDo not operate the washer continu-
ously for more than 30 seconds.cDo not operate the washer if the reser-
voir tank is empty.
cDo not fill the window washer reservoir
tank with washer fluid concentrates at
full strength. Some methyl alcohol
based washer fluid concentrates may
permanently stain the grille if spilled
while filling the window washer reser-
voir tank.
cPre-mix washer fluid concentrates with
water to the manufacturer’s recom-
mended levels before pouring the fluid
into the window washer reservoir tank.
Do not use the window washer reservoir
tank to mix the washer fluid concen-
trate and water.
Type A
WIC0639
Type B
WIC0640
WINDSHIELD WIPER AND WASHER
SWITCH
Instruments and controls2-17
ZREVIEW COPY:Ð2004 Sentra(b15)
Owners Manual(owners)ÐUSA English(nna)
04/02/04Ðskoniecz
X
Page 126 of 248
cMake sure the area around the vehicle is
clear.
cCheck fluid levels such as engine oil, cool-
ant, brake and clutch fluid, and window
washer fluid as frequently as possible, or at
least whenever you refuel.
cCheck that all windows and lights are clean.
cVisually inspect tires for their appearance
and condition. Also check tires for proper
inflation.
cLock all doors.
cPosition seat and adjust head restraints.
cAdjust inside and outside mirrors.
cFasten seat belts and ask all passengers to
do likewise.
cCheck the operation of warning lights when
the key is turned to the ON (3) position. See
“Warning/indicator lights and audible re-
minders” in the “Instruments and controls”
section of this manual.1. Apply the parking brake.
2.Automatic transmission:
Move the shift selector lever to P (Park) or N
(Neutral) . P (Park) is recommended.
The shift selector lever cannot be
moved out of P (Park) and into any of
the other gear positions if the ignition
key is turned to the OFF position or if
the key is removed from the ignition
switch.
The starter is designed not to operate if
the shift selector lever is in any of the
driving positions.
Manual transmission:
Move the shift lever to N (Neutral) . Depress
the clutch pedal to the floor while cranking
the engine.
The starter is designed not to operate
unless the clutch pedal is fully de-
pressed.
3. Crank the enginewith your foot off the
accelerator pedalby turning the ignition
key to START. Release the key when the
engine starts. If the engine starts, but fails to
run, repeat the above procedure.cIf the engine is very hard to start in ex-
tremely cold weather or when restarting,
depress the accelerator pedal a little (ap-
proximately 1/5 to the floor) and hold it
and then crank the engine. Release the
key and the accelerator pedal when the
engine starts.
cIf the engine is very hard to start because
it is flooded, depress the accelerator
pedal all the way to the floor and hold it.
Crank the engine for 5-6 seconds. After
cranking the engine, release the accel-
erator pedal. Crank the enginewith your
foot off the accelerator pedalby turn-
ing the ignition key to START. Release the
key when the engine starts. If the engine
starts, but fails to run, repeat the above
procedure.
CAUTION
Do not operate the starter for more than
15 seconds at a time. If the engine does
not start, turn the key off and wait 10
seconds before cranking again, otherwise
the starter could be damaged.
4. Allow the engine to idle for at least 30 sec-
onds after starting. Drive at moderate speed
for a short distance first, especially in cold
weather.
BEFORE STARTING THE ENGINE STARTING THE ENGINE
5-6Starting and driving
ZREVIEW COPY:Ð2004 Sentra(b15)
Owners Manual(owners)ÐUSA English(nna)
03/18/04Ðtbrooks
X
Page 141 of 248
For details, see ‘‘Changing engine coolant’’ in the
‘‘Maintenance and do-it-yourself’’ section of this
manual.
TIRE EQUIPMENT
1. SUMMER tires have a tread designed to
provide superior performance on dry pave-
ment. However, the performance of these
tires will be substantially reduced in snowy
and icy conditions. If you operate your ve-
hicle on snowy or icy roads, NISSAN recom-
mends the use of MUD & SNOW or ALL
SEASON TIRES on all four wheels. Please
consult a NISSAN dealer for the tire type,
size, speed rating and availability informa-
tion.
2. For additional traction on icy roads, studded
tires may be used. However, some U.S.
states and Canadian provinces prohibit their
use. Check local, state and provincial laws
before installing studded tires.
Skid and traction capabilities of studded
snow tires on wet or dry surfaces may be
poorer than that of non-studded snow tires.
3. Tire chains
WARNING
Tire chains/cables cannot be installed on
P215/45ZR17 size tires. Installation of the
tire chains/cables on P215/45ZR17 size
tires will cause damage to the vehicles. If
you plan to use tire chains/cables, you
should install P195/55R16 size tires on
your vehicle.
Use of tire chains may be prohibited accord-
ing to location. Check the local laws before
installing tire chains. When installing tire
chains, make sure they are of proper size for
the tires on your vehicle and are installed
according to the chain manufacturer’s sug-
gestions.Use only SAE Class “S”
chains.Class “S” chains are used on ve-
hicles with restricted tire to vehicle clear-
ance. Vehicles that can use Class “S” chains
are designed to meet the minimum clear-
ances between the tire and the closest ve-
hicle suspension or body component re-
quired to accommodate the use of a winter
traction device (tire chains or cables) . The
minimum clearances are determined using
the factory equipped tire size. Other types
may damage your vehicle. Use chain ten-
sioners when recommended by the tire
chain manufacturer to ensure a tight fit.
Loose end links of the tire chain must besecured or removed to prevent the possibil-
ity of whipping action damage to the fenders
or underbody. If possible, avoid fully loading
your vehicle when using tire chains. In addi-
tion, drive at a reduced speed. Otherwise,
your vehicle may be damaged and/or vehicle
handling and performance may be adversely
affected.
Never install tire chains on spare tires. Do
not use tire chains on dry roads.
SPECIAL WINTER EQUIPMENT
It is recommended that the following items be
carried in the vehicle during winter:
cA scraper and stiff-bristled brush to remove
ice and snow from the windows and wiper
blades.
cA sturdy, flat board to be placed under the
jack to give it firm support.
cA shovel to dig the vehicle out of snowdrifts.
cExtra window washer fluid to refill the reser-
voir tank.
Starting and driving5-21
ZREVIEW COPY:Ð2004 Sentra(b15)
Owners Manual(owners)ÐUSA English(nna)
03/18/04Ðtbrooks
X