2004 NISSAN SENTRA ECO mode
[x] Cancel search: ECO modePage 2 of 248

This manual includes information for all options
available on this model. Therefore, you may find
some information that does not apply to your
vehicle.
All information, specifications and illustrations in
this manual are those in effect at the time of
printing. NISSAN reserves the right to change
specifications or design without notice and with-
out obligation.
IMPORTANT INFORMATION ABOUT
THIS MANUAL
You will see various symbols in this manual. They
are used in the following ways:
WARNING
This is used to indicate the presence of a
hazard that could cause death or serious
personal injury. To avoid or reduce the
risk, the procedures must be followed
precisely.
CAUTION
This is used to indicate the presence of a
hazard that could cause minor or moder-
ate personal injury or damage to your ve-
hicle. To avoid or reduce the risk, the pro-
cedures must be followed carefully.If you see this symbol, it means“Do not do this”
or“Do not let this happen.”
If you see a symbol similar to these in an illustra-
tion, it means the arrow points to the front of the
vehicle.
Arrows in an illustration that are similar to these
indicate movement or action.
Arrows in an illustration that are similar to these
call attention to an item in the illustration.
CALIFORNIA PROPOSITION 65
WARNING
WARNING
Engine exhaust, some of its constituents,
and certain vehicle components contain
or emit chemicals known to the State of
California to cause cancer and birth de-
fects or other reproductive harm. In addi-
tion, certain fluids contained in vehicles
and certain products of component wear
contain or emit chemicals known to the
State of California to cause cancer and
birth defects or other reproductive harm.
© 2004 NISSAN NORTH AMERICA, INC.
GARDENA, CALIFORNIA
All rights reserved. No part of this Owner’s
Manual may be reproduced or stored in a retrieval
system, or transmitted in any form, or by any
means, electronic, mechanical, photocopying,
recording or otherwise, without the prior written
permission of Nissan North America, Inc., Gar-
dena, California.
APD1005
WHEN READING THE MANUAL
ZREVIEW COPY:Ð2004 Sentra(b15)
Owners Manual(owners)ÐUSA English(nna)
03/18/04Ðtbrooks
X
Page 52 of 248
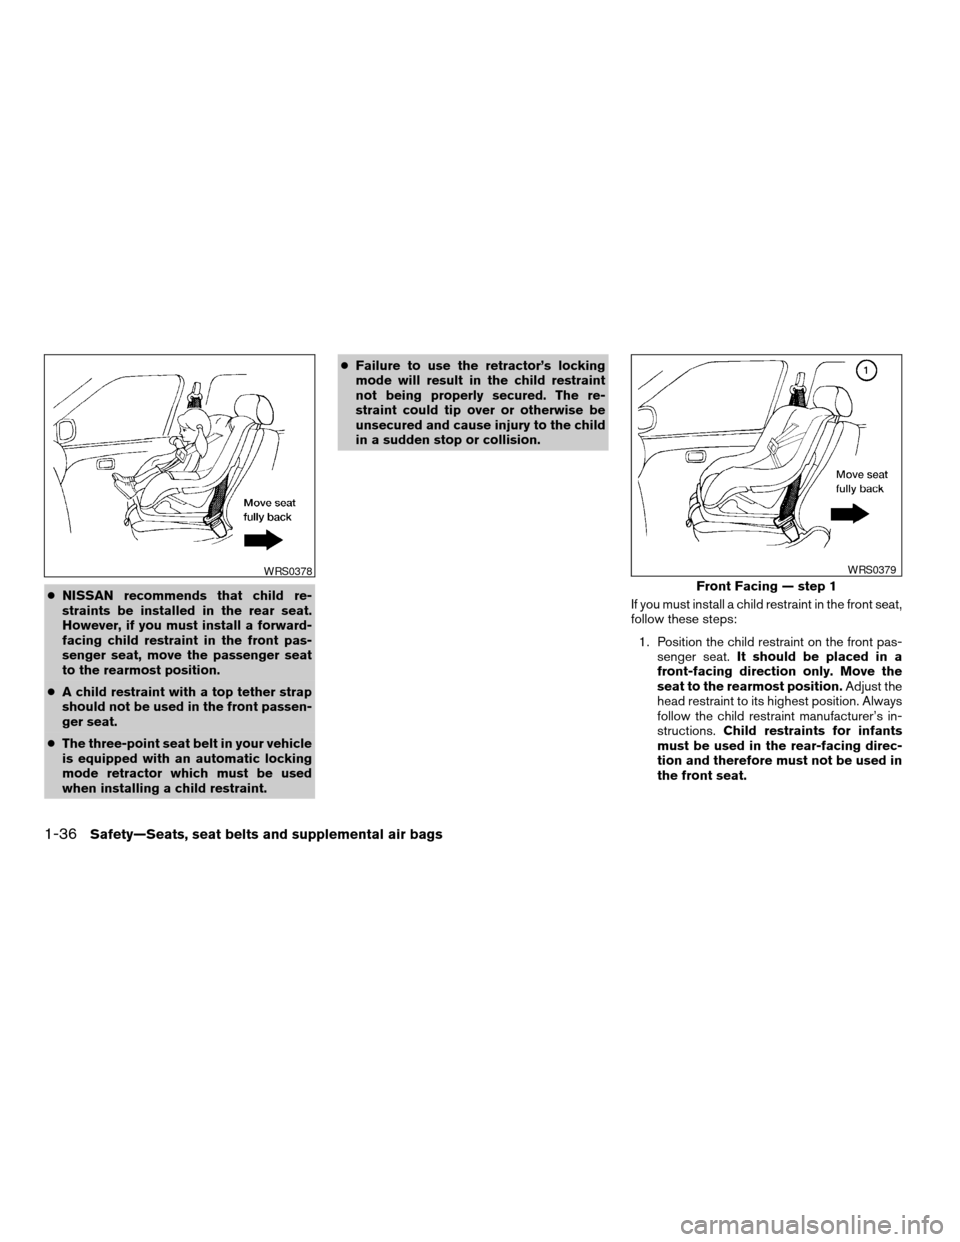
cNISSAN recommends that child re-
straints be installed in the rear seat.
However, if you must install a forward-
facing child restraint in the front pas-
senger seat, move the passenger seat
to the rearmost position.
cA child restraint with a top tether strap
should not be used in the front passen-
ger seat.
cThe three-point seat belt in your vehicle
is equipped with an automatic locking
mode retractor which must be used
when installing a child restraint.cFailure to use the retractor’s locking
mode will result in the child restraint
not being properly secured. The re-
straint could tip over or otherwise be
unsecured and cause injury to the child
in a sudden stop or collision.
If you must install a child restraint in the front seat,
follow these steps:
1. Position the child restraint on the front pas-
senger seat.It should be placed in a
front-facing direction only. Move the
seat to the rearmost position.Adjust the
head restraint to its highest position. Always
follow the child restraint manufacturer’s in-
structions.Child restraints for infants
must be used in the rear-facing direc-
tion and therefore must not be used in
the front seat.
WRS0378
Front Facing — step 1
WRS0379
1-36Safety—Seats, seat belts and supplemental air bags
ZREVIEW COPY:Ð2004 Sentra(b15)
Owners Manual(owners)ÐUSA English(nna)
03/18/04Ðtbrooks
X
Page 59 of 248

Resetting the trip odometer:
Pushing the change button for more than 1 sec-
ond resets the trip odometer to zero.
TRIP COMPUTER (if so equipped)
The display of the trip computer is situated in the
speedometer display. When the ignition is turned
to ON, the display scrolls all the modes of the trip
computer and then shows the mode chosen be-
fore the ignition switch is turned OFF.
If the battery terminal is disconnected,
push the trip computer mode switch more
than 1 second to activate the computer.
When the ignition switch is turned to ON, modes
of the trip computer can be selected by pushing
the trip computer change button. The following
modes can be selected:
Outside air temperature (ICY-°F or °C)
The outside air temperature is displayed in °F or
°C.
The outside air temperature mode includes a low
temperature warning feature: below 37°F (3°C) ,
the outside air temperature mode is automatically
selected and ICY will illuminate in order to draw
the driver’s attention. Press the change button if
you wish to return to the mode that was selected
before the warning occurred. The ICY indicatorwill continue blinking as long as the temperature
remains below 39°F (4°C) .
The ambient temperature sensor is located in
front of the radiator. The sensor may be affected
by road or engine heat, wind directions and other
driving conditions. The display may differ from the
actual ambient temperature or the temperature
displayed on various signs or billboards.
Distance to empty (dte—mile or km)
The distance to empty (dte) mode provides you
with an estimation of the distance that can be
driven before refueling. The dte is constantly be-
ing calculated, based on the amount of fuel in the
fuel tank and the actual fuel consumption.
The display is updated every 30 seconds.
The dte mode includes a low range warning
feature: when the fuel level is low, the dte mode is
automatically selected and the digits blink in or-
der to draw the driver’s attention. Press the
change button if you wish to return to the mode
that was selected before the warning occurred.
The dte mark (dte) will remain blinking until the
vehicle is refueled.
When the fuel level drops even lower, the dte
display will change to (----) .NOTE:
cIf the amount of fuel added while the
ignition switch is OFF is small, the dis-
play just before the ignition switch is
turned OFF may continue to be dis-
played.
cWhen driving uphill or rounding curves,
the fuel in the tank shifts, which may
momentarily change the display.Average fuel consumption (Mpg or
l/100km)
The average fuel consumption mode shows the
average fuel consumption since the last reset.
Resetting is done by pressing the change button
for more than approximately 1 second. The dis-
play is updated every 30 seconds. At about the
first 1/3 miles (500 m) after a reset, the display
shows (----) .
Average speed (MPH or km/h)
The average speed mode shows the average
vehicle speed since last reset. Resetting is done
by pressing the change button for more than
approximately 1 second. The display is updated
every 30 seconds. The first 30 seconds after a
reset, the display shows (----) .
Instruments and controls2-5
ZREVIEW COPY:Ð2004 Sentra(b15)
Owners Manual(owners)ÐUSA English(nna)
03/18/04Ðtbrooks
X
Page 60 of 248
Journey time
The journey time mode shows the time since the
last reset. The displayed time can be reset by
pressing the change button for more than ap-
proximately 1 second.
NOTE:
If a low temperature warning and low range
warning occur simultaneously, other dis-
play modes switch automatically to the
outside temperature display.
When the change button is pushed, the
display switches to the mode chosen be-
fore the warning display, and the outside
air temperature indicator marked ICY will
blink.
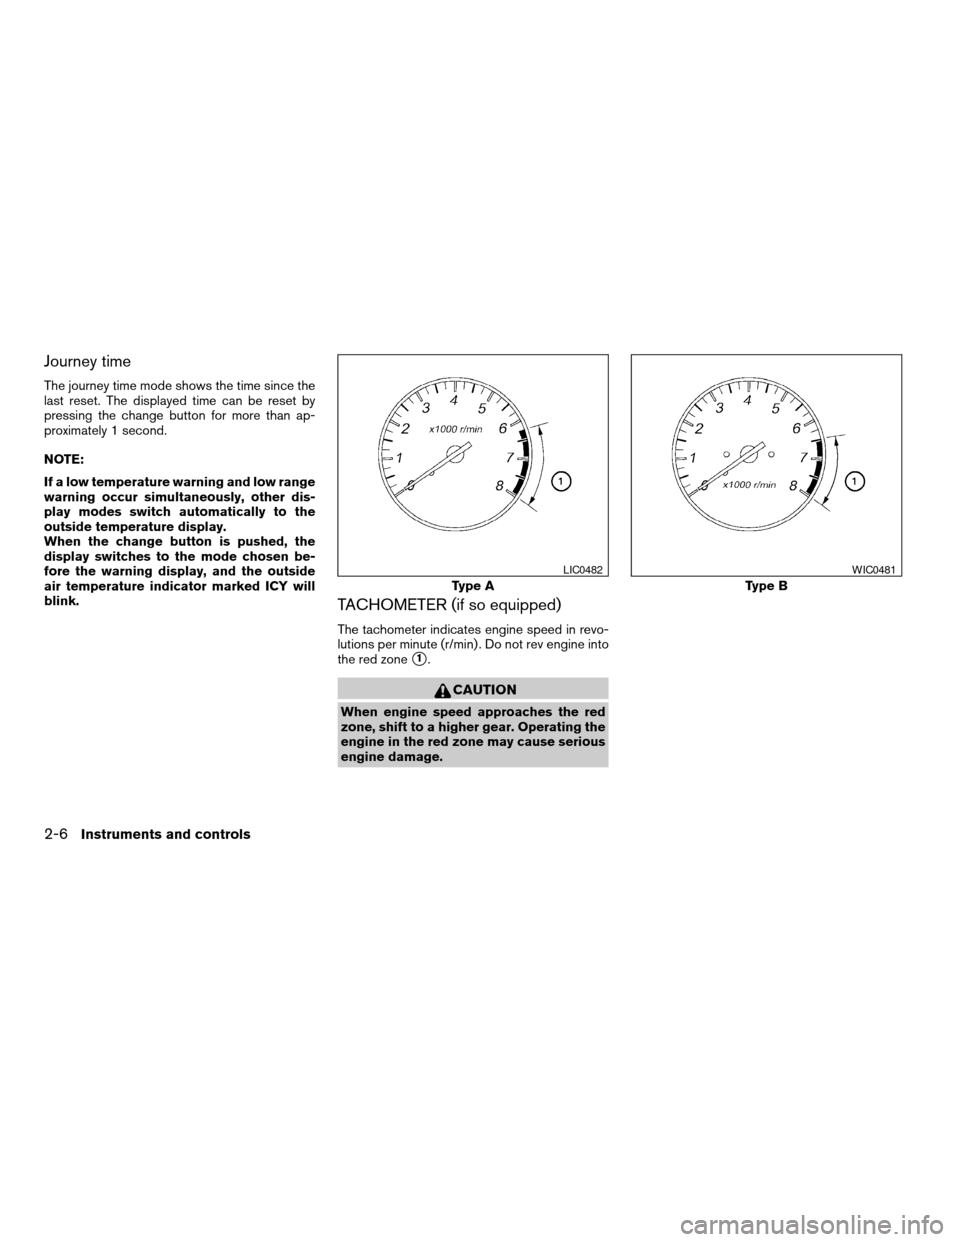
TACHOMETER (if so equipped)
The tachometer indicates engine speed in revo-
lutions per minute (r/min) . Do not rev engine into
the red zone
s1.
CAUTION
When engine speed approaches the red
zone, shift to a higher gear. Operating the
engine in the red zone may cause serious
engine damage.
Type A
LIC0482
Type B
WIC0481
2-6Instruments and controls
ZREVIEW COPY:Ð2004 Sentra(b15)
Owners Manual(owners)ÐUSA English(nna)
03/18/04Ðtbrooks
X
Page 104 of 248
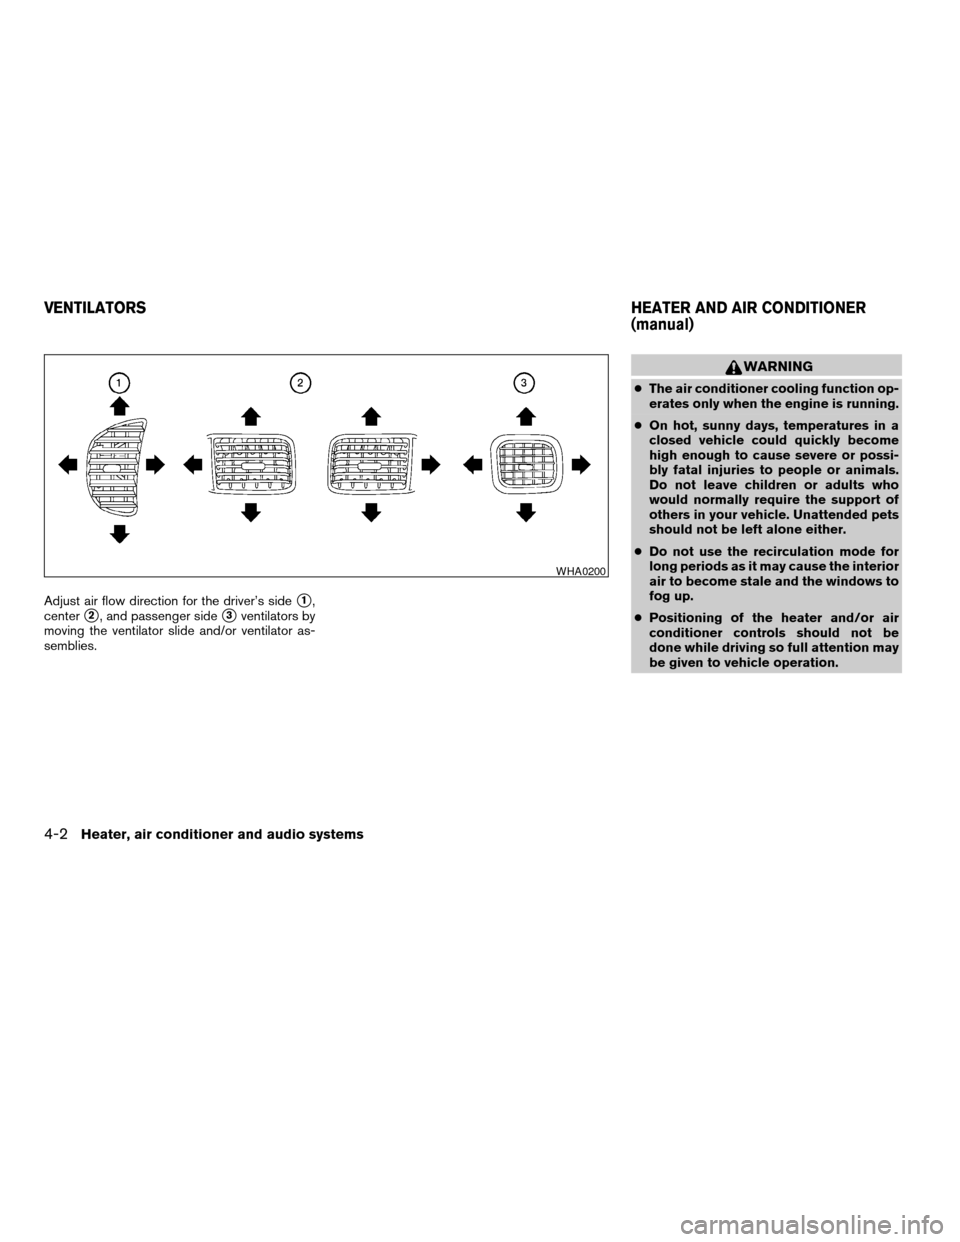
Adjust air flow direction for the driver’s sides1,
center
s2, and passenger sides3ventilators by
moving the ventilator slide and/or ventilator as-
semblies.
WARNING
cThe air conditioner cooling function op-
erates only when the engine is running.
cOn hot, sunny days, temperatures in a
closed vehicle could quickly become
high enough to cause severe or possi-
bly fatal injuries to people or animals.
Do not leave children or adults who
would normally require the support of
others in your vehicle. Unattended pets
should not be left alone either.
cDo not use the recirculation mode for
long periods as it may cause the interior
air to become stale and the windows to
fog up.
cPositioning of the heater and/or air
conditioner controls should not be
done while driving so full attention may
be given to vehicle operation.
WHA0200
VENTILATORSHEATER AND AIR CONDITIONER
(manual)
4-2Heater, air conditioner and audio systems
ZREVIEW COPY:Ð2004 Sentra(b15)
Owners Manual(owners)ÐUSA English(nna)
03/18/04Ðtbrooks
X
Page 116 of 248
Adjusting tone quality and speaker balance
To adjust BAS/TRE or FAD/BAL (Bass/Treble or
Fader/Balance) , press the AUDIO button until
the desired mode (BAS, TRE, FAD, or BAL) ap-
pears in the display. Press the
orbutton to adjust Bass (BAS) and Treble (TRE) to
the desired level. Use theorbutton
also to adjust Fader (FAD) or Balance (BAL)
modes. Fader (FAD) adjusts the sound level be-
tween the front and rear speakers and Balance
(BAL) adjusts the sound between the right and
left speakers.
Clock operation
Pressing the clock button alternates the clock
and the radio/CD player options in the display.
Clock set
1. Press and hold the CLOCK button for more
than 1.5 seconds to enter clock set mode.
2. Tap the CLOCK button to set hours “H”,
then use the
orbuttons to ad-
just.
3. Tap the CLOCK button again to set minutes
“M”, then use the
orbuttons to
adjust.4. Tap the CLOCK button again to exit clock
set mode.
Clock priority mode
In this mode the clock is shown in the display. If
any radio or CD functions are activated, the radio
or CD display illuminates for 10 seconds then
returns to the clock mode.
NOTE:
After clock adjustment, the radio is in the
clock priority mode.
FM/AM/SAT radio operation
FM/AM/SAT band select
Push the RADIO button to change from AM to
FM and SAT (Satellite) (if so equipped) recep-
tion.
No Satellite radio reception is available and “NO
SAT” will be displayed when the SAT band option
is selected unless optional satellite receiver and
antenna were factory installed (retrofit unavail-
able without factory satellite radio pre-wiring) ,
and an XMTor Sirius™ satellite radio service
subscription is active.
The FM stereo indicator, ST, illuminates during
FM stereo reception. When the stereo broadcast
signal is weak, the radio automatically changes
from stereo to monaural reception.
TUNE/SEEK buttons
WARNING
The radio should not be tuned while driv-
ing so full attention may be given to ve-
hicle operation.
Push the
orbutton for less than 0.5
seconds for manual tuning.
SEEK tuning
Push the
orbutton for more than
1.5 seconds to seek through the frequencies.
SEEK tuning begins from low to high frequen-
cies, or high to low frequencies depending on
which button is pushed, and stops at the next
broadcasting station. Once the highest broad-
casting station is reached, the radio continues in
the SEEK mode at the lowest broadcasting sta-
tion.
SCAN button
Push the SCAN tuning button. SCAN illuminates
in the display. SCAN tuning begins from low to
high frequencies. SCAN tuning stops at each
broadcasting station for 5 seconds. Pushing the
button again during this 5 second period stops
SCAN tuning and the radio remains tuned to that
station.
4-14Heater, air conditioner and audio systems
ZREVIEW COPY:Ð2004 Sentra(b15)
Owners Manual(owners)ÐUSA English(nna)
03/18/04Ðtbrooks
X
Page 117 of 248
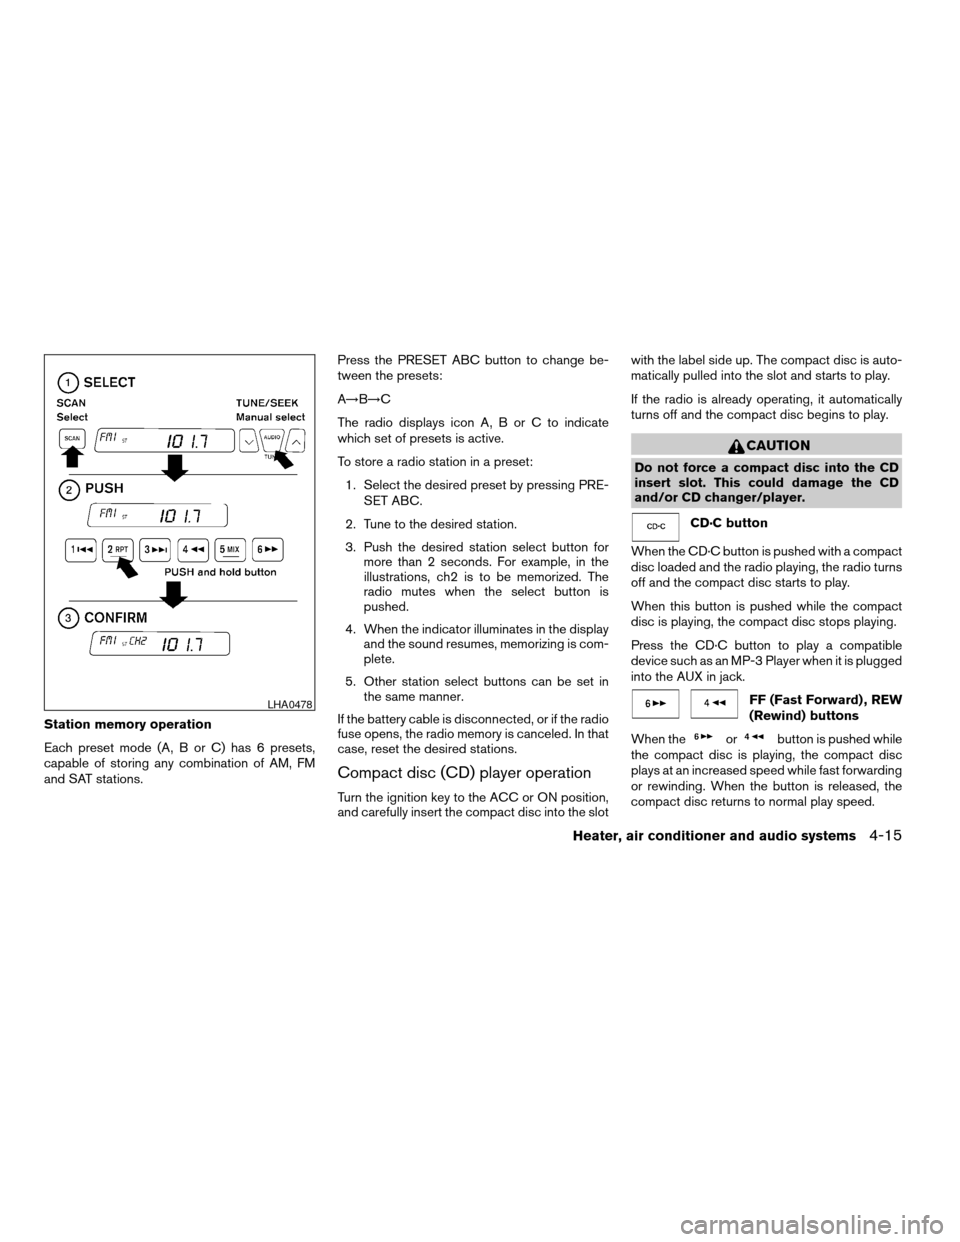
Station memory operation
Each preset mode (A, B or C) has 6 presets,
capable of storing any combination of AM, FM
and SAT stations.Press the PRESET ABC button to change be-
tween the presets:
A!B!C
The radio displays icon A, B or C to indicate
which set of presets is active.
To store a radio station in a preset:
1. Select the desired preset by pressing PRE-
SET ABC.
2. Tune to the desired station.
3. Push the desired station select button for
more than 2 seconds. For example, in the
illustrations, ch2 is to be memorized. The
radio mutes when the select button is
pushed.
4. When the indicator illuminates in the display
and the sound resumes, memorizing is com-
plete.
5. Other station select buttons can be set in
the same manner.
If the battery cable is disconnected, or if the radio
fuse opens, the radio memory is canceled. In that
case, reset the desired stations.
Compact disc (CD) player operation
Turn the ignition key to the ACC or ON position,
and carefully insert the compact disc into the slotwith the label side up. The compact disc is auto-
matically pulled into the slot and starts to play.
If the radio is already operating, it automatically
turns off and the compact disc begins to play.
CAUTION
Do not force a compact disc into the CD
insert slot. This could damage the CD
and/or CD changer/player.
CD·C button
When the CD·C button is pushed with a compact
disc loaded and the radio playing, the radio turns
off and the compact disc starts to play.
When this button is pushed while the compact
disc is playing, the compact disc stops playing.
Press the CD·C button to play a compatible
device such as an MP-3 Player when it is plugged
into the AUX in jack.
FF (Fast Forward) , REW
(Rewind) buttons
When the
orbutton is pushed while
the compact disc is playing, the compact disc
plays at an increased speed while fast forwarding
or rewinding. When the button is released, the
compact disc returns to normal play speed.
LHA0478
Heater, air conditioner and audio systems4-15
ZREVIEW COPY:Ð2004 Sentra(b15)
Owners Manual(owners)ÐUSA English(nna)
03/18/04Ðtbrooks
X
Page 119 of 248
ANTENNA
The antenna cannot be shortened, but can be
removed. When you need to remove the antenna,
turn the antenna rod counterclockwise.
To install the antenna rod, turn the antenna clock-
wise. Tighten the antenna rod to specification
using a suitable tool such as an open-end
wrench. The antenna rod tightening specification
is 3.4 - 3.6 N·m (30 - 32 in-lb) . Do not use pliers
to tighten the antenna as they can leave marks on
the antenna surface. The antenna rod cannot be
hand tightened to the proper specification.
CAUTION
Always properly tighten the antenna rod
during installation or the antenna rod may
break during vehicle operation.When installing a CB, ham radio or car phone in
your NISSAN, be sure to observe the following
cautions, otherwise the new equipment may ad-
versely affect the MFI (Multiport Fuel Injection)
system and other electronic parts.
WARNING
cA cellular telephone should not be used
while driving so full attention may be
given to vehicle operation. Some juris-
dictions prohibit the use of cellular tele-
phones while driving.
cIf you must make a call while your ve-
hicle is in motion, the hands free cellu-
lar phone operational mode (if so
equipped) is highly recommended. Ex-
ercise extreme caution at all times so
full attention may be given to vehicle
operation.
cIf a conversation in a moving vehicle
requires you to take notes, pull off the
road to a safe location and stop your
vehicle before doing so.
CAUTION
cKeep the antenna as far away as pos-
sible from the Engine Control Module
(ECM) .cKeep the antenna wire more than 8 in
(20 cm) away from the Multiport Fuel
Injection harness. Do not route the an-
tenna wire next to any harness.
cAdjust the antenna standing-wave ratio
as recommended by the manufacturer.
cConnect the ground wire from the CB
radio chassis to the body.
cFor details, consult a NISSAN dealer.
CAR PHONE OR CB RADIO
Heater, air conditioner and audio systems4-17
ZREVIEW COPY:Ð2004 Sentra(b15)
Owners Manual(owners)ÐUSA English(nna)
03/18/04Ðtbrooks
X